

1. 概览
AI 智能体越来越受欢迎,它们能够自主运行、学习并与环境互动以实现目标,从而彻底改变了任务自动化和决策制定方式。
但具体如何构建智能体呢?本 Codelab 将向您展示如何构建一个可以进行不同国家/地区货币之间换算的货币智能体,帮助您入门。然后,您将构建一个旅行社智能体,并将其连接到货币智能体。目标是引导您了解最新技术,帮助您理解可能在互联网上看到的缩写词(MCP、ADK、A2A),并了解它们是如何协同工作的。
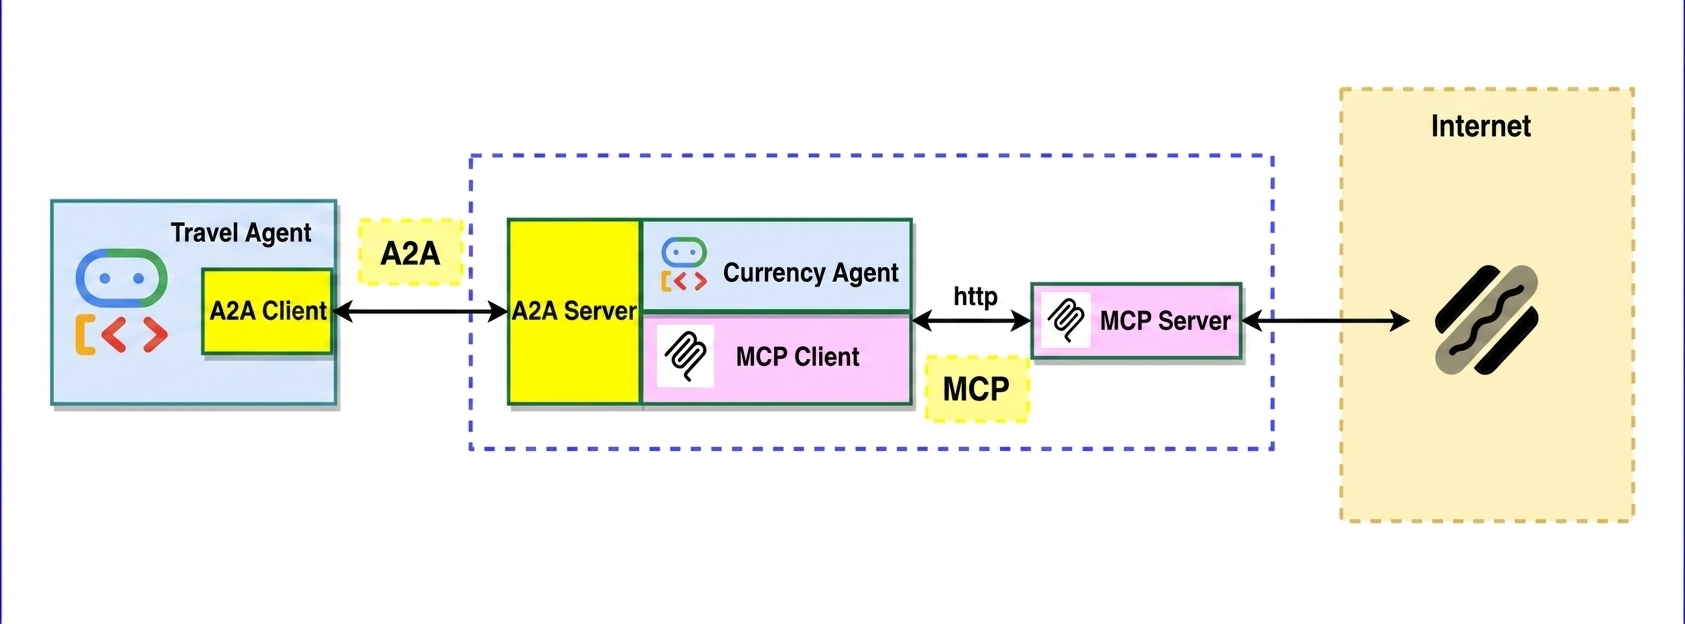
Model Context Protocol (MCP)
Model Context Protocol (MCP) 是一种开放协议,可规范应用为 LLM 提供上下文的方式。MCP 提供了一种将 AI 模型连接到资源、提示和工具的标准方式。
智能体开发套件 (ADK)
智能体开发套件 (ADK) 是一个灵活的编排框架,用于开发和部署 AI 智能体。ADK 不限模型、不限部署,并且与其他框架兼容。ADK 的设计旨在让智能体开发更接近软件开发,使开发者能够更轻松地创建、部署和编排智能体架构,涵盖从简单任务到复杂工作流的全场景。
Agent2Agent (A2A) protocol
Agent2Agent (A2A) protocol 是一种开放标准,旨在让 AI 智能体之间实现无缝通信和协作。就像 MCP 提供了一种让 LLM 访问数据和工具的标准方式一样,A2A 也提供了一种让智能体与其他智能体对话的标准方式!在一个由不同供应商使用不同框架构建智能体的世界中,A2A 提供了一种通用语言,打破了孤岛,促进了互操作性。
学习内容
- 如何创建本地 MCP 服务器
- 将 MCP 服务器部署到 Cloud Run
- 如何使用智能体开发套件构建使用 MCP 工具的智能体
- 如何将 ADK 智能体公开为 A2A 服务器
- 使用 A2A 客户端测试 A2A 服务器
- 如何构建智能体以通过 A2A protocol 与另一个智能体对话
所需条件
2. 准备工作
创建项目
如果您没有 Google Cloud 项目,请创建一个。
在 Google Cloud 控制台的项目选择器页面上,选择或创建一个 Google Cloud 项目。
另外,请确保您的 Cloud 项目已启用结算功能。了解如何检查项目是否已启用结算功能。
激活 Cloud Shell
Google Cloud Shell 是一个基于浏览器的交互式开发环境,直接在 Google Cloud 控制台中提供。这是开始使用 Google Cloud 的最简单方式,无需在本地安装工具。
点击此链接,激活 Cloud Shell。您可以点击 Cloud Shell 中的相应按钮,在 Cloud Shell 终端(用于运行云命令)和编辑器(用于构建项目)之间进行切换。
连接到 Cloud Shell 后,您可以使用以下命令检查自己是否已通过身份验证,以及项目是否已设置为您的项目 ID:
gcloud auth list
在 Cloud Shell 中运行以下命令,以确认 gcloud 命令了解您的项目。
gcloud config list project
使用以下命令设置项目:
export PROJECT_ID=<YOUR_PROJECT_ID>
gcloud config set project $PROJECT_ID
启用 Cloud API
使用以下命令启用所需的 API。这可能需要几分钟的时间。
gcloud services enable cloudresourcemanager.googleapis.com \
                       servicenetworking.googleapis.com \
                       run.googleapis.com \
                       cloudbuild.googleapis.com \
                       artifactregistry.googleapis.com \
                       aiplatform.googleapis.com \
                       compute.googleapis.com
如需了解 gcloud 命令和用法,请参阅文档。
获取代码
克隆代码库:
git clone https://github.com/jackwotherspoon/currency-agent.git
cd currency-agent
uv 用于管理依赖项,并且已安装在 Cloud Shell 中,但如果您在本地运行 Codelab,则可以按如下方式安装它:
# macOS and Linux
curl -LsSf https://astral.sh/uv/install.sh | sh

# Windows (uncomment below line)
# powershell -ExecutionPolicy ByPass -c "irm https://astral.sh/uv/install.ps1 | iex"
运行以下命令,使用 .env 文件配置环境变量:
echo "GOOGLE_GENAI_USE_ENTERPRISE=TRUE" >> .env \
&& echo "GOOGLE_CLOUD_PROJECT=$PROJECT_ID" >> .env \
&& echo "GOOGLE_CLOUD_LOCATION=global" >> .env
3. 创建本地 MCP 服务器
在编排货币智能体之前,您首先需要创建一个 MCP 服务器,用于公开智能体将需要的工具。
借助 MCP 服务器,您可以编写轻量级程序,将特定功能(例如获取货币汇率)公开为工具。然后,智能体甚至多个智能体都可以使用标准化的 Model Context Protocol (MCP) 访问这些工具。
您可以利用 FastMCP Python 软件包创建一个 MCP 服务器,该服务器公开一个名为 get_exchange_rate 的工具。get_exchange_rate 工具通过互联网调用 Frankfurter API,以获取两种货币之间的当前汇率。
MCP 服务器的代码位于 mcp-server/server.py 文件中:
import logging
import os

import httpx
from fastmcp import FastMCP

# Set up logging
logger = logging.getLogger(__name__)
logging.basicConfig(format="[%(levelname)s]: %(message)s", level=logging.INFO)

mcp = FastMCP("Currency MCP Server 💵")

@mcp.tool()
def get_exchange_rate(
    currency_from: str = 'USD',
    currency_to: str = 'EUR',
    currency_date: str = 'latest',
):
    """Use this to get current exchange rate.

    Args:
        currency_from: The currency to convert from (e.g., "USD").
        currency_to: The currency to convert to (e.g., "EUR").
        currency_date: The date for the exchange rate or "latest". Defaults to "latest".

    Returns:
        A dictionary containing the exchange rate data, or an error message if the request fails.
    """
    logger.info(f"--- 🛠️ Tool: get_exchange_rate called for converting {currency_from} to {currency_to} ---")
    try:
        response = httpx.get(
            f'https://api.frankfurter.app/{currency_date}',
            params={'from': currency_from, 'to': currency_to},
        )
        response.raise_for_status()

        data = response.json()
        if 'rates' not in data:
            return {'error': 'Invalid API response format.'}
        logger.info(f'✅ API response: {data}')
        return data
    except httpx.HTTPError as e:
        return {'error': f'API request failed: {e}'}
    except ValueError:
        return {'error': 'Invalid JSON response from API.'}

if __name__ == "__main__":
    logger.info(f"🚀 MCP server started on port {os.getenv('PORT', 8080)}")
    # Could also use 'sse' transport, host="0.0.0.0" required for Cloud Run.
    asyncio.run(
        mcp.run_async(
            transport="http",
            host="0.0.0.0",
            port=os.getenv("PORT", 8080),
        )
    )
如需在本地启动 MCP 服务器,请打开终端并运行以下命令(服务器将在 http://localhost:8080 上启动):
uv run mcp-server/server.py
测试 MCP 服务器是否正常运行,以及是否可以使用 Model Context Protocol 访问 get_exchange_rate 工具。
在新终端 窗口中(这样您就不会停止本地 MCP 服务器),运行以下命令:
uv run mcp-server/test_server.py
您应该会看到输出的 1 美元 (USD) 兑欧元 (EUR) 的当前汇率:
--- 🛠️ Tool found: get_exchange_rate ---
--- 🪛 Calling get_exchange_rate tool for USD to EUR ---
--- ✅ Success: {
  "amount": 1.0,
  "base": "USD",
  "date": "2025-05-26",
  "rates": {
    "EUR": 0.87866
  }
} ---
太棒了!您已成功拥有一个可正常运行的 MCP 服务器,其中包含一个智能体可以访问的工具。
在继续前往下一站之前,请在启动本地运行的 MCP 服务器的终端中运行 Ctrl+C(或在 Mac 上运行 Command+C),以停止该服务器。
4. 将 MCP 服务器部署到 Cloud Run
现在,您已准备好将 MCP 服务器作为远程 MCP 服务器部署到 Cloud Run 🚀☁️
远程运行 MCP 服务器的优势
在 Cloud Run 上远程运行 MCP 服务器可以带来以下几个优势:
- 📈可伸缩性:Cloud Run 旨在快速纵向扩容以处理所有传入请求。Cloud Run 将根据需求自动扩缩您的 MCP 服务器。
- 👥集中式服务器:您可以通过 IAM 权限与团队成员共享对集中式 MCP 服务器的访问权限,让他们能够从本地机器连接到该服务器,而不是在本地运行自己的服务器。如果对 MCP 服务器进行更改,所有团队成员都将受益。
- 🔐安全性:Cloud Run 提供了一种强制执行经过身份验证的请求的简单方法。这样,只有安全连接才能访问您的 MCP 服务器,从而防止未经授权的访问。
切换到 mcp-server 目录:
cd mcp-server
将 MCP 服务器部署到 Cloud Run:
gcloud run deploy mcp-server --no-allow-unauthenticated --region=us-central1 --source .
如果您的服务已成功部署,您将看到类似以下内容的消息:
Service [mcp-server] revision [mcp-server-12345-abc] has been deployed and is serving 100 percent of traffic.
对 MCP 客户端进行身份验证
由于您指定了 --no-allow-unauthenticated 以要求进行身份验证,因此连接到远程 MCP 服务器的任何 MCP 客户端都需要进行身份验证。
Host MCP servers on Cloud Run 的官方文档提供了有关此主题的更多信息,具体取决于您运行 MCP 客户端的位置。
您需要在本地机器上运行 Cloud Run 代理,以创建通往远程 MCP 服务器的经过身份验证的隧道。
默认情况下,Cloud Run 服务的网址要求所有请求都必须通过 Cloud Run Invoker (roles/run.invoker) IAM 角色进行授权。此 IAM 政策绑定可确保使用强大的安全机制来验证本地 MCP 客户端的身份。
您应确保您或任何尝试访问远程 MCP 服务器的团队成员都已将 roles/run.invoker IAM 角色绑定到其 IAM 主账号(Google
Cloud 账号)。
gcloud run services proxy mcp-server --region=us-central1
您应该会看到以下输出内容:
Proxying to Cloud Run service [mcp-server] in project [<YOUR_PROJECT_ID>] region [us-central1]
http://127.0.0.1:8080 proxies to https://mcp-server-abcdefgh-uc.a.run.app
现在,所有流向 http://127.0.0.1:8080 的流量都将经过身份验证并转发到远程 MCP 服务器。
测试远程 MCP 服务器
在新终端中,返回根文件夹并重新运行mcp-server/test_server.py文件,以确保远程 MCP 服务器正常运行。
cd ..
uv run mcp-server/test_server.py
您应该会看到与在本地运行服务器时类似的输出:
--- 🛠️ Tool found: get_exchange_rate ---
--- 🪛 Calling get_exchange_rate tool for USD to EUR ---
--- ✅ Success: {
  "amount": 1.0,
  "base": "USD",
  "date": "2025-05-26",
  "rates": {
    "EUR": 0.87866
  }
} ---
如果您想验证远程服务器是否确实被调用,可以查询已部署的 Cloud Run MCP 服务器的日志:
gcloud run services logs read mcp-server --region us-central1 --limit 5
您应该会在日志中看到以下输出内容:
2025-06-04 14:28:29,871 [INFO]: --- 🛠️ Tool: get_exchange_rate called for converting USD to EUR ---
2025-06-04 14:28:30,610 [INFO]: HTTP Request: GET https://api.frankfurter.app/latest?from=USD&to=EUR "HTTP/1.1 200 OK"
2025-06-04 14:28:30,611 [INFO]: ✅ API response: {'amount': 1.0, 'base': 'USD', 'date': '2025-06-03', 'rates': {'EUR': 0.87827}}
现在您已经拥有了远程 MCP 服务器,接下来就可以创建智能体了!🤖
5. 使用 ADK 创建智能体
您已部署 MCP 服务器,现在可以使用 智能体开发套件 (ADK) 创建货币智能体了。
ADK 使创建智能体变得非常轻量级,并允许它们连接到 MCP 服务器,内置支持 MCP 工具。货币智能体将使用 ADK 的 MCPToolset 类访问 get_exchange_rate 工具。
货币智能体的代码位于 currency_agent/agent.py 中:
import logging
import os

from dotenv import load_dotenv
from google.adk.agents import LlmAgent
from google.adk.a2a.utils.agent_to_a2a import to_a2a
from google.adk.tools.mcp_tool import MCPToolset, StreamableHTTPConnectionParams

logger = logging.getLogger(__name__)
logging.basicConfig(format="[%(levelname)s]: %(message)s", level=logging.INFO)

load_dotenv()

SYSTEM_INSTRUCTION = (
    "You are a specialized assistant for currency conversions. "
    "Your sole purpose is to use the 'get_exchange_rate' tool to answer questions about currency exchange rates. "
    "If the user asks about anything other than currency conversion or exchange rates, "
    "politely state that you cannot help with that topic and can only assist with currency-related queries. "
    "Do not attempt to answer unrelated questions or use tools for other purposes."
)

logger.info("--- 🔧 Loading MCP tools from MCP Server... ---")
logger.info("--- 🤖 Creating ADK Currency Agent... ---")

root_agent = LlmAgent(
    model="gemini-3.7-flash",
    name="currency_agent",
    description="An agent that can help with currency conversions",
    instruction=SYSTEM_INSTRUCTION,
    tools=[
        MCPToolset(
            connection_params=StreamableHTTPConnectionParams(
                url=os.getenv("MCP_SERVER_URL", "http://localhost:8080/mcp")
            )
        )
    ],
)
如需快速测试货币智能体,您可以利用 ADK 的开发界面,通过运行 adk web 访问该界面:
uv run adk web --allow_origins "regex:https://.*\.cloudshell\.dev"
在浏览器中,前往 http://localhost:8000 以查看和测试智能体!
确保在 Web 界面的左上角选择了 currency_agent 作为智能体。
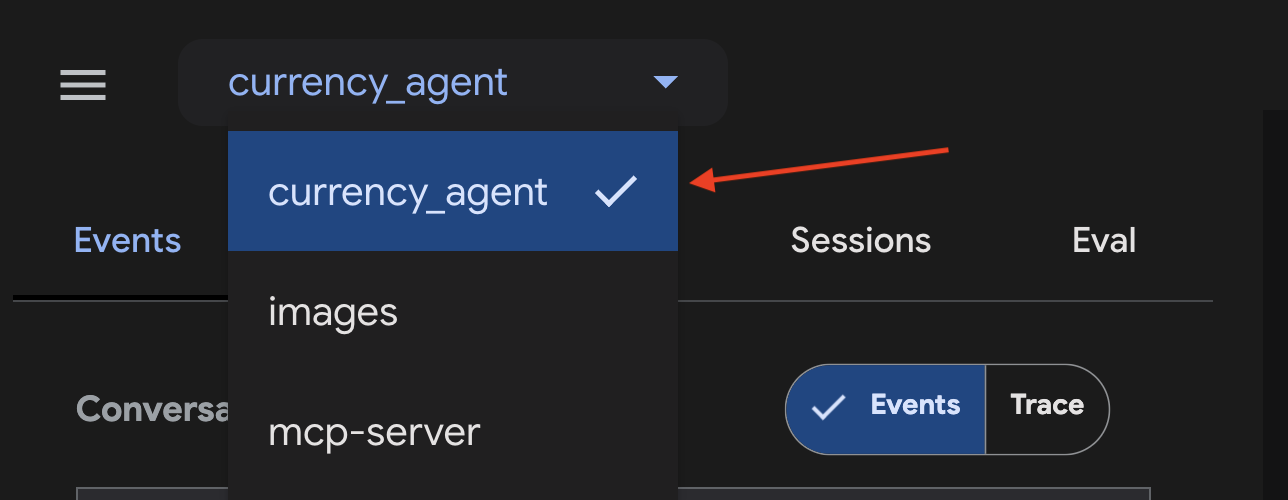
在聊天区域中询问您的智能体,例如“250 加元兑换成美元是多少?”。您应该会看到智能体在给出回答之前调用我们的
get_exchange_rate MCP 工具。
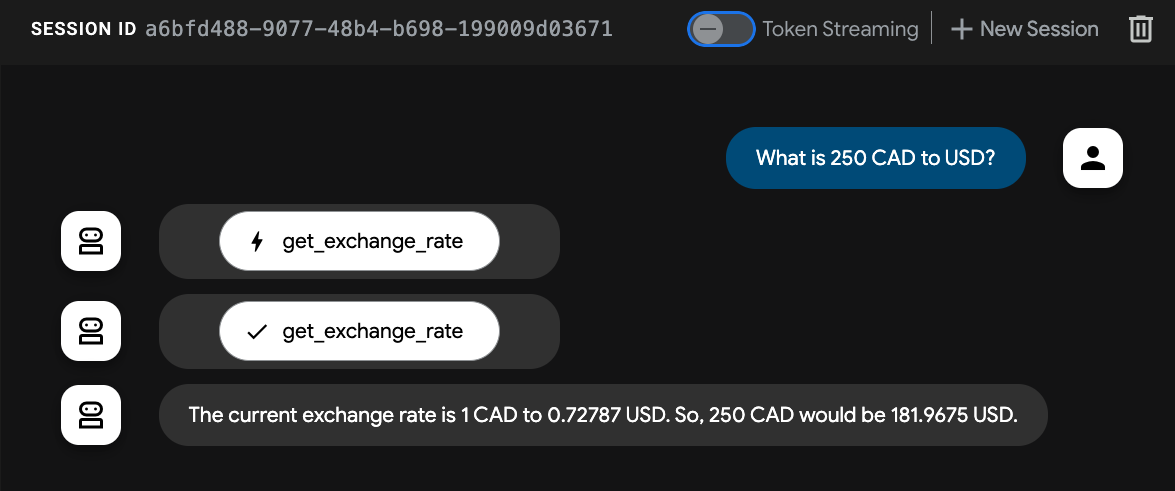
智能体正常运行!它可以处理围绕货币换算的查询 💸。
6. Agent2Agent (A2A) protocol
Agent2Agent (A2A) protocol 是一种开放标准,旨在让 AI 智能体之间实现无缝通信和协作。这样,使用不同框架构建且由不同供应商提供的智能体就可以使用通用语言相互通信,打破孤岛,促进互操作性。
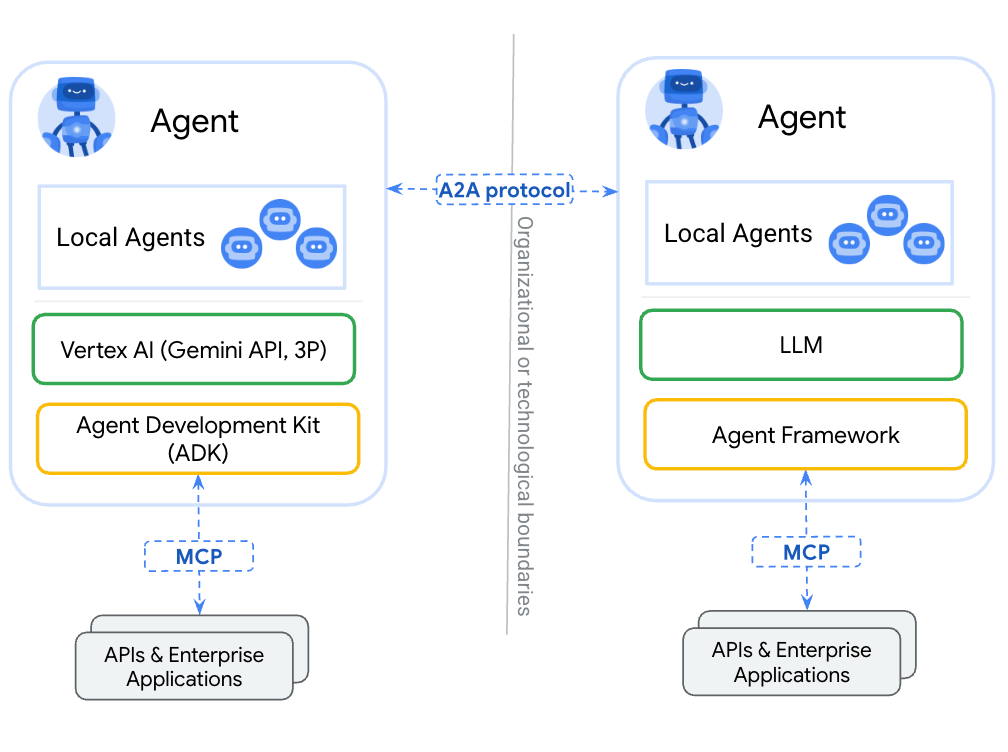
借助 A2A,智能体可以:
- 发现: 使用标准化的智能体卡片查找其他智能体,并了解其技能 (AgentSkill) 和功能 (AgentCapabilities)。
- 通信: 安全地交换消息和数据。
- 协作: 委托任务并协调行动,以实现复杂目标。
A2A protocol 通过“智能体卡片”等机制促进这种通信,这些卡片充当数字名片,智能体可以使用它们来宣传自己的功能和连接信息。
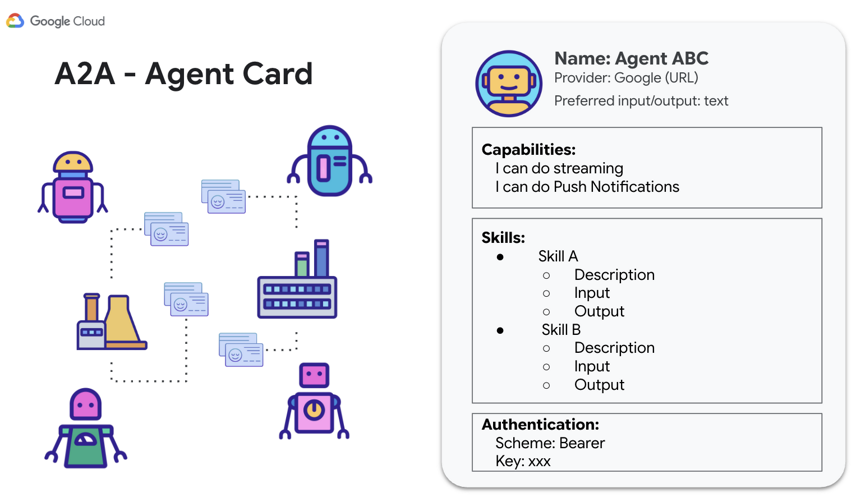
现在,您可以使用 A2A 公开货币智能体,以便其他智能体和客户端可以调用它。
A2A Python SDK
A2A Python SDK 为上述每种资源(AgentSkill、AgentCapabilities 和 AgentCard)提供了 Pydantic 模型。这提供了一个接口,用于加快开发速度并与 A2A protocol 集成。
您将通过 AgentSkill 向其他智能体宣传货币智能体具有 get_exchange_rate 工具:
# A2A Agent Skill definition
skill = AgentSkill(
    id='get_exchange_rate',
    name='Currency Exchange Rates Tool',
    description='Helps with exchange values between various currencies',
    tags=['currency conversion', 'currency exchange'],
    examples=['What is exchange rate between USD and GBP?'],
)
然后,作为 AgentCard 的一部分,它将列出智能体的技能和功能,以及智能体可以处理的其他详细信息,例如输入和输出模式:
# A2A Agent Card definition
agent_card = AgentCard(
    name='Currency Agent',
    description='Helps with exchange rates for currencies',
    url=f'http://{host}:{port}/',
    version='1.0.0',
    defaultInputModes=["text"],
    defaultOutputModes=["text"],
    capabilities=AgentCapabilities(streaming=True),
    skills=[skill],
)
现在是时候将所有内容与货币智能体结合起来,展示 A2A 的强大功能了!
7. 将货币智能体公开为 A2A 服务器
ADK 简化了使用 A2A protocol 构建和连接智能体的过程。如需将现有 ADK 智能体作为 A2A 服务器 提供(公开),请使用 ADK 的 to_a2a(root_agent) 函数(如需了解完整详情,请参阅 ADK 文档)。
to_a2a 函数会将现有智能体转换为与 A2A 协同工作,并能够通过 uvicorn 将其公开为服务器。这意味着,如果您计划将智能体投入生产,则可以更严格地控制要公开的内容。to_a2a()
函数会在后台使用 A2A Python SDK 根据您的智能体代码自动生成智能体卡片。
查看 currency_agent/agent.py 文件内部,您可以看到 to_a2a 的使用方式,以及如何仅使用两行代码将货币智能体公开为
A2A 服务器!
from google.adk.a2a.utils.agent_to_a2a import to_a2a
# ... see file for full code

# Make the agent A2A-compatible
a2a_app = to_a2a(root_agent, port=10000)
如需运行 A2A 服务器,请在新终端 中运行以下命令:
uv run uvicorn currency_agent.agent:a2a_app --host localhost --port 10000
如果服务器成功启动,输出将如下所示,表明它正在 端口 10000 上运行:
[INFO]: --- 🔧 Loading MCP tools from MCP Server... ---
[INFO]: --- 🤖 Creating ADK Currency Agent... ---
INFO:     Started server process [45824]
INFO:     Waiting for application startup.
INFO:     Application startup complete.
INFO:     Uvicorn running on http://localhost:10000 (Press CTRL+C to quit)
货币智能体现在已成功作为 A2A 服务器运行,能够使用 A2A protocol 被其他智能体或客户端调用!
验证远程智能体是否正在运行
您可以访问 to_a2a() 函数自动生成的货币智能体的智能体卡片网址,仔细检查您的智能体是否已启动并正在运行。
在浏览器中,前往 http://localhost:10000/.well-known/agent-card.json
您应该会看到以下智能体卡片:
{
  "capabilities": {

  },
  "defaultInputModes": [
    "text/plain"
  ],
  "defaultOutputModes": [
    "text/plain"
  ],
  "description": "An agent that can help with currency conversions",
  "name": "currency_agent",
  "preferredTransport": "JSONRPC",
  "protocolVersion": "0.3.0",
  "skills": [
    {
      "description": "An agent that can help with currency conversions I am a specialized assistant for currency conversions. my sole purpose is to use the 'get_exchange_rate' tool to answer questions about currency exchange rates. If the user asks about anything other than currency conversion or exchange rates, politely state that I cannot help with that topic and can only assist with currency-related queries. Do not attempt to answer unrelated questions or use tools for other purposes.",
      "id": "currency_agent",
      "name": "model",
      "tags": [
        "llm"
      ]
    },
    {
      "description": "Use this to get current exchange rate.\n\nArgs:\n    currency_from: The currency to convert from (e.g., \"USD\").\n    currency_to: The currency to convert to (e.g., \"EUR\").\n    currency_date: The date for the exchange rate or \"latest\". Defaults to \"latest\".\n\nReturns:\n    A dictionary containing the exchange rate data, or an error message if the request fails.",
      "id": "currency_agent-get_exchange_rate",
      "name": "get_exchange_rate",
      "tags": [
        "llm",
        "tools"
      ]
    }
  ],
  "supportsAuthenticatedExtendedCard": false,
  "url": "http://localhost:10000",
  "version": "0.0.1"
}
测试 A2A 服务器
现在,您可以使用 A2A 向服务器发送一些请求来测试服务器!
A2A Python SDK 提供了一个 a2a.client.Client 类,可为您简化此操作。
currency_agent/test_a2aclient.py 文件包含的代码展示了如何获取智能体卡片并向 A2A 服务器发送消息。
# ... see file for full code

async def get_agent_card():
    """Get the agent card."""
    print(f"🔄 Fetching the agent card at {AGENT_URL}")

    async with httpx.AsyncClient() as httpx_client:
        resolver = A2ACardResolver(
            httpx_client=httpx_client,
            base_url=AGENT_URL,
        )
        public_agent_card = await resolver.get_agent_card()
        print("✅ Successfully fetched the agent card")
    return public_agent_card


async def send_message(text_query: str) -> None:
    """
    Send a text query to the agent and print the response.
    """
    public_agent_card = await get_agent_card()

    print("🔄 Initializing a non-streaming client")
    config = ClientConfig(streaming=False)
    client = await create_client(agent=public_agent_card, client_config=config)

    message = new_text_message(text_query, role=Role.ROLE_USER)
    print("Sending request:")
    request = SendMessageRequest(message=message)
    print(request)

    print("Response:")
    async for chunk in client.send_message(request):
        print(chunk)
    await client.close()
请使用以下命令运行测试:
uv run currency_agent/test_a2aclient.py
成功运行测试后,将得到以下结果:
🔄 Fetching the agent card at http://localhost:10000
✅ Successfully fetched the agent card
====================================================
                     AgentCard
====================================================
--- General ---
Name        : currency_agent
Description : An agent that can help with currency conversions
Version     : 0.0.1

--- Interfaces ---
  [0] http://localhost:10000  (JSONRPC 1.0)

--- Capabilities ---
Streaming           : False
Push notifications  : False
Extended agent card : False

--- I/O Modes ---
Input  : text/plain
Output : text/plain

--- Skills ---
----------------------------------------------------
  ID          : currency_agent
  Name        : model
  Description : An agent that can help with currency conversions
  Tags        : llm
----------------------------------------------------
  ID          : currency_agent-get_exchange_rate
  Name        : get_exchange_rate
  Description : Use this to get current exchange rate.
  Tags        : llm, tools
====================================================
🔄 Fetching the agent card at http://localhost:10000
✅ Successfully fetched the agent card
🔄 Initializing a non-streaming client
Sending request:
message {
  message_id: "5d190c88-336e-4a22-925d-e2af49cf4bad"
  role: ROLE_USER
  parts {
    text: "how much is 100 USD in GBP?"
  }
}

Response:
task {
  id: "e6f311bb-654a-477f-82a9-81c7a48f7b81"
  context_id: "672e351b-0ff3-4aed-a059-868b383c41a0"
  status {
    state: TASK_STATE_COMPLETED
    timestamp {
      seconds: 1787836031
      nanos: 994786000
    }
  }
  artifacts {
    artifact_id: "e0a05ac8-25c7-471c-a33c-1073fe48cbb8"
    parts {
      text: "100 USD is currently equal to approximately **73.37 GBP** (at an exchange rate of 1 USD = 0.73368 GBP)."
    }
  }
  ...
正常运行!您已成功测试,可以使用 A2A 客户端通过 A2A protocol 与货币智能体通信!🎉
如需了解更多 A2A 示例,请查看 GitHub 上的 a2a-samples 代码库。
8. 通过 A2A 使用远程货币智能体
在上一步中,您使用了 A2A 客户端通过 A2A 与货币智能体通信。
在此步骤中,让我们看看如何从另一个旅行社智能体使用货币智能体作为远程智能体。
旅行社智能体的代码位于 travel_agent/agent.py 中:
import logging
import os

from dotenv import load_dotenv
from google.adk.agents import LlmAgent
from google.adk.tools.agent_tool import AgentTool
from google.adk.agents.remote_a2a_agent import RemoteA2aAgent, AGENT_CARD_WELL_KNOWN_PATH

logger = logging.getLogger(__name__)
logging.basicConfig(format="[%(levelname)s]: %(message)s", level=logging.INFO)

load_dotenv()

SYSTEM_INSTRUCTION = (
    "You are a helpful travel assistant. You help users plan trips, recommend places, "
    "and answer travel-related questions. "
    "Whenever a user asks about currency exchange rates or money conversions, "
    "delegate the request to the 'currency_agent' sub-agent."
)

CURRENCY_AGENT_URL = os.getenv("CURRENCY_AGENT_URL", "http://localhost:10000")

logger.info(
    "--- 🔗 Connecting to Remote A2A Currency Agent at %s... ---",
    CURRENCY_AGENT_URL,
)

currency_remote_agent = RemoteA2aAgent(
    name="currency_agent",
    agent_card=f"{CURRENCY_AGENT_URL}{AGENT_CARD_WELL_KNOWN_PATH}",
    description="An agent that can help with currency conversions and exchange rates.",
)

logger.info("--- 🤖 Creating ADK Travel Agent... ---")

root_agent = LlmAgent(
    model="gemini-3.7-flash",
    name="travel_agent",
    description="A travel assistant that can help plan trips and convert currencies via the remote currency agent.",
    instruction=SYSTEM_INSTRUCTION,
    tools=[AgentTool(agent=currency_remote_agent)],
)
请注意如何使用 RemoteA2aAgent 访问货币智能体。
运行 adk web 以测试旅行社智能体:
uv run adk web --allow_origins "regex:https://.*\.cloudshell\.dev"
在浏览器中,前往 http://localhost:8000 以查看和测试智能体。
确保在 Web 界面的左上角选择了 travel_agent 作为智能体。
在聊天区域中询问您的智能体,例如“250 加元兑换成美元是多少?”。
您应该会看到旅行社智能体远程调用 currency_agent,然后给出回答。
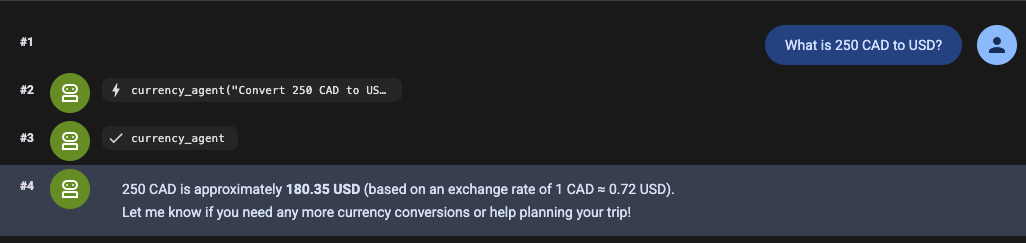
智能体正常运行!它可以处理围绕货币换算的查询 💸,方法是使用 A2A 调用远程智能体!
9. 恭喜
恭喜!您已成功构建和部署远程 MCP 服务器,使用智能体开发套件 (ADK) 创建了使用 MCP 连接到工具的货币智能体,并使用 Agent2Agent (A2A) protocol 公开了您的智能体。然后,您创建了一个旅行社智能体,以使用 A2A 远程与货币智能体对话!
想要部署智能体?Gemini Enterprise Agent Platform 的 Agent Runtime 提供了一种托管式体验,可将 AI 智能体部署到生产环境!
所学内容
- 如何创建本地 MCP 服务器
- 将 MCP 服务器部署到 Cloud Run
- 如何使用智能体开发套件构建使用 MCP 工具的智能体
- 如何将 ADK 智能体公开为 A2A 服务器
- 使用 A2A 客户端测试 A2A 服务器
- 如何构建智能体以通过 A2A protocol 与另一个智能体对话
清理
为避免系统因本实验中使用的资源向您的 Google Cloud 账号收取费用,请按照以下步骤操作:
- 在 Google Cloud 控制台中,前往管理资源页面。
- 在项目列表中,选择要删除的项目,然后点击删除 。
- 在对话框中输入项目 ID,然后点击关停 以删除项目。