
১. জেমিনি দ্বারা চালিত একটি ফ্লাটার অ্যাপ তৈরি করুন।
আপনি যা তৈরি করবেন
এই কোডল্যাবে, আপনি কালারিস্ট (Colorist) তৈরি করবেন – এটি একটি ইন্টারেক্টিভ ফ্লাটার অ্যাপ্লিকেশন যা জেমিনি এপিআই (Gemini API)-এর ক্ষমতা সরাসরি আপনার ফ্লাটার অ্যাপে নিয়ে আসে। আপনি কি কখনো ব্যবহারকারীদের স্বাভাবিক ভাষার মাধ্যমে আপনার অ্যাপ নিয়ন্ত্রণ করার সুযোগ দিতে চেয়েছেন, কিন্তু কোথা থেকে শুরু করবেন তা জানতেন না? এই কোডল্যাবটি আপনাকে দেখাবে কীভাবে তা করতে হয়।
কালারিস্ট ব্যবহারকারীদের স্বাভাবিক ভাষায় রঙের বর্ণনা দেওয়ার সুযোগ দেয় (যেমন "সূর্যাস্তের কমলা" বা "গভীর সমুদ্রের নীল"), এবং অ্যাপটি:
- গুগলের জেমিনি এপিআই ব্যবহার করে এই বিবরণগুলি প্রক্রিয়া করে।
- বর্ণনাগুলোকে সুনির্দিষ্ট RGB রঙের মানে রূপান্তর করে।
- স্ক্রিনে রিয়েল-টাইমে রঙ প্রদর্শন করে।
- রঙের প্রযুক্তিগত বিবরণ এবং রঙটি সম্পর্কে আকর্ষণীয় প্রেক্ষাপট প্রদান করে।
- সম্প্রতি তৈরি হওয়া রঙগুলোর ইতিহাস সংরক্ষণ করে।
অ্যাপটিতে একটি স্প্লিট-স্ক্রিন ইন্টারফেস রয়েছে, যার একপাশে একটি রঙিন ডিসপ্লে এলাকা ও একটি ইন্টারেক্টিভ চ্যাট সিস্টেম এবং অপরপাশে একটি বিস্তারিত লগ প্যানেল আছে, যা এলএলএম-এর সরাসরি ইন্টারঅ্যাকশনগুলো দেখায়। এই লগটি আপনাকে আরও ভালোভাবে বুঝতে সাহায্য করে যে, একটি এলএলএম ইন্টিগ্রেশন আড়ালে আসলে কীভাবে কাজ করে।
ফ্লাটার ডেভেলপারদের জন্য এটি কেন গুরুত্বপূর্ণ
এলএলএম (LLM) ব্যবহারকারীদের অ্যাপ্লিকেশনের সাথে মিথস্ক্রিয়ার পদ্ধতিতে বৈপ্লবিক পরিবর্তন আনছে, কিন্তু মোবাইল এবং ডেস্কটপ অ্যাপে এগুলোকে কার্যকরভাবে একীভূত করা কিছু স্বতন্ত্র চ্যালেঞ্জ তৈরি করে। এই কোডল্যাবটি আপনাকে এমন কিছু ব্যবহারিক প্যাটার্ন শেখাবে যা কেবল গতানুগতিক এপিআই (API) কলের বাইরেও কাজ করে।
আপনার শেখার যাত্রা
এই কোডল্যাবটি আপনাকে ধাপে ধাপে কালারিস্ট তৈরি করার প্রক্রিয়াটি দেখাবে:
- প্রজেক্ট সেটআপ - আপনি একটি বেসিক ফ্লাটার অ্যাপ স্ট্রাকচার এবং
colorist_uiপ্যাকেজ দিয়ে শুরু করবেন। - বেসিক জেমিনি ইন্টিগ্রেশন - আপনার অ্যাপকে ফায়ারবেস এআই লজিকের সাথে সংযুক্ত করুন এবং এলএলএম কমিউনিকেশন বাস্তবায়ন করুন।
- কার্যকরী নির্দেশনা - এমন একটি সিস্টেম নির্দেশনা তৈরি করুন যা এলএলএম-কে রঙের বর্ণনা বুঝতে পথ দেখাবে।
- ফাংশন ঘোষণা - আপনার অ্যাপ্লিকেশনে রং নির্ধারণ করার জন্য LLM যে টুলগুলো ব্যবহার করতে পারে, সেগুলো সংজ্ঞায়িত করুন।
- টুল হ্যান্ডলিং - LLM থেকে ফাংশন কলগুলো প্রসেস করুন এবং সেগুলোকে আপনার অ্যাপের স্টেটের সাথে সংযুক্ত করুন।
- স্ট্রিমিং প্রতিক্রিয়া - রিয়েল-টাইম স্ট্রিমিং এলএলএম প্রতিক্রিয়ার মাধ্যমে ব্যবহারকারীর অভিজ্ঞতা উন্নত করুন
- এলএলএম কনটেক্সট সিঙ্ক্রোনাইজেশন - ব্যবহারকারীর কার্যকলাপ সম্পর্কে এলএলএম-কে অবহিত করে একটি সুসংহত অভিজ্ঞতা তৈরি করুন।
আপনি যা শিখবেন
- ফ্লাটার অ্যাপ্লিকেশনের জন্য ফায়ারবেস এআই লজিক কনফিগার করুন
- এলএলএম আচরণকে নির্দেশিত করার জন্য কার্যকর সিস্টেম নির্দেশিকা তৈরি করুন।
- স্বাভাবিক ভাষা এবং অ্যাপের বৈশিষ্ট্যগুলির মধ্যে সংযোগ স্থাপনকারী ফাংশন ঘোষণাগুলি বাস্তবায়ন করুন।
- প্রতিক্রিয়াশীল ব্যবহারকারীর অভিজ্ঞতার জন্য স্ট্রিমিং প্রতিক্রিয়া প্রক্রিয়া করুন
- UI ইভেন্ট এবং LLM-এর মধ্যে অবস্থা সিঙ্ক্রোনাইজ করুন
- রিভারপড ব্যবহার করে এলএলএম কথোপকথনের অবস্থা পরিচালনা করুন
- LLM-চালিত অ্যাপ্লিকেশনগুলিতে ত্রুটিগুলি সুন্দরভাবে পরিচালনা করুন
কোড প্রিভিউ: আপনি যা বাস্তবায়ন করবেন তার একটি ঝলক
আপনার অ্যাপে LLM-কে রং নির্ধারণ করতে দেওয়ার জন্য আপনি যে ফাংশন ডিক্লারেশনটি তৈরি করবেন, তার একটি ঝলক এখানে দেওয়া হলো:
FunctionDeclaration get setColorFuncDecl => FunctionDeclaration(
  'set_color',
  'Set the color of the display square based on red, green, and blue values.',
  parameters: {
    'red': Schema.number(description: 'Red component value (0.0 - 1.0)'),
    'green': Schema.number(description: 'Green component value (0.0 - 1.0)'),
    'blue': Schema.number(description: 'Blue component value (0.0 - 1.0)'),
  },
);
এই কোডল্যাবটির একটি ভিডিও ওভারভিউ
Observable Flutter এপিসোড #59-এ ক্রেইগ ল্যাবেঞ্জ এবং অ্যান্ড্রু ব্রগডনের এই কোডল্যাব আলোচনাটি দেখুন:
পূর্বশর্ত
এই কোডল্যাব থেকে সর্বাধিক সুবিধা পেতে আপনার নিম্নলিখিত বিষয়গুলো থাকা উচিত:
- ফ্লাটার ডেভেলপমেন্টের অভিজ্ঞতা - ফ্লাটারের মৌলিক বিষয় এবং ডার্ট সিনট্যাক্স সম্পর্কে পরিচিতি
- অ্যাসিঙ্ক্রোনাস প্রোগ্রামিং জ্ঞান - ফিউচার, async/await, এবং স্ট্রিম সম্পর্কে ধারণা
- ফায়ারবেস অ্যাকাউন্ট - ফায়ারবেস সেট আপ করার জন্য আপনার একটি গুগল অ্যাকাউন্ট লাগবে।
চলুন আপনার প্রথম এলএলএম-চালিত ফ্লাটার অ্যাপ তৈরি করা শুরু করা যাক!
২. প্রজেক্ট সেটআপ এবং ইকো সার্ভিস
এই প্রথম ধাপে, আপনি প্রজেক্টের কাঠামো তৈরি করবেন এবং একটি ইকো সার্ভিস ইমপ্লিমেন্ট করবেন, যা পরবর্তীতে জেমিনি এপিআই ইন্টিগ্রেশন দ্বারা প্রতিস্থাপিত হবে। এর মাধ্যমে অ্যাপ্লিকেশনটির আর্কিটেকচার প্রতিষ্ঠিত হয় এবং এলএলএম কলের জটিলতা যোগ করার আগে আপনার ইউআই (UI) সঠিকভাবে কাজ করছে কিনা তা নিশ্চিত করা হয়।
এই ধাপে আপনি যা শিখবেন
- প্রয়োজনীয় ডিপেন্ডেন্সি সহ একটি ফ্লাটার প্রজেক্ট সেট আপ করা
- UI কম্পোনেন্টগুলির জন্য
colorist_uiপ্যাকেজ নিয়ে কাজ করা - একটি ইকো মেসেজ সার্ভিস বাস্তবায়ন করা এবং এটিকে UI-এর সাথে সংযুক্ত করা।
একটি নতুন ফ্লাটার প্রজেক্ট তৈরি করুন
নিম্নলিখিত কমান্ড ব্যবহার করে একটি নতুন ফ্লাটার প্রজেক্ট তৈরি করে শুরু করুন:
flutter create -e colorist --platforms=android,ios,macos,web,windows
-e ফ্ল্যাগটি নির্দেশ করে যে আপনি ডিফল্ট counter অ্যাপ ছাড়া একটি খালি প্রজেক্ট চান। অ্যাপটি ডেস্কটপ, মোবাইল এবং ওয়েবে কাজ করার জন্য ডিজাইন করা হয়েছে। তবে, flutterfire বর্তমানে লিনাক্স সমর্থন করে না।
নির্ভরতা যোগ করুন
আপনার প্রজেক্ট ডিরেক্টরিতে যান এবং প্রয়োজনীয় ডিপেন্ডেন্সিগুলো যোগ করুন:
cd colorist
flutter pub add colorist_ui flutter_riverpod riverpod_annotation
flutter pub add --dev build_runner riverpod_generator riverpod_lint json_serializable custom_lint
এটি নিম্নলিখিত মূল প্যাকেজগুলি যুক্ত করবে:
-
colorist_ui: একটি কাস্টম প্যাকেজ যা কালারিস্ট অ্যাপের জন্য UI উপাদানগুলো সরবরাহ করে। -
flutter_riverpodএবংriverpod_annotation: স্টেট ম্যানেজমেন্টের জন্য -
logging: কাঠামোগত লগিংয়ের জন্য - কোড জেনারেশন এবং লিন্টিং এর জন্য ডেভেলপমেন্ট নির্ভরতা
আপনার pubspec.yaml দেখতে অনেকটা এইরকম হবে:
pubspec.yaml
name: colorist
description: "A new Flutter project."
publish_to: 'none'
version: 0.1.0

environment:
  sdk: ^3.9.2

dependencies:
  flutter:
    sdk: flutter
  colorist_ui: ^0.3.0
  flutter_riverpod: ^3.0.0
  riverpod_annotation: ^3.0.0

dev_dependencies:
  flutter_test:
    sdk: flutter
  flutter_lints: ^6.0.0
  build_runner: ^2.7.1
  riverpod_generator: ^3.0.0
  riverpod_lint: ^3.0.0
  json_serializable: ^6.11.1

flutter:
  uses-material-design: true
বিশ্লেষণ বিকল্পগুলি কনফিগার করুন
আপনার প্রোজেক্টের রুটে থাকা analysis_options.yaml ফাইলে custom_lint যোগ করুন:
include: package:flutter_lints/flutter.yaml

analyzer:
  plugins:
    - custom_lint
এই কনফিগারেশনটি কোডের মান বজায় রাখতে রিভারপড-এর নিজস্ব লিন্টগুলো সক্রিয় করে।
main.dart ফাইলটি বাস্তবায়ন করুন।
lib/main.dart ফাইলের বিষয়বস্তু নিম্নলিখিত দ্বারা প্রতিস্থাপন করুন:
lib/main.dart
import 'package:colorist_ui/colorist_ui.dart';
import 'package:flutter/material.dart';
import 'package:flutter_riverpod/flutter_riverpod.dart';

void main() async {
  runApp(ProviderScope(child: MainApp()));
}

class MainApp extends ConsumerWidget {
  const MainApp({super.key});

  @override
  Widget build(BuildContext context, WidgetRef ref) {
    return MaterialApp(
      theme: ThemeData(
        colorScheme: ColorScheme.fromSeed(seedColor: Colors.deepPurple),
      ),
      home: MainScreen(
        sendMessage: (message) {
          sendMessage(message, ref);
        },
      ),
    );
  }

  // A fake LLM that just echoes back what it receives.
  void sendMessage(String message, WidgetRef ref) {
    final chatStateNotifier = ref.read(chatStateProvider.notifier);
    final logStateNotifier = ref.read(logStateProvider.notifier);

    chatStateNotifier.addUserMessage(message);
    logStateNotifier.logUserText(message);
    chatStateNotifier.addLlmMessage(message, MessageState.complete);
    logStateNotifier.logLlmText(message);
  }
}
এটি এমন একটি ফ্লাটার অ্যাপ তৈরি করে যা একটি ইকো সার্ভিস প্রয়োগ করে, যা ব্যবহারকারীর বার্তা ফেরত দেওয়ার মাধ্যমে একটি এলএলএম (LLM)-এর আচরণ অনুকরণ করে।
স্থাপত্য বোঝা
চলুন, colorist অ্যাপটির গঠনপ্রণালী বুঝতে এক মিনিট সময় নিই:
colorist_ui প্যাকেজ
colorist_ui প্যাকেজটি পূর্ব-নির্মিত UI উপাদান এবং অবস্থা ব্যবস্থাপনা সরঞ্জাম সরবরাহ করে:
- MainScreen : প্রধান UI উপাদান যা প্রদর্শন করে:
- ডেস্কটপে একটি স্প্লিট-স্ক্রিন লেআউট (ইন্টারঅ্যাকশন এরিয়া এবং লগ প্যানেল)
- মোবাইলে একটি ট্যাবযুক্ত ইন্টারফেস
- রঙিন ডিসপ্লে, চ্যাট ইন্টারফেস এবং ইতিহাসের থাম্বনেইল
- অবস্থা ব্যবস্থাপনা : অ্যাপটি একাধিক অবস্থা নোটিফায়ার ব্যবহার করে:
- ChatStateNotifier : চ্যাট বার্তাগুলো পরিচালনা করে
- ColorStateNotifier : বর্তমান রঙ এবং ইতিহাস পরিচালনা করে
- LogStateNotifier : ডিবাগিংয়ের জন্য লগ এন্ট্রিগুলো পরিচালনা করে।
- বার্তা পরিচালনা : অ্যাপটি বিভিন্ন অবস্থা সহ একটি বার্তা মডেল ব্যবহার করে:
- ব্যবহারকারীর বার্তা : ব্যবহারকারী কর্তৃক প্রবেশ করানো হয়েছে
- এলএলএম বার্তা : এলএলএম দ্বারা (অথবা আপাতত আপনার ইকো পরিষেবা দ্বারা) তৈরি।
- MessageState : LLM বার্তাগুলি সম্পূর্ণ হয়েছে নাকি এখনও আসছে তা ট্র্যাক করে।
অ্যাপ্লিকেশন আর্কিটেকচার
অ্যাপটি নিম্নলিখিত স্থাপত্য অনুসরণ করে:
- UI লেয়ার :
colorist_uiপ্যাকেজ দ্বারা সরবরাহকৃত - স্টেট ম্যানেজমেন্ট : রিঅ্যাক্টিভ স্টেট ম্যানেজমেন্টের জন্য রিভারপড ব্যবহার করে।
- সার্ভিস লেয়ার : বর্তমানে এতে আপনার সিম্পল ইকো সার্ভিস রয়েছে, এটি জেমিনি চ্যাট সার্ভিস দ্বারা প্রতিস্থাপিত হবে।
- এলএলএম অন্তর্ভুক্তি : পরবর্তী ধাপে যোগ করা হবে
এই পৃথকীকরণ আপনাকে এলএলএম ইন্টিগ্রেশন বাস্তবায়নের উপর মনোযোগ দিতে সাহায্য করে, কারণ ইউআই উপাদানগুলোর ব্যবস্থা আগে থেকেই করা থাকে।
অ্যাপটি চালান
নিম্নলিখিত কমান্ডটি দিয়ে অ্যাপটি চালান:
flutter run -d DEVICE
DEVICE জায়গায় আপনার কাঙ্ক্ষিত ডিভাইসটির নাম লিখুন, যেমন macos , windows , chrome বা একটি ডিভাইস আইডি।
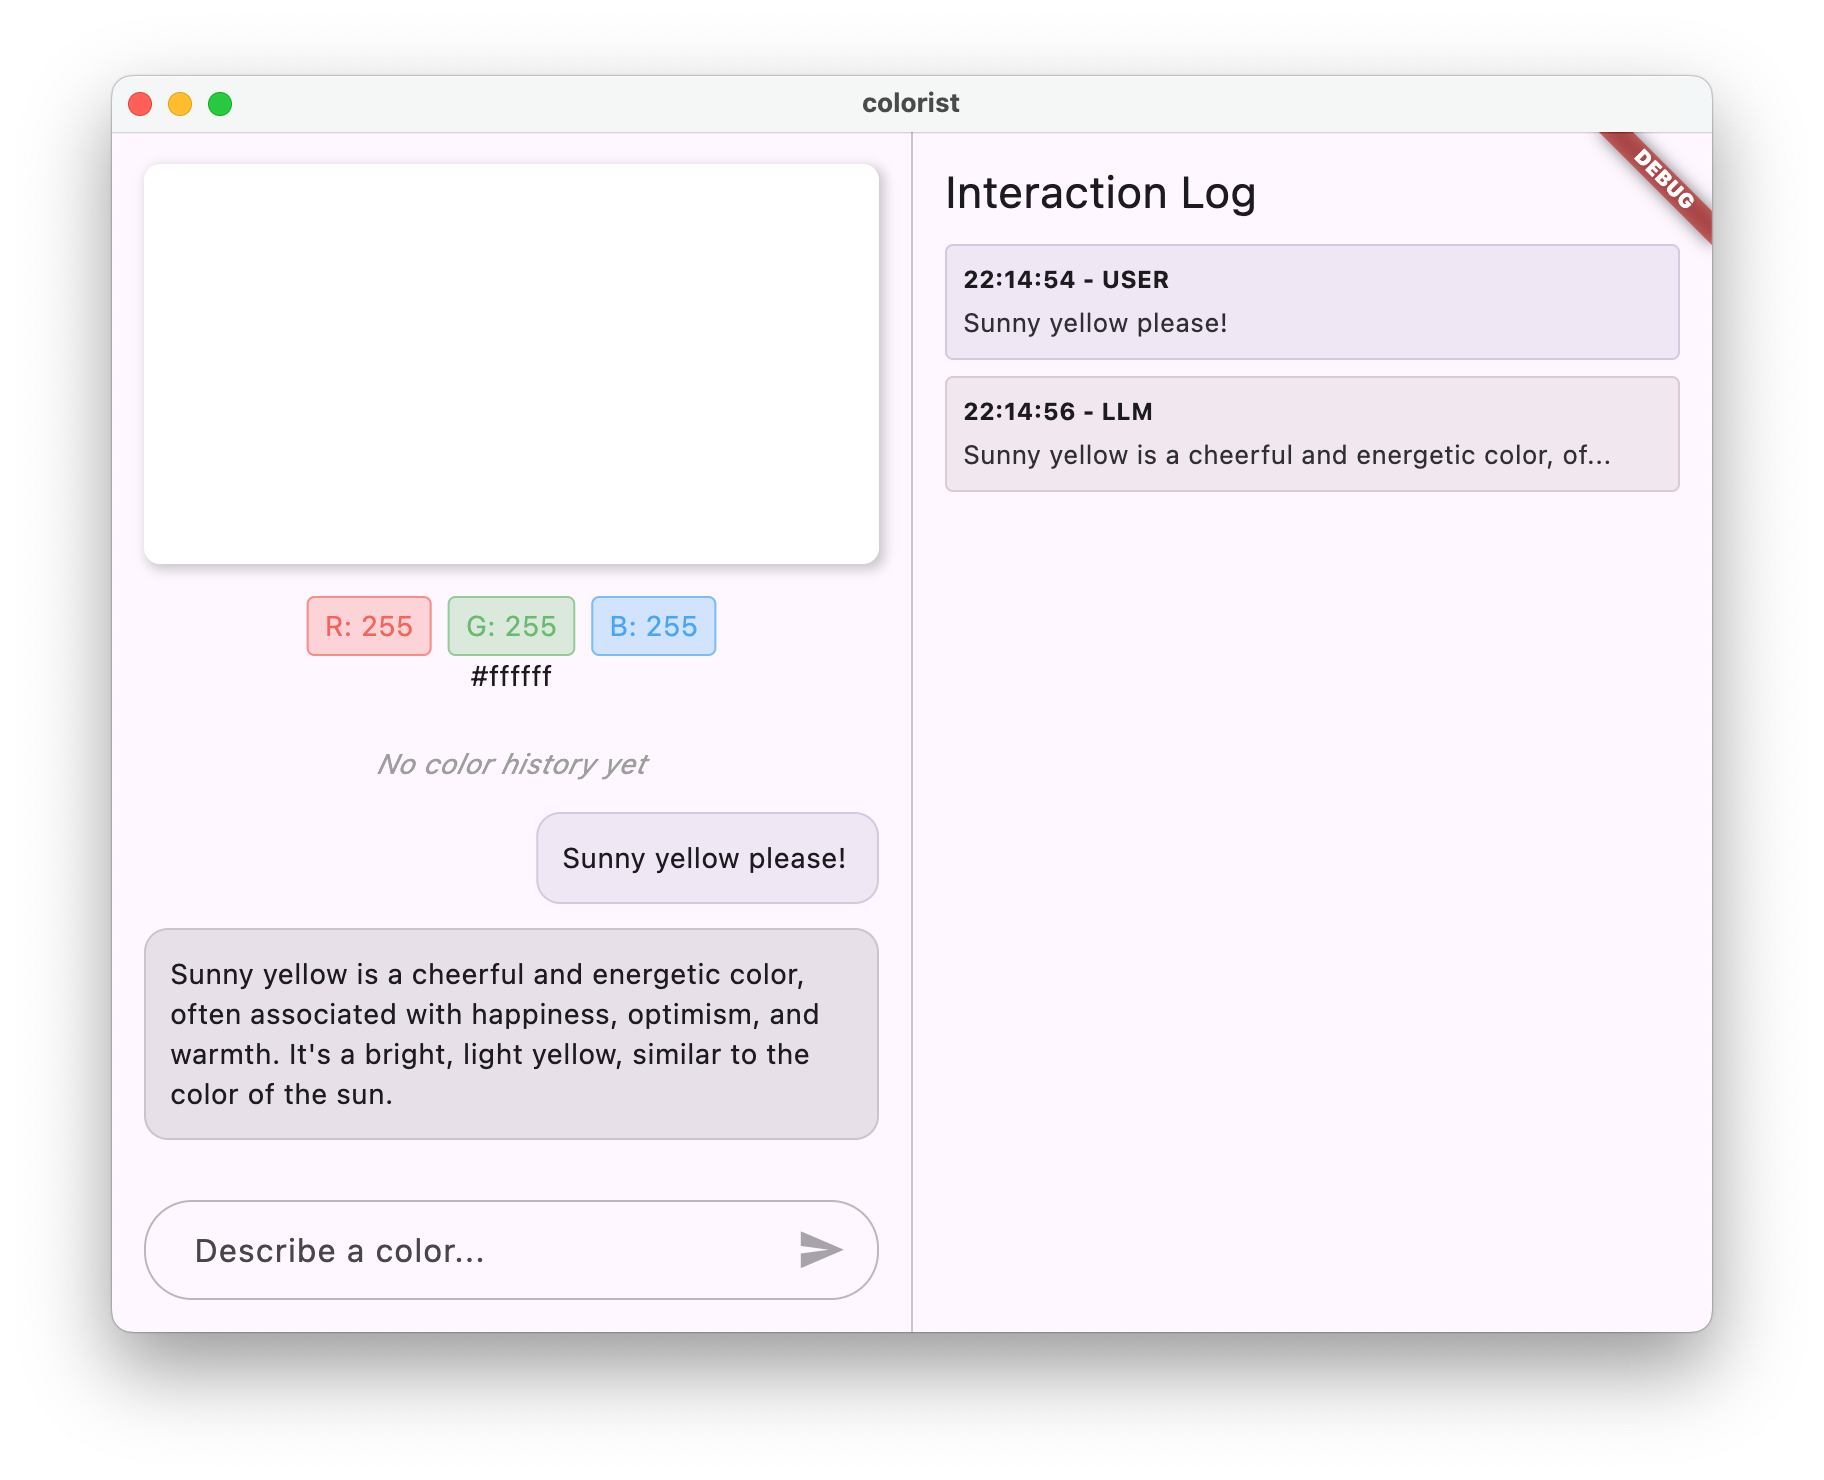
এখন আপনি কালারিস্ট অ্যাপটি দেখতে পাবেন, যেখানে থাকবে:
- ডিফল্ট রঙ সহ একটি রঙিন প্রদর্শন এলাকা
- একটি চ্যাট ইন্টারফেস যেখানে আপনি বার্তা টাইপ করতে পারেন
- একটি লগ প্যানেল যা চ্যাটের কথোপকথনগুলো দেখাচ্ছে।
"আমি একটি গাঢ় নীল রঙ চাই"-এর মতো একটি বার্তা টাইপ করে সেন্ড চাপুন। ইকো সার্ভিসটি কেবল আপনার বার্তাটি পুনরাবৃত্তি করবে। পরবর্তী ধাপগুলিতে, আপনি ফায়ারবেস এআই লজিক ব্যবহার করে এটিকে প্রকৃত রঙের ব্যাখ্যা দিয়ে প্রতিস্থাপন করবেন।
এরপর কী?
পরবর্তী ধাপে, আপনি আপনার ইকো সার্ভিসকে জেমিনি চ্যাট সার্ভিস দিয়ে প্রতিস্থাপন করতে ফায়ারবেস কনফিগার করবেন এবং বেসিক জেমিনি এপিআই ইন্টিগ্রেশন প্রয়োগ করবেন। এর ফলে অ্যাপটি রঙের বিবরণ বুঝতে পারবে এবং বুদ্ধিদীপ্ত প্রতিক্রিয়া প্রদান করতে পারবে।
সমস্যা সমাধান
UI প্যাকেজ সমস্যা
colorist_ui প্যাকেজটি নিয়ে যদি কোনো সমস্যা হয়:
- নিশ্চিত করুন যে আপনি সর্বশেষ সংস্করণটি ব্যবহার করছেন।
- যাচাই করুন যে আপনি ডিপেন্ডেন্সিটি সঠিকভাবে যোগ করেছেন।
- প্যাকেজের কোনো সাংঘর্ষিক সংস্করণ আছে কিনা তা পরীক্ষা করুন।
বিল্ড ত্রুটি
যদি আপনি বিল্ড ত্রুটি দেখতে পান:
- নিশ্চিত করুন যে আপনার সিস্টেমে সর্বশেষ স্থিতিশীল চ্যানেল ফ্লাটার এসডিকে (Flutter SDK) ইনস্টল করা আছে।
- প্রথমে
flutter cleanএবং তারপরflutter pub getচালান। - নির্দিষ্ট ত্রুটির বার্তাগুলির জন্য কনসোল আউটপুট পরীক্ষা করুন।
শেখা মূল ধারণাগুলো
- প্রয়োজনীয় ডিপেন্ডেন্সি সহ একটি ফ্লাটার প্রজেক্ট সেট আপ করা
- অ্যাপ্লিকেশনটির স্থাপত্য এবং উপাদানগুলির দায়িত্ব বোঝা
- একটি সাধারণ পরিষেবা বাস্তবায়ন করা যা একটি এলএলএম-এর আচরণ অনুকরণ করে।
- সার্ভিসটিকে UI কম্পোনেন্টগুলোর সাথে সংযুক্ত করা
- স্টেট ম্যানেজমেন্টের জন্য রিভারপড ব্যবহার করা
৩. বেসিক জেমিনি চ্যাট ইন্টিগ্রেশন
এই ধাপে, আপনি আগের ধাপের ইকো সার্ভিসটিকে ফায়ারবেস এআই লজিক ব্যবহার করে জেমিনি এপিআই ইন্টিগ্রেশন দ্বারা প্রতিস্থাপন করবেন। আপনি ফায়ারবেস কনফিগার করবেন, প্রয়োজনীয় প্রোভাইডারগুলো সেট আপ করবেন এবং একটি বেসিক চ্যাট সার্ভিস ইমপ্লিমেন্ট করবেন যা জেমিনি এপিআই-এর সাথে যোগাযোগ করে।
এই ধাপে আপনি যা শিখবেন
- ফ্লাটার অ্যাপ্লিকেশনে ফায়ারবেস সেট আপ করা
- জেমিনি অ্যাক্সেসের জন্য ফায়ারবেস এআই লজিক কনফিগার করা
- Firebase এবং Gemini পরিষেবাগুলির জন্য Riverpod প্রোভাইডার তৈরি করা
- জেমিনি এপিআই ব্যবহার করে একটি প্রাথমিক চ্যাট পরিষেবা বাস্তবায়ন করা
- অ্যাসিঙ্ক্রোনাস এপিআই প্রতিক্রিয়া এবং ত্রুটির অবস্থা পরিচালনা করা
ফায়ারবেস সেট আপ করুন
প্রথমে, আপনাকে আপনার ফ্লাটার প্রজেক্টের জন্য ফায়ারবেস সেট আপ করতে হবে। এর জন্য একটি ফায়ারবেস প্রজেক্ট তৈরি করতে হবে, তাতে আপনার অ্যাপটি যুক্ত করতে হবে এবং প্রয়োজনীয় ফায়ারবেস এআই লজিক সেটিংস কনফিগার করতে হবে।
একটি ফায়ারবেস প্রজেক্ট তৈরি করুন
- ফায়ারবেস কনসোলে যান এবং আপনার গুগল অ্যাকাউন্ট দিয়ে সাইন ইন করুন।
- একটি Firebase প্রজেক্ট তৈরি করতে ক্লিক করুন অথবা একটি বিদ্যমান প্রজেক্ট নির্বাচন করুন।
- আপনার প্রজেক্ট তৈরি করতে সেটআপ উইজার্ডটি অনুসরণ করুন।
আপনার Firebase প্রোজেক্টে Firebase AI Logic সেট আপ করুন
- Firebase কনসোলে আপনার প্রজেক্টে যান।
- বাম পাশের সাইডবারে AI নির্বাচন করুন।
- AI ড্রপ-ডাউন মেনু থেকে AI Logic নির্বাচন করুন।
- Firebase AI Logic কার্ডে, Get Started নির্বাচন করুন।
- আপনার প্রোজেক্টের জন্য জেমিনি ডেভেলপার এপিআই (Gemini Developer API) সক্রিয় করতে নির্দেশাবলী অনুসরণ করুন।
FlutterFire CLI ইনস্টল করুন
FlutterFire CLI ফ্লাটার অ্যাপে Firebase সেটআপকে সহজ করে তোলে:
dart pub global activate flutterfire_cli
আপনার ফ্লাটার অ্যাপে ফায়ারবেস যোগ করুন
- আপনার প্রজেক্টে Firebase core এবং Firebase AI Logic প্যাকেজগুলো যোগ করুন:
flutter pub add firebase_core firebase_ai
- FlutterFire কনফিগারেশন কমান্ডটি চালান:
flutterfire configure
এই কমান্ডটি যা করবে:
- আপনাকে এইমাত্র তৈরি করা ফায়ারবেস প্রজেক্টটি নির্বাচন করতে বলা হচ্ছে।
- আপনার ফ্লাটার অ্যাপ(গুলি) ফায়ারবেসে নিবন্ধন করুন
- আপনার প্রোজেক্ট কনফিগারেশন দিয়ে একটি
firebase_options.dartফাইল তৈরি করুন।
এই কমান্ডটি আপনার নির্বাচিত প্ল্যাটফর্মগুলো (iOS, Android, macOS, Windows, web) স্বয়ংক্রিয়ভাবে শনাক্ত করবে এবং সেগুলোকে যথাযথভাবে কনফিগার করবে।
প্ল্যাটফর্ম-নির্দিষ্ট কনফিগারেশন
ফায়ারবেসের জন্য ফ্লাটারের ডিফল্ট ভার্সনের চেয়ে ন্যূনতম উচ্চতর ভার্সন প্রয়োজন। ফায়ারবেস এআই লজিক সার্ভারগুলোর সাথে যোগাযোগের জন্য এটির নেটওয়ার্ক অ্যাক্সেসও প্রয়োজন।
ম্যাকওএস অনুমতি কনফিগার করুন
macOS-এর জন্য, আপনার অ্যাপের এনটাইটেলমেন্টে নেটওয়ার্ক অ্যাক্সেস চালু করতে হবে:
-
macos/Runner/DebugProfile.entitlementsখুলুন এবং যোগ করুন:
macos/Runner/DebugProfile.entitlements
<key>com.apple.security.network.client</key>
<true/>
- এছাড়াও
macos/Runner/Release.entitlementsখুলুন এবং একই এন্ট্রিটি যোগ করুন।
iOS সেটিংস কনফিগার করুন
iOS-এর জন্য, ios/Podfile এর শীর্ষে সর্বনিম্ন সংস্করণটি আপডেট করুন:
ios/Podfile
# Firebase requires at least iOS 15.0
platform :ios, '15.0'
জেমিনি মডেল প্রদানকারী তৈরি করুন
এখন আপনি Firebase এবং Gemini-এর জন্য Riverpod প্রোভাইডার তৈরি করবেন। lib/providers/gemini.dart একটি নতুন ফাইল তৈরি করুন:
lib/providers/gemini.dart
import 'dart:async';

import 'package:firebase_ai/firebase_ai.dart';
import 'package:firebase_core/firebase_core.dart';
import 'package:riverpod_annotation/riverpod_annotation.dart';

import '../firebase_options.dart';

part 'gemini.g.dart';

@Riverpod(keepAlive: true)
Future<FirebaseApp> firebaseApp(Ref ref) =>
    Firebase.initializeApp(options: DefaultFirebaseOptions.currentPlatform);

@Riverpod(keepAlive: true)
Future<GenerativeModel> geminiModel(Ref ref) async {
  await ref.watch(firebaseAppProvider.future);

  final model = FirebaseAI.googleAI().generativeModel(
    model: 'gemini-3.1-flash-lite',
  );
  return model;
}

@Riverpod(keepAlive: true)
Future<ChatSession> chatSession(Ref ref) async {
  final model = await ref.watch(geminiModelProvider.future);
  return model.startChat();
}
এই ফাইলটি তিনটি মূল প্রোভাইডারের ভিত্তি নির্ধারণ করে। আপনি যখন dart run build_runner চালান, তখন রিভারপড কোড জেনারেটরগুলো এই প্রোভাইডারগুলো তৈরি করে। এই কোডটি আপডেট করা প্রোভাইডার প্যাটার্নসহ রিভারপড ৩-এর অ্যানোটেশন-ভিত্তিক পদ্ধতি ব্যবহার করে।
-
firebaseAppProvider: আপনার প্রোজেক্ট কনফিগারেশন দিয়ে Firebase চালু করে। -
geminiModelProvider: একটি জেমিনি জেনারেটিভ মডেল ইনস্ট্যান্স তৈরি করে। -
chatSessionProvider: জেমিনি মডেলের সাথে একটি চ্যাট সেশন তৈরি ও রক্ষণাবেক্ষণ করে।
চ্যাট সেশনের keepAlive: true অ্যানোটেশনটি নিশ্চিত করে যে এটি অ্যাপের জীবনচক্র জুড়ে টিকে থাকে এবং কথোপকথনের প্রাসঙ্গিকতা বজায় রাখে।
জেমিনি চ্যাট পরিষেবা বাস্তবায়ন করুন
চ্যাট পরিষেবাটি বাস্তবায়ন করতে lib/services/gemini_chat_service.dart একটি নতুন ফাইল তৈরি করুন:
lib/services/gemini_chat_service.dart
import 'dart:async';

import 'package:colorist_ui/colorist_ui.dart';
import 'package:firebase_ai/firebase_ai.dart';
import 'package:riverpod_annotation/riverpod_annotation.dart';

import '../providers/gemini.dart';

part 'gemini_chat_service.g.dart';

class GeminiChatService {
  GeminiChatService(this.ref);
  final Ref ref;

  Future<void> sendMessage(String message) async {
    final chatSession = await ref.read(chatSessionProvider.future);
    final chatStateNotifier = ref.read(chatStateProvider.notifier);
    final logStateNotifier = ref.read(logStateProvider.notifier);

    chatStateNotifier.addUserMessage(message);
    logStateNotifier.logUserText(message);
    final llmMessage = chatStateNotifier.createLlmMessage();
    try {
      final response = await chatSession.sendMessage(Content.text(message));

      final responseText = response.text;
      if (responseText != null) {
        logStateNotifier.logLlmText(responseText);
        chatStateNotifier.appendToMessage(llmMessage.id, responseText);
      }
    } catch (e, st) {
      logStateNotifier.logError(e, st: st);
      chatStateNotifier.appendToMessage(
        llmMessage.id,
        "\nI'm sorry, I encountered an error processing your request. "
        "Please try again.",
      );
    } finally {
      chatStateNotifier.finalizeMessage(llmMessage.id);
    }
  }
}

@Riverpod(keepAlive: true)
GeminiChatService geminiChatService(Ref ref) => GeminiChatService(ref);
এই পরিষেবা:
- ব্যবহারকারীর বার্তা গ্রহণ করে এবং সেগুলো জেমিনি এপিআই-তে পাঠায়।
- মডেলের প্রতিক্রিয়া দিয়ে চ্যাট ইন্টারফেস আপডেট করে।
- এলএলএম-এর প্রকৃত কার্যপ্রবাহ সহজে বোঝার জন্য সমস্ত যোগাযোগ নথিভুক্ত করা হয়।
- যথাযথ ব্যবহারকারীর মতামতের মাধ্যমে ত্রুটিগুলি সমাধান করে।
দ্রষ্টব্য: এই পর্যায়ে লগ উইন্ডোটি দেখতে প্রায় চ্যাট উইন্ডোর মতোই হবে। আপনি যখন ফাংশন কল এবং তারপর স্ট্রিমিং রেসপন্স যুক্ত করবেন, তখন লগটি আরও আকর্ষণীয় হয়ে উঠবে।
রিভারপড কোড তৈরি করুন
প্রয়োজনীয় রিভারপড কোড তৈরি করতে বিল্ড রানার কমান্ডটি চালান:
dart run build_runner build --delete-conflicting-outputs
এটি রিভারপডের কার্যকারিতার জন্য প্রয়োজনীয় .g.dart ফাইলগুলো তৈরি করবে।
main.dart ফাইলটি আপডেট করুন।
নতুন জেমিনি চ্যাট পরিষেবা ব্যবহার করার জন্য আপনার lib/main.dart ফাইলটি আপডেট করুন:
lib/main.dart
import 'package:colorist_ui/colorist_ui.dart';
import 'package:flutter/material.dart';
import 'package:flutter_riverpod/flutter_riverpod.dart';

import 'providers/gemini.dart';
import 'services/gemini_chat_service.dart';

void main() async {
  runApp(ProviderScope(child: MainApp()));
}

class MainApp extends ConsumerWidget {
  const MainApp({super.key});

  @override
  Widget build(BuildContext context, WidgetRef ref) {
    final model = ref.watch(geminiModelProvider);

    return MaterialApp(
      theme: ThemeData(
        colorScheme: ColorScheme.fromSeed(seedColor: Colors.deepPurple),
      ),
      home: model.when(
        data: (data) => MainScreen(
          sendMessage: (text) {
            ref.read(geminiChatServiceProvider).sendMessage(text);
          },
        ),
        loading: () => LoadingScreen(message: 'Initializing Gemini Model'),
        error: (err, st) => ErrorScreen(error: err),
      ),
    );
  }
}
এই আপডেটের প্রধান পরিবর্তনগুলো হলো:
- ইকো সার্ভিসকে জেমিনি এপিআই ভিত্তিক চ্যাট সার্ভিস দিয়ে প্রতিস্থাপন করা
- রিভারপডের
AsyncValueপ্যাটার্নেরwhenমেথড ব্যবহার করে লোডিং এবং এরর স্ক্রিন যোগ করা। -
sendMessageকলব্যাকের মাধ্যমে আপনার নতুন চ্যাট পরিষেবার সাথে UI সংযোগ করা
অ্যাপটি চালান
নিম্নলিখিত কমান্ডটি দিয়ে অ্যাপটি চালান:
flutter run -d DEVICE
DEVICE জায়গায় আপনার কাঙ্ক্ষিত ডিভাইসটির নাম লিখুন, যেমন macos , windows , chrome বা একটি ডিভাইস আইডি।
এখন আপনি যখন কোনো বার্তা টাইপ করবেন, সেটি জেমিনি এপিআই-তে পাঠানো হবে এবং আপনি প্রতিধ্বনির (echo) পরিবর্তে এলএলএম (LLM) থেকে একটি প্রতিক্রিয়া পাবেন। লগ প্যানেলটি এপিআই-এর সাথে হওয়া কার্যকলাপগুলো দেখাবে।
এলএলএম যোগাযোগ বোঝা
জেমিনি এপিআই (Gemini API)-এর সাথে যোগাযোগ করার সময় কী ঘটে, তা বুঝতে একটু সময় নেওয়া যাক:
যোগাযোগের প্রবাহ
- ব্যবহারকারীর ইনপুট : ব্যবহারকারী চ্যাট ইন্টারফেসে টেক্সট প্রবেশ করান।
- অনুরোধের বিন্যাস : অ্যাপটি জেমিনি এপিআই-এর জন্য টেক্সটটিকে একটি
Contentঅবজেক্ট হিসেবে বিন্যাস করে। - এপিআই যোগাযোগ : টেক্সটটি ফায়ারবেস এআই লজিকের মাধ্যমে জেমিনি এপিআই-তে পাঠানো হয়।
- এলএলএম প্রসেসিং : জেমিনি মডেলটি টেক্সট প্রসেস করে এবং একটি প্রতিক্রিয়া তৈরি করে।
- প্রতিক্রিয়া পরিচালনা : অ্যাপটি প্রতিক্রিয়া গ্রহণ করে এবং UI আপডেট করে।
- লগিং : স্বচ্ছতার জন্য সমস্ত যোগাযোগ লগ করা হয়।
চ্যাট সেশন এবং কথোপকথনের প্রেক্ষাপট
জেমিনি চ্যাট সেশন মেসেজগুলোর মধ্যে প্রাসঙ্গিকতা বজায় রাখে, যা কথোপকথনমূলক আদান-প্রদানের সুযোগ করে দেয়। এর মানে হলো, এলএলএম বর্তমান সেশনের পূর্ববর্তী আলাপচারিতা "মনে রাখে", যা আরও সুসংহত কথোপকথন সম্ভব করে তোলে।
আপনার চ্যাট সেশন প্রোভাইডারে থাকা keepAlive: true অ্যানোটেশনটি নিশ্চিত করে যে এই কনটেক্সটটি অ্যাপটির জীবনচক্র জুড়ে বজায় থাকে। LLM-এর সাথে একটি স্বাভাবিক কথোপকথনের ধারা বজায় রাখার জন্য এই স্থায়ী কনটেক্সটটি অত্যন্ত গুরুত্বপূর্ণ।
এরপর কী?
এই পর্যায়ে, আপনি জেমিনি এপিআই-কে যেকোনো কিছু জিজ্ঞাসা করতে পারেন, কারণ এটি কী উত্তর দেবে তার উপর কোনো বিধিনিষেধ নেই। উদাহরণস্বরূপ, আপনি এটিকে 'ওয়ার্স অফ দ্য রোজেস'-এর একটি সারাংশ জিজ্ঞাসা করতে পারেন, যা আপনার কালার অ্যাপের উদ্দেশ্যের সাথে সম্পর্কিত নয়।
পরবর্তী ধাপে, আপনি জেমিনিকে রঙের বিবরণ আরও কার্যকরভাবে ব্যাখ্যা করতে নির্দেশনা দেওয়ার জন্য একটি সিস্টেম প্রম্পট তৈরি করবেন। এর মাধ্যমে দেখানো হবে কীভাবে অ্যাপ্লিকেশন-নির্দিষ্ট প্রয়োজন অনুসারে একটি এলএলএম-এর আচরণ কাস্টমাইজ করতে হয় এবং এর সক্ষমতাগুলোকে আপনার অ্যাপের ডোমেইনে কেন্দ্রীভূত করতে হয়।
সমস্যা সমাধান
ফায়ারবেস কনফিগারেশন সমস্যা
ফায়ারবেস ইনিশিয়ালাইজেশনে কোনো ত্রুটি দেখা দিলে:
- আপনার
firebase_options.dartফাইলটি সঠিকভাবে তৈরি হয়েছে কিনা তা নিশ্চিত করুন। - Firebase AI Logic অ্যাক্সেসের জন্য আপনি Blaze প্ল্যানে আপগ্রেড করেছেন কিনা তা যাচাই করুন।
এপিআই অ্যাক্সেস ত্রুটি
জেমিনি এপিআই অ্যাক্সেস করতে গিয়ে যদি কোনো ত্রুটি পান:
- আপনার ফায়ারবেস প্রজেক্টে বিলিং সঠিকভাবে সেট আপ করা আছে কিনা তা নিশ্চিত করুন।
- আপনার Firebase প্রজেক্টে Firebase AI Logic এবং Cloud AI API সক্রিয় করা আছে কিনা তা যাচাই করুন।
- আপনার নেটওয়ার্ক সংযোগ এবং ফায়ারওয়াল সেটিংস পরীক্ষা করুন
- মডেলের নাম (
gemini-3.1-flash-lite) সঠিক এবং উপলব্ধ আছে কিনা তা যাচাই করুন।
কথোপকথনের প্রেক্ষাপট সংক্রান্ত সমস্যা
যদি আপনি লক্ষ্য করেন যে জেমিনি চ্যাটের পূর্ববর্তী প্রসঙ্গ মনে রাখতে পারছে না:
- নিশ্চিত করুন যে
chatSessionফাংশনটি@Riverpod(keepAlive: true)দিয়ে অ্যানোটেট করা আছে। - সমস্ত বার্তা আদান-প্রদানের জন্য আপনি একই চ্যাট সেশন পুনরায় ব্যবহার করছেন কিনা তা যাচাই করুন।
- বার্তা পাঠানোর আগে চ্যাট সেশনটি সঠিকভাবে চালু হয়েছে কিনা তা যাচাই করুন।
প্ল্যাটফর্ম-নির্দিষ্ট সমস্যা
প্ল্যাটফর্ম-নির্দিষ্ট সমস্যাগুলির জন্য:
- iOS/macOS: সঠিক এনটাইটেলমেন্ট সেট করা আছে এবং ন্যূনতম সংস্করণ কনফিগার করা আছে কিনা তা নিশ্চিত করুন।
- অ্যান্ড্রয়েড: ন্যূনতম SDK সংস্করণটি সঠিকভাবে সেট করা আছে কিনা তা যাচাই করুন।
- কনসোলে প্ল্যাটফর্ম-নির্দিষ্ট ত্রুটির বার্তাগুলি পরীক্ষা করুন।
শেখা মূল ধারণাগুলো
- ফ্লাটার অ্যাপ্লিকেশনে ফায়ারবেস সেট আপ করা
- জেমিনিতে অ্যাক্সেসের জন্য ফায়ারবেস এআই লজিক কনফিগার করা হচ্ছে
- অ্যাসিঙ্ক্রোনাস পরিষেবাগুলির জন্য রিভারপড প্রোভাইডার তৈরি করা
- একটি চ্যাট পরিষেবা বাস্তবায়ন করা যা একজন এলএলএম-এর সাথে যোগাযোগ করে
- অ্যাসিঙ্ক্রোনাস এপিআই স্টেট (লোডিং, এরর, ডেটা) পরিচালনা করা
- এলএলএম যোগাযোগ প্রবাহ এবং চ্যাট সেশন বোঝা
৪. রঙের বর্ণনা দেওয়ার জন্য কার্যকর নির্দেশনা
এই ধাপে, আপনি একটি সিস্টেম প্রম্পট তৈরি ও প্রয়োগ করবেন যা জেমিনিকে রঙের বিবরণ ব্যাখ্যা করতে নির্দেশনা দেবে। আপনার কোড পরিবর্তন না করেই নির্দিষ্ট কাজের জন্য এলএলএম-এর আচরণ কাস্টমাইজ করার একটি শক্তিশালী উপায় হলো সিস্টেম প্রম্পট।
এই ধাপে আপনি যা শিখবেন
- এলএলএম আবেদনপত্রে সিস্টেম প্রম্পট এবং তাদের গুরুত্ব বোঝা
- ডোমেন-নির্দিষ্ট কাজের জন্য কার্যকর নির্দেশিকা তৈরি করা
- ফ্লাটার অ্যাপে সিস্টেম প্রম্পট লোড করা এবং ব্যবহার করা
- এলএলএম শিক্ষার্থীকে সামঞ্জস্যপূর্ণ বিন্যাসে উত্তর প্রদানে নির্দেশনা প্রদান
- সিস্টেম প্রম্পটগুলো কীভাবে LLM-এর আচরণকে প্রভাবিত করে তা পরীক্ষা করা হচ্ছে
সিস্টেম প্রম্পট বোঝা
বাস্তবায়নে যাওয়ার আগে, চলুন জেনে নিই সিস্টেম প্রম্পট কী এবং কেন এগুলো গুরুত্বপূর্ণ:
সিস্টেম প্রম্পট বলতে কী বোঝায়?
সিস্টেম প্রম্পট হলো একটি এলএলএম-কে দেওয়া এক বিশেষ ধরনের নির্দেশনা, যা তার প্রতিক্রিয়ার জন্য প্রেক্ষাপট, আচরণের নির্দেশিকা এবং প্রত্যাশা নির্ধারণ করে। ব্যবহারকারীর বার্তার থেকে ভিন্ন, সিস্টেম প্রম্পটগুলো:
- এলএলএম-এর ভূমিকা ও ব্যক্তিত্ব প্রতিষ্ঠা করুন
- বিশেষায়িত জ্ঞান বা সক্ষমতা সংজ্ঞায়িত করুন।
- ফরম্যাটিং নির্দেশাবলী প্রদান করুন
- প্রতিক্রিয়ার উপর সীমাবদ্ধতা আরোপ করুন
- বিভিন্ন পরিস্থিতি কীভাবে সামাল দিতে হয় তা বর্ণনা করুন।
সিস্টেম প্রম্পটকে এলএলএম-কে তার 'কাজের বিবরণ' দেওয়ার মতো করে ভাবুন — এটি মডেলকে বলে দেয় যে কথোপকথন জুড়ে তাকে কীভাবে আচরণ করতে হবে।
সিস্টেম প্রম্পট কেন গুরুত্বপূর্ণ
সামঞ্জস্যপূর্ণ ও কার্যকর এলএলএম মিথস্ক্রিয়া তৈরির জন্য সিস্টেম প্রম্পট অত্যন্ত গুরুত্বপূর্ণ, কারণ এগুলো:
- সামঞ্জস্য নিশ্চিত করুন : মডেলটিকে একটি সামঞ্জস্যপূর্ণ বিন্যাসে প্রতিক্রিয়া জানাতে নির্দেশনা দিন।
- প্রাসঙ্গিকতা উন্নত করুন : মডেলটিকে আপনার নির্দিষ্ট ডোমেনের (আপনার ক্ষেত্রে, রঙ) উপর কেন্দ্রীভূত করুন।
- সীমা নির্ধারণ করুন : মডেলটি কী করবে এবং কী করবে না তা সংজ্ঞায়িত করুন।
- ব্যবহারকারীর অভিজ্ঞতা উন্নত করুন : আরও স্বাভাবিক ও সহায়ক ইন্টারঅ্যাকশন প্যাটার্ন তৈরি করুন
- পরবর্তী প্রক্রিয়াকরণ হ্রাস করুন : এমন বিন্যাসে প্রতিক্রিয়া পান যা বিশ্লেষণ বা প্রদর্শন করা সহজ।
আপনার কালারিস্ট অ্যাপের জন্য, রঙের বিবরণ ধারাবাহিকভাবে ব্যাখ্যা করতে এবং একটি নির্দিষ্ট ফরম্যাটে RGB মান প্রদান করতে LLM-এর প্রয়োজন।
একটি সিস্টেম প্রম্পট অ্যাসেট তৈরি করুন
প্রথমে, আপনাকে একটি সিস্টেম প্রম্পট ফাইল তৈরি করতে হবে যা রানটাইমে লোড হবে। এই পদ্ধতিটি আপনাকে আপনার অ্যাপটি পুনরায় কম্পাইল না করেই প্রম্পটটি পরিবর্তন করার সুযোগ দেয়।
নিম্নলিখিত বিষয়বস্তু সহ assets/system_prompt.md একটি নতুন ফাইল তৈরি করুন:
assets/system_prompt.md
# Colorist System Prompt
You are a color expert assistant integrated into a desktop app called Colorist. Your job is to interpret natural language color descriptions and provide the appropriate RGB values that best represent that description.
## Your Capabilities
You are knowledgeable about colors, color theory, and how to translate natural language descriptions into specific RGB values. When users describe a color, you should:
1. Analyze their description to understand the color they are trying to convey
2. Determine the appropriate RGB values (values should be between 0.0 and 1.0)
3. Respond with a conversational explanation and explicitly state the RGB values
## How to Respond to User Inputs
When users describe a color:
1. First, acknowledge their color description with a brief, friendly response
2. Interpret what RGB values would best represent that color description
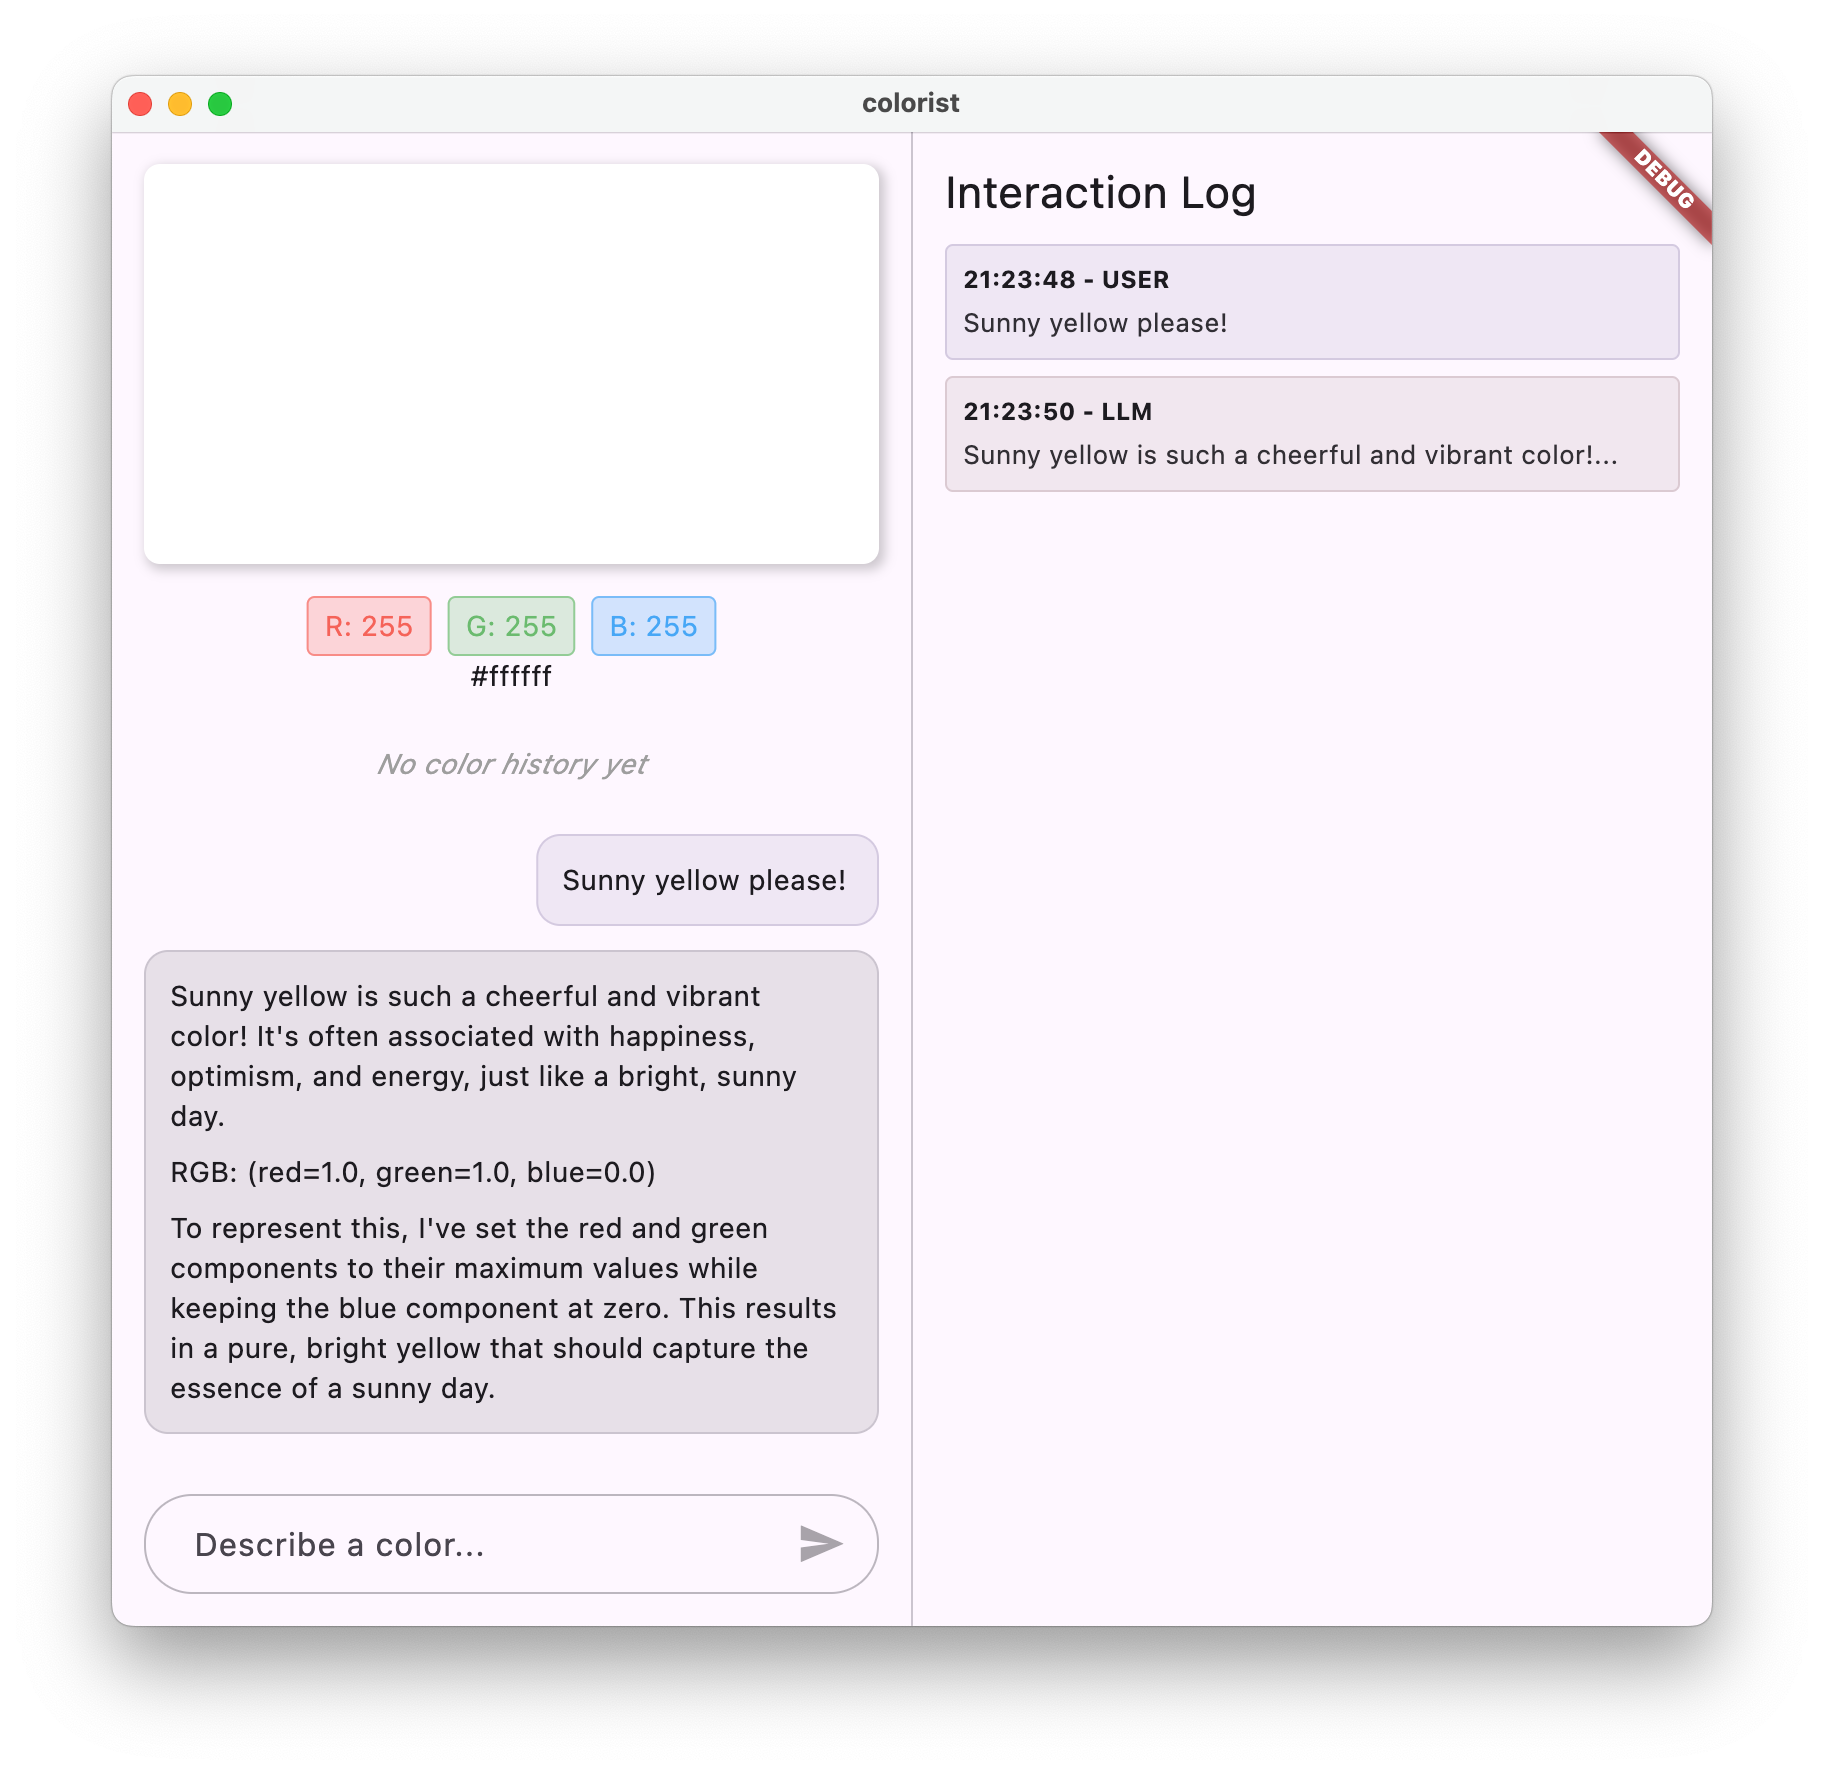
3. Always include the RGB values clearly in your response, formatted as: `RGB: (red=X.X, green=X.X, blue=X.X)`
4. Provide a brief explanation of your interpretation
Example:
User: "I want a sunset orange"
You: "Sunset orange is a warm, vibrant color that captures the golden-red hues of the setting sun. It combines a strong red component with moderate orange tones.
RGB: (red=1.0, green=0.5, blue=0.25)
I've selected values with high red, moderate green, and low blue to capture that beautiful sunset glow. This creates a warm orange with a slightly reddish tint, reminiscent of the sun low on the horizon."
## When Descriptions are Unclear
If a color description is ambiguous or unclear, please ask the user clarifying questions, one at a time.
## Important Guidelines
- Always keep RGB values between 0.0 and 1.0
- Always format RGB values as: `RGB: (red=X.X, green=X.X, blue=X.X)` for easy parsing
- Provide thoughtful, knowledgeable responses about colors
- When possible, include color psychology, associations, or interesting facts about colors
- Be conversational and engaging in your responses
- Focus on being helpful and accurate with your color interpretations
সিস্টেম প্রম্পট কাঠামো বোঝা
চলুন বিশ্লেষণ করা যাক এই প্রম্পটটি কী করে:
- ভূমিকার সংজ্ঞা : এলএলএম-কে 'রঙ বিশেষজ্ঞ সহকারী' হিসেবে প্রতিষ্ঠা করে।
- কাজের বিবরণ : রঙের বিবরণকে RGB মানে রূপান্তর করাই হলো প্রধান কাজ।
- প্রতিক্রিয়া বিন্যাস : সামঞ্জস্য রক্ষার জন্য RGB মানগুলি ঠিক কীভাবে বিন্যাস করা উচিত তা নির্দিষ্ট করে।
- উদাহরণ বিনিময় : প্রত্যাশিত মিথস্ক্রিয়ার ধরনের একটি সুনির্দিষ্ট উদাহরণ প্রদান করে
- প্রান্তিক পরিস্থিতি পরিচালনা : অস্পষ্ট বিবরণ কীভাবে পরিচালনা করতে হবে তার নির্দেশনা দেয়।
- সীমাবদ্ধতা ও নির্দেশিকা : RGB মান 0.0 এবং 1.0-এর মধ্যে রাখার মতো সীমা নির্ধারণ করে।
এই কাঠামোগত পদ্ধতিটি নিশ্চিত করে যে LLM-এর প্রতিক্রিয়াগুলি সামঞ্জস্যপূর্ণ, তথ্যপূর্ণ এবং এমনভাবে বিন্যস্ত হবে, যাতে আপনি প্রোগ্রামগতভাবে RGB মানগুলি বের করতে চাইলে তা সহজে বিশ্লেষণ করতে পারেন।
pubspec.yaml আপডেট করুন
এখন, আপনার pubspec.yaml নিচের অংশটি আপডেট করে assets ডিরেক্টরিটি অন্তর্ভুক্ত করুন:
pubspec.yaml
flutter:
  uses-material-design: true

  assets:
    - assets/
অ্যাসেট বান্ডেল রিফ্রেশ করতে flutter pub get চালান।
একটি সিস্টেম প্রম্পট প্রদানকারী তৈরি করুন
সিস্টেম প্রম্পট লোড করার জন্য lib/providers/system_prompt.dart একটি নতুন ফাইল তৈরি করুন:
lib/providers/system_prompt.dart
import 'package:flutter/services.dart';
import 'package:riverpod_annotation/riverpod_annotation.dart';

part 'system_prompt.g.dart';

@Riverpod(keepAlive: true)
Future<String> systemPrompt(Ref ref) =>
    rootBundle.loadString('assets/system_prompt.md');
এই প্রোভাইডারটি রানটাইমে প্রম্পট ফাইলটি পড়ার জন্য ফ্লাটারের অ্যাসেট লোডিং সিস্টেম ব্যবহার করে।
জেমিনি মডেল সরবরাহকারীকে আপডেট করুন
এখন আপনার lib/providers/gemini.dart ফাইলটি পরিবর্তন করে সিস্টেম প্রম্পট অন্তর্ভুক্ত করুন:
lib/providers/gemini.dart
import 'dart:async';

import 'package:firebase_ai/firebase_ai.dart';
import 'package:firebase_core/firebase_core.dart';
import 'package:riverpod_annotation/riverpod_annotation.dart';

import '../firebase_options.dart';
import 'system_prompt.dart';                                          // Add this import

part 'gemini.g.dart';

@Riverpod(keepAlive: true)
Future<FirebaseApp> firebaseApp(Ref ref) =>
    Firebase.initializeApp(options: DefaultFirebaseOptions.currentPlatform);

@Riverpod(keepAlive: true)
Future<GenerativeModel> geminiModel(Ref ref) async {
  await ref.watch(firebaseAppProvider.future);
  final systemPrompt = await ref.watch(systemPromptProvider.future);  // Add this line

  final model = FirebaseAI.googleAI().generativeModel(
    model: 'gemini-3.1-flash-lite',
    systemInstruction: Content.system(systemPrompt),                  // And this line
  );
  return model;
}

@Riverpod(keepAlive: true)
Future<ChatSession> chatSession(Ref ref) async {
  final model = await ref.watch(geminiModelProvider.future);
  return model.startChat();
}
মূল পরিবর্তনটি হলো জেনারেটিভ মডেল তৈরি করার সময় systemInstruction: Content.system(systemPrompt) যোগ করা। এটি জেমিনিকে বলে দেয় যে এই চ্যাট সেশনের সমস্ত ইন্টারঅ্যাকশনের জন্য আপনার নির্দেশাবলীকে সিস্টেম প্রম্পট হিসেবে ব্যবহার করতে হবে।
রিভারপড কোড তৈরি করুন
প্রয়োজনীয় রিভারপড কোড তৈরি করতে বিল্ড রানার কমান্ডটি চালান:
dart run build_runner build --delete-conflicting-outputs
অ্যাপ্লিকেশনটি চালান এবং পরীক্ষা করুন।
এখন আপনার অ্যাপ্লিকেশনটি চালান:
flutter run -d DEVICE
বিভিন্ন রঙের বিবরণ দিয়ে এটি পরীক্ষা করে দেখুন:
- আমি আকাশী নীল রঙ চাই।
- আমাকে গাঢ় সবুজ রঙ দাও।
- একটি উজ্জ্বল সূর্যাস্তের কমলা রঙ তৈরি করুন।
- আমি তাজা ল্যাভেন্ডারের মতো রঙ চাই।
- আমাকে গভীর সমুদ্রের নীলের মতো কিছু দেখাও।
আপনি লক্ষ্য করবেন যে, জেমিনি এখন রংগুলো সম্পর্কে কথোপকথনমূলক ব্যাখ্যার পাশাপাশি সামঞ্জস্যপূর্ণভাবে বিন্যস্ত RGB মানও প্রদান করে। সিস্টেম প্রম্পটটি কার্যকরভাবে LLM-কে আপনার প্রয়োজনীয় প্রতিক্রিয়াগুলো প্রদান করতে পরিচালিত করেছে।
এছাড়াও রঙের প্রসঙ্গের বাইরে অন্য কোনো বিষয়বস্তু সম্পর্কে জিজ্ঞাসা করে দেখুন। যেমন, ‘ওয়ার্স অফ দ্য রোজেস’-এর প্রধান কারণগুলো। আপনি আগের ধাপ থেকে একটি পার্থক্য লক্ষ্য করবেন।
বিশেষায়িত কাজের জন্য দ্রুত প্রকৌশলের গুরুত্ব
সিস্টেম প্রম্পট হলো একাধারে শিল্প ও বিজ্ঞান। এগুলো এলএলএম ইন্টিগ্রেশনের একটি অত্যন্ত গুরুত্বপূর্ণ অংশ, যা আপনার নির্দিষ্ট অ্যাপ্লিকেশনের জন্য মডেলটি কতটা উপযোগী হবে, তা ব্যাপকভাবে প্রভাবিত করতে পারে। আপনি এখানে যা করেছেন তা হলো এক ধরনের প্রম্পট ইঞ্জিনিয়ারিং—অর্থাৎ, আপনার অ্যাপ্লিকেশনের প্রয়োজন অনুসারে মডেলটিকে কাজ করানোর জন্য নির্দেশাবলীকে বিশেষভাবে তৈরি করা।
কার্যকরী প্রম্পট ইঞ্জিনিয়ারিংয়ের সাথে জড়িত বিষয়গুলো হলো:
- ভূমিকার সুস্পষ্ট সংজ্ঞা : এলএলএম-এর উদ্দেশ্য কী তা প্রতিষ্ঠা করা
- সুস্পষ্ট নির্দেশাবলী : এলএলএম ঠিক কীভাবে প্রতিক্রিয়া জানাবে তার বিশদ বিবরণ।
- বাস্তব উদাহরণ : ভালো প্রতিক্রিয়াগুলো কেমন হয় তা শুধু বলার পরিবর্তে দেখানো
- প্রান্তিক পরিস্থিতি পরিচালনা : অস্পষ্ট পরিস্থিতি কীভাবে মোকাবেলা করতে হবে সে বিষয়ে এলএলএম-কে নির্দেশনা প্রদান।
- বিন্যাস সংক্রান্ত নির্দেশাবলী : উত্তরগুলো যেন সামঞ্জস্যপূর্ণ ও ব্যবহারযোগ্যভাবে বিন্যস্ত থাকে তা নিশ্চিত করা।
আপনার তৈরি করা সিস্টেম প্রম্পটটি জেমিনির সাধারণ ক্ষমতাগুলোকে একটি বিশেষায়িত রঙ ব্যাখ্যা সহায়কে রূপান্তরিত করে, যা আপনার অ্যাপ্লিকেশনের প্রয়োজন অনুসারে বিশেষভাবে বিন্যস্ত প্রতিক্রিয়া প্রদান করে। এটি একটি শক্তিশালী প্যাটার্ন যা আপনি বিভিন্ন ক্ষেত্র ও কাজে প্রয়োগ করতে পারেন।
এরপর কী?
পরবর্তী ধাপে, আপনি ফাংশন ডিক্লারেশন যোগ করে এই ভিত্তির ওপর কাজ করবেন, যা LLM-কে শুধু RGB ভ্যালু সাজেস্ট করতেই নয়, বরং সরাসরি রঙ সেট করার জন্য আপনার অ্যাপের ফাংশন কল করতেও সক্ষম করে। এটি দেখায় যে কীভাবে LLM স্বাভাবিক ভাষা এবং অ্যাপ্লিকেশনের সুনির্দিষ্ট ফিচারের মধ্যেকার ব্যবধান কমিয়ে আনতে পারে।
সমস্যা সমাধান
অ্যাসেট লোডিং সমস্যা
সিস্টেম প্রম্পট লোড করতে ত্রুটি দেখা দিলে:
- আপনার
pubspec.yamlঅ্যাসেটস ডিরেক্টরি সঠিকভাবে তালিকাভুক্ত আছে কিনা তা যাচাই করুন। -
rootBundle.loadString()-এর পাথটি আপনার ফাইলের অবস্থানের সাথে মেলে কিনা তা যাচাই করুন। - অ্যাসেট বান্ডেল রিফ্রেশ করতে প্রথমে
flutter cleanএবং তারপরflutter pub getচালান।
অসামঞ্জস্যপূর্ণ প্রতিক্রিয়া
যদি এলএলএম আপনার ফরম্যাট নির্দেশাবলী ধারাবাহিকভাবে অনুসরণ না করে:
- সিস্টেম প্রম্পটে ফরম্যাটের প্রয়োজনীয়তাগুলো আরও সুস্পষ্ট করার চেষ্টা করুন।
- প্রত্যাশিত প্যাটার্নটি দেখানোর জন্য আরও উদাহরণ যোগ করুন।
- আপনি যে ফরম্যাটটি অনুরোধ করছেন তা যেন মডেলটির জন্য উপযুক্ত হয়, তা নিশ্চিত করুন।
এপিআই রেট লিমিটিং
যদি আপনি রেট লিমিটিং সম্পর্কিত ত্রুটির সম্মুখীন হন:
- মনে রাখবেন যে Firebase AI Logic পরিষেবা ব্যবহারের সীমাবদ্ধতা রয়েছে।
- এক্সপোনেনশিয়াল ব্যাকঅফ সহ রিট্রাই লজিক প্রয়োগ করার কথা বিবেচনা করুন।
- কোটা সংক্রান্ত কোনো সমস্যা আছে কিনা তা জানতে আপনার ফায়ারবেস কনসোল চেক করুন।
শেখা মূল ধারণাগুলো
- এলএলএম আবেদনপত্রে সিস্টেম প্রম্পটের ভূমিকা ও গুরুত্ব বোঝা
- স্পষ্ট নির্দেশনা, উদাহরণ এবং সীমাবদ্ধতা সহ কার্যকর প্রম্পট তৈরি করা
- ফ্লাটার অ্যাপ্লিকেশনে সিস্টেম প্রম্পট লোড এবং ব্যবহার করা
- ডোমেন-নির্দিষ্ট কাজের জন্য এলএলএম আচরণকে নির্দেশিত করা
- এলএলএম প্রতিক্রিয়াগুলিকে আকার দিতে প্রম্পট ইঞ্জিনিয়ারিং ব্যবহার করা
এই ধাপে দেখানো হয়েছে কিভাবে আপনি আপনার কোড পরিবর্তন না করেই, শুধুমাত্র সিস্টেম প্রম্পটে স্পষ্ট নির্দেশনা প্রদানের মাধ্যমে LLM-এর আচরণে উল্লেখযোগ্য কাস্টমাইজেশন করতে পারেন।
৫. এলএলএম টুলগুলির জন্য ফাংশন ঘোষণা
এই ধাপে, আপনি ফাংশন ডিক্লারেশন প্রয়োগ করার মাধ্যমে আপনার অ্যাপে জেমিনিকে সক্রিয় করার কাজ শুরু করবেন। এই শক্তিশালী বৈশিষ্ট্যটি এলএলএম-কে শুধু আরজিবি মান প্রস্তাব করতেই নয়, বরং বিশেষ টুল কলের মাধ্যমে আপনার অ্যাপের ইউআই-তে তা সেট করতেও সক্ষম করে। তবে, ফ্লাটার অ্যাপে এলএলএম অনুরোধগুলো কার্যকর হতে দেখার জন্য পরবর্তী ধাপটির প্রয়োজন হবে।
এই ধাপে আপনি যা শিখবেন
- ফ্লাটার অ্যাপ্লিকেশনের জন্য LLM ফাংশন কলিং এবং এর সুবিধাগুলো বোঝা
- জেমিনির জন্য স্কিমা-ভিত্তিক ফাংশন ঘোষণা সংজ্ঞায়িত করা
- আপনার জেমিনি মডেলের সাথে ফাংশন ডিক্লারেশন একীভূত করা
- টুলের সক্ষমতা ব্যবহার করার জন্য সিস্টেম প্রম্পট আপডেট করা হচ্ছে।
ফাংশন কলিং বোঝা
ফাংশন ডিক্লারেশন প্রয়োগ করার আগে, চলুন জেনে নিই এগুলো কী এবং কেন এগুলো মূল্যবান:
ফাংশন কলিং বলতে কী বোঝায়?
ফাংশন কলিং (কখনও কখনও "টুল ব্যবহার" বলা হয়) এমন একটি সক্ষমতা যা একজন এলএলএম-কে নিম্নলিখিত কাজগুলো করতে দেয়:
- কখন কোনো ব্যবহারকারীর অনুরোধ একটি নির্দিষ্ট ফাংশন আহ্বান করার মাধ্যমে উপকৃত হবে তা শনাক্ত করুন।
- ঐ ফাংশনের জন্য প্রয়োজনীয় প্যারামিটারগুলো দিয়ে একটি স্ট্রাকচার্ড JSON অবজেক্ট তৈরি করুন।
- আপনার অ্যাপ্লিকেশনটিকে ওই প্যারামিটারগুলো দিয়ে ফাংশনটি সম্পাদন করতে দিন।
- ফাংশনের ফলাফল গ্রহণ করুন এবং এটিকে এর প্রতিক্রিয়ার সাথে অন্তর্ভুক্ত করুন।
এলএলএম শুধু কী করতে হবে তা বর্ণনা করার পরিবর্তে, ফাংশন কলিং আপনার অ্যাপ্লিকেশনে সুনির্দিষ্ট পদক্ষেপ গ্রহণ করার ক্ষমতা দেয়।
ফ্লাটার অ্যাপের জন্য ফাংশন কলিং কেন গুরুত্বপূর্ণ
ফাংশন কলিং স্বাভাবিক ভাষা এবং অ্যাপ্লিকেশন বৈশিষ্ট্যগুলির মধ্যে একটি শক্তিশালী সংযোগ স্থাপন করে:
- সরাসরি পদক্ষেপ : ব্যবহারকারীরা স্বাভাবিক ভাষায় তাদের চাহিদা বর্ণনা করতে পারেন এবং অ্যাপটি সুনির্দিষ্ট পদক্ষেপের মাধ্যমে সাড়া দেয়।
- কাঠামোগত আউটপুট : এলএলএম এমন টেক্সটের পরিবর্তে পরিচ্ছন্ন ও কাঠামোগত ডেটা তৈরি করে, যেগুলোর পার্সিং প্রয়োজন হয়।
- জটিল কার্যক্রম : LLM-কে বাহ্যিক ডেটা অ্যাক্সেস করতে, গণনা সম্পাদন করতে, বা অ্যাপ্লিকেশনের অবস্থা পরিবর্তন করতে সক্ষম করে।
- উন্নত ব্যবহারকারীর অভিজ্ঞতা : কথোপকথন এবং কার্যকারিতার মধ্যে নির্বিঘ্ন সমন্বয় তৈরি করে
আপনার কালারিস্ট অ্যাপে, ফাংশন কলিংয়ের মাধ্যমে ব্যবহারকারীরা "আমি একটি ফরেস্ট গ্রিন চাই" বললেই, টেক্সট থেকে RGB ভ্যালু পার্স না করেই UI তাৎক্ষণিকভাবে সেই রঙে আপডেট হয়ে যায়।
ফাংশন ঘোষণা সংজ্ঞায়িত করুন
আপনার ফাংশন ডিক্লারেশনগুলো সংজ্ঞায়িত করতে lib/services/gemini_tools.dart একটি নতুন ফাইল তৈরি করুন:
lib/services/gemini_tools.dart
import 'package:firebase_ai/firebase_ai.dart';
import 'package:riverpod_annotation/riverpod_annotation.dart';

part 'gemini_tools.g.dart';

class GeminiTools {
  GeminiTools(this.ref);

  final Ref ref;

  FunctionDeclaration get setColorFuncDecl => FunctionDeclaration(
    'set_color',
    'Set the color of the display square based on red, green, and blue values.',
    parameters: {
      'red': Schema.number(description: 'Red component value (0.0 - 1.0)'),
      'green': Schema.number(description: 'Green component value (0.0 - 1.0)'),
      'blue': Schema.number(description: 'Blue component value (0.0 - 1.0)'),
    },
  );

  List<Tool> get tools => [
    Tool.functionDeclarations([setColorFuncDecl]),
  ];
}

@Riverpod(keepAlive: true)
GeminiTools geminiTools(Ref ref) => GeminiTools(ref);
ফাংশন ঘোষণা বোঝা
চলুন এই কোডটি কী করে তা বিশ্লেষণ করা যাক:
- ফাংশনের নামকরণ : এর উদ্দেশ্য স্পষ্টভাবে বোঝানোর জন্য আপনার ফাংশনের নাম
set_colorরাখুন। - কার্যাবলীর বিবরণ : আপনি একটি সুস্পষ্ট বিবরণ প্রদান করবেন যা এলএলএম-কে বুঝতে সাহায্য করবে কখন এটি ব্যবহার করতে হবে।
- প্যারামিটার সংজ্ঞা : আপনি নিজস্ব বিবরণ সহ কাঠামোগত প্যারামিটার নির্ধারণ করেন:
-
red: RGB-এর লাল উপাদান, যা 0.0 এবং 1.0-এর মধ্যে একটি সংখ্যা হিসাবে নির্দিষ্ট করা হয়। -
green: RGB-এর সবুজ উপাদান, যা 0.0 এবং 1.0-এর মধ্যে একটি সংখ্যা হিসাবে নির্দিষ্ট করা হয়। -
blue: RGB-এর নীল উপাদান, যা 0.0 এবং 1.0-এর মধ্যে একটি সংখ্যা হিসাবে নির্দিষ্ট করা হয়।
-
- স্কিমা প্রকারভেদ : এগুলি যে সাংখ্যিক মান, তা বোঝাতে আপনি
Schema.number()ব্যবহার করেন। - টুলস সংগ্রহ : আপনি আপনার ফাংশন ঘোষণা সম্বলিত টুলসের একটি তালিকা তৈরি করেন।
এই কাঠামোগত পদ্ধতি জেমিনি এলএলএম-কে বুঝতে সাহায্য করে:
- কখন এই ফাংশনটি কল করা উচিত
- এটিকে কী কী প্যারামিটার সরবরাহ করতে হবে
- সেই প্যারামিটারগুলোর ক্ষেত্রে কী কী সীমাবদ্ধতা প্রযোজ্য (যেমন মানের পরিসর)?
জেমিনি মডেল সরবরাহকারীকে আপডেট করুন
এখন, জেমিনি মডেল ইনিশিয়ালাইজ করার সময় ফাংশন ডিক্লারেশনগুলো অন্তর্ভুক্ত করতে আপনার lib/providers/gemini.dart ফাইলটি পরিবর্তন করুন:
lib/providers/gemini.dart
import 'dart:async';

import 'package:firebase_ai/firebase_ai.dart';
import 'package:firebase_core/firebase_core.dart';
import 'package:riverpod_annotation/riverpod_annotation.dart';

import '../firebase_options.dart';
import '../services/gemini_tools.dart';                              // Add this import
import 'system_prompt.dart';

part 'gemini.g.dart';

@Riverpod(keepAlive: true)
Future<FirebaseApp> firebaseApp(Ref ref) =>
    Firebase.initializeApp(options: DefaultFirebaseOptions.currentPlatform);

@Riverpod(keepAlive: true)
Future<GenerativeModel> geminiModel(Ref ref) async {
  await ref.watch(firebaseAppProvider.future);
  final systemPrompt = await ref.watch(systemPromptProvider.future);
  final geminiTools = ref.watch(geminiToolsProvider);                // Add this line

  final model = FirebaseAI.googleAI().generativeModel(
    model: 'gemini-3.1-flash-lite',
    systemInstruction: Content.system(systemPrompt),
    tools: geminiTools.tools,                                        // And this line
  );
  return model;
}

@Riverpod(keepAlive: true)
Future<ChatSession> chatSession(Ref ref) async {
  final model = await ref.watch(geminiModelProvider.future);
  return model.startChat();
}
মূল পরিবর্তনটি হলো জেনারেটিভ মডেল তৈরি করার সময় tools: geminiTools.tools প্যারামিটারটি যোগ করা। এর ফলে, জেমিনি জানতে পারে যে কোন কোন ফাংশন কল করার জন্য উপলব্ধ আছে।
সিস্টেম প্রম্পট আপডেট করুন
এখন আপনাকে নতুন set_color টুলটি ব্যবহার করার জন্য LLM-কে নির্দেশ দিতে আপনার সিস্টেম প্রম্পট পরিবর্তন করতে হবে। assets/system_prompt.md আপডেট করুন:
assets/system_prompt.md
# Colorist System Prompt

You are a color expert assistant integrated into a desktop app called Colorist. Your job is to interpret natural language color descriptions and set the appropriate color values using a specialized tool.

## Your Capabilities

You are knowledgeable about colors, color theory, and how to translate natural language descriptions into specific RGB values. You have access to the following tool:

`set_color` - Sets the RGB values for the color display based on a description

## How to Respond to User Inputs

When users describe a color:

1. First, acknowledge their color description with a brief, friendly response
2. Interpret what RGB values would best represent that color description
3. Use the `set_color` tool to set those values (all values should be between 0.0 and 1.0)
4. After setting the color, provide a brief explanation of your interpretation

Example:
User: "I want a sunset orange"
You: "Sunset orange is a warm, vibrant color that captures the golden-red hues of the setting sun. It combines a strong red component with moderate orange tones."

[Then you would call the set_color tool with approximately: red=1.0, green=0.5, blue=0.25]

After the tool call: "I've set a warm orange with strong red, moderate green, and minimal blue components that is reminiscent of the sun low on the horizon."

## When Descriptions are Unclear

If a color description is ambiguous or unclear, please ask the user clarifying questions, one at a time.

## Important Guidelines

- Always keep RGB values between 0.0 and 1.0
- Provide thoughtful, knowledgeable responses about colors
- When possible, include color psychology, associations, or interesting facts about colors
- Be conversational and engaging in your responses
- Focus on being helpful and accurate with your color interpretations
সিস্টেম প্রম্পটের প্রধান পরিবর্তনগুলো হলো:
- টুল পরিচিতি : ফরম্যাট করা RGB মান চাওয়ার পরিবর্তে, এখন আপনি LLM-কে
set_colorটুলটি সম্পর্কে জানাবেন। - সংশোধিত প্রক্রিয়া : আপনি ধাপ ৩-কে 'প্রতিক্রিয়ায় মান ফরম্যাট করুন' থেকে 'মান নির্ধারণ করতে টুলটি ব্যবহার করুন'-এ পরিবর্তন করুন।
- সংশোধিত উদাহরণ : আপনি দেখিয়েছেন কীভাবে প্রতিক্রিয়ায় ফরম্যাট করা টেক্সটের পরিবর্তে একটি টুল কল অন্তর্ভুক্ত করা উচিত।
- ফরম্যাটিংয়ের আবশ্যকতা দূর করা হয়েছে : যেহেতু আপনি স্ট্রাকচার্ড ফাংশন কল ব্যবহার করছেন, তাই আপনার আর কোনো নির্দিষ্ট টেক্সট ফরম্যাটের প্রয়োজন নেই।
এই আপডেট করা প্রম্পটটি এলএলএম-কে শুধু টেক্সট আকারে আরজিবি মান প্রদানের পরিবর্তে ফাংশন কলিং ব্যবহার করতে নির্দেশ দেয়।
রিভারপড কোড তৈরি করুন
প্রয়োজনীয় রিভারপড কোড তৈরি করতে বিল্ড রানার কমান্ডটি চালান:
dart run build_runner build --delete-conflicting-outputs
অ্যাপ্লিকেশনটি চালান
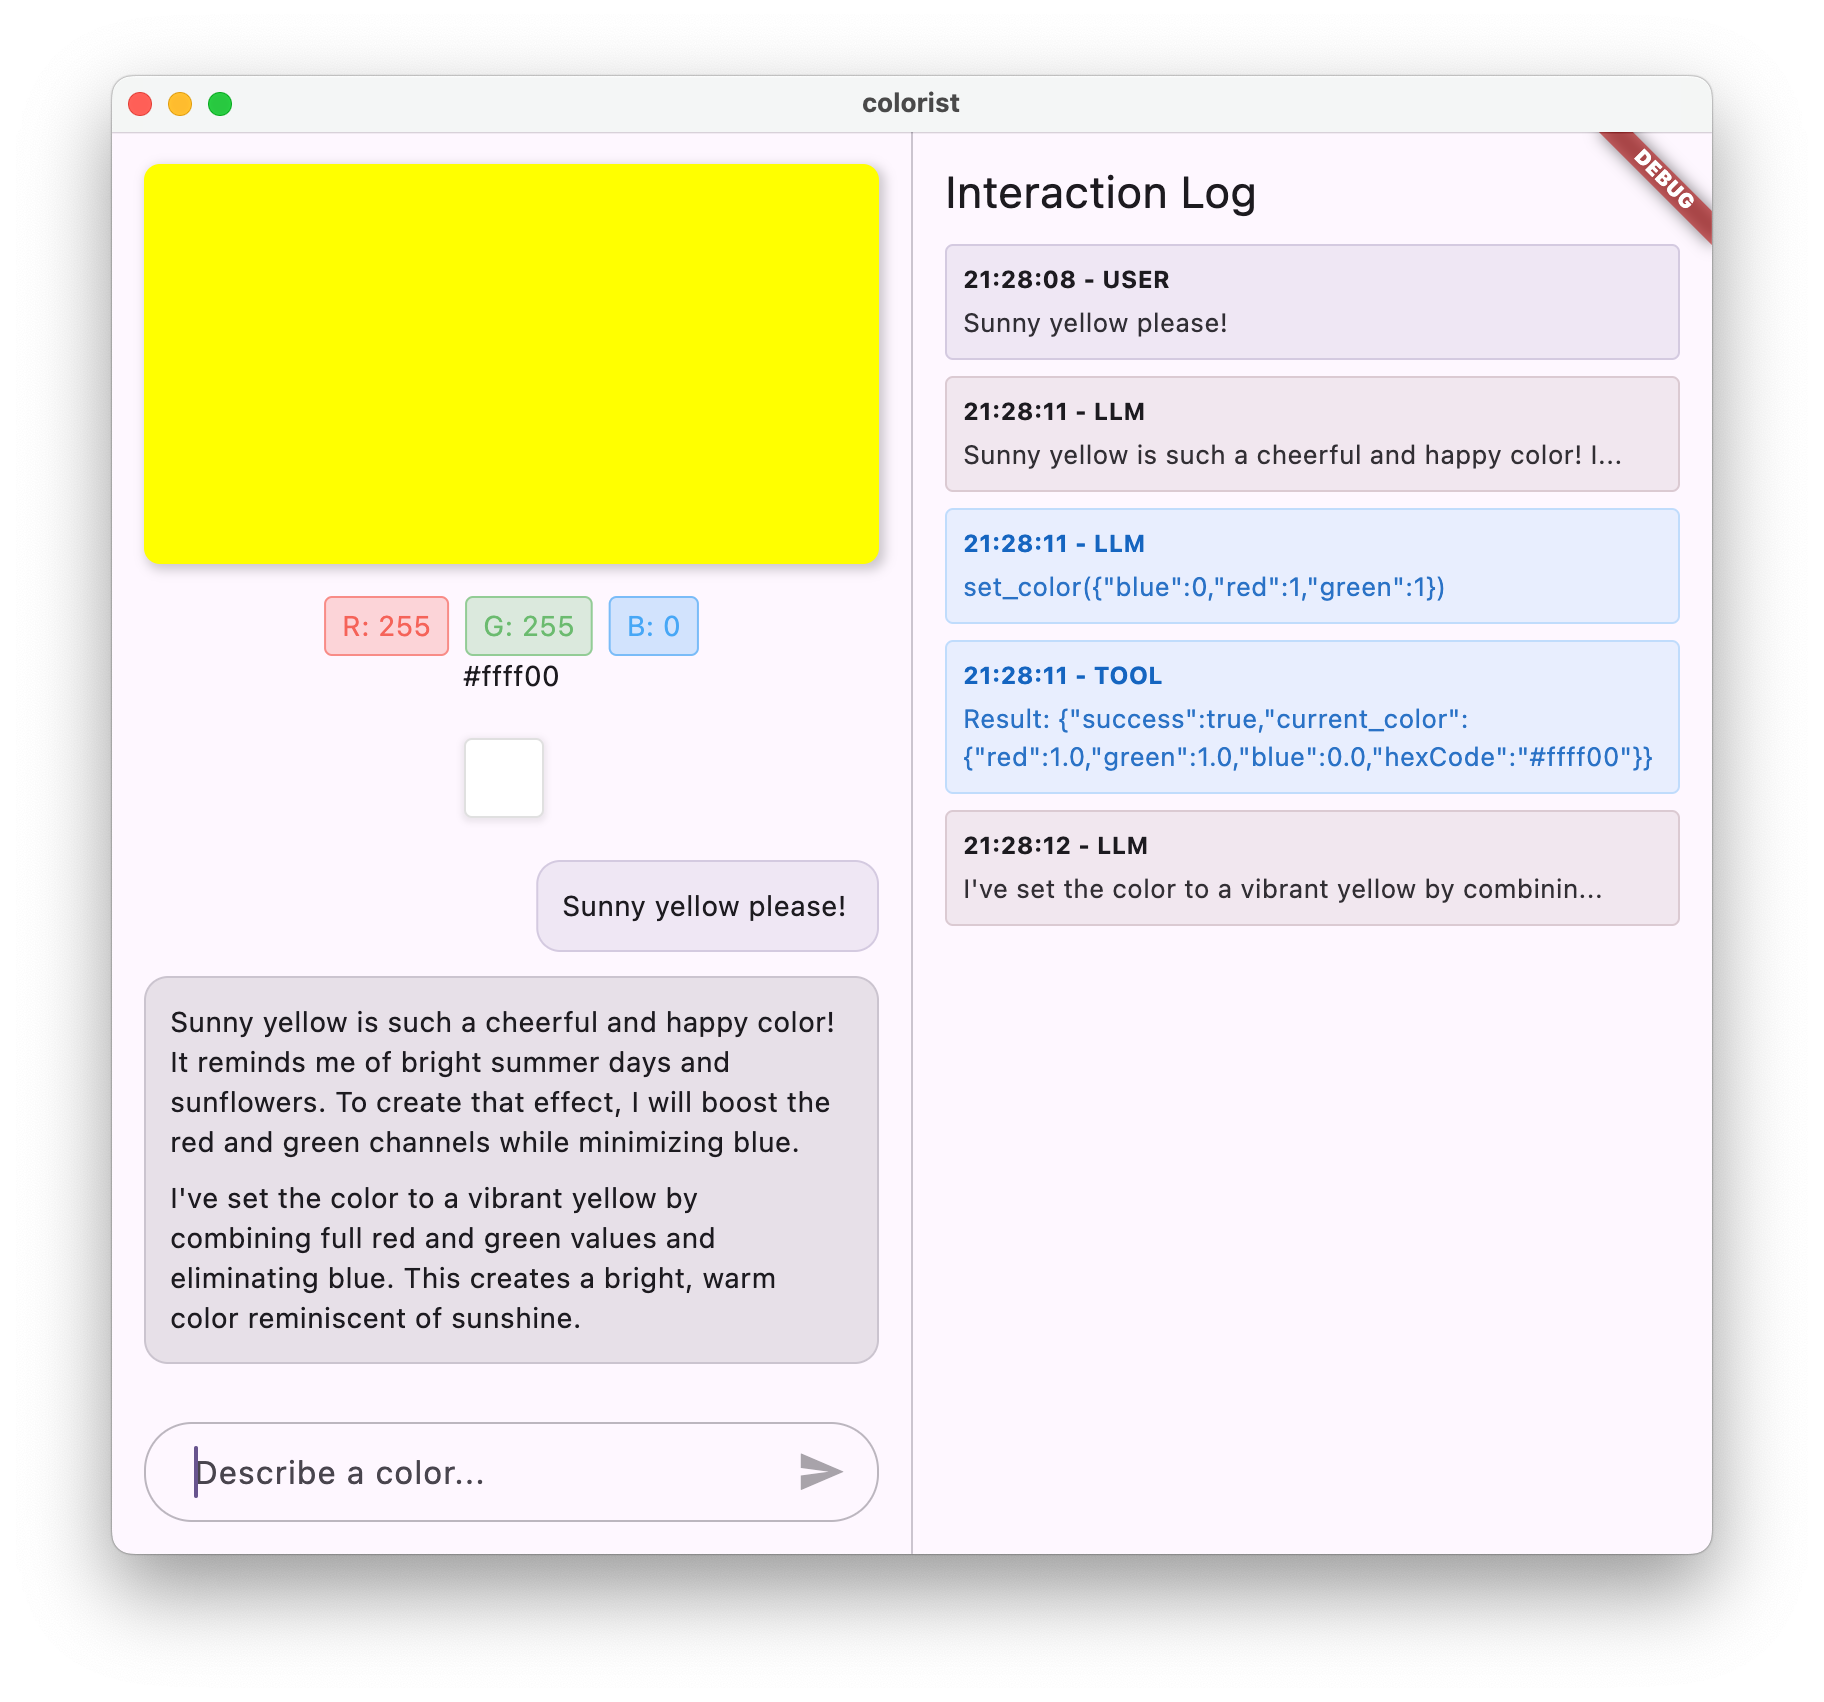
এই পর্যায়ে, জেমিনি এমন কন্টেন্ট তৈরি করবে যা ফাংশন কলিং ব্যবহার করার চেষ্টা করে, কিন্তু আপনি এখনও ফাংশন কলগুলোর জন্য হ্যান্ডলার ইমপ্লিমেন্ট করেননি। যখন আপনি অ্যাপটি রান করে কোনো রঙের বর্ণনা দেবেন, তখন দেখবেন জেমিনি এমনভাবে সাড়া দিচ্ছে যেন এটি কোনো টুল চালু করেছে, কিন্তু পরবর্তী ধাপের আগে আপনি UI-তে কোনো রঙের পরিবর্তন দেখতে পাবেন না।
আপনার অ্যাপটি চালান:
flutter run -d DEVICE
'গভীর সমুদ্রের নীল' বা 'বনের সবুজ'-এর মতো কোনো রঙের বর্ণনা দিয়ে দেখুন এবং প্রতিক্রিয়াগুলো পর্যবেক্ষণ করুন। এলএলএম (LLM) উপরে সংজ্ঞায়িত ফাংশনগুলোকে কল করার চেষ্টা করছে, কিন্তু আপনার কোড এখনও ফাংশন কলগুলো শনাক্ত করতে পারছে না।
ফাংশন কলিং প্রক্রিয়া
চলুন জেনে নেওয়া যাক, মিথুন রাশি ফাংশন কলিং ব্যবহার করলে কী ঘটে:
- ফাংশন নির্বাচন : ব্যবহারকারীর অনুরোধের ভিত্তিতে কোনো ফাংশন কল সহায়ক হবে কিনা, তা এলএলএম (LLM) সিদ্ধান্ত নেয়।
- প্যারামিটার তৈরি : এলএলএম এমন প্যারামিটার মান তৈরি করে যা ফাংশনের স্কিমার সাথে সামঞ্জস্যপূর্ণ।
- ফাংশন কল ফরম্যাট : LLM তার প্রতিক্রিয়ায় একটি স্ট্রাকচার্ড ফাংশন কল অবজেক্ট পাঠায়।
- অ্যাপ্লিকেশন হ্যান্ডলিং : আপনার অ্যাপ এই কলটি গ্রহণ করবে এবং প্রাসঙ্গিক ফাংশনটি (যা পরবর্তী ধাপে প্রয়োগ করা হয়েছে) কার্যকর করবে।
- প্রতিক্রিয়া একত্রীকরণ : একাধিক পালাবিশিষ্ট কথোপকথনে, LLM ফাংশনটির ফলাফল ফেরত পাওয়ার প্রত্যাশা করে।
আপনার অ্যাপের বর্তমান অবস্থায় প্রথম তিনটি ধাপ সম্পন্ন হচ্ছে, কিন্তু আপনি এখনো ৪ বা ৫ নম্বর ধাপটি (ফাংশন কলগুলো পরিচালনা করা) বাস্তবায়ন করেননি, যা আপনি পরবর্তী ধাপে করবেন।
প্রযুক্তিগত বিবরণ: মিথুন রাশি কীভাবে ফাংশন ব্যবহার করার সিদ্ধান্ত নেয়
মিথুন রাশি নিম্নলিখিত বিষয়গুলির উপর ভিত্তি করে কখন ফাংশন ব্যবহার করতে হবে সে সম্পর্কে বুদ্ধিদীপ্ত সিদ্ধান্ত নেয়:
- ব্যবহারকারীর অভিপ্রায় : ব্যবহারকারীর অনুরোধটি কোনো ফাংশনের মাধ্যমে সবচেয়ে ভালোভাবে পূরণ করা যাবে কিনা
- ফাংশনের প্রাসঙ্গিকতা : উপলব্ধ ফাংশনগুলো কাজের সাথে কতটা ভালোভাবে মেলে।
- প্যারামিটার প্রাপ্যতা : এটি আত্মবিশ্বাসের সাথে প্যারামিটার মান নির্ধারণ করতে পারে কিনা
- সিস্টেম নির্দেশাবলী : ফাংশন ব্যবহার সম্পর্কে আপনার সিস্টেম প্রম্পট থেকে প্রাপ্ত নির্দেশনা
সুস্পষ্ট ফাংশন ডিক্লারেশন এবং সিস্টেম নির্দেশনা প্রদানের মাধ্যমে, আপনি জেমিনিকে এমনভাবে সেট আপ করেছেন যাতে এটি রঙের বিবরণ সংক্রান্ত অনুরোধগুলোকে set_color ফাংশনটি কল করার সুযোগ হিসেবে শনাক্ত করতে পারে।
এরপর কী?
পরবর্তী ধাপে, আপনি জেমিনি থেকে আসা ফাংশন কলগুলোর জন্য হ্যান্ডলার প্রয়োগ করবেন। এর মাধ্যমে প্রক্রিয়াটি সম্পূর্ণ হবে, যা এলএলএম-এর ফাংশন কলের মাধ্যমে ব্যবহারকারীর বর্ণনাকে ইউআই-তে প্রকৃত রঙের পরিবর্তন ঘটাতে সক্ষম করবে।
সমস্যা সমাধান
ফাংশন ঘোষণার সমস্যা
ফাংশন ডিক্লারেশনে কোনো ত্রুটি দেখা দিলে:
- প্যারামিটারের নাম এবং টাইপ প্রত্যাশিত মানের সাথে মিলছে কিনা তা যাচাই করুন।
- ফাংশনের নামটি স্পষ্ট এবং বর্ণনামূলক কিনা তা যাচাই করুন।
- নিশ্চিত করুন যে ফাংশনের বিবরণটি এর উদ্দেশ্য সঠিকভাবে ব্যাখ্যা করে।
সিস্টেম প্রম্পট সমস্যা
যদি এলএলএম ফাংশনটি ব্যবহার করার চেষ্টা না করে:
- যাচাই করুন যে আপনার সিস্টেম প্রম্পট LLM-কে
set_colorটুলটি ব্যবহার করার জন্য স্পষ্টভাবে নির্দেশ দিচ্ছে। - সিস্টেম প্রম্পটে থাকা উদাহরণটি ফাংশনের ব্যবহার প্রদর্শন করে কিনা তা যাচাই করুন।
- টুলটি ব্যবহারের নির্দেশনা আরও সুস্পষ্ট করার চেষ্টা করুন।
সাধারণ বিষয়গুলি
যদি আপনি অন্য কোনো সমস্যার সম্মুখীন হন:
- ফাংশন ডিক্লারেশন সম্পর্কিত কোনো ত্রুটির জন্য কনসোল চেক করুন।
- টুলগুলো মডেলে সঠিকভাবে পাঠানো হয়েছে কিনা তা যাচাই করুন।
- রিভারপড দ্বারা তৈরি সমস্ত কোড হালনাগাদ আছে কিনা তা নিশ্চিত করুন।
শেখা মূল ধারণাগুলো
- ফ্লাটার অ্যাপে LLM-এর সক্ষমতা বাড়ানোর জন্য ফাংশন ডিক্লারেশন সংজ্ঞায়িত করা
- কাঠামোগত ডেটা সংগ্রহের জন্য প্যারামিটার স্কিমা তৈরি করা
- জেমিনি মডেলের সাথে ফাংশন ঘোষণা একীভূত করা
- সিস্টেম আপডেট করার মাধ্যমে ফাংশন ব্যবহারে উৎসাহিত করা হয়।
- এলএলএম কীভাবে ফাংশন নির্বাচন ও আহ্বান করে তা বোঝা
এই ধাপে দেখানো হয়েছে কীভাবে এলএলএম (LLM) স্বাভাবিক ভাষার ইনপুট এবং কাঠামোগত ফাংশন কলের মধ্যেকার ব্যবধান পূরণ করতে পারে, যা কথোপকথন এবং অ্যাপ্লিকেশনের বৈশিষ্ট্যগুলির মধ্যে নির্বিঘ্ন একীকরণের ভিত্তি স্থাপন করে।
৬. টুল হ্যান্ডলিং বাস্তবায়ন
এই ধাপে, আপনি জেমিনি থেকে আসা ফাংশন কলগুলোর জন্য হ্যান্ডলার প্রয়োগ করবেন। এর মাধ্যমে স্বাভাবিক ভাষার ইনপুট এবং অ্যাপ্লিকেশনের সুনির্দিষ্ট ফিচারগুলোর মধ্যে যোগাযোগের চক্রটি সম্পূর্ণ হয়, যা এলএলএম-কে ব্যবহারকারীর বর্ণনার উপর ভিত্তি করে সরাসরি আপনার ইউআই নিয়ন্ত্রণ করার সুযোগ দেয়।
এই ধাপে আপনি যা শিখবেন
- এলএলএম অ্যাপ্লিকেশনগুলিতে সম্পূর্ণ ফাংশন কলিং পাইপলাইন বোঝা
- Processing function calls from Gemini in a Flutter application
- Implementing function handlers that modify application state
- Handling function responses and returning results to the LLM
- Creating a complete communication flow between LLM and UI
- Logging function calls and responses for transparency
Understanding the function calling pipeline
Before diving into implementation, let's understand the complete function calling pipeline:
The end-to-end flow
- User input : User describes a color in natural language (eg, "forest green")
- LLM processing : Gemini analyzes the description and decides to call the
set_colorfunction - Function call generation : Gemini creates a structured JSON with parameters (red, green, blue values)
- Function call reception : Your app receives this structured data from Gemini
- Function execution : Your app executes the function with the provided parameters
- State update : The function updates your app's state (changing the displayed color)
- Response generation : Your function returns results back to the LLM
- Response incorporation : The LLM incorporates these results into its final response
- UI update : Your UI reacts to the state change, displaying the new color
The complete communication cycle is essential for proper LLM integration. When an LLM makes a function call, it doesn't simply send the request and move on. Instead, it waits for your application to execute the function and return results. The LLM then uses these results to formulate its final response, creating a natural conversation flow that acknowledges the actions taken.
Implement function handlers
Let's update your lib/services/gemini_tools.dart file to add handlers for function calls:
lib/services/gemini_tools.dart
import 'package:colorist_ui/colorist_ui.dart';
import 'package:firebase_ai/firebase_ai.dart';
import 'package:riverpod_annotation/riverpod_annotation.dart';
part 'gemini_tools.g.dart';
class GeminiTools {
GeminiTools(this.ref);
final Ref ref;
FunctionDeclaration get setColorFuncDecl => FunctionDeclaration(
'set_color',
'Set the color of the display square based on red, green, and blue values.',
parameters: {
'red': Schema.number(description: 'Red component value (0.0 - 1.0)'),
'green': Schema.number(description: 'Green component value (0.0 - 1.0)'),
'blue': Schema.number(description: 'Blue component value (0.0 - 1.0)'),
},
);
List<Tool> get tools => [
Tool.functionDeclarations([setColorFuncDecl]),
];
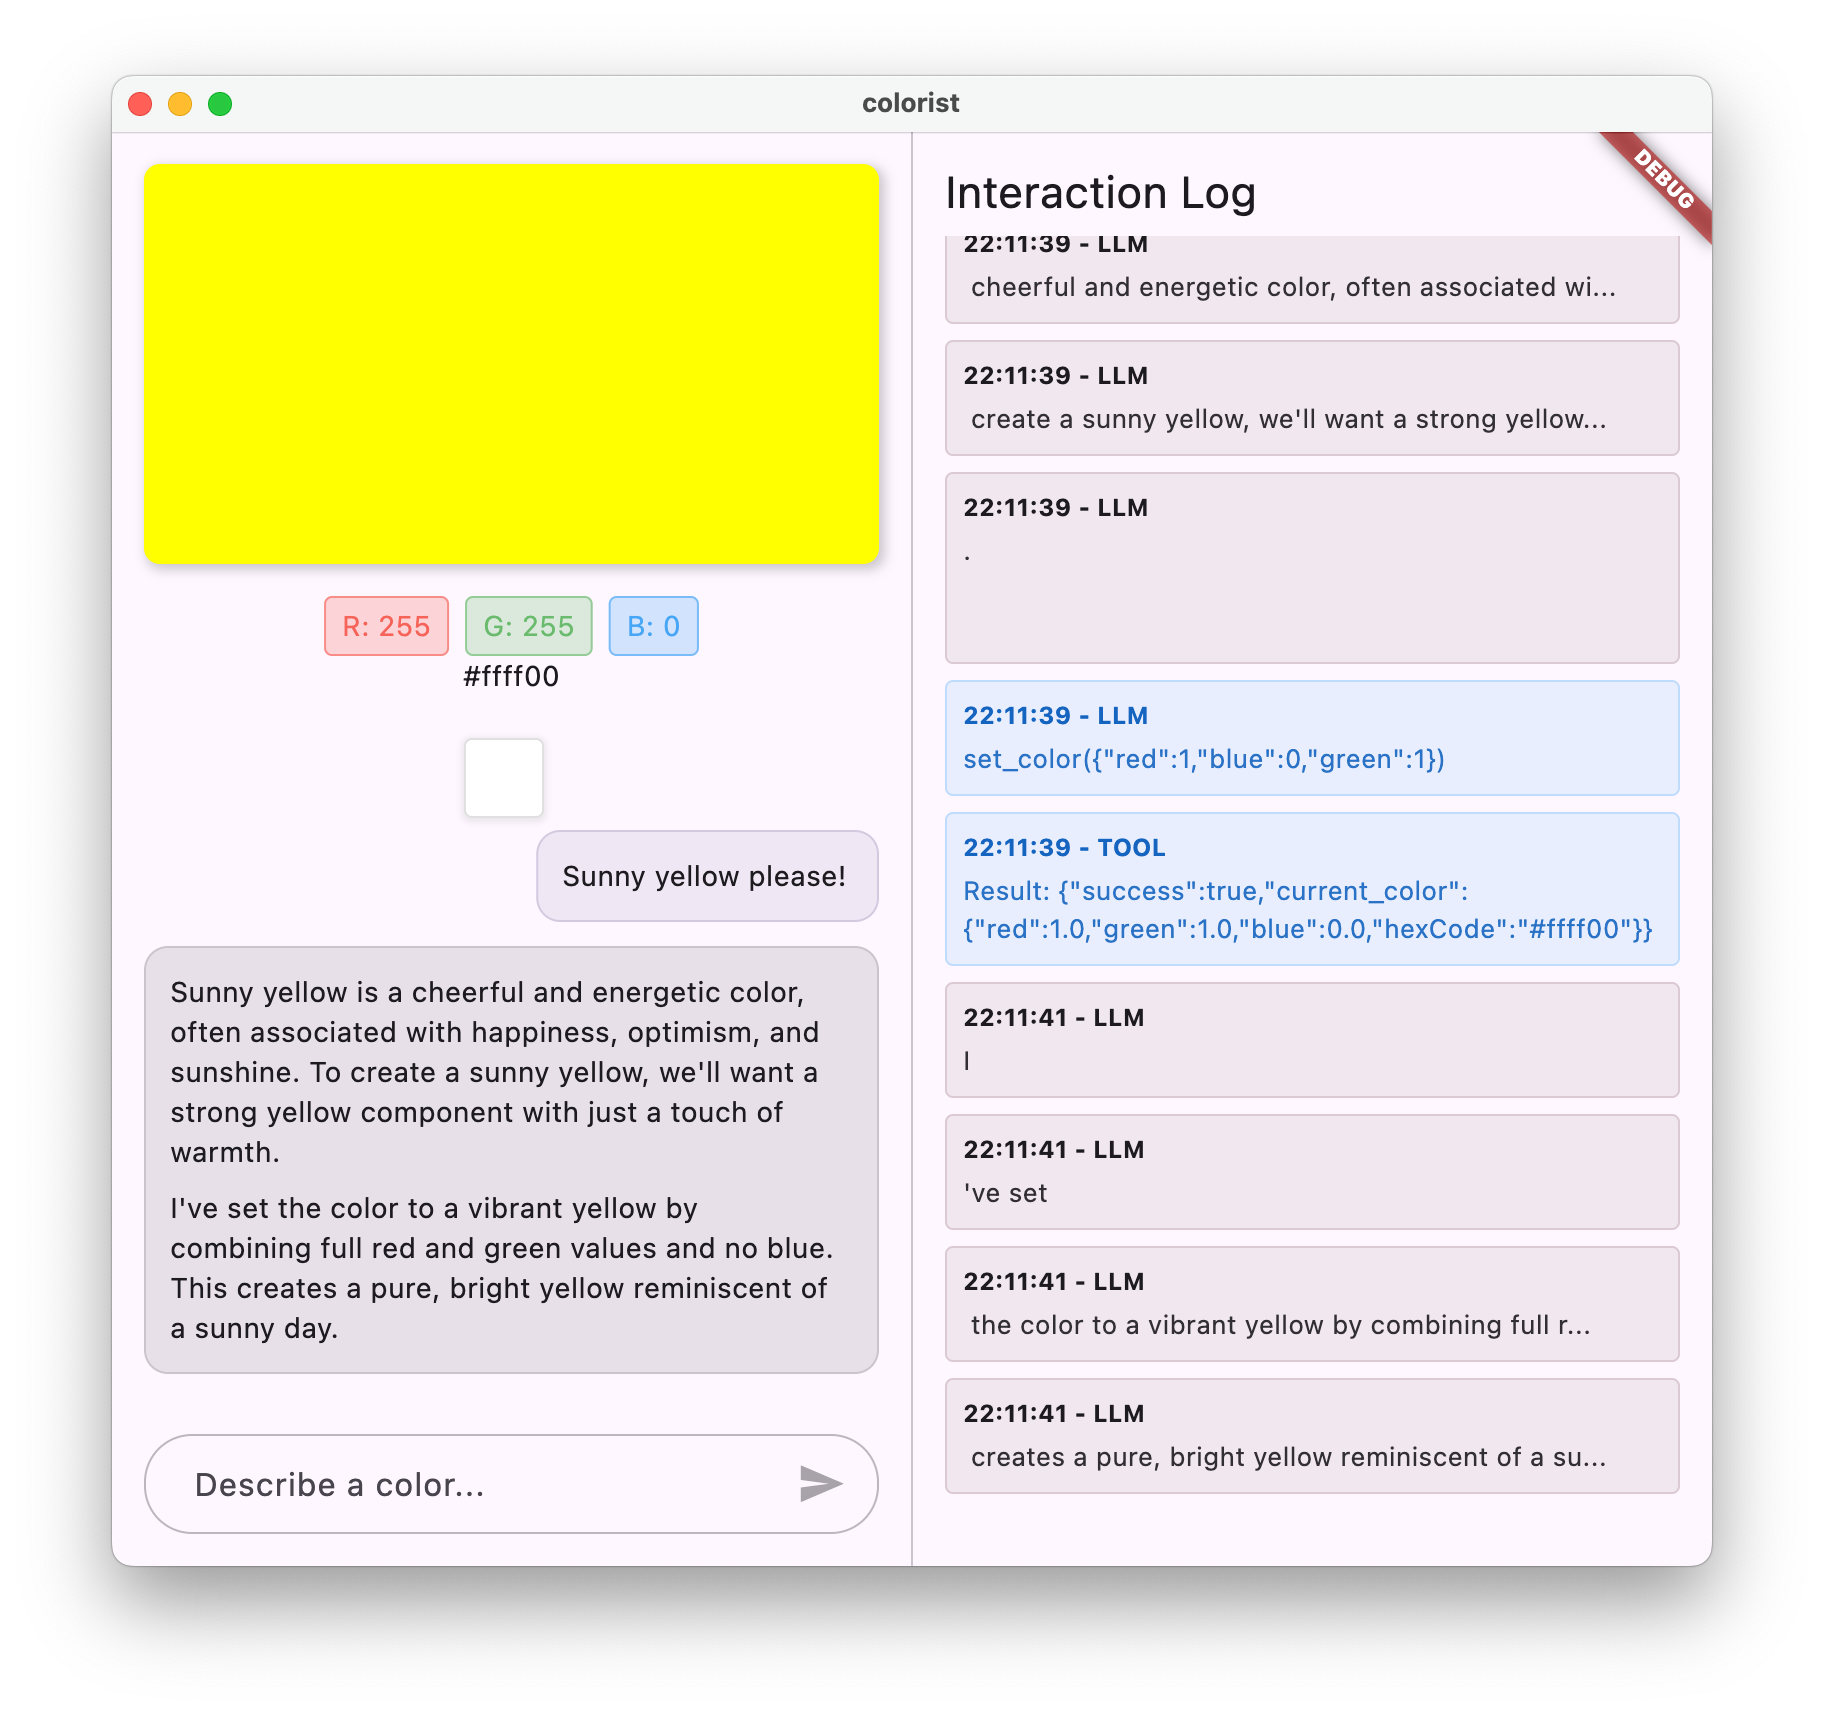
Map<String, Object?> handleFunctionCall( // Add from here
String functionName,
Map<String, Object?> arguments,
) {
final logStateNotifier = ref.read(logStateProvider.notifier);
logStateNotifier.logFunctionCall(functionName, arguments);
return switch (functionName) {
'set_color' => handleSetColor(arguments),
_ => handleUnknownFunction(functionName),
};
}
Map<String, Object?> handleSetColor(Map<String, Object?> arguments) {
final colorStateNotifier = ref.read(colorStateProvider.notifier);
final red = (arguments['red'] as num).toDouble();
final green = (arguments['green'] as num).toDouble();
final blue = (arguments['blue'] as num).toDouble();
final functionResults = {
'success': true,
'current_color': colorStateNotifier
.updateColor(red: red, green: green, blue: blue)
.toLLMContextMap(),
};
final logStateNotifier = ref.read(logStateProvider.notifier);
logStateNotifier.logFunctionResults(functionResults);
return functionResults;
}
Map<String, Object?> handleUnknownFunction(String functionName) {
final logStateNotifier = ref.read(logStateProvider.notifier);
logStateNotifier.logWarning('Unsupported function call $functionName');
return {
'success': false,
'reason': 'Unsupported function call $functionName',
};
} // To here.
}
@Riverpod(keepAlive: true)
GeminiTools geminiTools(Ref ref) => GeminiTools(ref);
Understanding the function handlers
Let's break down what these function handlers do:
-
handleFunctionCall: A central dispatcher that:- Logs the function call for transparency in the log panel
- Routes to the appropriate handler based on the function name
- Returns a structured response that will be sent back to the LLM
-
handleSetColor: The specific handler for yourset_colorfunction that:- Extracts RGB values from the arguments map
- Converts them to the expected types (doubles)
- Updates the application's color state using the
colorStateNotifier - Creates a structured response with success status and current color information
- Logs the function results for debugging
-
handleUnknownFunction: A fallback handler for unknown functions that:- Logs a warning about the unsupported function
- Returns an error response to the LLM
The handleSetColor function is particularly important as it bridges the gap between the LLM's natural language understanding and concrete UI changes.
Update the Gemini chat service to process function calls and responses
Now, let's update the lib/services/gemini_chat_service.dart file to process function calls from the LLM responses and send the results back to the LLM:
lib/services/gemini_chat_service.dart
import 'dart:async';

import 'package:colorist_ui/colorist_ui.dart';
import 'package:firebase_ai/firebase_ai.dart';
import 'package:riverpod_annotation/riverpod_annotation.dart';

import '../providers/gemini.dart';
import 'gemini_tools.dart';                                          // Add this import

part 'gemini_chat_service.g.dart';

class GeminiChatService {
  GeminiChatService(this.ref);
  final Ref ref;

  Future<void> sendMessage(String message) async {
    final chatSession = await ref.read(chatSessionProvider.future);
    final chatStateNotifier = ref.read(chatStateProvider.notifier);
    final logStateNotifier = ref.read(logStateProvider.notifier);

    chatStateNotifier.addUserMessage(message);
    logStateNotifier.logUserText(message);
    final llmMessage = chatStateNotifier.createLlmMessage();
    try {
      final response = await chatSession.sendMessage(Content.text(message));

      final responseText = response.text;
      if (responseText != null) {
        logStateNotifier.logLlmText(responseText);
        chatStateNotifier.appendToMessage(llmMessage.id, responseText);
      }

      if (response.functionCalls.isNotEmpty) {                       // Add from here
        final geminiTools = ref.read(geminiToolsProvider);
        final functionResultResponse = await chatSession.sendMessage(
          Content.functionResponses([
            for (final functionCall in response.functionCalls)
              FunctionResponse(
                functionCall.name,
                geminiTools.handleFunctionCall(
                  functionCall.name,
                  functionCall.args,
                ),
              ),
          ]),
        );
        final responseText = functionResultResponse.text;
        if (responseText != null) {
          logStateNotifier.logLlmText(responseText);
          chatStateNotifier.appendToMessage(llmMessage.id, responseText);
        }
      }                                                              // To here.
    } catch (e, st) {
      logStateNotifier.logError(e, st: st);
      chatStateNotifier.appendToMessage(
        llmMessage.id,
        "\nI'm sorry, I encountered an error processing your request. "
        "Please try again.",
      );
    } finally {
      chatStateNotifier.finalizeMessage(llmMessage.id);
    }
  }
}

@Riverpod(keepAlive: true)
GeminiChatService geminiChatService(Ref ref) => GeminiChatService(ref);
Understanding the flow of communication
The key addition here is the complete handling of function calls and responses:
if (response.functionCalls.isNotEmpty) {
  final geminiTools = ref.read(geminiToolsProvider);
  final functionResultResponse = await chatSession.sendMessage(
    Content.functionResponses([
      for (final functionCall in response.functionCalls)
        FunctionResponse(
          functionCall.name,
          geminiTools.handleFunctionCall(
            functionCall.name,
            functionCall.args,
          ),
        ),
    ]),
  );
  final responseText = functionResultResponse.text;
  if (responseText != null) {
    logStateNotifier.logLlmText(responseText);
    chatStateNotifier.appendToMessage(llmMessage.id, responseText);
  }
}
This code:
- Checks if the LLM response contains any function calls
- For each function call, invokes your
handleFunctionCallmethod with the function name and arguments - Collects the results of each function call
- Sends these results back to the LLM using
Content.functionResponses - Processes the LLM's response to the function results
- Updates the UI with the final response text
This creates a round trip flow:
- User → LLM: Requests a color
- LLM → App: Function calls with parameters
- App → User: New color displayed
- App → LLM: Function results
- LLM → User: Final response incorporating function results
Generate Riverpod code
Run the build runner command to generate the needed Riverpod code:
dart run build_runner build --delete-conflicting-outputs
Run and test the complete flow
Now run your application:
flutter run -d DEVICE
Try entering various color descriptions:
- "I'd like a deep crimson red"
- "Show me a calming sky blue"
- "Give me the color of fresh mint leaves"
- "I want to see a warm sunset orange"
- "Make it a rich royal purple"
Now you should see:
- Your message appearing in the chat interface
- Gemini's response appearing in the chat
- Function calls being logged in the log panel
- Function results being logged immediately after
- The color rectangle updating to display the described color
- RGB values updating to show the new color's components
- Gemini's final response appearing, often commenting on the color that was set
The log panel provides insight into what's happening behind the scenes. You'll see:
- The exact function calls Gemini is making
- The parameters it's choosing for each RGB value
- The results your function is returning
- The follow-up responses from Gemini
The color state notifier
The colorStateNotifier you're using to update colors is part of the colorist_ui package. It manages:
- The current color displayed in the UI
- The color history (last 10 colors)
- Notification of state changes to UI components
When you call updateColor with new RGB values, it:
- Creates a new
ColorDataobject with the provided values - Updates the current color in the app state
- Adds the color to the history
- Triggers UI updates through Riverpod's state management
The UI components in the colorist_ui package watch this state and automatically update when it changes, creating a reactive experience.
Understanding error handling
Your implementation includes robust error handling:
- Try-catch block : Wraps all LLM interactions to catch any exceptions
- Error logging : Records errors in the log panel with stack traces
- User feedback : Provides a friendly error message in the chat
- State cleanup : Finalizes the message state even if an error occurs
This ensures the app remains stable and provides appropriate feedback even when issues occur with the LLM service or function execution.
The power of function calling for user experience
What you've accomplished here demonstrates how LLMs can create powerful natural interfaces:
- Natural language interface : Users express intent in everyday language
- Intelligent interpretation : The LLM translates vague descriptions into precise values
- Direct manipulation : The UI updates in response to natural language
- Contextual responses : The LLM provides conversational context about the changes
- Low cognitive load : Users don't need to understand RGB values or color theory
This pattern of using LLM function calling to bridge natural language and UI actions can be extended to countless other domains beyond color selection.
এরপর কী?
In the next step, you'll enhance the user experience by implementing streaming responses. Rather than waiting for the complete response, you'll process text chunks and function calls as they are received, creating a more responsive and engaging application.
সমস্যা সমাধান
Function call issues
If Gemini isn't calling your functions or parameters are incorrect:
- Verify your function declaration matches what's described in the system prompt
- Check that parameter names and types are consistent
- Ensure your system prompt explicitly instructs the LLM to use the tool
- Verify the function name in your handler matches exactly what's in the declaration
- Examine the log panel for detailed information on function calls
Function response issues
If function results aren't being properly sent back to the LLM:
- Check that your function returns a properly formatted Map
- Verify that the Content.functionResponses is being constructed correctly
- Look for any errors in the log related to function responses
- Ensure you're using the same chat session for the response
Color display issues
If colors aren't displaying correctly:
- Ensure RGB values are properly converted to doubles (LLM might send them as integers)
- Verify that values are in the expected range (0.0 to 1.0)
- Check that the color state notifier is being called correctly
- Examine the log for the exact values being passed to the function
General problems
For general issues:
- Examine the logs for errors or warnings
- Verify Firebase AI Logic connectivity
- Check for any type mismatches in function parameters
- Ensure all Riverpod generated code is up to date
Key concepts learned
- Implementing a complete function calling pipeline in Flutter
- Creating full communication between an LLM and your application
- Processing structured data from LLM responses
- Sending function results back to the LLM for incorporation into responses
- Using the log panel to gain visibility into LLM-application interactions
- Connecting natural language inputs to concrete UI changes
With this step complete, your app now demonstrates one of the most powerful patterns for LLM integration: translating natural language inputs into concrete UI actions, while maintaining a coherent conversation that acknowledges these actions. This creates an intuitive, conversational interface that feels magical to users.
7. Streaming responses for better UX
In this step, you'll enhance the user experience by implementing streaming responses from Gemini. Instead of waiting for the entire response to be generated, you'll process text chunks and function calls as they are received, creating a more responsive and engaging application.
What you'll cover in this step
- The importance of streaming for LLM-powered applications
- Implementing streaming LLM responses in a Flutter application
- Processing partial text chunks as they arrive from the API
- Managing conversation state to prevent message conflicts
- Handling function calls in streaming responses
- Creating visual indicators for in-progress responses
Why streaming matters for LLM applications
Before implementing, let's understand why streaming responses are crucial for creating excellent user experiences with LLMs:
উন্নত ব্যবহারকারীর অভিজ্ঞতা
Streaming responses provide several significant user experience benefits:
- Reduced perceived latency : Users see text start appearing immediately (typically within 100-300ms), rather than waiting several seconds for a complete response. This perception of immediacy dramatically improves user satisfaction.
- Natural conversational rhythm : The gradual appearance of text mimics how humans communicate, creating a more natural dialogue experience.
- Progressive information processing : Users can begin processing information as it arrives, rather than being overwhelmed by a large block of text all at once.
- Opportunity for early interruption : In a full application, users could potentially interrupt or redirect the LLM if they see it going in an unhelpful direction.
- Visual confirmation of activity : The streaming text provides immediate feedback that the system is working, reducing uncertainty.
Technical advantages
Beyond UX improvements, streaming offers technical benefits:
- Early function execution : Function calls can be detected and executed as soon as they appear in the stream, without waiting for the complete response.
- Incremental UI updates : You can update your UI progressively as new information arrives, creating a more dynamic experience.
- Conversation state management : Streaming provides clear signals about when responses are complete vs. still in progress, enabling better state management.
- Reduced timeout risks : With non-streaming responses, long-running generations risk connection timeouts. Streaming establishes the connection early and maintains it.
For your Colorist app, implementing streaming means users will see both text responses and color changes appearing more promptly, creating a significantly more responsive experience.
Add conversation state management
First, let's add a state provider to track whether the app is currently handling a streaming response. Update your lib/services/gemini_chat_service.dart file:
lib/services/gemini_chat_service.dart
import 'dart:async';

import 'package:colorist_ui/colorist_ui.dart';
import 'package:firebase_ai/firebase_ai.dart';
import 'package:flutter_riverpod/flutter_riverpod.dart';
import 'package:riverpod_annotation/riverpod_annotation.dart';

import '../providers/gemini.dart';
import 'gemini_tools.dart';

part 'gemini_chat_service.g.dart';

class ConversationStateNotifier extends Notifier<ConversationState> {  // Add from here...
  @override
  ConversationState build() => ConversationState.idle;

  void busy() {
    state = ConversationState.busy;
  }

  void idle() {
    state = ConversationState.idle;
  }
}

final conversationStateProvider =
    NotifierProvider<ConversationStateNotifier, ConversationState>(
      ConversationStateNotifier.new,
    );                                                                 // To here.

class GeminiChatService {
  GeminiChatService(this.ref);
  final Ref ref;

  Future<void> sendMessage(String message) async {
    final chatSession = await ref.read(chatSessionProvider.future);
    final conversationState = ref.read(conversationStateProvider);   // Add this line
    final chatStateNotifier = ref.read(chatStateProvider.notifier);
    final logStateNotifier = ref.read(logStateProvider.notifier);

    if (conversationState == ConversationState.busy) {               // Add from here...
      logStateNotifier.logWarning(
        "Can't send a message while a conversation is in progress",
      );
      throw Exception(
        "Can't send a message while a conversation is in progress",
      );
    }
    final conversationStateNotifier = ref.read(
      conversationStateProvider.notifier,
    );
    conversationStateNotifier.busy();                                // To here.
    chatStateNotifier.addUserMessage(message);
    logStateNotifier.logUserText(message);
    final llmMessage = chatStateNotifier.createLlmMessage();
    try {                                                            // Modify from here...
      final responseStream = chatSession.sendMessageStream(
        Content.text(message),
      );
      await for (final block in responseStream) {
        await _processBlock(block, llmMessage.id);
      }                                                              // To here.
    } catch (e, st) {
      logStateNotifier.logError(e, st: st);
      chatStateNotifier.appendToMessage(
        llmMessage.id,
        "\nI'm sorry, I encountered an error processing your request. "
        "Please try again.",
      );
    } finally {
      chatStateNotifier.finalizeMessage(llmMessage.id);
      conversationStateNotifier.idle();                              // Add this line.
    }
  }

  Future<void> _processBlock(                                        // Add from here...
    GenerateContentResponse block,
    String llmMessageId,
  ) async {
    final chatSession = await ref.read(chatSessionProvider.future);
    final chatStateNotifier = ref.read(chatStateProvider.notifier);
    final logStateNotifier = ref.read(logStateProvider.notifier);
    final blockText = block.text;
    if (blockText != null) {
      logStateNotifier.logLlmText(blockText);
      chatStateNotifier.appendToMessage(llmMessageId, blockText);
    }

    if (block.functionCalls.isNotEmpty) {
      final geminiTools = ref.read(geminiToolsProvider);
      final responseStream = chatSession.sendMessageStream(
        Content.functionResponses([
          for (final functionCall in block.functionCalls)
            FunctionResponse(
              functionCall.name,
              geminiTools.handleFunctionCall(
                functionCall.name,
                functionCall.args,
              ),
            ),
        ]),
      );
      await for (final response in responseStream) {
        final responseText = response.text;
        if (responseText != null) {
          logStateNotifier.logLlmText(responseText);
          chatStateNotifier.appendToMessage(llmMessageId, responseText);
        }
      }
    }
  }                                                                  // To here.
}

@Riverpod(keepAlive: true)
GeminiChatService geminiChatService(Ref ref) => GeminiChatService(ref);
Understanding the streaming implementation
Let's break down what this code does:
- Conversation state tracking :
- A
conversationStateProvidertracks whether the app is currently processing a response - The state transitions from
idle→busywhile processing, then back toidle - This prevents multiple concurrent requests that could conflict
- A
- Stream initialization :
-
sendMessageStream()returns a Stream of response chunks instead of aFuturewith the complete response - Each chunk may contain text, function calls, or both
-
- Progressive processing :
-
await forprocesses each chunk as it arrives in real-time - Text is appended to the UI immediately, creating the streaming effect
- Function calls are executed as soon as they're detected
-
- Function call handling :
- When a function call is detected in a chunk, it's executed immediately
- Results are sent back to the LLM through another streaming call
- The LLM's response to these results is also processed in a streaming fashion
- Error handling and cleanup :
-
try/catchprovides robust error handling - The
finallyblock ensures conversation state is reset properly - Message is always finalized, even if errors occur
-
This implementation creates a responsive, reliable streaming experience while maintaining proper conversation state.
Update the main screen to connect conversation state
Modify your lib/main.dart file to pass the conversation state to the main screen:
lib/main.dart
import 'package:colorist_ui/colorist_ui.dart';
import 'package:flutter/material.dart';
import 'package:flutter_riverpod/flutter_riverpod.dart';

import 'providers/gemini.dart';
import 'services/gemini_chat_service.dart';

void main() async {
  runApp(ProviderScope(child: MainApp()));
}

class MainApp extends ConsumerWidget {
  const MainApp({super.key});

  @override
  Widget build(BuildContext context, WidgetRef ref) {
    final model = ref.watch(geminiModelProvider);
    final conversationState = ref.watch(conversationStateProvider);  // Add this line

    return MaterialApp(
      theme: ThemeData(
        colorScheme: ColorScheme.fromSeed(seedColor: Colors.deepPurple),
      ),
      home: model.when(
        data: (data) => MainScreen(
          conversationState: conversationState,                      // And this line
          sendMessage: (text) {
            ref.read(geminiChatServiceProvider).sendMessage(text);
          },
        ),
        loading: () => LoadingScreen(message: 'Initializing Gemini Model'),
        error: (err, st) => ErrorScreen(error: err),
      ),
    );
  }
}
The key change here is passing the conversationState to the MainScreen widget. The MainScreen (provided by the colorist_ui package) will use this state to disable the text input while a response is being processed.
This creates a cohesive user experience where the UI reflects the current state of the conversation.
Generate Riverpod code
Run the build runner command to generate the needed Riverpod code:
dart run build_runner build --delete-conflicting-outputs
Run and test streaming responses
Run your application:
flutter run -d DEVICE
Now try testing the streaming behavior with various color descriptions. Try descriptions like:
- "Show me the deep teal color of the ocean at twilight"
- "I'd like to see a vibrant coral that reminds me of tropical flowers"
- "Create a muted olive green like old army fatigues"
The streaming technical flow in detail
Let's examine exactly what happens when streaming a response:
Connection establishment
When you call sendMessageStream() , the following happens:
- The app establishes a connection to the Firebase AI Logic service
- The user request is sent to the service
- The server begins processing the request
- The stream connection remains open, ready to transmit chunks
Chunk transmission
As Gemini generates content, chunks are sent through the stream:
- The server sends text chunks as they're generated (typically a few words or sentences)
- When Gemini decides to make a function call, it sends the function call information
- Additional text chunks may follow function calls
- The stream continues until the generation is complete
Progressive processing
Your app processes each chunk incrementally:
- Each text chunk is appended to the existing response
- Function calls are executed as soon as they're detected
- The UI updates in real-time with both text and function results
- State is tracked to show the response is still streaming
Stream completion
When the generation is complete:
- The stream is closed by the server
- Your
await forloop exits naturally - The message is marked as complete
- The conversation state is set back to idle
- The UI updates to reflect the completed state
Streaming vs. non-streaming comparison
To better understand the benefits of streaming, let's compare streaming vs. non-streaming approaches:
দিক | Non-Streaming | স্ট্রিমিং |
Perceived latency | User sees nothing until complete response is ready | User sees first words within milliseconds |
ব্যবহারকারীর অভিজ্ঞতা | Long wait followed by sudden text appearance | Natural, progressive text appearance |
State management | Simpler (messages are either pending or complete) | More complex (messages can be in a streaming state) |
Function execution | Occurs only after complete response | Occurs during response generation |
Implementation complexity | Simpler to implement | Requires additional state management |
Error recovery | All-or-nothing response | Partial responses may still be useful |
Code complexity | Less complex | More complex due to stream handling |
For an application like Colorist, the UX benefits of streaming outweigh the implementation complexity, especially for color interpretations that might take several seconds to generate.
Best practices for streaming UX
When implementing streaming in your own LLM applications, consider these best practices:
- Clear visual indicators : Always provide clear visual cues that distinguish streaming vs. complete messages
- Input blocking : Disable user input during streaming to prevent multiple overlapping requests
- Error recovery : Design your UI to handle graceful recovery if streaming is interrupted
- State transitions : Ensure smooth transitions between idle, streaming, and complete states
- Progress visualization : Consider subtle animations or indicators that show active processing
- Cancellation options : In a complete app, provide ways for users to cancel in-progress generations
- Function result integration : Design your UI to handle function results appearing mid-stream
- Performance optimization : Minimize UI rebuilds during rapid stream updates
The colorist_ui package implements many of these best practices for you, but they're important considerations for any streaming LLM implementation.
এরপর কী?
In the next step, you'll implement LLM synchronization by notifying Gemini when users select colors from history. This will create a more cohesive experience where the LLM is aware of user-initiated changes to the application state.
সমস্যা সমাধান
Stream processing issues
If you encounter issues with stream processing:
- Symptoms : Partial responses, missing text, or abrupt stream termination
- Solution : Check network connectivity and ensure proper async/await patterns in your code
- Diagnosis : Examine the log panel for error messages or warnings related to stream processing
- Fix : Ensure all stream processing uses proper error handling with
try/catchblocks
Missing function calls
If function calls aren't being detected in the stream:
- Symptoms : Text appears but colors don't update, or log shows no function calls
- Solution : Verify the system prompt's instructions about using function calls
- Diagnosis : Check the log panel to see if function calls are being received
- Fix : Adjust your system prompt to more explicitly instruct the LLM to use the
set_colortool
General error handling
For any other issues:
- Step 1 : Check the log panel for error messages
- Step 2 : Verify Firebase AI Logic connectivity
- Step 3 : Ensure all Riverpod generated code is up to date
- Step 4 : Review the streaming implementation for any missing await statements
Key concepts learned
- Implementing streaming responses with the Gemini API for more responsive UX
- Managing conversation state to handle streaming interactions properly
- Processing real-time text and function calls as they arrive
- Creating responsive UIs that update incrementally during streaming
- Handling concurrent streams with proper async patterns
- Providing appropriate visual feedback during streaming responses
By implementing streaming, you've significantly enhanced the user experience of your Colorist app, creating a more responsive, engaging interface that feels truly conversational.
8. LLM Context Synchronization
In this bonus step, you'll implement LLM Context Synchronization by notifying Gemini when users select colors from history. This creates a more cohesive experience where the LLM is aware of user actions in the interface, not just their explicit messages.
What you'll cover in this step
- Creating LLM Context Synchronization between your UI and the LLM
- Serializing UI events into context the LLM can understand
- Updating conversation context based on user actions
- Creating a coherent experience across different interaction methods
- Enhancing LLM context awareness beyond explicit chat messages
Understanding LLM Context Synchronization
Traditional chatbots only respond to explicit user messages, creating a disconnect when users interact with the app through other means. LLM Context Synchronization addresses this limitation:
Why LLM Context Synchronization matters
When users interact with your app through UI elements (like selecting a color from history), the LLM has no way of knowing what happened unless you explicitly tell it. LLM Context Synchronization:
- Maintains context : Keeps the LLM informed about all relevant user actions
- Creates coherence : Produces a cohesive experience where the LLM acknowledges UI interactions
- Enhances intelligence : Allows the LLM to respond appropriately to all user actions
- Improves user experience : Makes the entire application feel more integrated and responsive
- Reduces user effort : Eliminates the need for users to manually explain their UI actions
In your Colorist app, when a user selects a color from history, you want Gemini to acknowledge this action and comment intelligently about the selected color, maintaining the illusion of a seamless, aware assistant.
Update the Gemini chat service for color selection notifications
First, you'll add a method to the GeminiChatService to notify the LLM when a user selects a color from history. Update your lib/services/gemini_chat_service.dart file:
lib/services/gemini_chat_service.dart
import 'dart:async';
import 'dart:convert';                                               // Add this import

import 'package:colorist_ui/colorist_ui.dart';
import 'package:firebase_ai/firebase_ai.dart';
import 'package:flutter_riverpod/flutter_riverpod.dart';
import 'package:riverpod_annotation/riverpod_annotation.dart';

import '../providers/gemini.dart';
import 'gemini_tools.dart';

part 'gemini_chat_service.g.dart';

class ConversationStateNotifier extends Notifier<ConversationState> {
  @override
  ConversationState build() => ConversationState.idle;

  void busy() {
    state = ConversationState.busy;
  }

  void idle() {
    state = ConversationState.idle;
  }
}

final conversationStateProvider =
    NotifierProvider<ConversationStateNotifier, ConversationState>(
      ConversationStateNotifier.new,
    );

class GeminiChatService {
  GeminiChatService(this.ref);
  final Ref ref;

  Future<void> notifyColorSelection(ColorData color) => sendMessage(  // Add from here...
    'User selected color from history: ${json.encode(color.toLLMContextMap())}',
  );                                                                  // To here.

  Future<void> sendMessage(String message) async {
    final chatSession = await ref.read(chatSessionProvider.future);
    final conversationState = ref.read(conversationStateProvider);
    final chatStateNotifier = ref.read(chatStateProvider.notifier);
    final logStateNotifier = ref.read(logStateProvider.notifier);

    if (conversationState == ConversationState.busy) {
      logStateNotifier.logWarning(
        "Can't send a message while a conversation is in progress",
      );
      throw Exception(
        "Can't send a message while a conversation is in progress",
      );
    }
    final conversationStateNotifier = ref.read(
      conversationStateProvider.notifier,
    );
    conversationStateNotifier.busy();
    chatStateNotifier.addUserMessage(message);
    logStateNotifier.logUserText(message);
    final llmMessage = chatStateNotifier.createLlmMessage();
    try {
      final responseStream = chatSession.sendMessageStream(
        Content.text(message),
      );
      await for (final block in responseStream) {
        await _processBlock(block, llmMessage.id);
      }
    } catch (e, st) {
      logStateNotifier.logError(e, st: st);
      chatStateNotifier.appendToMessage(
        llmMessage.id,
        "\nI'm sorry, I encountered an error processing your request. "
        "Please try again.",
      );
    } finally {
      chatStateNotifier.finalizeMessage(llmMessage.id);
      conversationStateNotifier.idle();
    }
  }

  Future<void> _processBlock(
    GenerateContentResponse block,
    String llmMessageId,
  ) async {
    final chatSession = await ref.read(chatSessionProvider.future);
    final chatStateNotifier = ref.read(chatStateProvider.notifier);
    final logStateNotifier = ref.read(logStateProvider.notifier);
    final blockText = block.text;
    if (blockText != null) {
      logStateNotifier.logLlmText(blockText);
      chatStateNotifier.appendToMessage(llmMessageId, blockText);
    }

    if (block.functionCalls.isNotEmpty) {
      final geminiTools = ref.read(geminiToolsProvider);
      final responseStream = chatSession.sendMessageStream(
        Content.functionResponses([
          for (final functionCall in block.functionCalls)
            FunctionResponse(
              functionCall.name,
              geminiTools.handleFunctionCall(
                functionCall.name,
                functionCall.args,
              ),
            ),
        ]),
      );
      await for (final response in responseStream) {
        final responseText = response.text;
        if (responseText != null) {
          logStateNotifier.logLlmText(responseText);
          chatStateNotifier.appendToMessage(llmMessageId, responseText);
        }
      }
    }
  }
}

@Riverpod(keepAlive: true)
GeminiChatService geminiChatService(Ref ref) => GeminiChatService(ref);
The key addition is the notifyColorSelection method, which:
- Takes a
ColorDataobject representing the selected color - Encodes it to a JSON format that can be included in a message
- Sends a specially formatted message to the LLM indicating a user selection
- Reuses the existing
sendMessagemethod to handle the notification
This approach avoids duplication by utilizing your existing message handling infrastructure.
Update main app to connect color selection notifications
Now, modify your lib/main.dart file to pass the color selection notification function to the main screen:
lib/main.dart
import 'package:colorist_ui/colorist_ui.dart';
import 'package:flutter/material.dart';
import 'package:flutter_riverpod/flutter_riverpod.dart';

import 'providers/gemini.dart';
import 'services/gemini_chat_service.dart';

void main() async {
  runApp(ProviderScope(child: MainApp()));
}

class MainApp extends ConsumerWidget {
  const MainApp({super.key});

  @override
  Widget build(BuildContext context, WidgetRef ref) {
    final model = ref.watch(geminiModelProvider);
    final conversationState = ref.watch(conversationStateProvider);

    return MaterialApp(
      theme: ThemeData(
        colorScheme: ColorScheme.fromSeed(seedColor: Colors.deepPurple),
      ),
      home: model.when(
        data: (data) => MainScreen(
          conversationState: conversationState,
          notifyColorSelection: (color) {                            // Add from here...
            ref.read(geminiChatServiceProvider).notifyColorSelection(color);
          },                                                         // To here.
          sendMessage: (text) {
            ref.read(geminiChatServiceProvider).sendMessage(text);
          },
        ),
        loading: () => LoadingScreen(message: 'Initializing Gemini Model'),
        error: (err, st) => ErrorScreen(error: err),
      ),
    );
  }
}
The key change is adding the notifyColorSelection callback, which connects the UI event (selecting a color from history) to the LLM notification system.
Update the system prompt
Now, you need to update your system prompt to instruct the LLM on how to respond to color selection notifications. Modify your assets/system_prompt.md file:
assets/system_prompt.md
# Colorist System Prompt

You are a color expert assistant integrated into a desktop app called Colorist. Your job is to interpret natural language color descriptions and set the appropriate color values using a specialized tool.

## Your Capabilities

You are knowledgeable about colors, color theory, and how to translate natural language descriptions into specific RGB values. You have access to the following tool:

`set_color` - Sets the RGB values for the color display based on a description

## How to Respond to User Inputs

When users describe a color:

1. First, acknowledge their color description with a brief, friendly response
2. Interpret what RGB values would best represent that color description
3. Use the `set_color` tool to set those values (all values should be between 0.0 and 1.0)
4. After setting the color, provide a brief explanation of your interpretation

Example:
User: "I want a sunset orange"
You: "Sunset orange is a warm, vibrant color that captures the golden-red hues of the setting sun. It combines a strong red component with moderate orange tones."

[Then you would call the set_color tool with approximately: red=1.0, green=0.5, blue=0.25]

After the tool call: "I've set a warm orange with strong red, moderate green, and minimal blue components that is reminiscent of the sun low on the horizon."

## When Descriptions are Unclear

If a color description is ambiguous or unclear, please ask the user clarifying questions, one at a time.

## When Users Select Historical Colors

Sometimes, the user will manually select a color from the history panel. When this happens, you'll receive a notification about this selection that includes details about the color. Acknowledge this selection with a brief response that recognizes what they've done and comments on the selected color.

Example notification:
User: "User selected color from history: {red: 0.2, green: 0.5, blue: 0.8, hexCode: #3380CC}"
You: "I see you've selected an ocean blue from your history. This tranquil blue with a moderate intensity has a calming, professional quality to it. Would you like to explore similar shades or create a contrasting color?"

## Important Guidelines

- Always keep RGB values between 0.0 and 1.0
- Provide thoughtful, knowledgeable responses about colors
- When possible, include color psychology, associations, or interesting facts about colors
- Be conversational and engaging in your responses
- Focus on being helpful and accurate with your color interpretations
The key addition is the "When Users Select Historical Colors" section, which:
- Explains the concept of history selection notifications to the LLM
- Provides an example of what these notifications look like
- Shows an example of an appropriate response
- Sets expectations for acknowledging the selection and commenting on the color
This helps the LLM understand how to respond appropriately to these special messages.
Generate Riverpod Code
Run the build runner command to generate the needed Riverpod code:
dart run build_runner build --delete-conflicting-outputs
Run and test LLM Context Synchronization
Run your application:
flutter run -d DEVICE
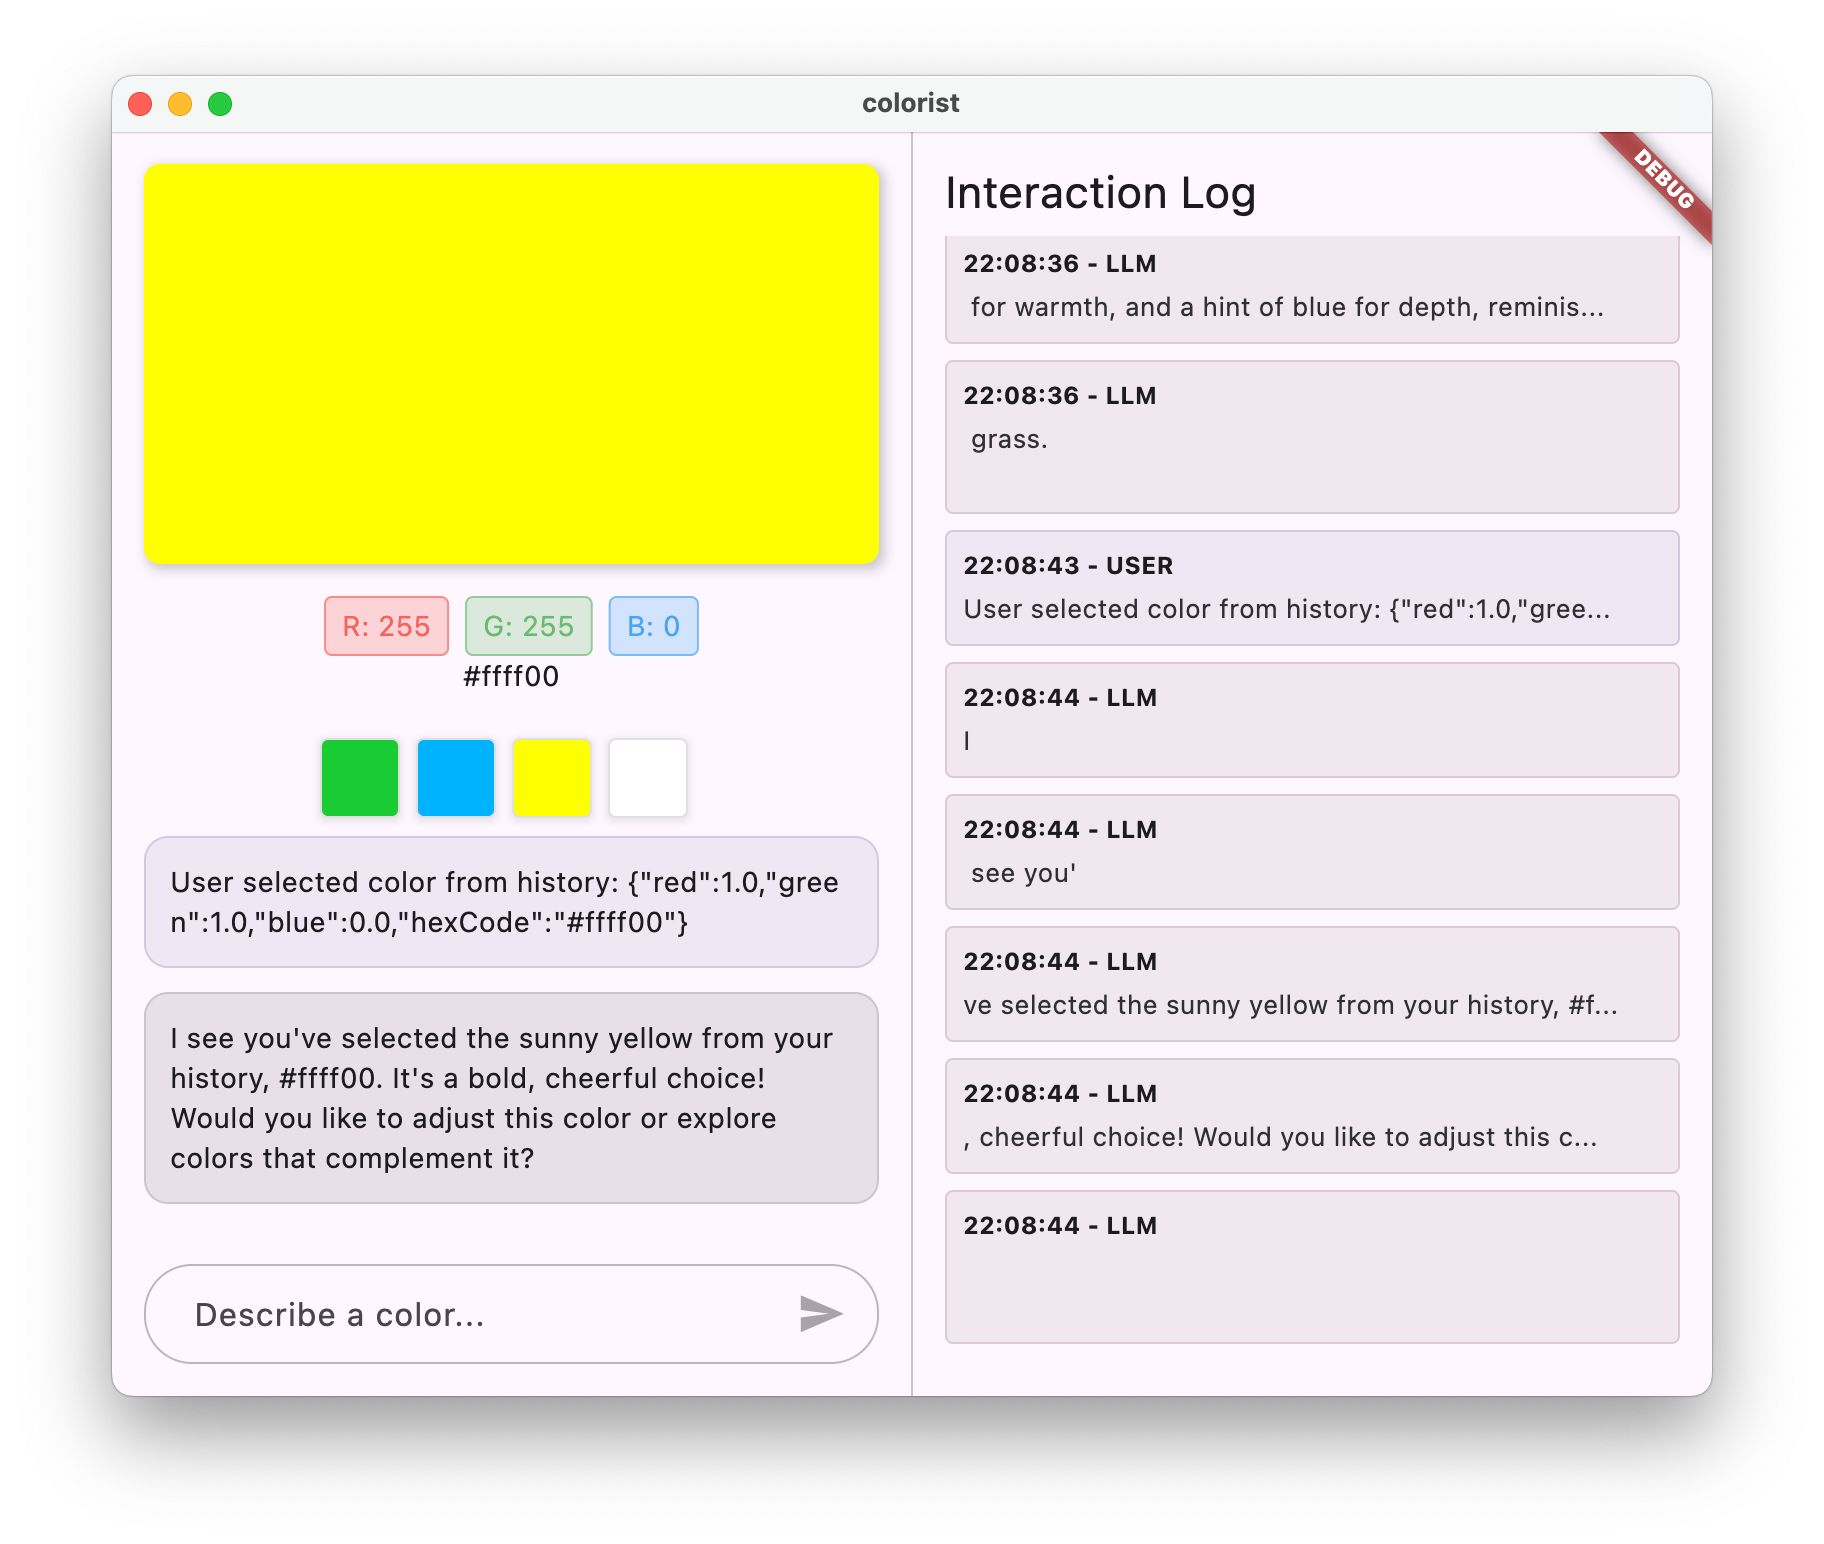
Testing the LLM Context Synchronization involves:
- First, generate a few colors by describing them in the chat
- "Show me a vibrant purple"
- "I'd like a forest green"
- "Give me a bright red"
- Then, click on one of the color thumbnails in the history strip
You should observe:
- The selected color appears in the main display
- A user message appears in the chat indicating the color selection
- The LLM responds by acknowledging the selection and commenting on the color
- The entire interaction feels natural and cohesive
This creates a seamless experience where the LLM is aware of and responds appropriately to both direct messages and UI interactions.
How LLM Context Synchronization works
Let's explore the technical details of how this synchronization works:
Data Flow
- User action : User clicks a color in the history strip
- UI event : The
MainScreenwidget detects this selection - Callback execution : The
notifyColorSelectioncallback is triggered - Message creation : A specially formatted message is created with the color data
- LLM processing : The message is sent to Gemini, which recognizes the format
- Contextual response : Gemini responds appropriately based on the system prompt
- UI update : The response appears in the chat, creating a cohesive experience
Data serialization
A key aspect of this approach is how you serialize the color data:
'User selected color from history: ${json.encode(color.toLLMContextMap())}'
The toLLMContextMap() method (provided by the colorist_ui package) converts a ColorData object into a map with key properties that the LLM can understand. This typically includes:
- RGB values (red, green, blue)
- Hex code representation
- Any name or description associated with the color
By formatting this data consistently and including it in the message, you ensure the LLM has all the information it needs to respond appropriately.
Broader applications of LLM Context Synchronization
This pattern of notifying the LLM about UI events has numerous applications beyond color selection:
Other use cases
- Filter changes : Notify the LLM when users apply filters to data
- Navigation events : Inform the LLM when users navigate to different sections
- Selection changes : Update the LLM when users select items from lists or grids
- Preference updates : Tell the LLM when users change settings or preferences
- Data manipulation : Notify the LLM when users add, edit, or delete data
In each case, the pattern remains the same:
- Detect the UI event
- Serialize relevant data
- Send a specially formatted notification to the LLM
- Guide the LLM to respond appropriately through the system prompt
Best practices for LLM Context Synchronization
Based on your implementation, here are some best practices for effective LLM Context Synchronization:
1. Consistent formatting
Use a consistent format for notifications so the LLM can easily identify them:
"User [action] [object]: [structured data]"
2. Rich context
Include enough detail in notifications for the LLM to respond intelligently. For colors, this means RGB values, hex codes, and any other relevant properties.
3. Clear instructions
Provide explicit instructions in the system prompt about how to handle notifications, ideally with examples.
4. Natural integration
Design notifications to flow naturally in the conversation, not as technical interruptions.
5. Selective notification
Only notify the LLM about actions that are relevant to the conversation. Not every UI event needs to be communicated.
সমস্যা সমাধান
Notification issues
If the LLM isn't responding properly to color selections:
- Check that the notification message format matches what's described in the system prompt
- Verify that the color data is being properly serialized
- Ensure the system prompt has clear instructions for handling selections
- Look for any errors in the chat service when sending notifications
Context management
If the LLM seems to lose context:
- Check that the chat session is being maintained properly
- Verify that conversation states transition correctly
- Ensure that notifications are being sent through the same chat session
General problems
For general issues:
- Examine the logs for errors or warnings
- Verify Firebase AI Logic connectivity
- Check for any type mismatches in function parameters
- Ensure all Riverpod generated code is up to date
Key concepts learned
- Creating LLM Context Synchronization between UI and LLM
- Serializing UI events into LLM-friendly context
- Guiding LLM behavior for different interaction patterns
- Creating a cohesive experience across message and non-message interactions
- Enhancing LLM awareness of the broader application state
By implementing LLM Context Synchronization, you've created a truly integrated experience where the LLM feels like an aware, responsive assistant rather than just a text generator. This pattern can be applied to countless other applications to create more natural, intuitive AI-powered interfaces.
9. Congratulations!
You've successfully completed the Colorist codelab! 🎉
What you've built
You've created a fully functional Flutter application that integrates Google's Gemini API to interpret natural language color descriptions. Your app can now:
- Process natural language descriptions like "sunset orange" or "deep ocean blue"
- Use Gemini to intelligently translate these descriptions into RGB values
- Display the interpreted colors in real-time with streaming responses
- Handle user interactions through both chat and UI elements
- Maintain contextual awareness across different interaction methods
Where to go from here
Now that you've mastered the basics of integrating Gemini with Flutter, here are some ways to continue your journey:
Enhance your Colorist app
- Color palettes : Add functionality to generate complementary or matching color schemes
- Voice input : Integrate speech recognition for verbal color descriptions
- History management : Add options to name, organize, and export color sets
- Custom prompting : Create an interface for users to customize system prompts
- Advanced analytics : Track which descriptions work best or cause difficulties
Explore more Gemini features
- Multimodal inputs : Add image inputs to extract colors from photos
- Content generation : Use Gemini to generate color-related content like descriptions or stories
- Function calling enhancements : Create more complex tool integrations with multiple functions
- Safety settings : Explore different safety settings and their impact on responses
Apply these patterns to other domains
- Document analysis : Create apps that can understand and analyze documents
- Creative writing assistance : Build writing tools with LLM-powered suggestions
- Task automation : Design apps that translate natural language into automated tasks
- Knowledge-based applications : Create expert systems in specific domains
সম্পদ
Here are some valuable resources to continue your learning:
সরকারি নথিপত্র
Prompting course and guide
সম্প্রদায়
Observable Flutter Agentic series
In expisode #59, Craig Labenz and Andrew Brogden explore this codelab, highlighting interesting parts of the app build.
In episode #60, join Craig and Andrew again as they extend the codelab app with new capabilities and fight with making LLMs do as they are told.
In episode #61, Craig is joined by Chris Sells to have a fresh take at analysing news headlines and generates corresponding images.
প্রতিক্রিয়া
We'd love to hear about your experience with this codelab! Please consider providing feedback through:
Thank you for completing this codelab, and we hope you continue exploring the exciting possibilities at the intersection of Flutter and AI!