
1. Overview
In this codelab, we'll build a web page for user sign-in. You'll use the Google Identity Services JavaScript library to display and customize the Sign in with Google button.
What you'll learn
- How to add a Sign in with Google button to a web page
- How to setup an OAuth 2.0 web application
- How to decode an ID token
- How to customize the Sign in with Google button
What you'll need
- A text editor and place to host a web page, environments we'll cover in this Codelab:
- running locally in a terminal on your machine, or
- using a platform such as Glitch.
- A Google Cloud project. You can use your existing project or create a new one. A Google Cloud Platform account and project are free.
- Basic knowledge of HTML, CSS, JavaScript and Chrome DevTools (or equivalent).
So let's get started.
2. Create your sign-in page
Go ahead and add this code sample into a file named index.html. You can do this on your machine using your favorite text editor or on a platform like Glitch.
<!DOCTYPE html>
<html lang="en">
  <head>
    <script src="https://accounts.google.com/gsi/client" async></script>

    <script>
      function decodeJWT(token) {

        let base64Url = token.split(".")[1];
        let base64 = base64Url.replace(/-/g, "+").replace(/_/g, "/");
        let jsonPayload = decodeURIComponent(
          atob(base64)
            .split("")
            .map(function (c) {
              return "%" + ("00" + c.charCodeAt(0).toString(16)).slice(-2);
            })
            .join("")
        );
        return JSON.parse(jsonPayload);
      }

      function handleCredentialResponse(response) {

        console.log("Encoded JWT ID token: " + response.credential);

        const responsePayload = decodeJWT(response.credential);

        console.log("Decoded JWT ID token fields:");
        console.log("  Full Name: " + responsePayload.name);
        console.log("  Given Name: " + responsePayload.given_name);
        console.log("  Family Name: " + responsePayload.family_name);
        console.log("  Unique ID: " + responsePayload.sub);
        console.log("  Profile image URL: " + responsePayload.picture);
        console.log("  Email: " + responsePayload.email);
      }
    </script>
  </head>
  <body>
    <!-- g_id_onload contains Google Identity Services settings -->
    <div
      id="g_id_onload"
      data-auto_prompt="false"
      data-callback="handleCredentialResponse"
      data-client_id="PUT_YOUR_WEB_CLIENT_ID_HERE"
    ></div>
    <!-- g_id_signin places the button on a page and supports customization -->
    <div class="g_id_signin"></div>
  </body>
</html>
This code is a mixture of HTML and JavaScript, it does a number of things:
- configures the Google Identity Services library using
g_id_onload, - displays a Sign in with Google button using
g_id_signin, - adds a JavaScript callback function handler named
handleCredentialResponseto receive user sign-in credential from Google, and - a
decodeJWTfunction to convert the JSON Web Token (JWT) credential into just plain JSON.
Something may seem a bit off with data-client_id="PUT_YOUR_WEB_CLIENT_ID_HERE".
For now just ignore it, we'll come back to it in a bit.
3. Serve your web page
We're going to discuss two environments for serving index.html to the browser:
- running a web server locally on your machine
- a remote platform like Glitch.
Chose the one you're most comfortable with. After setup we'll use the URL to configure an OAuth web client.
Locally from your machine
Make sure Python3 is installed on your system. Setup differs by OS and platform, start with Python Setup and Usage if you need to install Python on your machine.
Start the Python web server in the directory containing index.html:
$ python3 -m http.server
Serving HTTP on 0.0.0.0 port 8000 (http://0.0.0.0:8000/) ...
A web server is now listening for connections on port 8000 and ready to serve your sign-in page. The URL is
http://localhost:8000
From a web development platform
If you've chosen to edit and host your sign-in page using Glitch (or an equivalent) you should be able to open index.html either in a preview pane or new browser tab.
Typically, the URL you'll use is the project name you entered when you setup your glich.com project. For example, if your glitch project is named gis-example then URL is https://gis-example.glitch.me. Of course, you'll have chosen a different project name and cannot reuse this one. The URL is
https://<var>your-project-name</var>.glitch.me
Load the page
Hold on a second...
We've first got to create an OAuth 2.0 web client and configure it.
Copy or take note of the URL, it's used in the next step.
4. Set up an OAuth web client
Let's configure OAuth so people can actually sign in.
- Click this link to create an OAuth 2.0 Web client. If needed, a wizard will help you create and setup a new Google Cloud Project.
- Select Web application from the Application type dropdown.
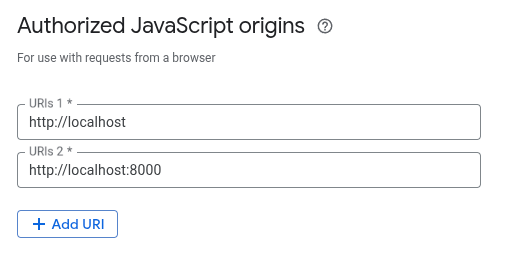
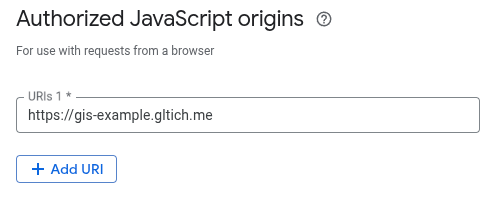
- Press the Add URI button under Authorized Javascript origins
- Enter the URL that's hosting
index.htmlfrom Step 3 Serve your web page.Hosted on your local machine
Hosted on a remote platform
- Press Create
- Copy the new Client ID.
One last thing
We need to go back and update index.html to use the new Client ID. In your editor, replace PUT_YOUR_WEB_CLIENT_ID_HERE with your new Client ID. A client ID looks like the following example: 1234567890-abc123def456.apps.googleusercontent.com.
Let's sign-in!
5. Sign in
First, open your browser's developer console, any errors and the JWT ID token credential returned from Google will be logged here.
Press the Sign in with Google button!
What happens next may vary a little bit:
- If you're currently signed into more than one Google Account, you'll be prompted to select which account you'll use to sign into this web app.
- If this is the first time you've signed-in to this web app, a consent prompt is shown.
After optionally selecting an account and giving your consent, Google then responds with a JWT. The handleCredentialResponse callback function running in the browser receives the JWT.
In this Codelab we decode and print out the JWT contents, in a production web app you'll verify and use the decoded JWT to do something more meaningful, such as creating a new account on your backend platform or establishing a new session for the user.
6. Inspect JWT ID token
The encoded JWT is logged in the developer console. After decoding the JWT, some commonly used ID token fields are also logged to console.
You can use online tools like jwt.io to decode the JWT.
Alternatively, jq in your terminal can also be used to decode and view the JWT (you may need to use your package manager to install jq). First, paste the encoded JWT string into the double-quotes:
$ JWT="eyJhbGciOiJSUzI1Ni ... Hecz6Wm4Q"
and then use this command to decode it
$ echo $JWT | jq -R 'split(".") | .[0],.[1] | @base64d | fromjson'
{
  "alg": "RS256",
  "kid": "c7e04465649ffa606557650c7e65f0a87ae00fe8",
  "typ": "JWT"
}
{
  "iss": "https://accounts.google.com",
  "azp": "123456789012-s0meRand0mStR1nG.apps.googleusercontent.com",
  "aud": "123456789012-s0meRand0mStR1nG.apps.googleusercontent.com",
  "sub": "2718281828459045",
  "email": "example@example.com",
  "email_verified": true,
  "nbf": 1744645148,
  "name": "Brian Daugherty",
  "picture": "https://lh3.googleusercontent.com/a/08a898b88ca4d6407be652d8",
  "given_name": "Brian",
  "family_name": "Daugherty",
  "iat": 1744645448,
  "exp": 1744649048,
  "jti": "52cd32984b30e178aa88bc2e75e63e055a461fcf"
}
Some of the keys and values like email, name, and picture should be fairly easy to understand. Other values are used to verify the JWT before you use it. Obtain user information from the ID token has more on what all the fields mean.
7. Customize the button
Placing a default sign-in button on a page is done like this
<div class="g_id_signin"></div>
and you'll see this button
But maybe you want to change the color, size, or text to match your site theme.
Let's change the button color to blue and instead have it say Sign up with Google.
Open index.html, locate the g_id_signin element, and add the data-theme="filled_blue" and data-text="signup_with" attributes:
    <div
      class="g_id_signin"
      data-theme="filled_blue"
      data-text="signup_with"
    ></div>
After saving and reloading the page, you'll see a blue button with the new text.

You can further customize the button, see Visual Data attributes for the complete list of options and try out our HTML code generator.
8. Additional Resources
Congratulations!
You've added a Sign in with Google button to a web page, configured an OAuth 2.0 web client, decoded a JWT ID token, and learned how to customize how the button looks.
These links may help you with next steps:
- Google Identity Services HTML API
- Google Identity Services JavaScript API
- How to Setup Sign in with Google for web
- Verify a Google ID token
- Learn more about Google Cloud Projects.
- Google Identity authentication methods