
1. Overview
An agent is an autonomous program that talks to an AI model to perform a goal-based operation using the tools and context it has and is capable of autonomous decision making grounded in truth!
When your application has multiple agents working together autonomously and together as required to cater to its larger purpose with each of its agents being independently knowledgeable and responsible for a specific focus area, then your application becomes a multi-agent system.
The Agent Development Kit (ADK)
Agent Development Kit (ADK) is a flexible and modular framework for developing and deploying AI agents. ADK supports building sophisticated applications by composing multiple, distinct agent instances into a Multi-Agent System (MAS).
In ADK, a multi-agent system is an application where different agents, often forming a hierarchy, collaborate or coordinate to achieve a larger goal. Structuring your application this way offers significant advantages, including enhanced modularity, specialization, reusability, maintainability, and the ability to define structured control flows using dedicated workflow agents.
Things to keep in mind for a multi-agent system
First, It's important to have a proper understanding and reasoning of the specialization for each agent. — "do you know why you need a specific sub-agent for something", work that out first.
Second, How to bring them together with a root agent to route and make sense of each of the responses.
Third, There are multiple types of agent routing that you can find here in this documentation. Make sure which one suits your application's flow. Also what are the various contexts and states that you need for your multi-agent system's flow control.
What you'll build
Let's build a multi-agent system to handle kitchen renovations. That's what we'll do. We'll build a system with 3 agents.
- Renovation Proposal Agent
- Permits and Compliance Check Agent
- Order Status Check Agent
Renovation Proposal Agent, to generate the kitchen renovation proposal document.
Permits and Compliance Agent, to take care of permits and compliance related tasks.
Order Status Check Agent, to check order status of materials by working on the order management database that we have set up in AlloyDB.
We'll have a root agent that orchestrates these agents based on the requirement.
Requirements
2. Before you begin
Create a project
- In the Google Cloud Console, on the project selector page, select or create a Google Cloud project.
- Make sure that billing is enabled for your Cloud project. Learn how to check if billing is enabled on a project .
- Activate Cloud Shell by clicking this link. You can toggle between Cloud Shell Terminal (for running cloud commands) and Editor (for building projects) by clicking on the corresponding button from Cloud Shell.
- Once connected to Cloud Shell, you check that you're already authenticated and that the project is set to your project ID using the following command:
gcloud auth list
- Run the following command in Cloud Shell to confirm that the gcloud command knows about your project.
gcloud config list project
- If your project is not set, use the following command to set it:
gcloud config set project <YOUR_PROJECT_ID>
- Make sure to have Python 3.9+
- Enable the following APIs by running the following commands:
gcloud services enable artifactregistry.googleapis.com \cloudbuild.googleapis.com \run.googleapis.com \aiplatform.googleapis.com
- Refer documentation for gcloud commands and usage.
3. Prototype
You can skip this step if you decide to go with the "Gemini 2.5 Pro" model for the project.
Go to Google AI Studio. Start typing in your prompt. Here's my prompt:
I want to renovate my kitchen, basically just remodel it. I don't know where to start. So I want to use Gemini to generate a plan. For that I need a good prompt. Give me a short yet detailed prompt that I can use.
Adjust & configure the parameters on the right hand side to get optimal response.
Based on this simple description, Gemini made me an incredibly detailed prompt to kick off my renovation! In effect, we're using Gemini to get even better responses out of AI Studio and our models. You can also select different models to use, based on your use case.
We have chosen Gemini 2.5 Pro. This is a Thinking model, which means that we get even more output tokens, in this case up to 65K tokens, for long-form analyses and detailed docs. The Gemini thinking box comes when you enable Gemini 2.5 Pro which has native reasoning capabilities and can take in long context requests.
See the snippet of the response below:
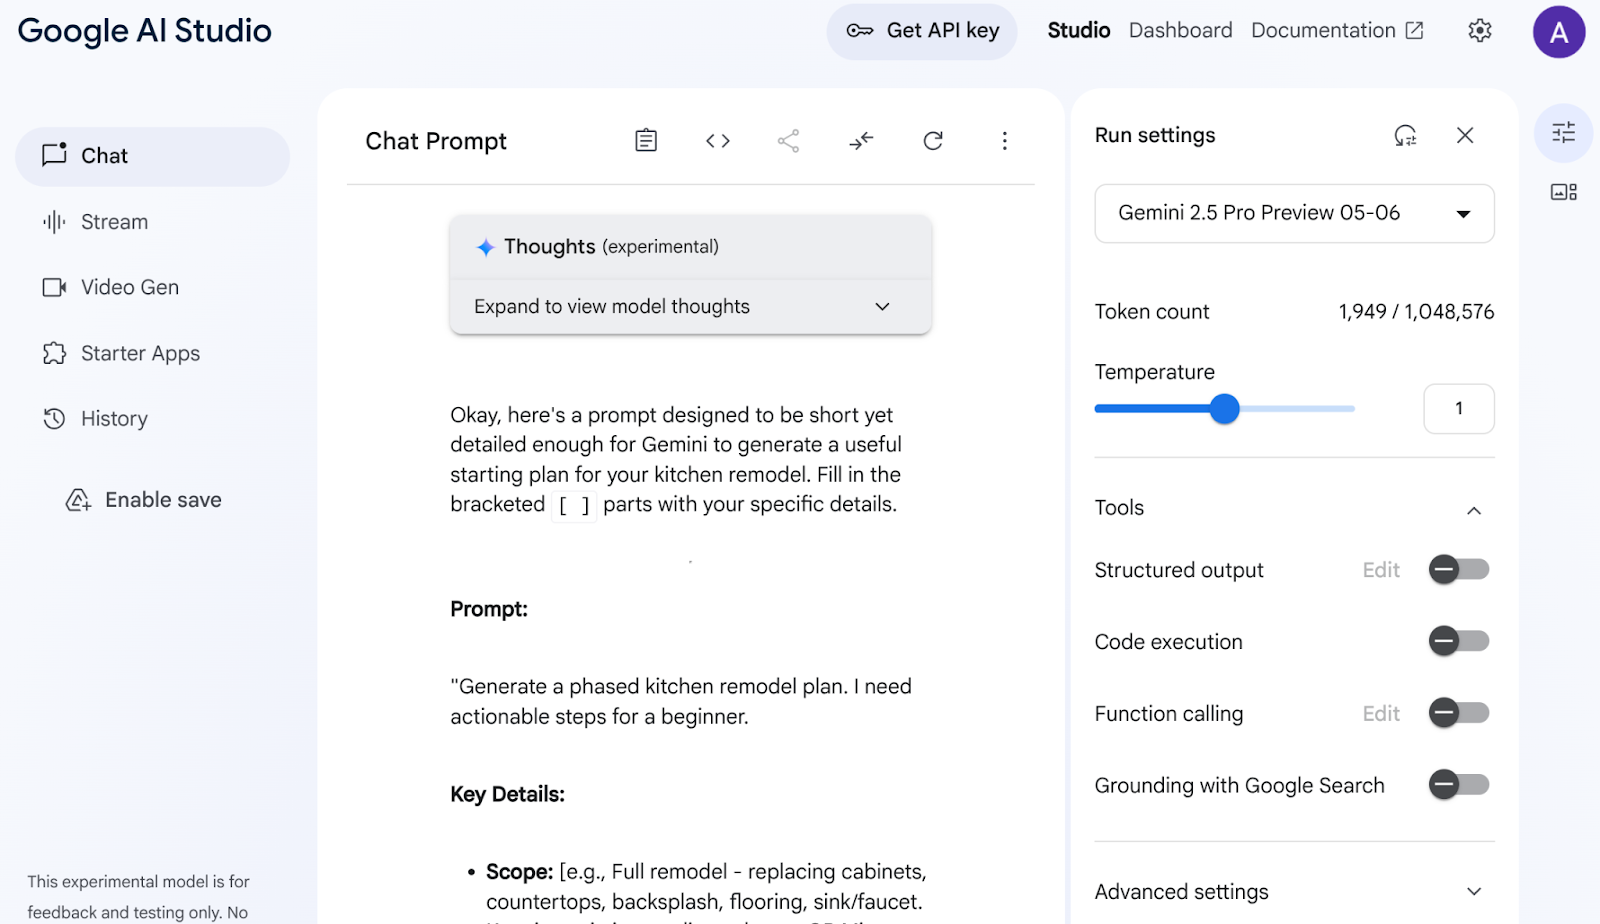
AI Studio analyzed my data and produced all these things like cabinets, countertops, backsplash, flooring, sink, cohesion, color palette, and material selection. Gemini is even citing sources!
Rinse and repeat with different model choices until you are satisfied with the outcome. But I would say why go through all that when you have Gemini 2.5 :)
Anyway, now try to see the idea come to life with a different prompt:
Add flat and circular light accessories above the island area for my current kitchen in the attached image.
Attach a link to the image of your current kitchen (or any sample kitchen image). Change the model to "Gemini 2.0 Flash Preview Image Generation" so you have access to generate images.
I got this output:
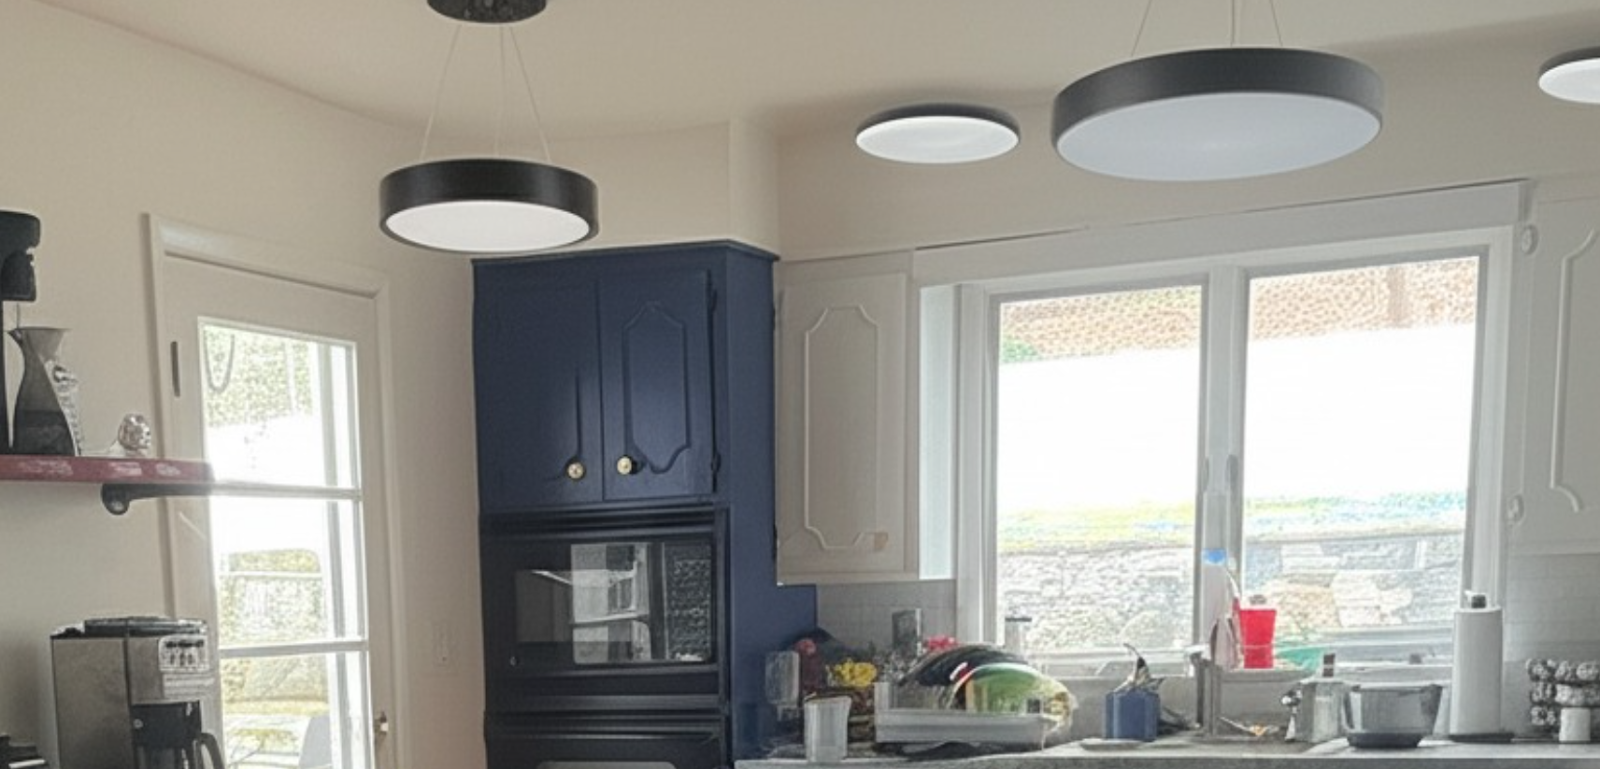
That's the power of Gemini!
From understanding videos, to native image generation, to grounding real information with Google Search – there are things that can only be built with Gemini.
From the AI Studio, you can take this prototype, grab the API key, and scale it into a full agentic application using the power of Vertex AI ADK.
4. ADK setup
- Create & Activate Virtual Environment (Recommended)
From your Cloud Shell Terminal, create a Virtual Environment:
python -m venv .venv
Activate the Virtual Environment:
source .venv/bin/activate
- Install ADK
pip install google-adk
5. Project Structure
- From Cloud Shell Terminal, create a directory in your desired project location
mkdir agentic-apps
cd agentic-apps
mkdir renovation-agent
- Go to Cloud Shell Editor and create the following project structure by creating the files (empty to begin with):
renovation-agent/
        __init__.py
        agent.py
        .env
        requirements.txt
6. Source Code
- Go to "init.py" and update with the following content:
from . import agent
- Go to agent.py and update the file with following content from the following path:
https://github.com/AbiramiSukumaran/adk-renovation-agent/blob/main/agent.py
In agent.py, we import necessary dependencies, retrieve configuration parameters from the .env file and define the root_agent which orchestrates the 3 sub-agents we set out to create in this application. There are several tools that help with the core and supporting functions of these sub-agents.
- Make sure you have the Cloud Storage Bucket
This is to store the proposal document that the agent generates. Create it and provide access so the multi-agent system created with Vertex AI can access it. Here is how you can do it:
https://cloud.google.com/storage/docs/creating-buckets#console
Name your bucket "next-demo-store". If you name it something else, remember to update the value of STORAGE_BUCKET in the .env file (in the ENV Variables Setup step).
- To set up access to the bucket, go to the Cloud Storage console and to your Storage Bucket (in our case the bucket name is "next-demo-storage": https://console.cloud.google.com/storage/browser/next-demo-storage.
Navigate to Permissions -> View Principals -> Grant Access. Select Principals as "allUsers" and Role as "Storage Object User".
Make sure to not enable "prevent public access". Since this is a demo/study application we are going with a public bucket. Remember to configure permission settings appropriately when you are building your application.
- Create dependencies list
List all dependencies in requirements.txt. You can copy this from repo.
Multi-agent System Source Code Explanation
The agent.py file defines the structure and behavior of our kitchen renovation multi-agent system using the Agent Development Kit (ADK). Let's break down the key components:
Agent Definitions
RenovationProposalAgent
This agent is responsible for creating the kitchen renovation proposal document. It optionally takes input parameters like kitchen size, desired style, budget, and customer preferences. Based on this information, it uses a Large Language Model (LLM) Gemini 2.5 to generate a detailed proposal. The generated proposal is then stored in a Google Cloud Storage bucket.
PermitsAndComplianceCheckAgent
This agent focuses on ensuring the renovation project adheres to local building codes and regulations. It receives information about the proposed renovation (e.g., structural changes, electrical work, plumbing modifications) and uses the LLM to check permit requirements and compliance rules. The agent uses information from a knowledge base (which you can customize to access external APIs to gather relevant regulations).
OrderingAgent
This agent, (you can comment it out if you don't want to implement now), handles checking the order status of materials and equipment needed for the renovation. To enable it, you'll need to create a Cloud Run function as described in the setup steps. The agent will then call this Cloud Run function, which interacts with an AlloyDB database containing order information. This demonstrates integration with a database system to track real-time data.
Root Agent (Orchestrator)
The root_agent acts as the central orchestrator of the multi-agent system. It receives the initial renovation request and determines which sub-agents to invoke based on the request's needs. For example, if the request requires checking permit requirements, it will call the PermitsAndComplianceCheckAgent. If the user wants to check order status, it will call the OrderingAgent (if enabled).
The root_agent then collects the responses from the sub-agents and combines them to provide a comprehensive response to the user. This could involve summarizing the proposal, listing required permits, and providing order status updates.
Data Flow & Key Concepts
The user initiates a request through the ADK interface (either the terminal or the web UI).
- The request is received by the root_agent.
- The root_agent analyzes the request and routes it to the appropriate sub-agents.
- The sub-agents use LLMs, knowledge bases, APIs, and databases to process the request and generate responses.
- The sub-agents return their responses to the root_agent.
- The root_agent combines the responses and provides a final output to the user.
LLMs (Large Language Models)
The agents rely heavily on LLMs to generate text, answer questions, and perform reasoning tasks. The LLMs are the "brains" behind the agents' ability to understand and respond to user requests. We are using Gemini 2.5 in this application.
Google Cloud Storage
Used to store the generated renovation proposal documents. You need to create a bucket and grant the necessary permissions for the agents to access it.
Cloud Run (Optional)
The OrderingAgent uses a Cloud Run function to interface with AlloyDB. Cloud Run provides a serverless environment to execute code in response to HTTP requests.
AlloyDB
If you're using the OrderingAgent, you'll need to set up an AlloyDB database to store order information. We'll get into the details of it in the next section that is "Database Setup".
.env file
The .env file stores sensitive information like API keys, database credentials, and bucket names. It's crucial to keep this file secure and not commit it to your repository. It also stores configuration settings for the agents and your Google Cloud project. The root_agent or supporting functions will typically read values from this file. Make sure all required variables are properly set in the .env file. This includes the Cloud Storage bucket name
7. Database Setup
In one of the tools used by the ordering_agent, called "check_status", we access the AlloyDB orders database to get the status of orders. In this section, we'll set up AlloyDB database cluster and instance.
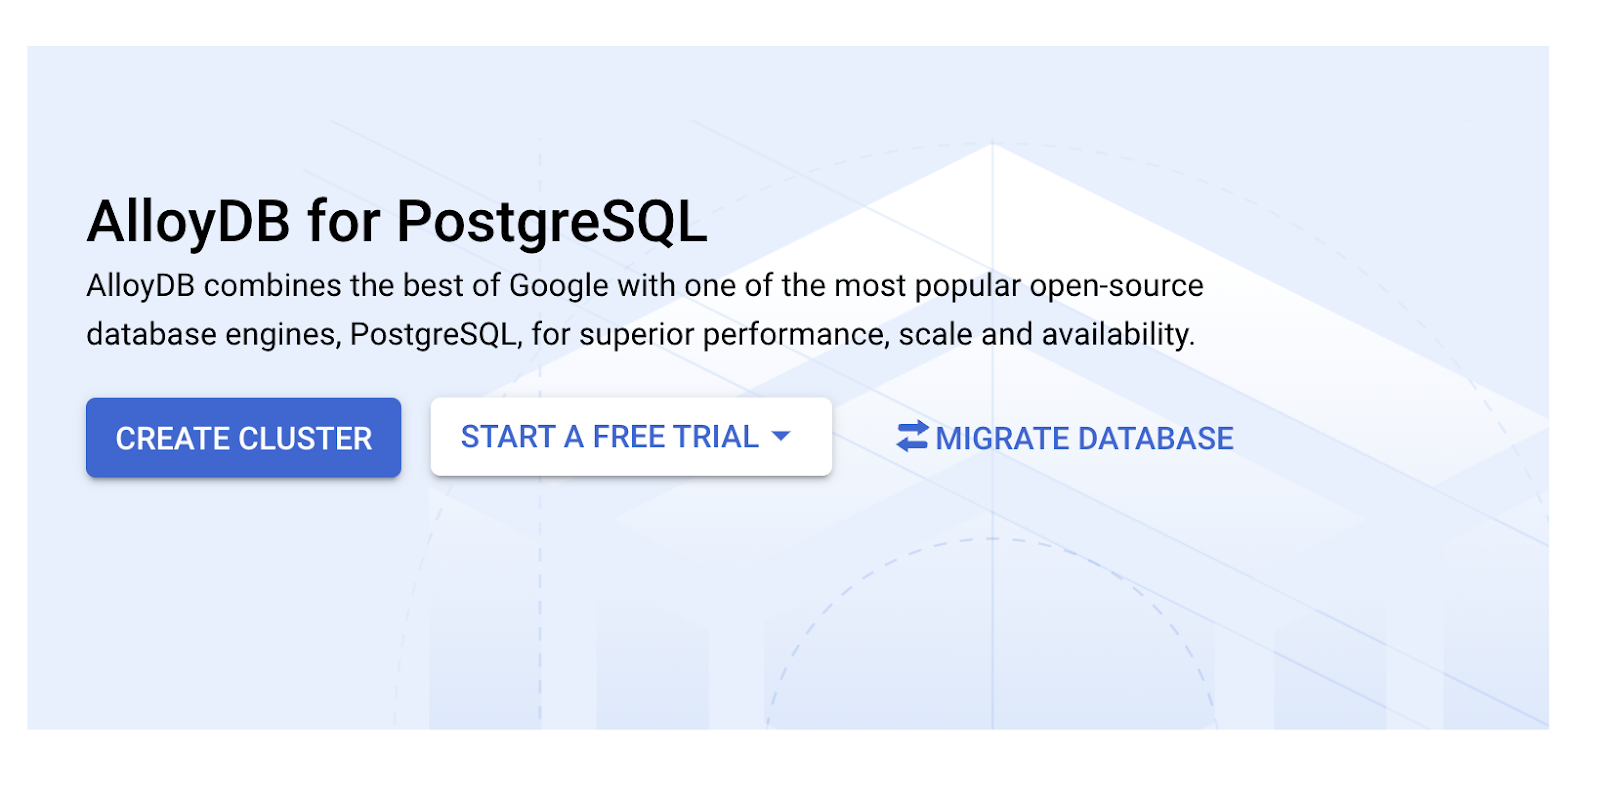
Create a cluster and instance
- Navigate the AlloyDB page in the Cloud Console. An easy way to find most pages in Cloud Console is to search for them using the search bar of the console.
- Select CREATE CLUSTER from that page:
- You'll see a screen like the one below. Create a cluster and instance with the following values (Make sure the values match in case you are cloning the application code from the repo):
- cluster id: "
vector-cluster" - password: "
alloydb" - PostgreSQL 15 / latest recommended
- Region: "
us-central1" - Networking: "
default"

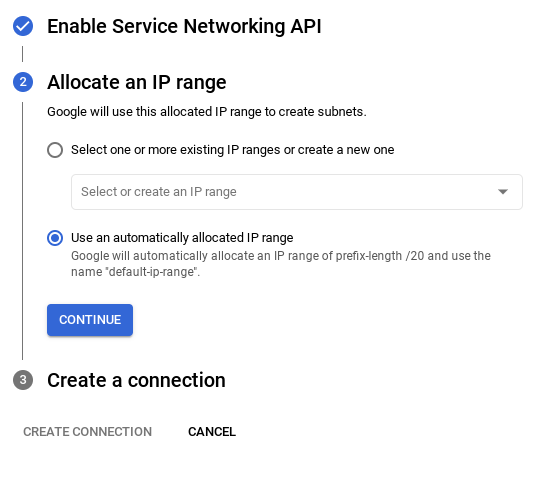
- When you select the default network, you'll see a screen like the one below.
Select SET UP CONNECTION.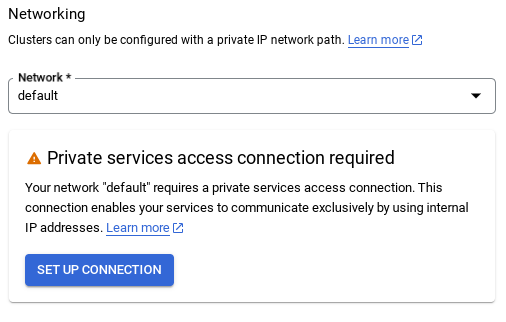
- From there, select "Use an automatically allocated IP range" and Continue. After reviewing the information, select CREATE CONNECTION.
- Once your network is set up, you can continue to create your cluster. Click CREATE CLUSTER to complete setting up of the cluster as shown below:
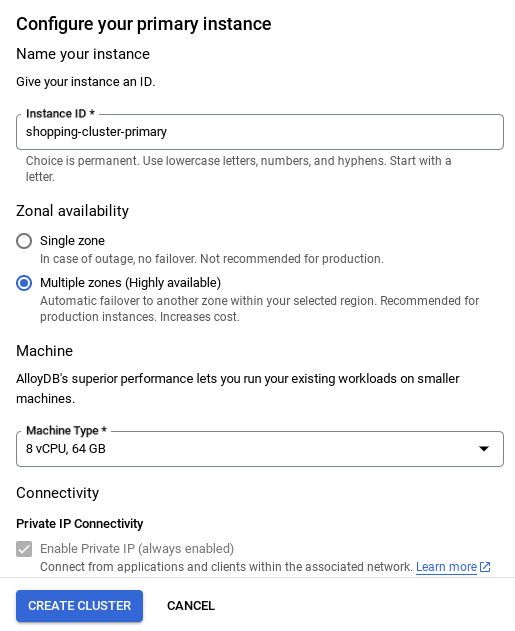
Make sure to change the instance id (which you can find at the time of configuration of the cluster / instance) to
vector-instance. If you cannot change it, remember to use your instance id in all the upcoming references.
Note that the Cluster creation will take around 10 minutes. Once it is successful, you should see a screen that shows the overview of your cluster you just created.
Data ingestion
Now it's time to add a table with the data about the store. Navigate to AlloyDB, select the primary cluster and then AlloyDB Studio:
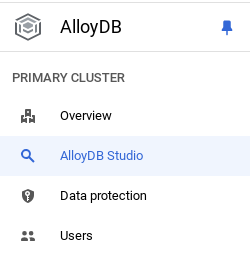
You may need to wait for your instance to finish being created. Once it is, sign into AlloyDB using the credentials you created when you created the cluster. Use the following data for authenticating to PostgreSQL:
- Username : "
postgres" - Database : "
postgres" - Password : "
alloydb"
Once you have authenticated successfully into AlloyDB Studio, SQL commands are entered in the Editor. You can add multiple Editor windows using the plus to the right of the last window.
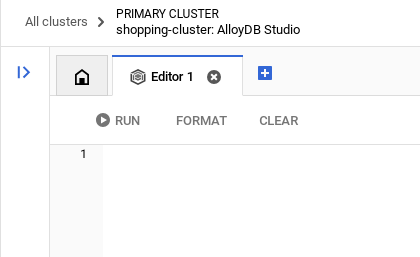
You'll enter commands for AlloyDB in editor windows, using the Run, Format, and Clear options as necessary.
Create a table
You can create a table using the DDL statement below in the AlloyDB Studio:
-- Table DDL for Procurement Material Order Status

CREATE TABLE material_order_status (
    order_id VARCHAR(50) PRIMARY KEY,
    material_name VARCHAR(100) NOT NULL,
    supplier_name VARCHAR(100) NOT NULL,
    order_date DATE NOT NULL,
    estimated_delivery_date DATE,
    actual_delivery_date DATE,
    quantity_ordered INT NOT NULL,
    quantity_received INT,
    unit_price DECIMAL(10, 2) NOT NULL,
    total_amount DECIMAL(12, 2),
    order_status VARCHAR(50) NOT NULL, -- e.g., "Ordered", "Shipped", "Delivered", "Cancelled"
    delivery_address VARCHAR(255),
    contact_person VARCHAR(100),
    contact_phone VARCHAR(20),
    tracking_number VARCHAR(100),
    notes TEXT,
    created_at TIMESTAMP DEFAULT CURRENT_TIMESTAMP,
    updated_at TIMESTAMP DEFAULT CURRENT_TIMESTAMP,
    quality_check_passed BOOLEAN,  -- Indicates if the material passed quality control
    quality_check_notes TEXT,        -- Notes from the quality control check
    priority VARCHAR(20),            -- e.g., "High", "Medium", "Low"
    project_id VARCHAR(50),          -- Link to a specific project
    receiver_name VARCHAR(100),        -- Name of the person who received the delivery
    return_reason TEXT,               -- Reason for returning material if applicable
    po_number VARCHAR(50)             -- Purchase order number
);
Insert Records
Copy the insert query statement from the database_script.sql script mentioned above to the editor.
Click Run.
Now that the dataset is ready, let's create a Java Cloud Run Functions application to extract status.
Create a Cloud Run Function in Java to extract order status information
- Create Cloud Run Function from here: https://console.cloud.google.com/run/create?deploymentType=function
- Set the name of the function to "check-status" and choose the "Java 17" as runtime.
- You can set authentication to "Allow unauthenticated invocations" since it is a demo application.
- Choose Java 17 as runtime and Inline Editor for the source code.
- At this point, the placeholder code will be loaded in the editor.
Replace the placeholder code
- Change the name of the Java file to "ProposalOrdersTool.java" and the class name to "ProposalOrdersTool".
- Replace the placeholder code in ProposalOrdersTool.java & pom.xml with code from the respective files in the folder "Cloud Run Function" in this repo.
- In ProposalOrdersTool.java find the following line of code, replace the placeholder values with values from your configuration:
String ALLOYDB_INSTANCE_NAME = "projects/<<YOUR_PROJECT_ID>>/locations/us-central1/clusters/<<YOUR_CLUSTER>>/instances/<<YOUR_INSTANCE>>";
- Click Create.
- The Cloud Run Function will be created and deployed.
IMPORTANT STEP:
Once deployed, in order to allow the Cloud Function to access our AlloyDB database instance, we'll create the VPC connector.
Once you are set out for deployment, you should be able to see the functions in the Google Cloud Run Functions console. Search for the newly created function (check-status), click on it, then click EDIT AND DEPLOY NEW REVISIONS (identified by the EDIT icon (pen) on top of the Cloud Run Functions console) and change the following:
- Go to the Networking tab:

- Select "Connect to a VPC for outbound traffic" and then select "Use Serverless VPC Access connectors"
- Under the Network dropdown, settings, Click on the Network dropdown and select "Add New VPC Connector" option (if you have not already configured the default one) and follow the instructions you see on the dialog box that pops-up:
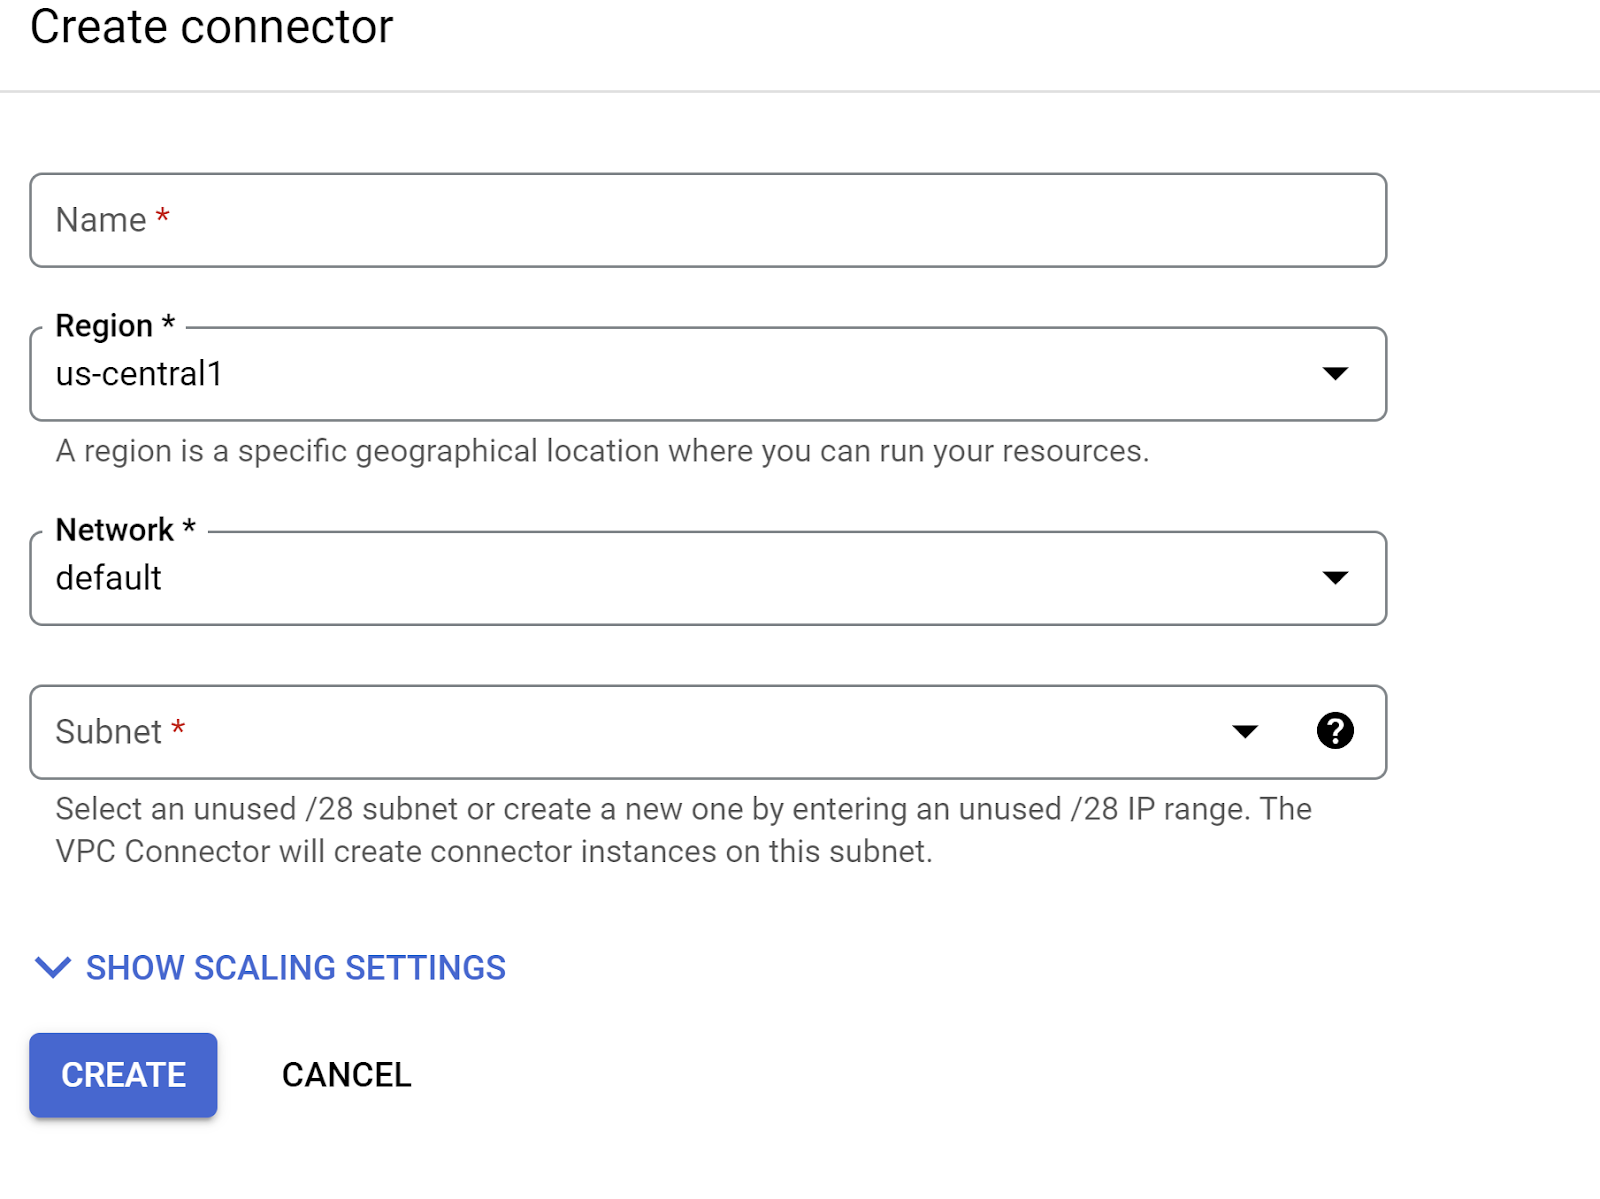
- Provide a name for the VPC Connector and make sure the region is the same as your instance. Leave the Network value as default and set Subnet as Custom IP Range with the IP range of 10.8.0.0 or something similar that is available.
- Expand SHOW SCALING SETTINGS and make sure you have the configuration set to exactly the following:

- Click CREATE and this connector should be listed in the egress settings now.
- Select the newly created connector.
- Opt for all traffic to be routed through this VPC connector.
- Click NEXT and then DEPLOY.
- Once the updated Cloud Function is deployed, you should see the endpoint generated.
- You should be able to test it by clicking the TEST button on the top of the Cloud Run Functions console and by executing the resulting command in the Cloud Shell Terminal.
- The deployed endpoint is the URL that you need to update in the .env variable
CHECK_ORDER_STATUS_ENDPOINT.
8. Model Setup
Your agent's ability to understand user requests and generate responses is powered by a Large Language Model (LLM). Your agent needs to make secure calls to this external LLM service, which requires authentication credentials. Without valid authentication, the LLM service will deny the agent's requests, and the agent will be unable to function.
- Get an API key from Google AI Studio.
- In the next step where you set up the .env file, replace
<<your API KEY>>with your actual API KEY value.
9. ENV Variables Setup
- Set up your values for the parameters in the template .env file in this repo. In my case, the .env has these variables:
GOOGLE_GENAI_USE_VERTEXAI=FALSE
GOOGLE_API_KEY=<<your API KEY>>
GOOGLE_CLOUD_LOCATION=us-central1 <<or your region>>
GOOGLE_CLOUD_PROJECT=<<your project id>>
PROJECT_ID=<<your project id>>
GOOGLE_CLOUD_REGION=us-central1 <<or your region>>
STORAGE_BUCKET=next-demo-store <<or your storage bucket name>>
CHECK_ORDER_STATUS_ENDPOINT=<<YOUR_ENDPOINT_TO_CLOUD FUNCTION_TO_READ_ORDER_DATA_FROM_ALLOYDB>>
Replace placeholders with your values.
10. Run Your Agent
- Using the terminal, navigate to the parent directory of your agent project:
cd renovation-agent
- Install all dependencies
pip install -r requirements.txt
- You can run the following command in your Cloud Shell terminal to execute the agent:
adk run .
- You can run the following to run it in an ADK provisioned web UI:
adk web
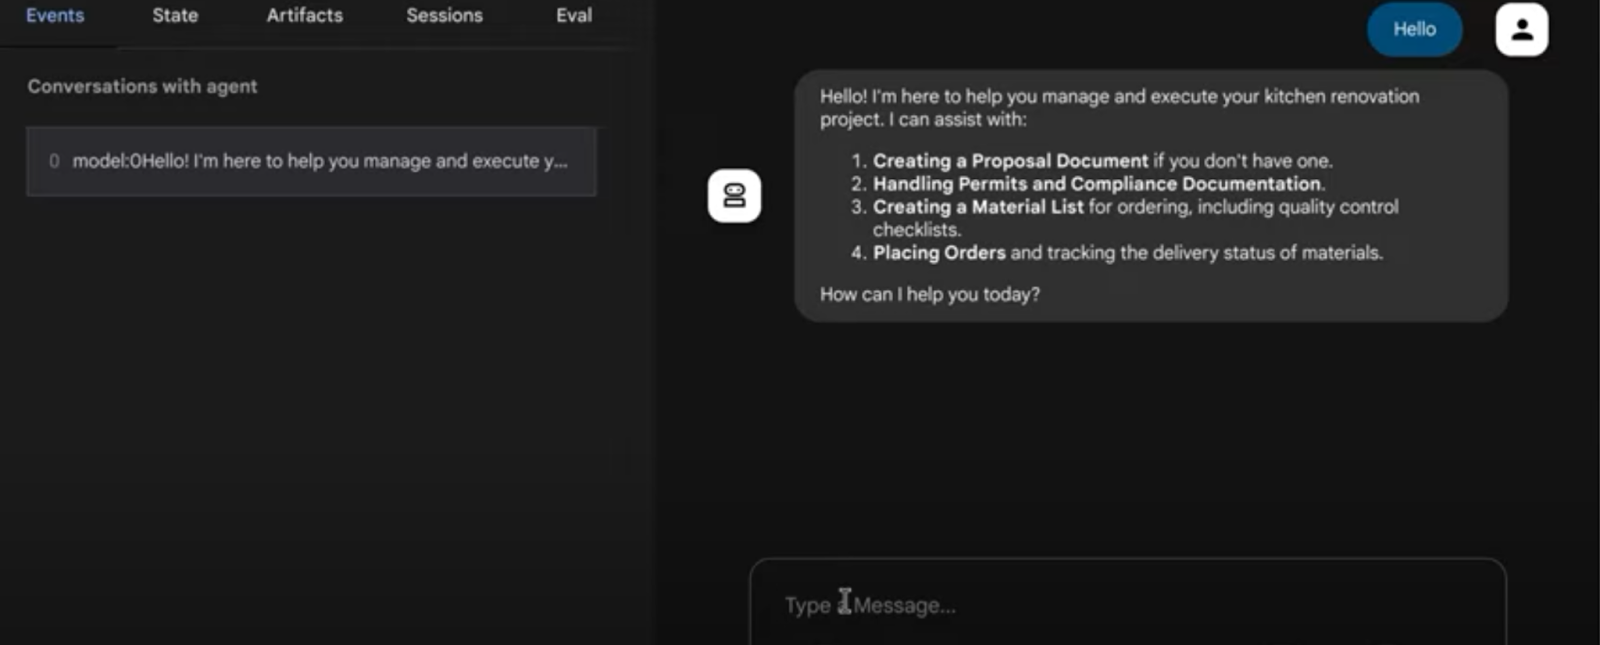
- Test with the following prompts:
user>>

Hello. Generate Proposal Document for the kitchen remodel requirement. I have no other specification.
11. Result
@ Multi-agent system for Kitchen Renovation tasks
12. Deployment to Agent Engine
Now that you have tested the multi-agent system to work fine, let's make it serverless and available on the cloud for anyone / any application to consume it. Uncomment the below code snippet in the agent.py from they repo and you are good to deploy your multi-agent system:
# Agent Engine Deployment:
# Create a remote app for our multiagent with agent Engine.
# This may take 1-2 minutes to finish.
# Uncomment the below segment when you're ready to deploy.

app = AdkApp(
    agent=root_agent,
    enable_tracing=True,
)

vertexai.init(
    project=PROJECT_ID,
    location=GOOGLE_CLOUD_LOCATION,
    staging_bucket=STAGING_BUCKET,
)

remote_app = agent_engines.create(
    app,
    requirements=[
        "google-cloud-aiplatform[agent_engines,adk]>=1.88",
        "google-adk",
        "pysqlite3-binary",
        "toolbox-langchain==0.1.0",
        "pdfplumber",
        "google-cloud-aiplatform",
        "cloudpickle==3.1.1",
        "pydantic==2.10.6",
        "pytest",
        "overrides",
        "scikit-learn",
        "reportlab",
        "google-auth",
        "google-cloud-storage",
    ],
)
# Deployment to Agent Engine related code ends
Execute this agent.py from within the project folder again with the following command:
>> cd adk-renovation-agent

>> python agent.py
This code will take a few minutes to complete. Once it is done, you will receive an endpoint that looks like this:
'projects/123456789/locations/us-central1/reasoningEngines/123456'
You can test your deployed agent with the following code by adding a new file " test.py"
import vertexai
from vertexai.preview import reasoning_engines
from vertexai import agent_engines
import os
import warnings
from dotenv import load_dotenv
load_dotenv()


GOOGLE_CLOUD_PROJECT = os.environ["GOOGLE_CLOUD_PROJECT"]
GOOGLE_CLOUD_LOCATION = os.environ["GOOGLE_CLOUD_LOCATION"]
GOOGLE_API_KEY = os.environ["GOOGLE_API_KEY"]
GOOGLE_GENAI_USE_VERTEXAI=os.environ["GOOGLE_GENAI_USE_VERTEXAI"]
AGENT_NAME = "adk_renovation_agent"
MODEL_NAME = "gemini-2.5-pro-preview-03-25"
warnings.filterwarnings("ignore")
PROJECT_ID = GOOGLE_CLOUD_PROJECT

reasoning_engine_id = "<<YOUR_DEPLOYED_ENGINE_ID>>"

vertexai.init(project=PROJECT_ID, location="us-central1")
agent = agent_engines.get(reasoning_engine_id)
print("**********************")
print(agent)
print("**********************")


for event in agent.stream_query(
    user_id="test_user",
    message="I want you to check order status.",
):
    print(event)
In the above code, replace the value for the placeholder "<<YOUR_DEPLOYED_ENGINE_ID>>" and run the command "python test.py" and you are all set to execute this to interact with a multi-agent system that is deployed Agent Engine and all set to renovate your kitchen!!!
13. One-line Deployment Options
Now that you have tested the deployed multi-agent system, let's learn simpler methods that abstract the deployment step we did in the previous step: ONE LINE DEPLOYMENT OPTIONS:
- To Cloud Run:
Syntax:
adk deploy cloud_run \
--project=<<YOUR_PROJECT_ID>> \
--region=us-central1 \
--service_name=<<YOUR_SERVICE_NAME>> \
--app_name=<<YOUR_APP_NAME>> \
--with_ui \
./<<YOUR_AGENT_PROJECT_NAME>>
In this case:
adk deploy cloud_run \
--project=<<YOUR_PROJECT_ID>> \
--region=us-central1 \
--service_name=renovation-agent \
--app_name=renovation-app \
--with_ui \
./renovation-agent
You can use the deployed endpoint for downstream integrations.
- To Agent Engine:
Syntax:
adk deploy agent_engine \
  --project <your-project-id> \
  --region us-central1 \
  --staging_bucket gs://<your-google-cloud-storage-bucket> \
  --trace_to_cloud \
  path/to/agent/folder
In this case:
adk deploy agent_engine --project <<YOUR_PROJECT_ID>> --region us-central1 --staging_bucket gs://<<YOUR_BUCKET_NAME>> --trace_to_cloud renovation-agent
You should see a new agent in the Agent Engine UI within the Google Cloud Console. Refer to this blog for more details.
14. Clean up
To avoid incurring charges to your Google Cloud account for the resources used in this post, follow these steps:
- In the Google Cloud console, go to the Manage resources page.
- In the project list, select the project that you want to delete, and then click Delete.
- In the dialog, type the project ID, and then click Shut down to delete the project.
15. Congratulations
Congratulations! You have successfully created and interacted with your first agent using ADK!