
1. Overview
Imagine a fashion app that not only helps you find the perfect outfit but also provides real-time styling advice, all thanks to the power of cutting-edge genAI integration! In this talk, we'll explore how we built such an app using AlloyDB's vector search capabilities, coupled with Google's ScaNN index, enabling lightning-fast searches for matching outfits and delivering instant fashion recommendations.
We'll also delve into how AlloyDB's ScaNN index optimizes complex queries to generate personalized style suggestions. We will also use Gemini & Imagen, powerful generative AI models, to provide creative styling inspiration and even visualize your personalized looks. This entire application is built on a serverless architecture, ensuring a seamless and scalable experience for users.
The Challenge: By offering personalized outfit suggestions, the app intends to help out people who struggle with fashion indecisiveness. It also helps avoid decision fatigue from outfit planning.
The Solution: The outfit recommender app solves the problem of providing users with an intelligent, personalized, and engaging fashion experience while showcasing the capabilities of AlloyDB, generative AI, and serverless technologies.
What you'll build
As part of this lab, you will:
- Create an AlloyDB instance and load Ecommerce Dataset
- Enable the pgvector and generative AI model extensions in AlloyDB
- Generate embeddings from the product description
- Deploy the solution in serverless Cloud Run Functions
- Upload an image to Gemini and generate an image description prompt.
- Generate search results based on prompts coupled with ecommerce dataset embeddings.
- Add additional prompts to customize the prompt and generate style recommendations.
- Deploy the solution in serverless Cloud Run Functions
Requirements
2. Architecture
The high-level architecture of the app is as follows:
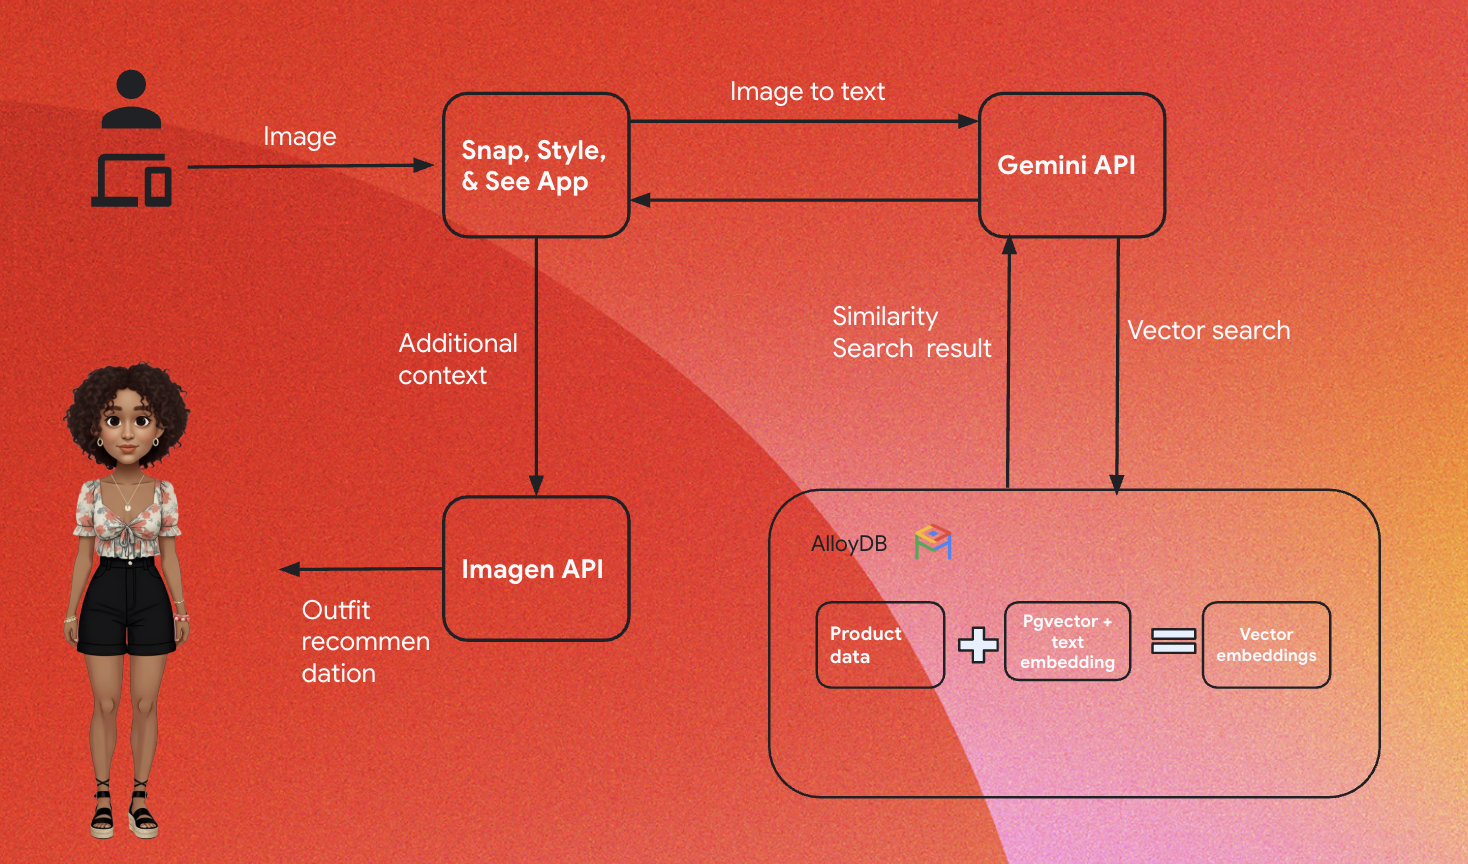
The following sections highlight the contextual flow of the tutorial:
Ingestion:
Our first step is to ingest the Retail data (inventory, product descriptions, customer interactions) into AlloyDB.
Analytics Engine:
We will use AlloyDB as the analytics engine to perform the below:
- Context Extraction: The engine analyzes the data stored within AlloyDB to understand relationships between products, categories, customer behavior, etc as applicable.
- Embedding Creation: Embeddings (mathematical representations of text) are generated for both the user's query and the information stored in AlloyDB.
- Vector Search: The engine performs a similarity search, comparing the query embedding to the embeddings of product descriptions, reviews, and other relevant data. This identifies the 25 most relevant "nearest neighbors."
Gemini recommendation:
The image byte array is passed to Gemini model via the Vertex AI API, along with the prompt asking for a textual description of the top wear along with the bottom-wear recommendation suggestions.
AlloyDB RAG and vector search:
The description of the topwear is used to query the database. The query converts the search text (recommendation from Gemini model for matching bottom wear) into embeddings and performs a Vector Search on the embeddings stored in the database to find the nearest neighbors (matching results). The vector embeddings in the AlloyDB database are indexed using the ScaNN index for better recall.
Response Image Generation:
The validated responses are structured into a JSON array and the whole engine is packaged into a serverless Cloud Run Function that is invoked from the Agent Builder.
Imagen image generation:
The user's styling prompt, a user-selected recommendation and any personalization requests are combined to prompt Imagen 3 with an existing image. The styling image is generated based on this prompt, using the Vertex AI API.
3. Before you begin
Create a project
- In the Google Cloud Console, on the project selector page, select or create a Google Cloud project.
- Make sure that billing is enabled for your Cloud project. Learn how to check if billing is enabled on a project .
- You'll use Cloud Shell, a command-line environment running in Google Cloud that comes preloaded with bq. Click Activate Cloud Shell (
 ) at the top of the Google Cloud console.
 - Once connected to Cloud Shell, verify that you're already authenticated and that the project is set to your project ID using the following command:
gcloud auth list
- Run the following command to confirm that the future gcloud commands will identify your project correctly.
gcloud config list project
- If your project is not set, use the following command to set it explicitly:
gcloud config set project <YOUR_PROJECT_ID>
- Enable the required APIs.
Follow the link to enable APIs.
If you miss enabling any API, you can always enable it during the course of the implementation.
For more information about gcloud commands and usage, refer to the documentation.
4. Database setup
In this lab we'll use AlloyDB as the database to store the retail ecommerce dataset. It uses clusters to store all of the resources, such as databases and logs. Each cluster has a primary instance that provides an access point to the data. Tables are the actual resource that stores data.
Let's create an AlloyDB cluster, instance, and table where the ecommerce dataset will be loaded.
Create a cluster and instance
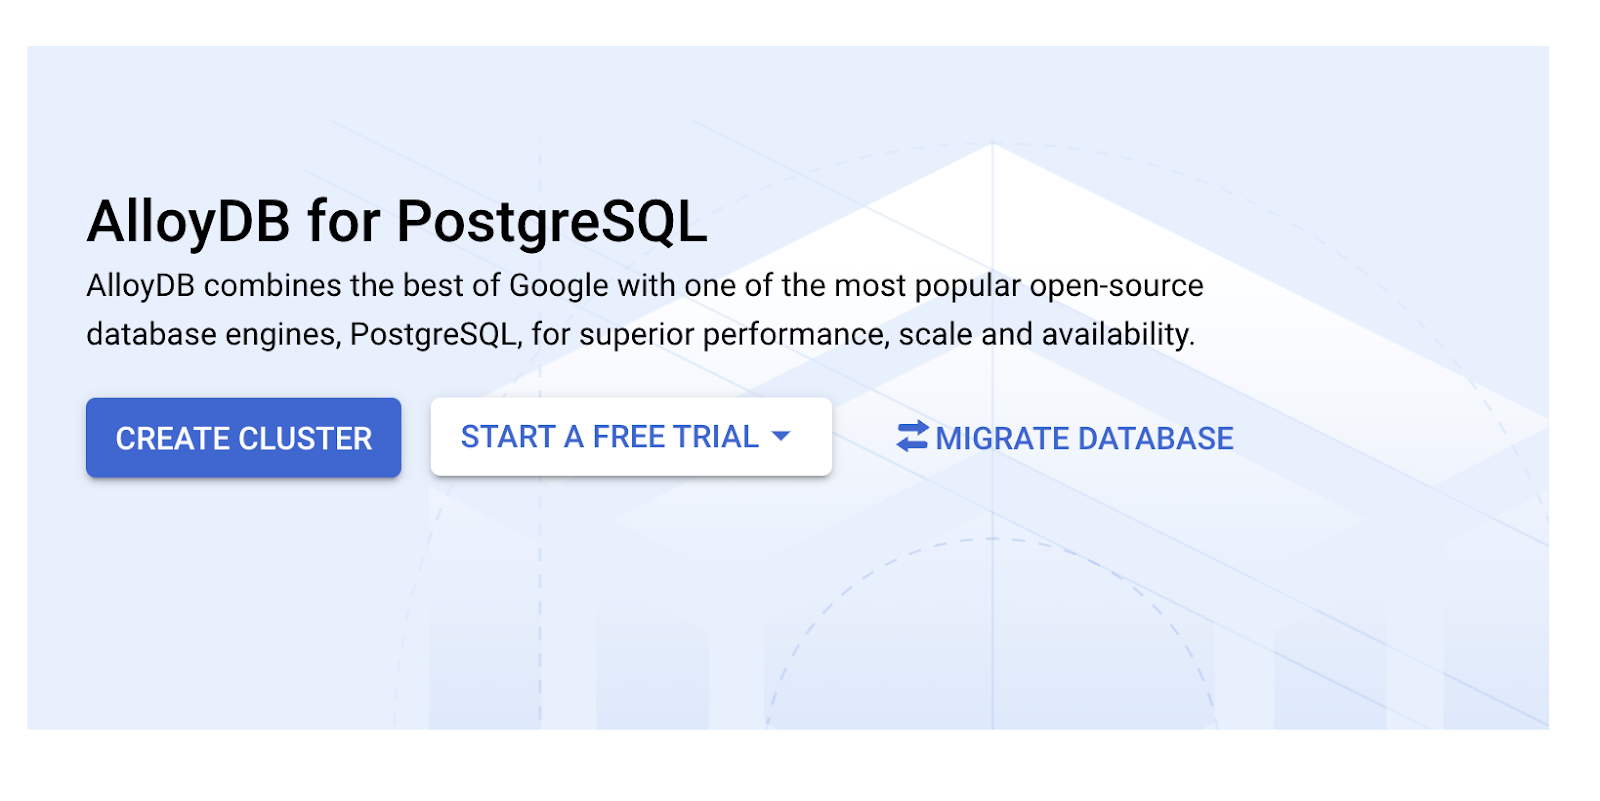
- In the Google Cloud Console, search for AlloyDB. An easy way to find most pages in Cloud Console is to search for them using the search bar of the console.
- Click CREATE CLUSTER.
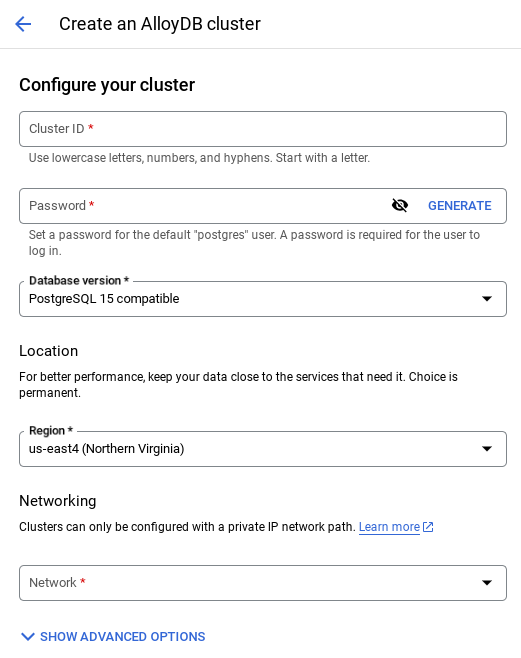
- Create a cluster and instance with the following values:
- cluster id: "
shopping-cluster" - password: "
alloydb" - PostgreSQL 15 compatible
- Region: "
us-central1" - Networking: "
default"
- In Network, when you select the default network, the following option appears. Click SET UP CONNECTION to set up a default network.

- Select Use an automatically allocated IP range and click Continue. After reviewing the information, click CREATE CONNECTION.
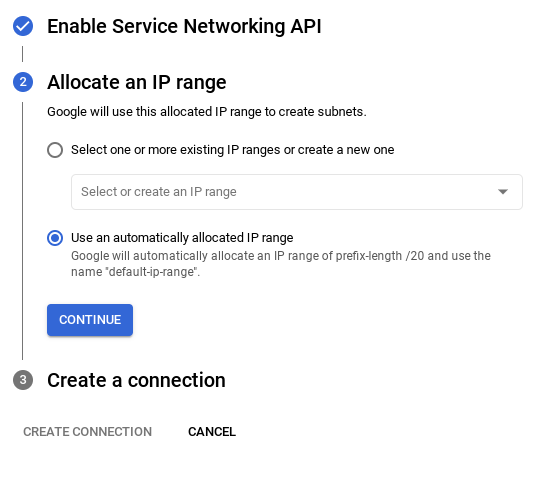
Wait for the default network creation to complete.
- In Configure your primary instance, set the Instance ID as "
shopping-instance".
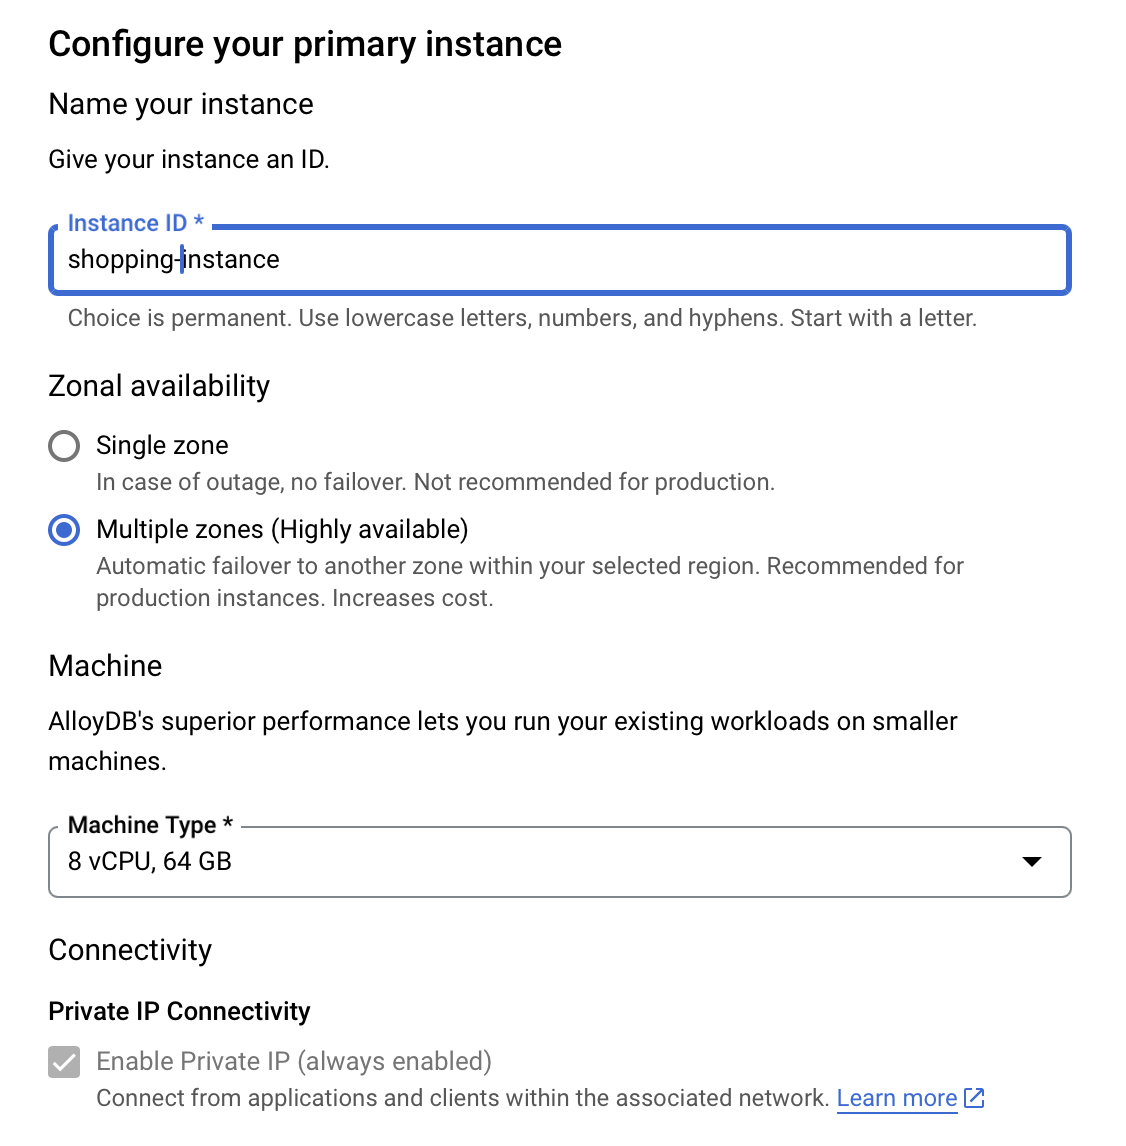
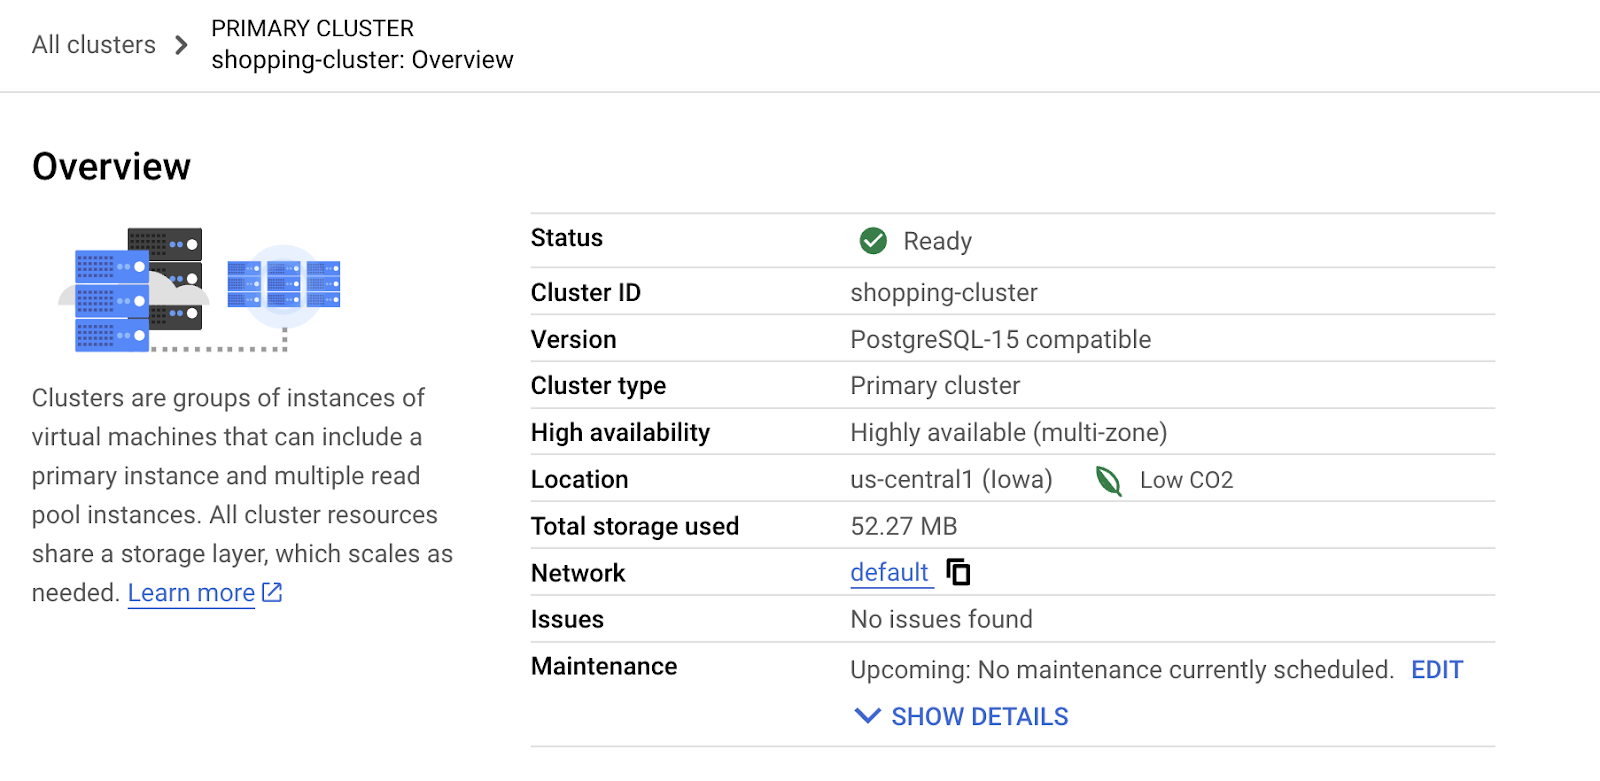
- Click CREATE CLUSTER to complete setting up of the cluster as follows:
5. Data ingestion
Now it's time to add a table with the data about the store. Wait for your instance to finish being created. Once it is created, you can sign into AlloyDB using the credentials you set when you created the cluster.
Authenticate to AlloyDB database
- In Google Cloud Console, go to AlloyDB. Select the primary cluster, and then click AlloyDB Studio in the left-hand navigation:

- Enter the following details to authenticate to AlloyDB database:
- Username : "
postgres" - Database : "
postgres" - Password : "
alloydb"
Once you have authenticated successfully into AlloyDB Studio, SQL commands are entered in the Editor tabs. You can add multiple Editor windows using the plus to the right of the first Editor tab.
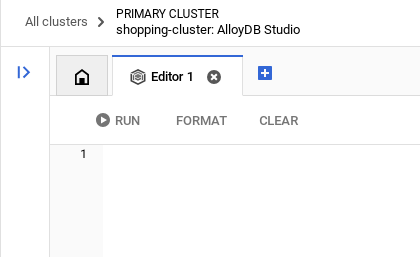
You'll enter commands for AlloyDB in Editor windows, using the Run, Format, and Clear options as necessary.
Enable Extensions
For building this app, we will use the "pgvector" and "google_ml_integration" extensions.
- pgvector extension allows you to store and search vector embeddings.
- google_ml_integration extension provides functions you use to access Vertex AI prediction endpoints to get predictions in SQL.
- Enable these extensions by running the following DDLs:
CREATE EXTENSION IF NOT EXISTS google_ml_integration CASCADE;
CREATE EXTENSION IF NOT EXISTS vector;
- Verify if the extensions are installed by running this SQL command:
select extname, extversion from pg_extension;
Create a table
- Create a table using the following DDL statement:
CREATE TABLE
 apparels ( id BIGINT,
   category VARCHAR(100),
   sub_category VARCHAR(50),
   uri VARCHAR(200),
   image VARCHAR(100),
   content VARCHAR(2000),
   pdt_desc VARCHAR(5000),
   embedding vector(768) );
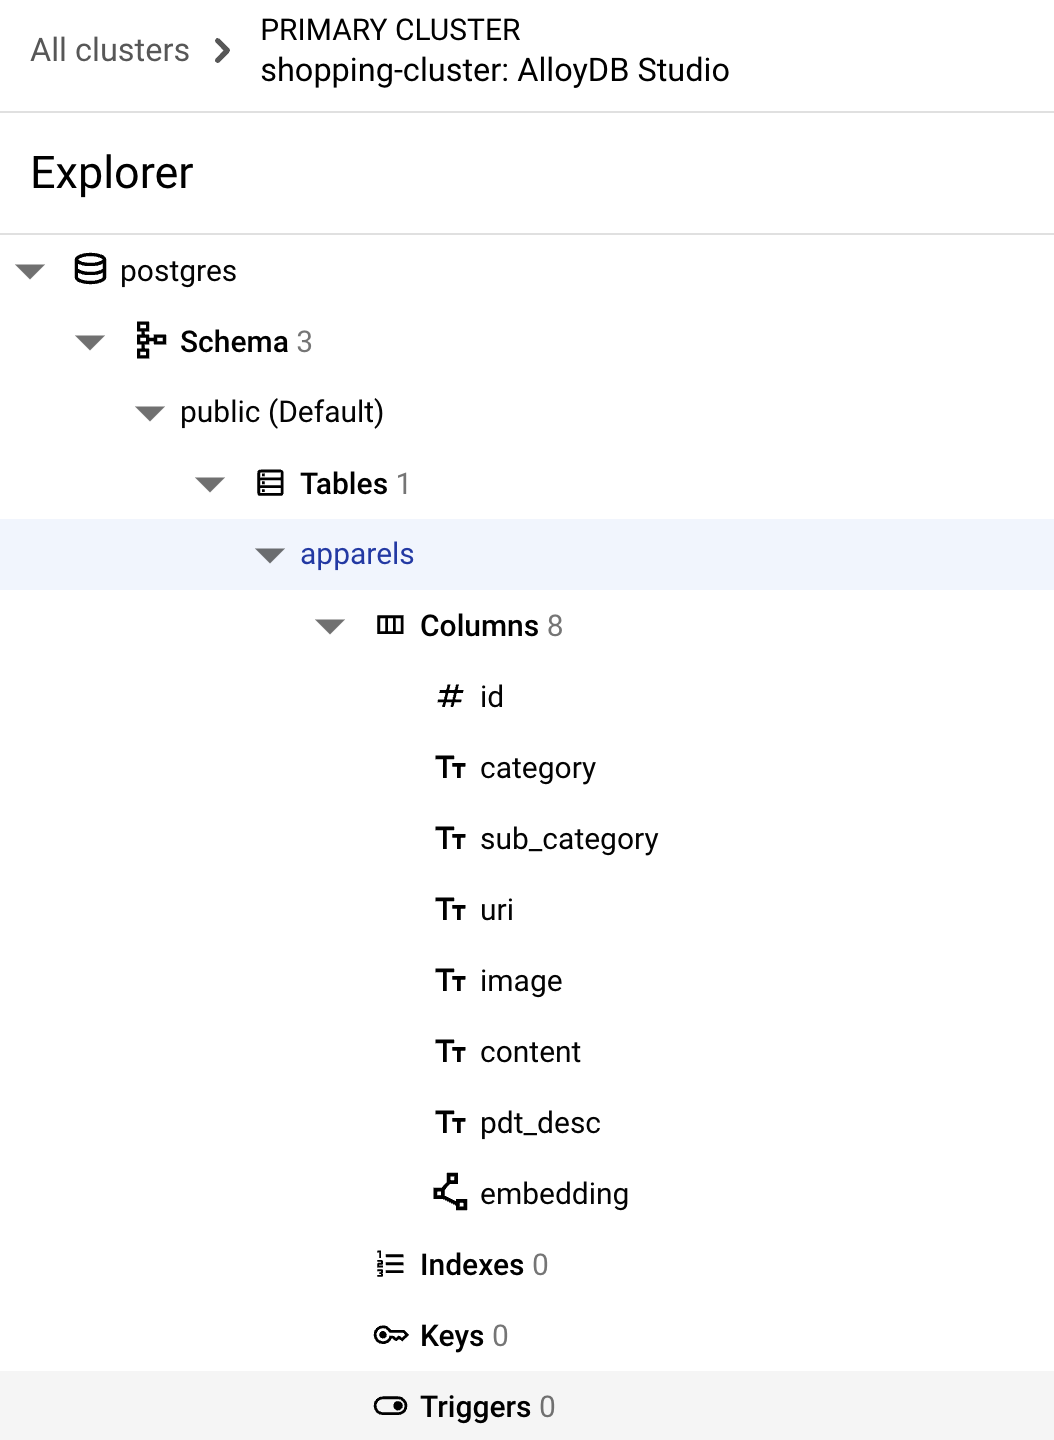
On successful execution of the above command, you should be able to view the table in
the database. The following image shows an example:
Ingest data
For this lab, we have test data of about 200 records in this SQL file. It contains the id, category, sub_category, uri, image, and content. The other fields will be filled in later in the lab.
- Copy the 20 lines/insert statements from the SQL file in a new Editor tab in AlloyDB Studio, and click RUN.
- Expand the Explorer section until you can see the table named
apparels. - Click the menu icon [⋮] and click Query. A SELECT statement will open in a new Editor tab.
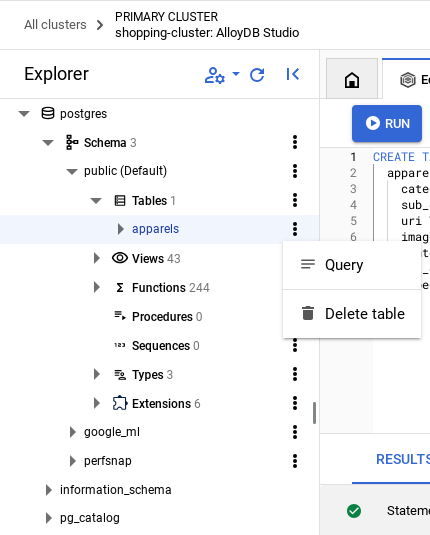
- Click Run to verify that the rows are inserted.
Grant Permission to user
We will grant permission to the postgres user to generate embeddings from within AlloyDB. In AlloyDB Studio, run the following statement to grant execute rights on the embedding function to the user postgres:
GRANT EXECUTE ON FUNCTION embedding TO postgres;
Grant Vertex AI User ROLE to the AlloyDB service account
We will be using the text embedding models from Vertex AI to generate embeddings for which Vertex AI User ROLE to the AlloyDB service account.
In the Google Cloud Console, click the Cloud Shell terminal [ ] icon and run the following command:
PROJECT_ID=$(gcloud config get-value project)

gcloud projects add-iam-policy-binding $PROJECT_ID \
  --member="serviceAccount:service-$(gcloud projects describe $PROJECT_ID --format="value(projectNumber)")@gcp-sa-alloydb.iam.gserviceaccount.com" \
--role="roles/aiplatform.user"
6. Build Context
To create an embedding, we'll need to have a context i.e. all of the information we want to include in a single field. We'll do this by creating a product description that we'll store in the pdt_desc column in the apparels table.
In our case, we'll use all the information about each product, but when you do this with your own data, feel free to engineer the data in any way that you find meaningful for your business.
In the AlloyDB Studio Editor tab, run the following command that updates the pdt_desc field with context data:
UPDATE
 apparels
SET
 pdt_desc = CONCAT('This product category is: ', category, ' and sub_category is: ', sub_category, '. The description of the product is as follows: ', content, '. The product image is stored at: ', uri)
WHERE
 id IS NOT NULL;
This DML creates a simple context summary using the information from all the fields available in the table and other dependencies (if any in your use case). For a more precise assortment of information and context creation, feel free to engineer the data in any way that you find meaningful for your business.
7. Create embeddings for the context
It's much easier for computers to process numbers than to process text. An embedding system converts text into a series of floating point numbers that should represent the text, no matter how it's worded, what language it uses, etc.
Consider describing a seaside location. It might be called "on the water", "beachfront", "walk from your room to the ocean", "sur la mer", "на берегу океана" etc. These terms all look different, but their semantic meaning or in machine learning terminology, their embeddings should be very close to each other.
Now that the data and context are ready, we will run the SQL to add the embeddings of the product description(pdt_desc) column to the table in the field embedding. There are a variety of embedding models you can use. We're using text-embedding-005 from Vertex AI.
- In AlloyDB Studio, run the following command to generate embeddings, and update the
pdt_desccolumn with embeddings for the data it stores:
UPDATE
 apparels
SET
 embedding = embedding( 'text-embedding-005',
   pdt_desc)
WHERE
 TRUE;
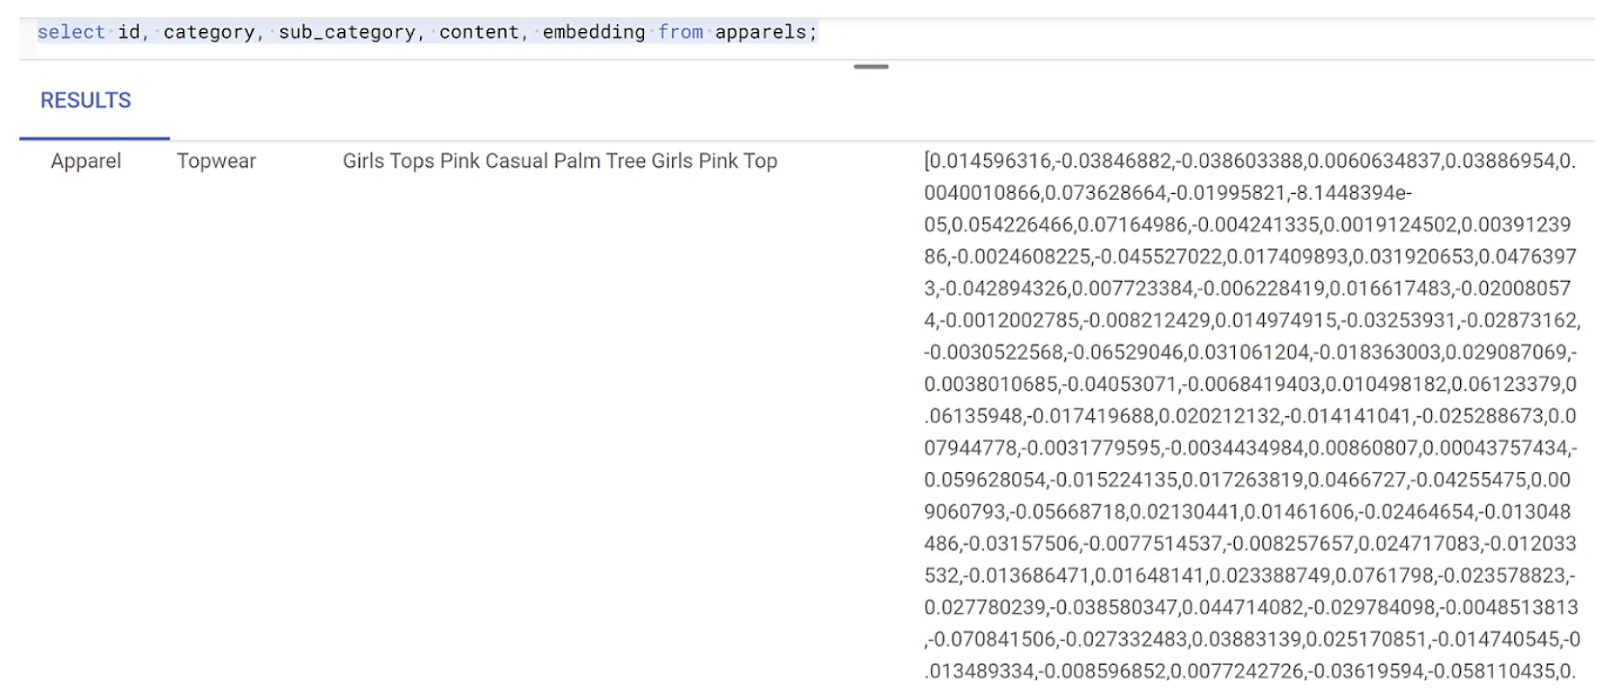
- Verify that embeddings are generated by running the following command:
SELECT
 id,
 category,
 sub_category,
 content,
 embedding
FROM
 Apparels
LIMIT 5;
The following is an example embeddings vector, that looks like an array of floats, for the sample text in the query as follows:
8. Perform Vector search
Now that the table, data, and embeddings are all ready, let's perform the real time vector search for the user search text.
Assume that the user's search text is "pink color, casual, pure cotton tops for women"
To find matches for this query, run the following SQL query:
SELECT
id,
category,
sub_category,
content,
pdt_desc AS description
FROM
apparels
ORDER BY
embedding <=> embedding('text-embedding-005',
  'pink color, casual, pure cotton tops for women')::vector
LIMIT
5;
Let's look at this query in detail:
In this query,
- The user's search text is: "
I want womens tops, pink casual only pure cotton." - We are converting this search text to embeddings using the
embedding()method along with the model:text-embedding-005. This step should look familiar after the last step, where we applied the embedding function to all of the items in the table. - "
<=>" represents the use of the COSINE SIMILARITY distance method. You can find all the similarity measures available in the documentation of pgvector. - We are converting the embedding method's result to vector data type to make it compatible with the vectors stored in the database.
- LIMIT 5 represents that we want to extract 5 nearest neighbors for the search text.
The following shows example response of this SQL query:
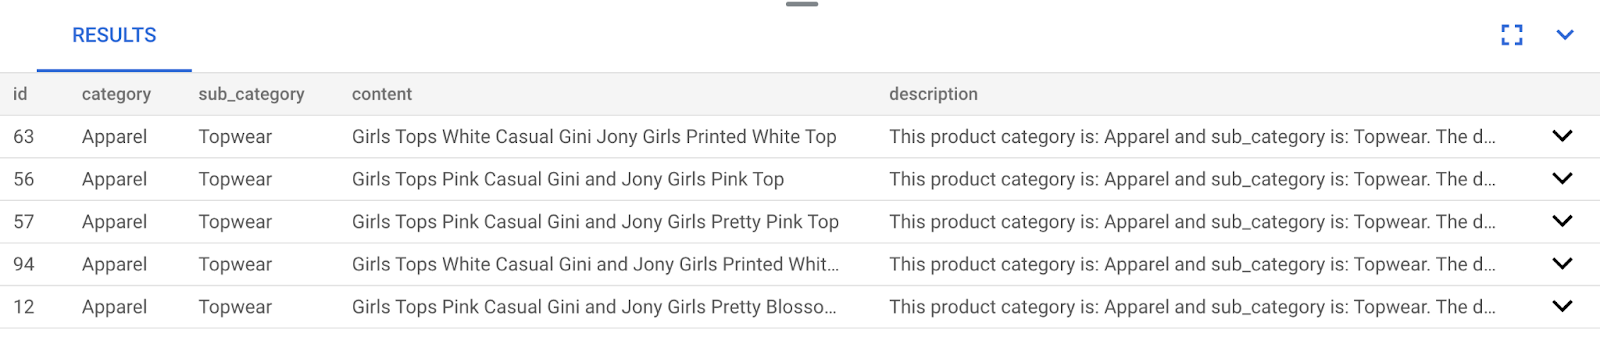
As you can observe in your results, the matches are pretty close to the search text. Try changing the color to see how the results change.
AlloyDB ScaNN index for query performance
Now let's say we want to increase the performance (query time), efficiency, and recall of this Vector Search result using the ScaNN index.
If you want to use ScaNN index, try the following steps:
- Since we already have the cluster, instance, context and embeddings created, we just have to install the ScaNN extension using the following statement:
CREATE EXTENSION IF NOT EXISTS alloydb_scann;
- Create the ScaNN index:
CREATE INDEX apparel_index ON apparels
USING scann (embedding cosine)
WITH (num_leaves=54);
In the above DDL:
apparel_indexis the name of the index.apparelsis the table name.scannis the index method.embeddingis the column in the table you want to index.cosineis the distance method you want to use with the index.54is the number of partitions to apply to this index. Set to any value between 1 to 1048576. For more information about how to decide this value, see Tune a ScaNN index.
As per the recommendation in the ScaNN repo, we have used a SQUARE ROOT of the number of data points. When partitioning, num_leaves should be roughly the square root of the number of datapoints.
- Check if the index is created using the query:
SELECT * FROM pg_stat_ann_indexes;
- Perform Vector Search using the same query we used without the index:
select * from apparels
   ORDER BY embedding <=> CAST(embedding('textembedding-gecko', 'white tops for girls without any print') as vector(768))
   LIMIT 20
The above query is the same one that we used in the lab in step 8. However, now we have the field indexed using the ScaNN index.
- Test with a simple search query with and without the index. For testing without index, you must drop the index:
white tops for girls without any print
The above search text in the Vector Search query on the INDEXED embeddings data results in quality search results and efficiency. The efficiency is vastly improved (in terms of time for execution: 10.37ms without ScaNN and 0.87ms with ScaNN) with the index. For more information on this topic, please refer to this blog.
9. Match Validation with the LLM
Before moving on and creating a service to return the best matches to an application, let's use a generative AI model to validate if these potential responses are truly relevant and safe to share with the user.
Ensuring the instance is set up for Gemini
- Verify that the
google_ml_integrationis already enabled for your Cluster and Instance. In AlloyDB Studio, run the following command:
show google_ml_integration.enable_model_support;
If the value is shown as "on", you can skip the next 2 steps and go directly to setting up
the AlloyDB and Vertex AI Model integration.
- Go to your AlloyDB cluster's primary instance, and click EDIT PRIMARY INSTANCE.
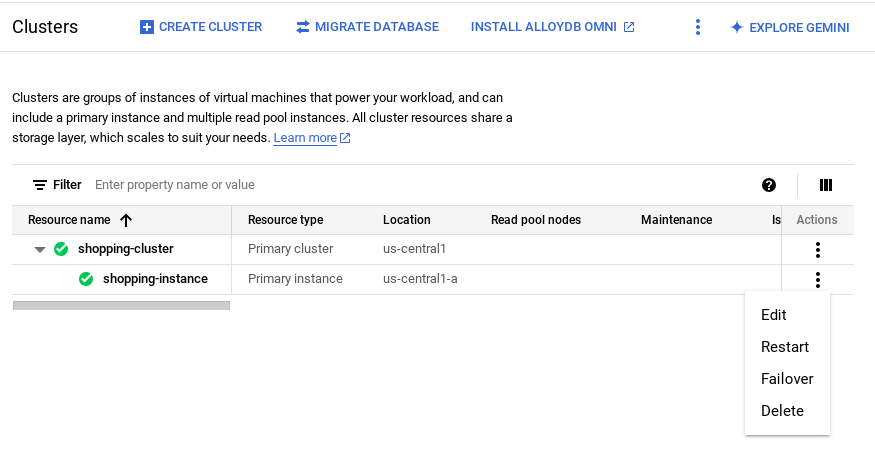
- In Advanced configuration options, expand the New database flag section, and ensure that the
google_ml_integration.enable_model_support flagis set to "on" as follows:
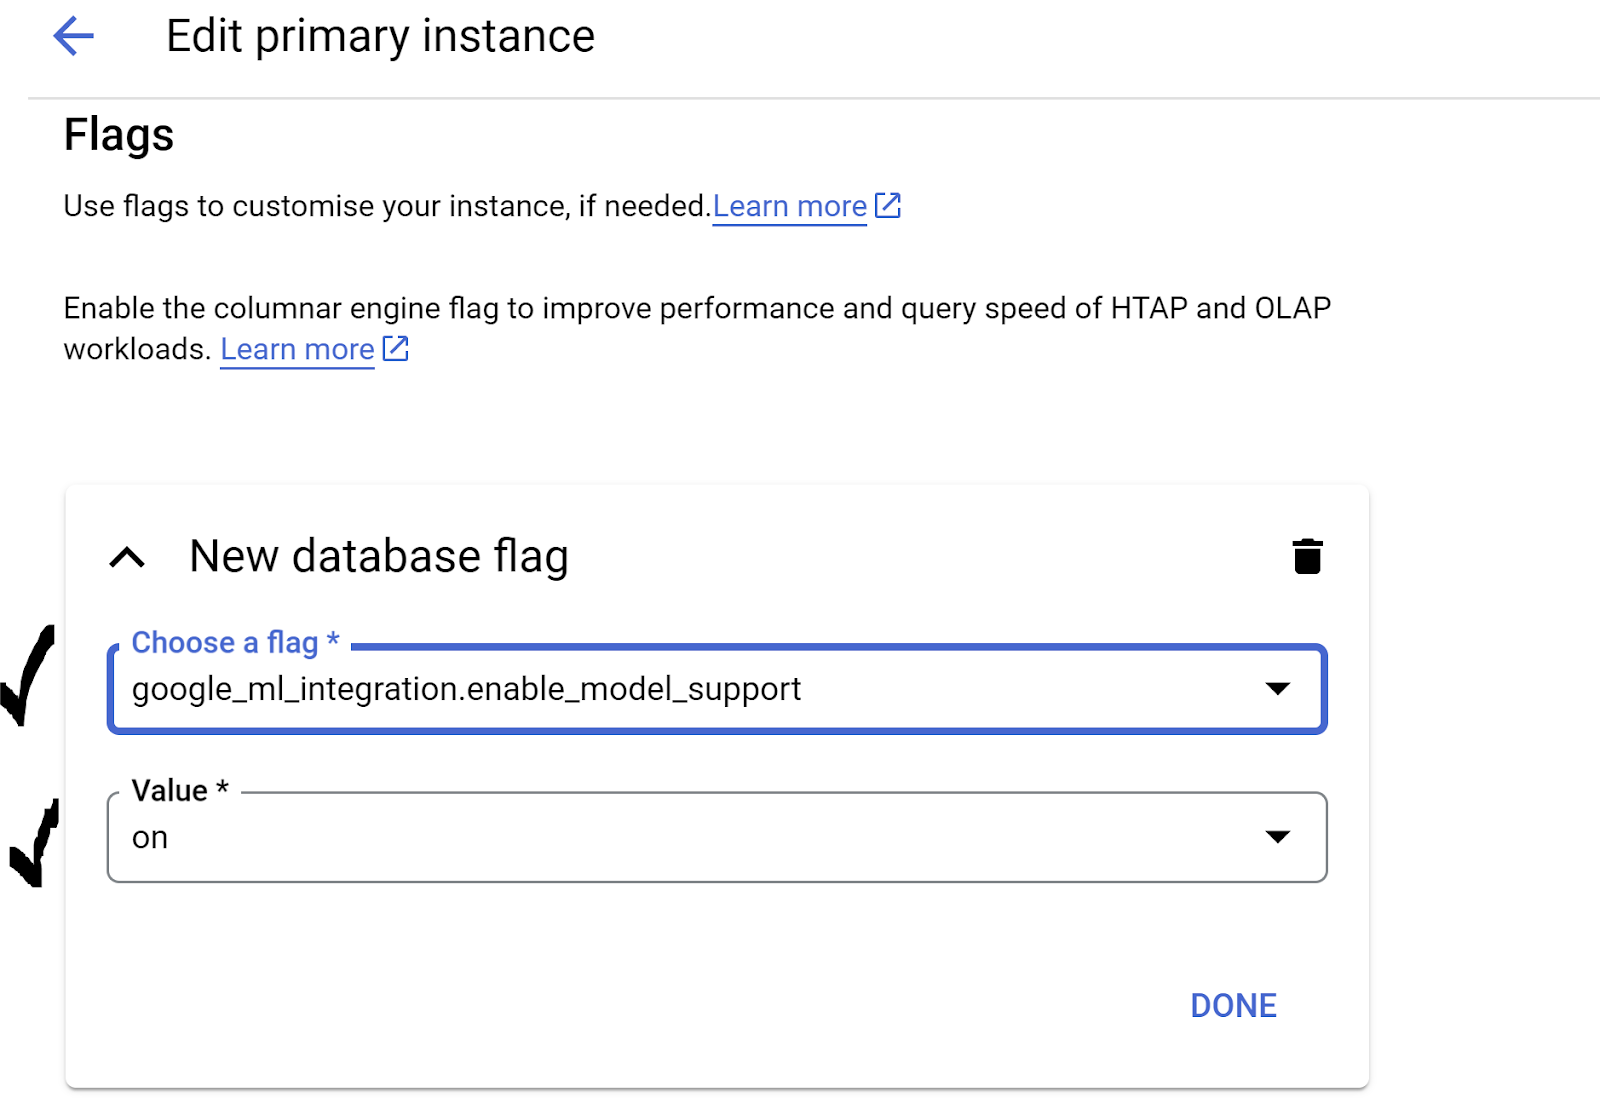 3. If it is not set to "`on`", set it to "`on`" and then click **UPDATE INSTANCE**.
This step will take a few minutes.
AlloyDB and Vertex AI Model integration
Now you can connect to AlloyDB Studio and run the following DML statement to set up Gemini model access from AlloyDB, using your project ID where indicated. You may be warned of a syntax error before running the command, but it should run fine.
- In Google Cloud Console, go to AlloyDB. Select the primary cluster, and then click AlloyDB Studio in the left-hand navigation.
- We will use the
gemini-1.5-pro:generateContentthat is available by default with thegoogle_ml_integrationextension.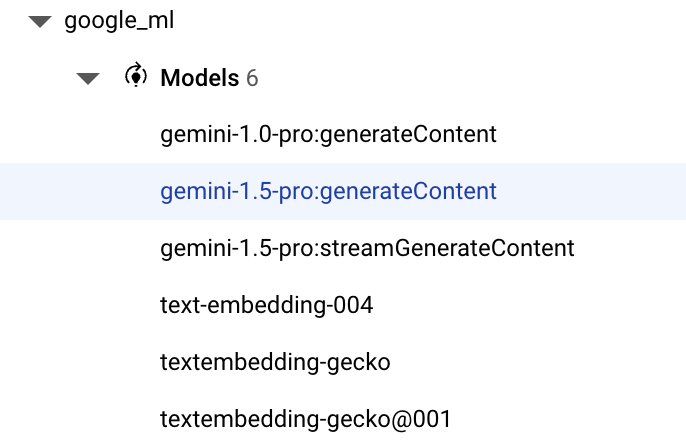
- You can check on the models configured for access via the following command in AlloyDB Studio:
select model_id,model_type from google_ml.model_info_view;
- Grant permission for database users to execute the ml_predict_row function to run predictions using the Google Vertex AI models by running the following command:
GRANT EXECUTE ON FUNCTION ml_predict_row to postgres;
Evaluating the responses
While we'll end up using one large query for the next section where we actually take the application to Cloud Run, to ensure the responses from the query are reasonable, the query can be difficult to understand.
We'll look at the individual sections that go on to build the larger query we finally use.
- First we'll send a request to the database to get the 5 closest matches to a user query. We're hardcoding the query to keep this simple, but don't worry, we'll interpolate it into the query later.
We're including the product description from the apparels table and adding two new fields–one that combines the description with the index and another with the original request. This data is being saved in a table called xyz, which is a temporary table name.
CREATE TABLE
 xyz AS
SELECT
 id || ' - ' || pdt_desc AS literature,
 pdt_desc AS content,
 'I want womens tops, pink casual only pure cotton.' AS  user_text
FROM
 apparels
ORDER BY
 embedding <=> embedding('text-embedding-005',
   'I want womens tops, pink casual only pure cotton.')::vector
LIMIT
 5;
The output of this query will be 5 most similar rows pertaining to the users query. The
new table xyz will contain 5 rows where each row will have the following columns:
literaturecontentuser_text
- To determine how valid responses are, we'll use a complicated query where we explain how to evaluate the responses. It uses the
user_textandcontentin thexyztable as part of the query.
"Read this user search text: ', user_text,
' Compare it against the product inventory data set: ', content,
' Return a response with 3 values: 1) MATCH: if the 2 contexts are at least 85% matching or not: YES or NO 2) PERCENTAGE: percentage of match, make sure that this percentage is accurate 3) DIFFERENCE: A clear short easy description of the difference between the 2 products. Remember if the user search text says that some attribute should not be there, and the record has it, it should be a NO match."
- Using that query, we'll then review the "goodness" of responses in the
xyztable. When we say goodness, we mean how closely accurate are the responses generated to what we expect them to be.
CREATE TABLE
  x AS
SELECT
  json_array_elements( google_ml.predict_row( model_id => 'gemini-1.5',
      request_body => CONCAT('{
 "contents": [
        { "role": "user",
          "parts":
             [ { "text": "Read this user search text: ', user_text, ' Compare it against the product inventory data set: ', content, ' Return a response with 3 values: 1) MATCH: if the 2 contexts are at least 85% matching or not: YES or NO 2) PERCENTAGE: percentage of match, make sure that this percentage is accurate 3) DIFFERENCE: A clear short easy description of the difference between the 2 products. Remember if the user search text says that some attribute should not be there, and the record has it, it should be a NO match."
             } ]
         }
] }'
)::json))-> 'candidates' -> 0 -> 'content' -> 'parts' -> 0 -> 'text'
AS LLM_RESPONSE
FROM
    xyz;
- The
predict_rowreturns its result in JSON format. The code "-> 'candidates' -> 0 -> 'content' -> 'parts' -> 0 -> 'text'"is used to extract the actual text from that JSON. To see the actual JSON that is returned, you can remove this code. - Finally, to get the LLM field, you just need to extract it from the x table:
SELECT
LLM_RESPONSE
FROM
        x;
- This can be combined into a single query as follows:
Warning: If you have run the above queries to check on the intermediate results,
ensure that you delete/remove the xyz and x tables from the AlloyDB database before running this query,
SELECT
 LLM_RESPONSE
FROM (
 SELECT
 json_array_elements( google_ml.predict_row( model_id => 'gemini-1.5',
     request_body => CONCAT('{
     "contents": [
       { "role": "user",
         "parts":
            [ { "text": "Read this user search text: ', user_text, ' Compare it against the product inventory data set: ', content, ' Return a response with 3 values: 1) MATCH: if the 2 contexts are at least 85% matching or not: YES or NO 2) PERCENTAGE: percentage of match, make sure that this percentage is accurate 3) DIFFERENCE: A clear short easy description of the difference between the 2 products. Remember if the user search text says that some attribute should not be there, and the record has it, it should be a NO match."
            } ]
        }
] }'
)::json))-> 'candidates' -> 0 -> 'content' -> 'parts' -> 0 -> 'text'
AS LLM_RESPONSE
   FROM (
         SELECT
           id || ' - ' || pdt_desc AS literature,
           pdt_desc AS content,
         'I want womens tops, pink casual only pure cotton.' user_text
         FROM
           apparels
         ORDER BY
             embedding <=> embedding('text-embedding-005',
             'I want womens tops, pink casual only pure cotton.')::vector
         LIMIT
           5 ) AS xyz ) AS X;
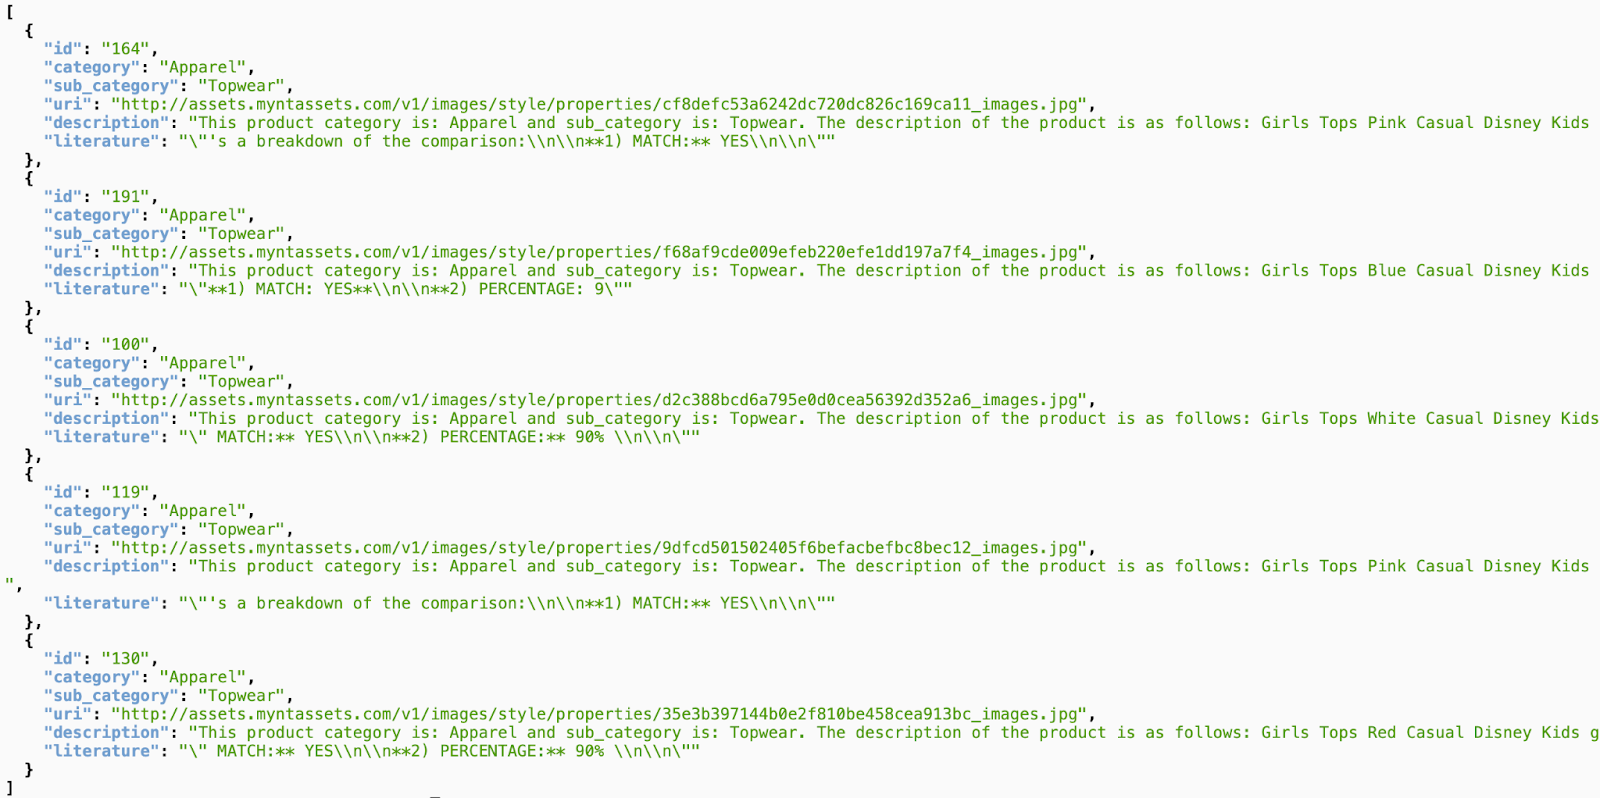
The larger query is a combination of all the queries we run in the earlier steps. The results tell whether or not there's a match, what percentage the match is, and some explanation of the rating.
Notice that the Gemini model has streaming on by default, so the actual response is spread across multiple lines: 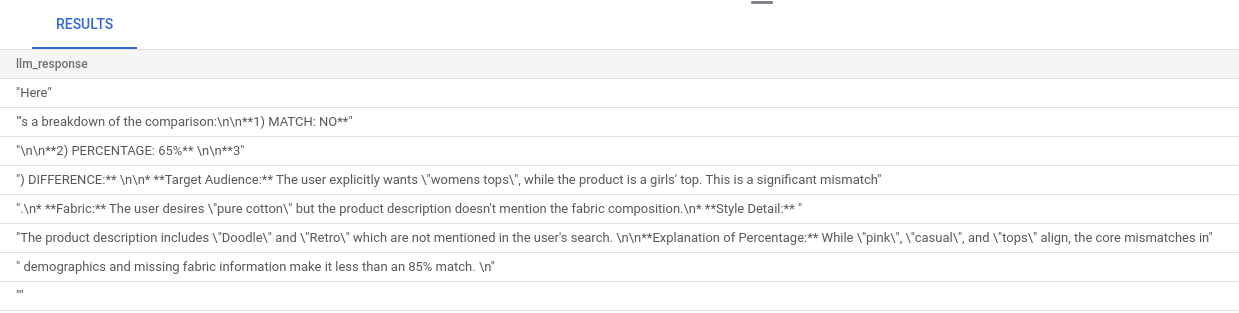
10. Take the application to web
We will now host this application so that it can be accessed from the internet.
Create the Cloud Run Function
- In the Google Cloud Console, go to Cloud Run Functions using the following link:
https://console.cloud.google.com/run/create?deploymentType=function
- In Configure, set the Function Name as "retail-engine" and select the region as "us-central1".
- In Endpoint URL, select runtime as Java 17.
- In Authentication, select Allow unauthenticated invocations.
- Expand Container(s), Volumes, Networking, Security, and click the Networking tab.
- Select Connect to a VPC for outbound traffic, and then click Use Serverless VPC Access connectors.
- In Network, click Add New VPC Connector. Enable the Serverless VPC Access API, if not already enabled.
- In the Create connector, set name to
alloydb-test-conn. - Set the region to
us-central. - Leave the Network value as default and set Subnet as Custom IP Range with the IP range of 10.8.0.0 or something similar that is available.
- Expand Show scaling settings, and set Minimum instances to 2 and the Maximum instances to 3.
- Select the Instance type as f1-micro. The following shows the Create connector options:
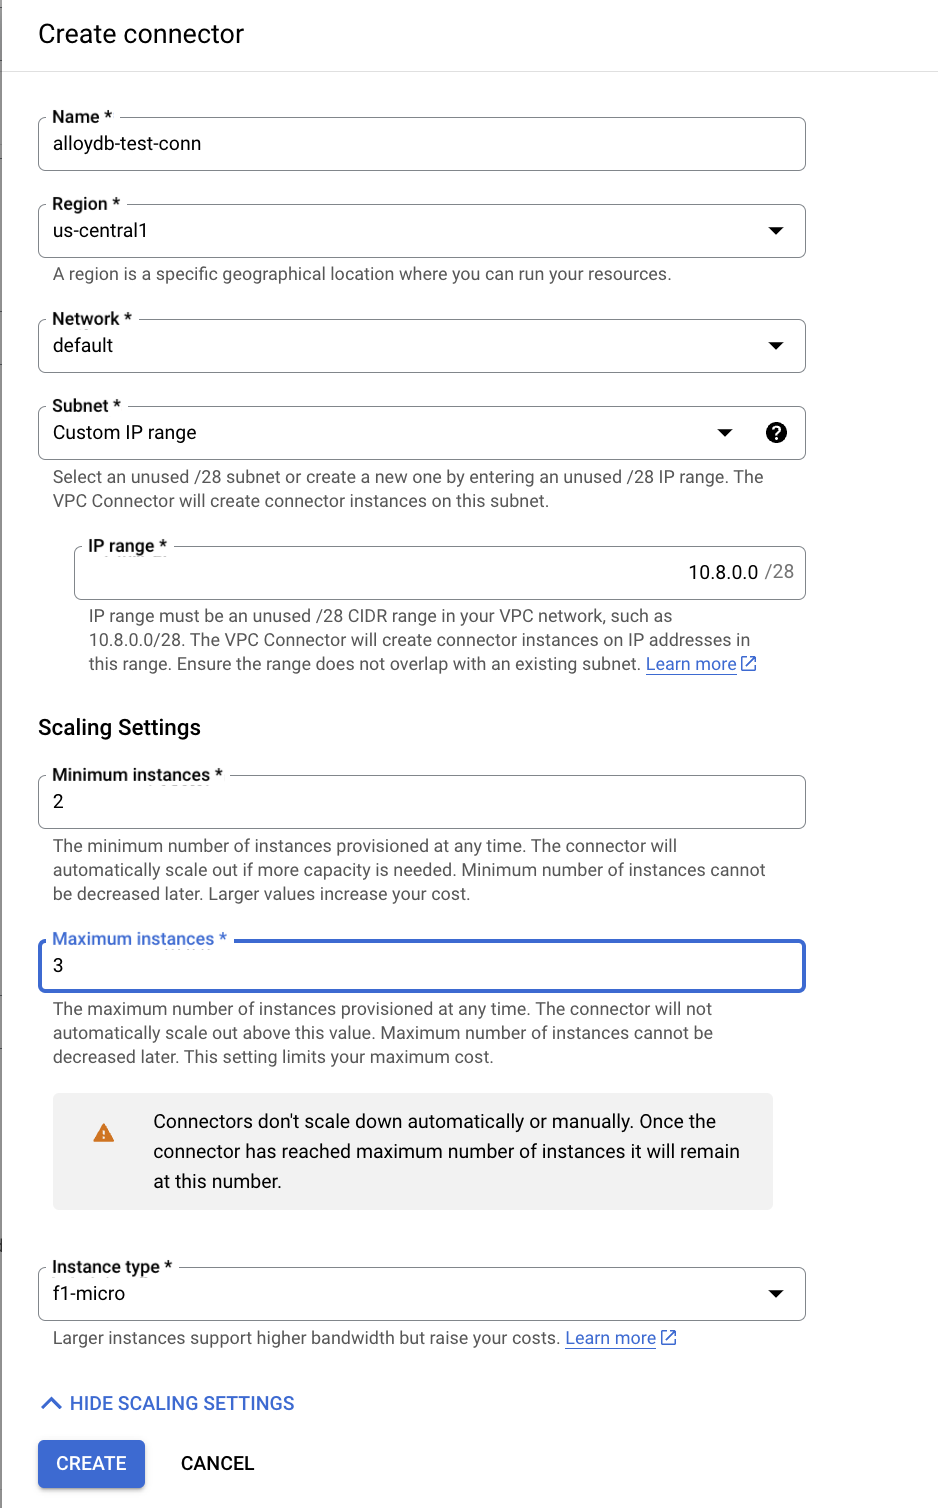
- Click Create to create the connector.
- In Traffic routing, select Route all traffic to the VPC.
- Click Create to create the function.
Deploy the application
After the function is created, update the source and redeploy the application.
- In Cloud Run, click the Services tab, and click the retail-engine function.
- Click the Source tab. Leave the default Function entry point set to "
gcfv2.HelloHttpFunction". - Replace the contents of the HelloHttpFunction.java file with the contents from this Java file.
- Update the AlloyDbJdbcConnector details in the file as per the details of your AlloyDB instance and cluster. Replace the
$PROJECT_IDwith the project ID of your AlloyDB cluster and instance.
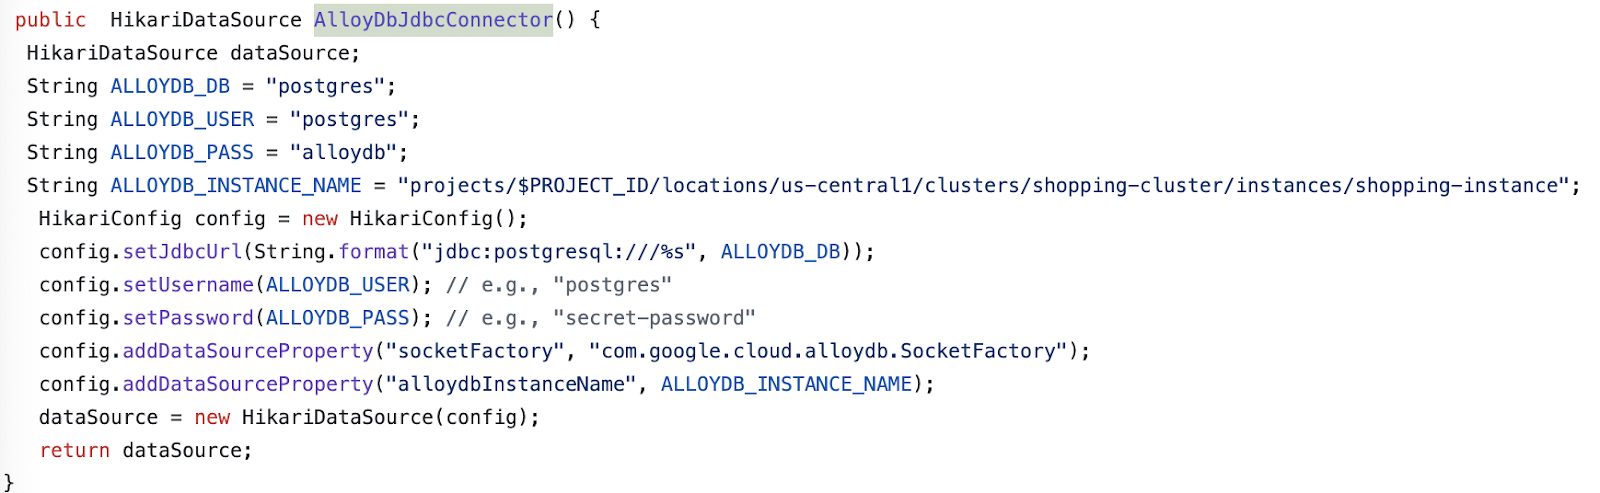
- Replace the contents of the pom.xml file with the contents of this XML file.
- Click Save and redeploy to deploy the function.
11. Test the retail-engine application
Once the updated Cloud Function is deployed, you should see the endpoint in the following format:
https://retail-engine-PROJECT_NUMBER.us-central1.run.app
You can test it from the Cloud Shell Terminal by running following command:
gcloud functions call retail-engine --region=us-central1 --gen2 --data '{"search": "I want some kids clothes themed on Disney"}'
Alternatively, you can test the Cloud Run Function as follows:
PROJECT_ID=$(gcloud config get-value project)

curl -X POST https://retail-engine-$PROJECT_NUMBER.us-central1.run.app \
  -H 'Content-Type: application/json' \
  -d '{"search":"I want some kids clothes themed on Disney"}' \
  | jq .
And the result:
Now that we have run similarity vector search using the embeddings model on AlloyDB data, we can move towards creating the application that uses these embeddings along with your image, and prompts to generate styling suggestions
12. Understand outfit recommendation flow
The outfit recommendation app is a sprint boot application that is configured to work with the embeddings we created in the AlloyDB retail-engine application along with Gemini and Imagen to generate visual outfit styling options. It also lets you add custom prompts and improvise the recommendation.
Think of it this way, you upload an image of a hot pink top in your wardrobe to this app. When you click Show, based on the prompt set in the application code and the embeddings in the AlloyDB database, the application generates multiple options that match the original image. Now you wonder how the suggested options might look with a blue necklace, so you add a prompt on those lines, and click Style. The final image is generated that combines the powerful combination of the original image and recommendations to create a matching outfit.
To start creating the outfit recommendation app, follow these steps:
- In Cloud Run, open the retail-engine app, and note the URL of your application. This is the embeddings repository that we will use to generate similar suggestions.
- In your IDE, clone the https://github.com/AbiramiSukumaran/outfit-recommender/ repository. For this exercise, the steps shown are performed in Visual Studio Code IDE.
git clone https://github.com/AbiramiSukumaran/outfit-recommender/
The following are some of the important files in the directory of the app:
src/main: Source directory where application files and HTML reside:HelloWorldApplication.java: Main entry point for the spring boot application.HelloWorldController.java: Spring Boot REST controller that handles HTTP requests related to an outfit recommender application. This file handles GET and POST requests, processes user prompts, analyzes images, interacts with AlloyDB embeddings, and returns final response to the UI. This controller calls the GenerateImageSample class.GenerateImageSample.java: Contains the image generation class that connects to Vertex AI, formats user prompt, makes API calls to Imagen model, returns predicted image to the controller class.Resources: This directory contains images and HTML files required to generate the application UI.Pom.xml: Defines the project dependencies and configurations.
- In Visual Studio code, open the
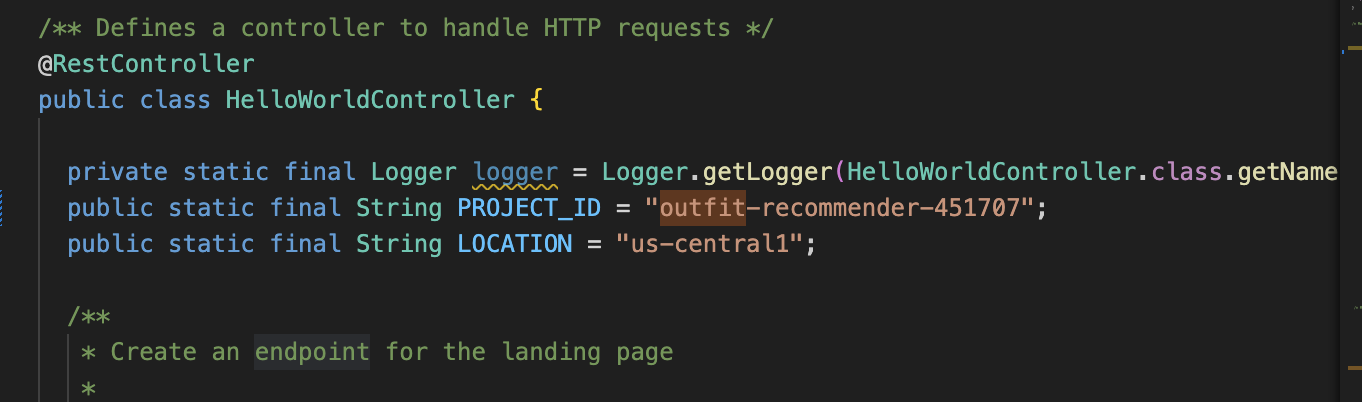
HelloWorldController.javaand update instances of the project ID and location as per where your AlloyDB instance is created.
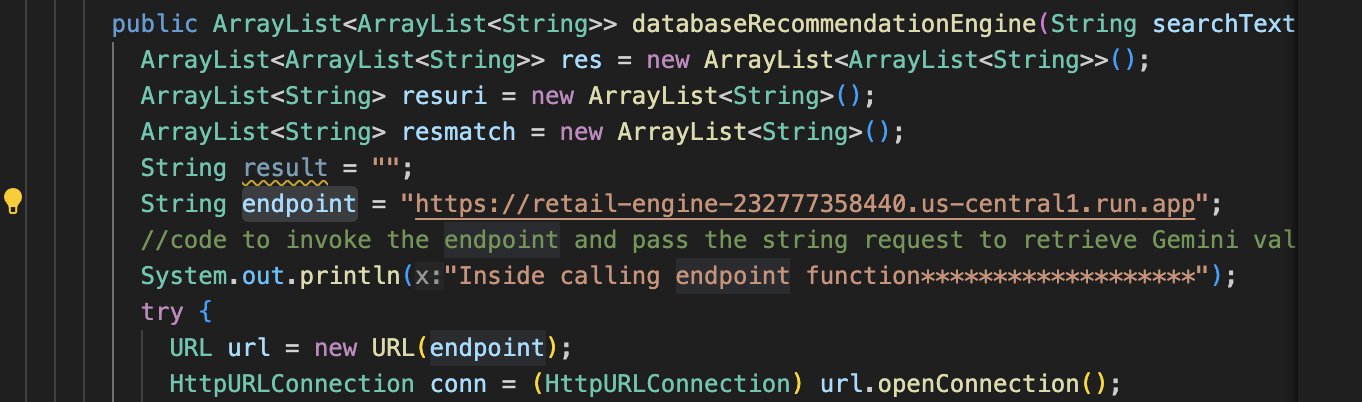
- Update the
endpointto the retail-engine app URL that you hosted earlier.
- Open the
GenerateImageSample.java, and update the project ID and the location as per where your AlloyDB instance is created.
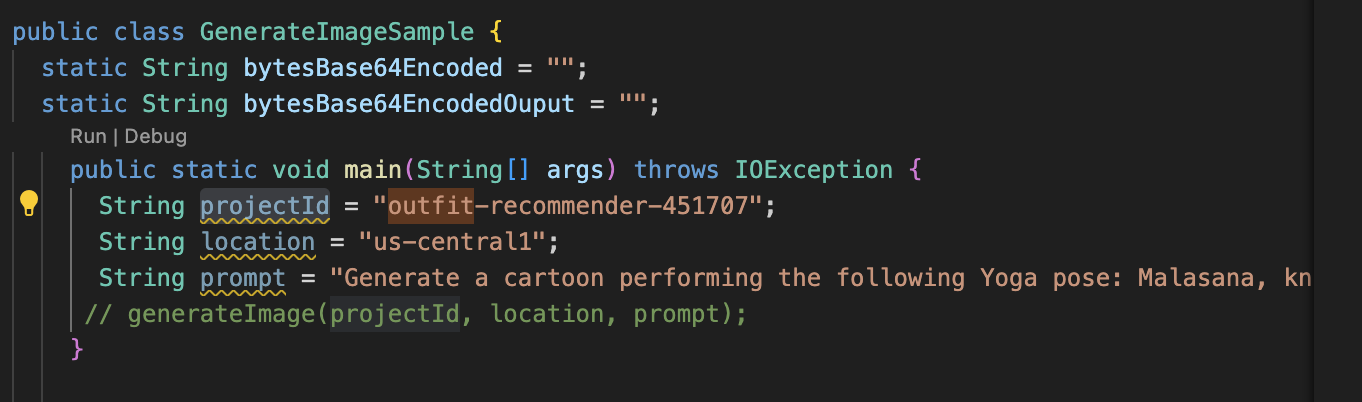
- Save all files.
We will now deploy this application to Cloud Run serverless runtime.
13. Take the application to the web
Now that we have added the relevant project, location, and the retail-engine app details to the outfit recommender spring boot application, we can deploy the application to Cloud Run.
We will use the gcloud run deploy command in the Visual Code Studio terminal to deploy the application. For Visual Studio Code, you can install the Google Cloud Code extension to start using the gcloud CLI.
To deploy the application, follow these steps:
- In your IDE, open the cloned directory and start the terminal. For Visual Code Studio, click Terminal > New Terminal.
- Follow the instructions in this document to install the gcloud CLI.
- If you are using Visual Code Studio, click Extensions, search for Google Cloud Code and install the extension.
- In your IDE terminal, authenticate your Google account by running the following command:
gcloud auth application-default login
- Set your project ID to the same project where your AlloyDB instance is located.
gcloud config set project PROJECT_ID
- Start the deploy process.
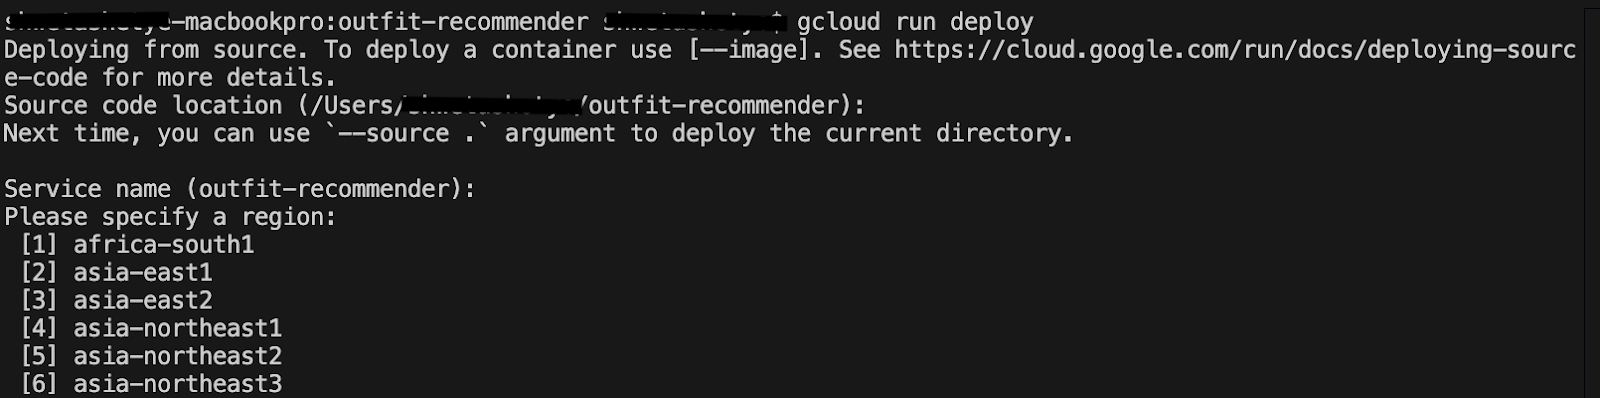
gcloud run deploy
- In
Source code location, press Enter to select the cloned GitHub directory. - In
Service name, enter a name for the service, such as outfit-recommender, and press Enter. - In
Please specify a region, enter the location where your AlloyDB instance and retail-engine application is hosted, such as 32 for us-central1, and press Enter.
- In
Allow unauthenticated invocations to [..], enter Y, and press Enter.
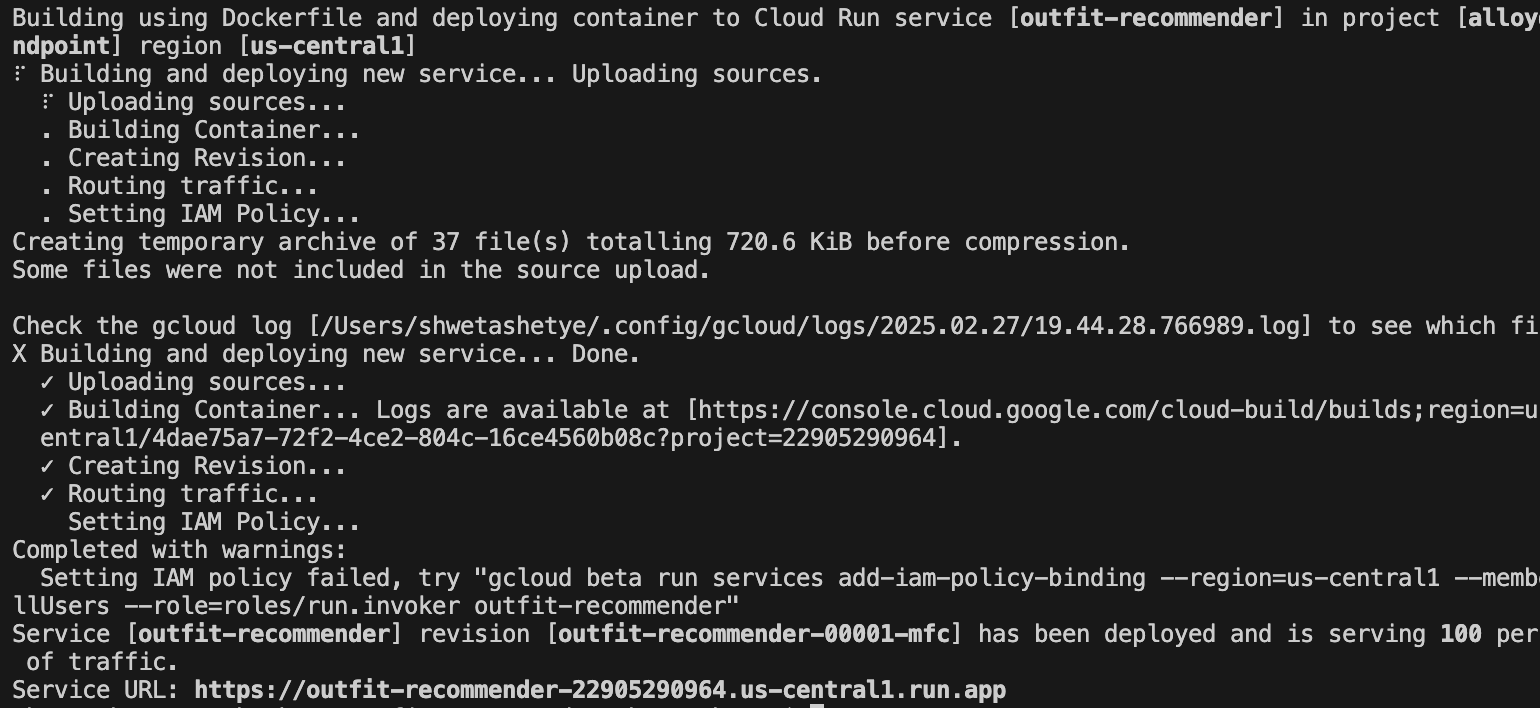
The following image shows the deployment progress of your application:
14. Test the outfit recommender application
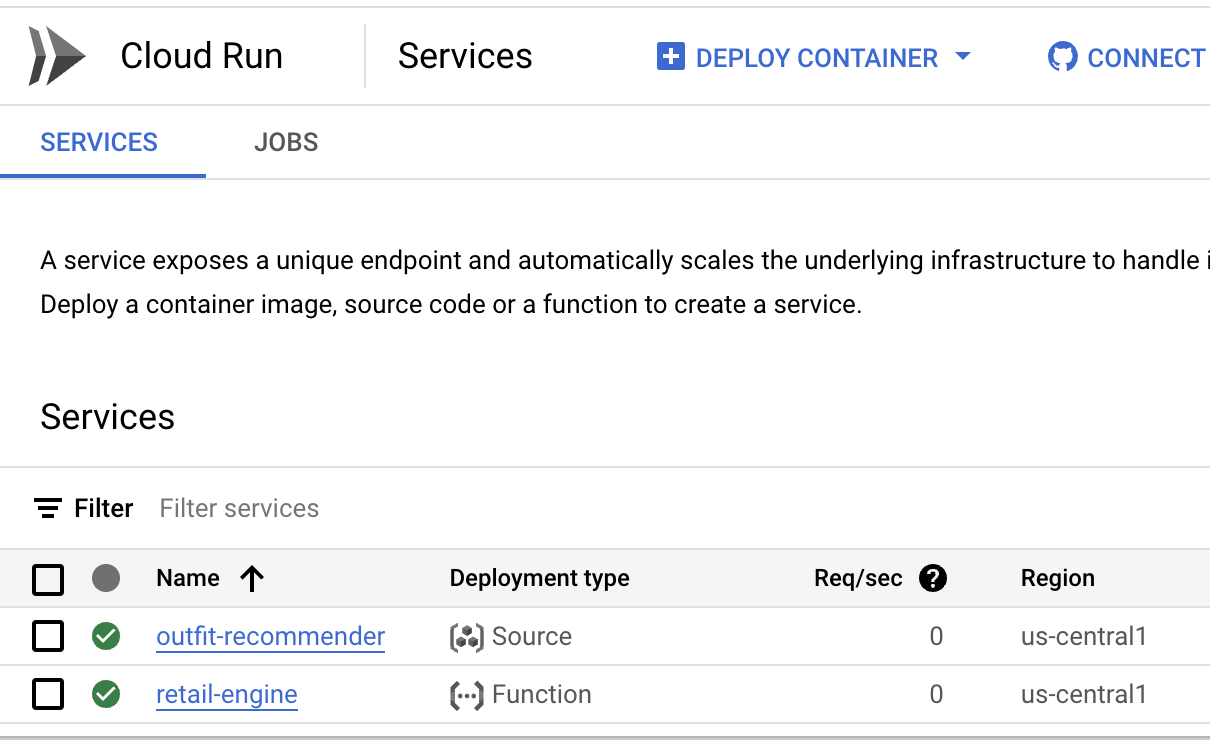
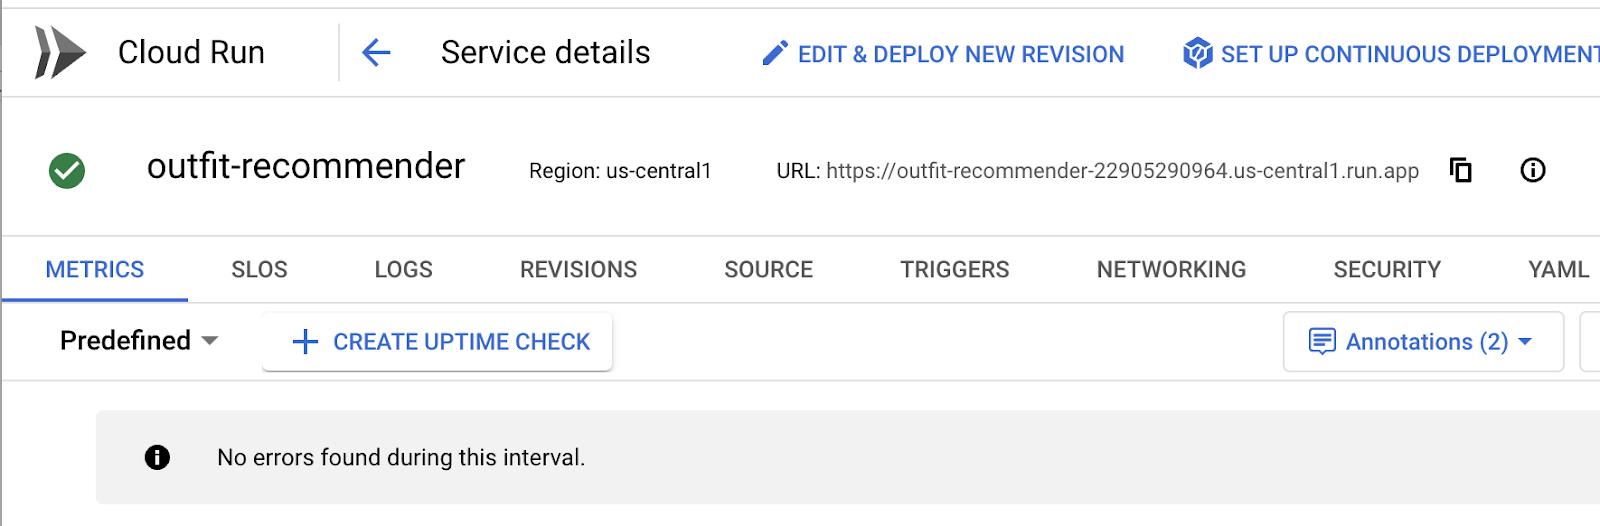
After the application is successfully deployed to Cloud Run, you can see the service in the Google Cloud Console as follows:
- In Google Cloud Console, go to Cloud Run.
- In Services, click the outfit recommender service you deployed. You should see both the retail-engine and the outfit-recommender service as follows:
- Click the application URL to open the recommender app UI.
The following is a sample URL that you will use:
https://outfit-recommender-22905290964.us-central1.run.app/style
The deployed application can be seen as follows:
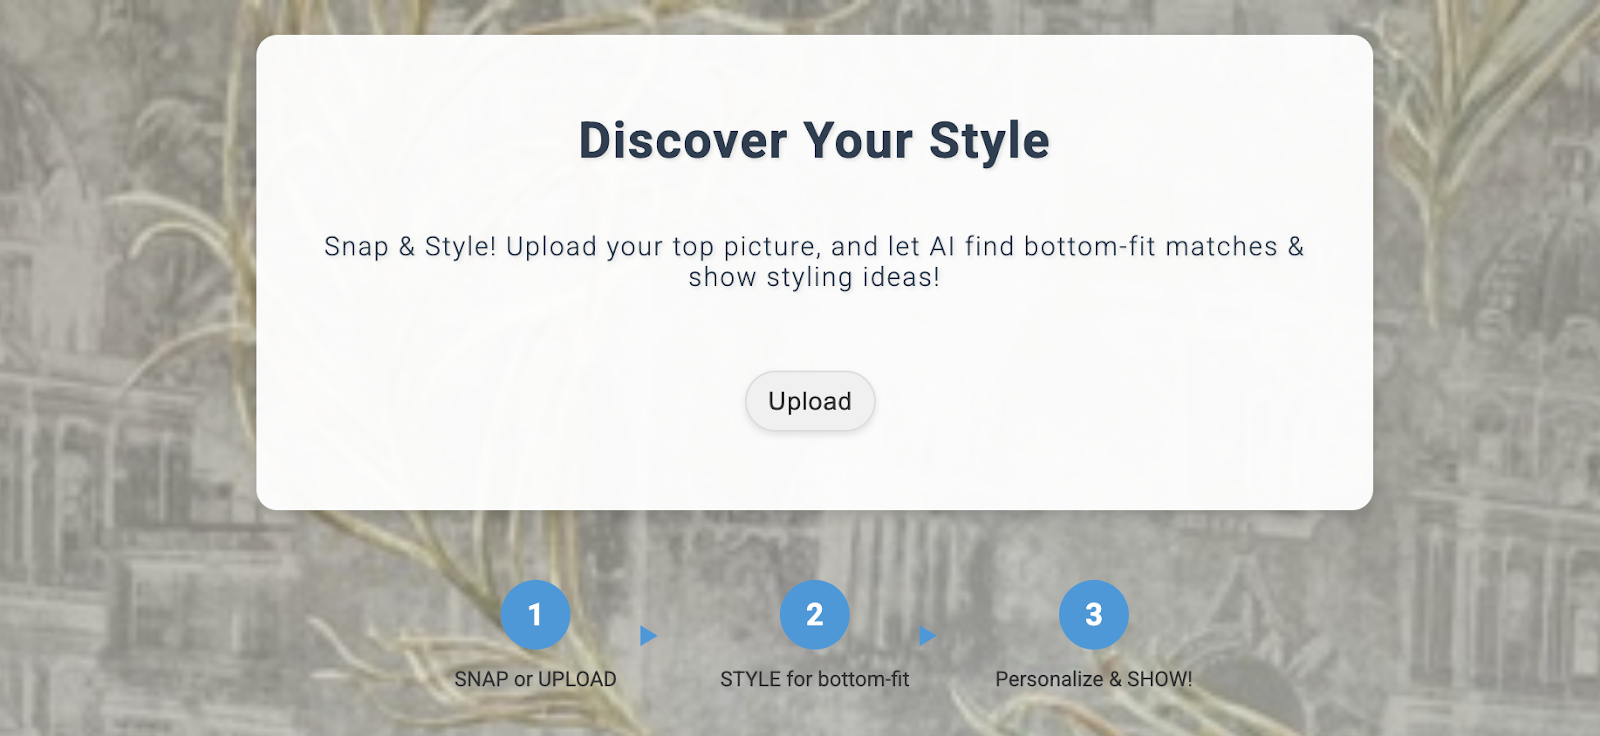
Using the application
To start using the application, follow these steps:
- Click Upload and upload a picture of a clothing item.
- After the image is uploaded, click Style. The application uses the image as a prompt and generates bottom options based on the prompt from the retail-engine app that includes embeddings for the retail dataset.
The app generates image suggestions along with a prompt based on the image with styling recommendations. For example, A white semi-sheer button up blouse with pink floral patterns on it, with balloon sleeves.
- You can pass additional prompts to this auto-generated style recommendation. For example,
STYLE RECOMMENDATION: Cute brown skirt on a curly updo. Make it photo realistic. Accessorize with cherry earrings and burgundy plastic case sling bag. - Click Show to see the final styling.

15. Clean up
To avoid incurring charges to your Google Cloud account for the resources used in this post, follow these steps:
- In the Google Cloud console, go to the Manage resources page.
- In the project list, select the project that you want to delete, and then click Delete.
- In the dialog, type the project ID, and then click Shut down to delete the project.
16. Congratulations
Congratulations! You have successfully performed a similarity search using AlloyDB, pgvector and Vector search coupled with using the search result with the powerful Imagen model to generate styling recommendations.