
1. Introduction


Eventarc makes it easy to connect Cloud Run services with events from a variety of sources. It allows you to build event-driven architectures in which microservices are loosely coupled and distributed. It takes care of event ingestion, delivery, security, authorization, and error-handling for you.
Workflows is a fully-managed orchestration platform that executes services in an order that you define: a workflow. These workflows can combine services hosted on Cloud Run or Cloud Functions, Google Cloud services such as Cloud Vision AI and BigQuery, and any HTTP-based API.
In this codelab, you will build an event-driven orchestration of microservices to process images. You will use Workflows to orchestrate the order, inputs, and outputs of 4 image processing Cloud Functions. You will then enable the orchestration to respond to Cloud Storage events in a loosely coupled way with Eventarc.
In the end, you will end up with a flexible yet structured serverless architecture to process images.
What you'll learn
- An overview of Eventarc and Workflows
- How to deploy Cloud Functions services
- How to orchestrate services using Workflows
- How to make Workflows respond to Cloud Storage events with Eventarc
2. Setup and Requirements
Self-paced environment setup
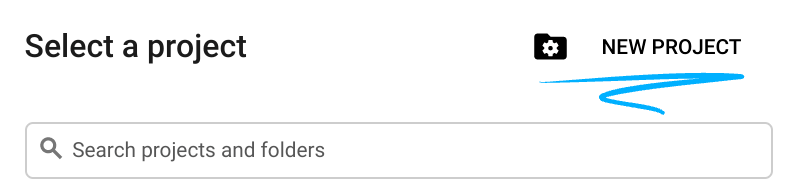
- Sign-in to the Google Cloud Console and create a new project or reuse an existing one. If you don't already have a Gmail or Google Workspace account, you must create one.

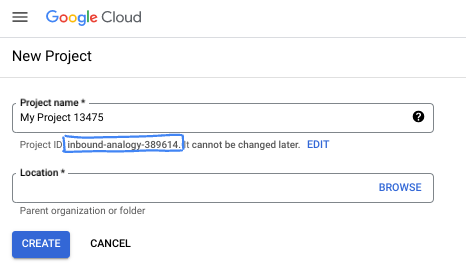
- The Project name is the display name for this project's participants. It is a character string not used by Google APIs. You can always update it.
- The Project ID is unique across all Google Cloud projects and is immutable (cannot be changed after it has been set). The Cloud Console auto-generates a unique string; usually you don't care what it is. In most codelabs, you'll need to reference your Project ID (typically identified as
PROJECT_ID). If you don't like the generated ID, you might generate another random one. Alternatively, you can try your own, and see if it's available. It can't be changed after this step and remains for the duration of the project. - For your information, there is a third value, a Project Number, which some APIs use. Learn more about all three of these values in the documentation.
- Next, you'll need to enable billing in the Cloud Console to use Cloud resources/APIs. Running through this codelab won't cost much, if anything at all. To shut down resources to avoid incurring billing beyond this tutorial, you can delete the resources you created or delete the project. New Google Cloud users are eligible for the $300 USD Free Trial program.
Start Cloud Shell
While Google Cloud can be operated remotely from your laptop, in this codelab you will be using Google Cloud Shell, a command line environment running in the Cloud.
From the Google Cloud Console, click the Cloud Shell icon on the top right toolbar:

It should only take a few moments to provision and connect to the environment. When it is finished, you should see something like this:

This virtual machine is loaded with all the development tools you'll need. It offers a persistent 5GB home directory, and runs on Google Cloud, greatly enhancing network performance and authentication. All of your work in this codelab can be done within a browser. You do not need to install anything.
Set up gcloud
In Cloud Shell, set your project ID and the region you want to deploy your application to. Save them as PROJECT_ID and REGION variables. See Cloud Functions locations for available regions.
PROJECT_ID=your-project-id
gcloud config set project $PROJECT_ID
Get the source code
The source code of the application is in the processing-pipelines folder of the eventarc-samples repo.
Clone the repo:
git clone https://github.com/GoogleCloudPlatform/eventarc-samples.git
Navigate to the eventarc-samples/processing-pipelines folder:
cd eventarc-samples/processing-pipelines
3. Architecture overview
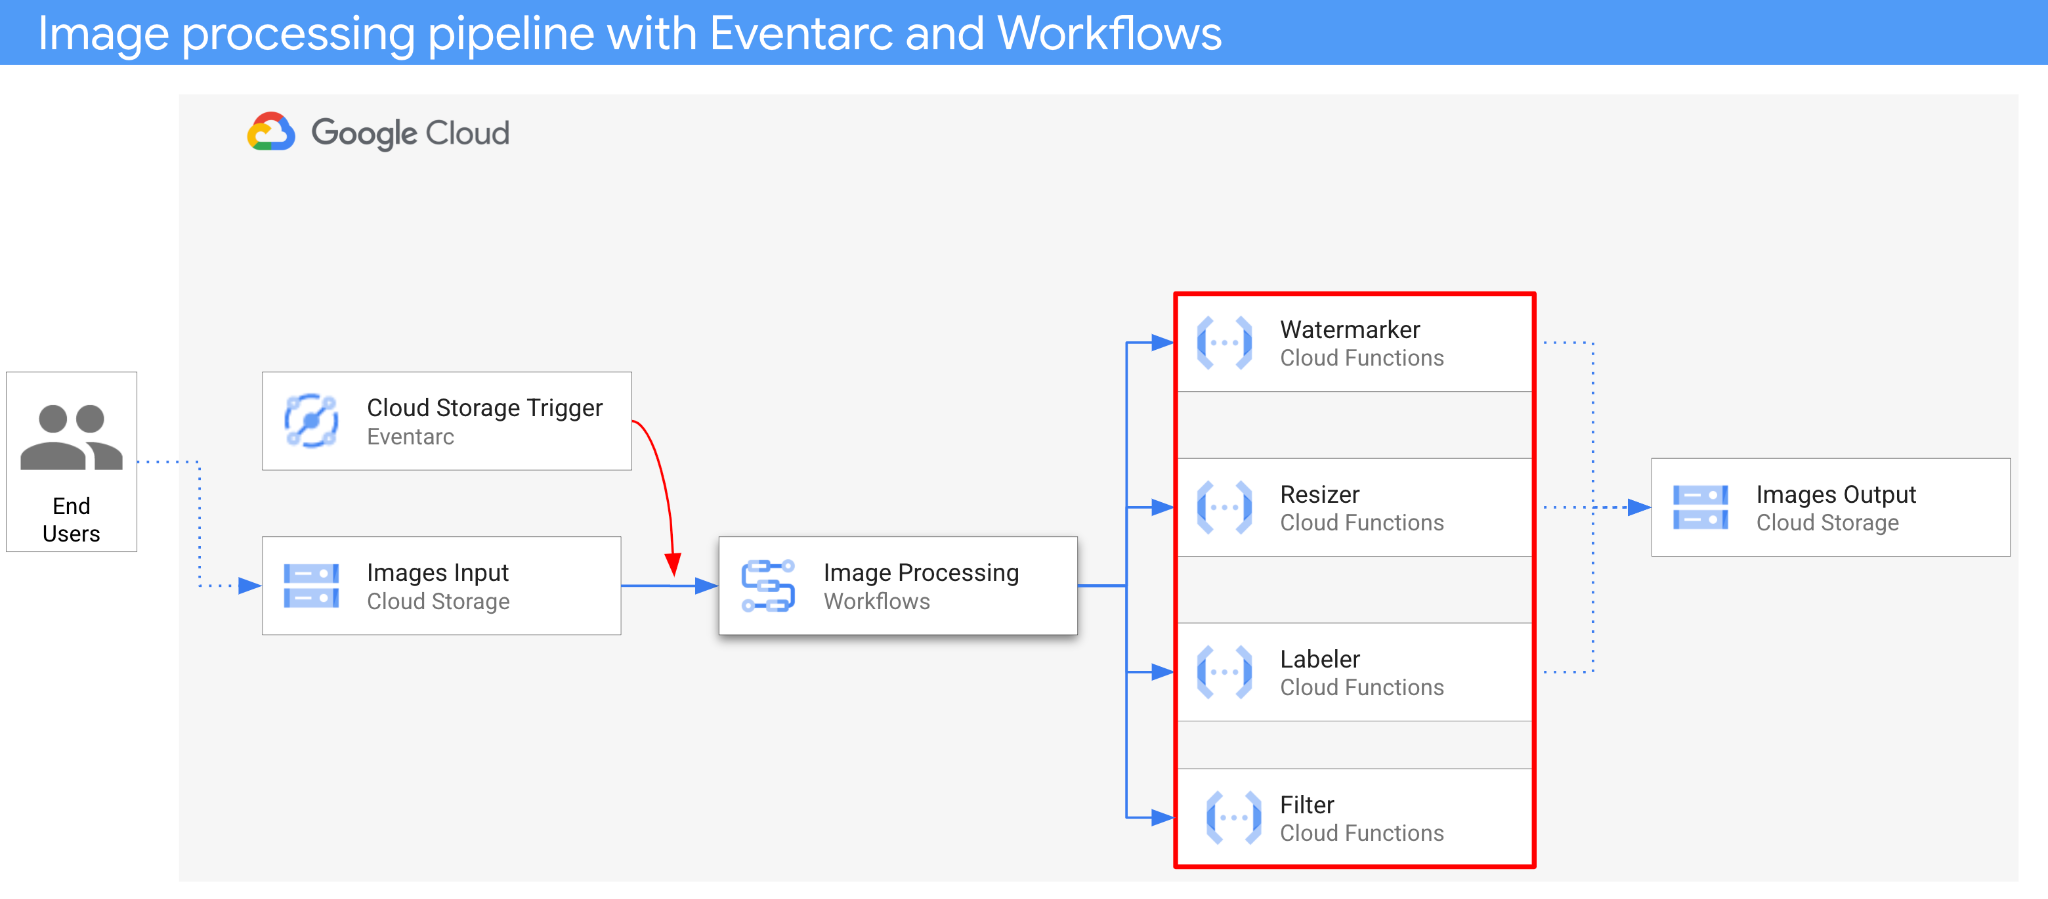
The architecture of the application is as follows:
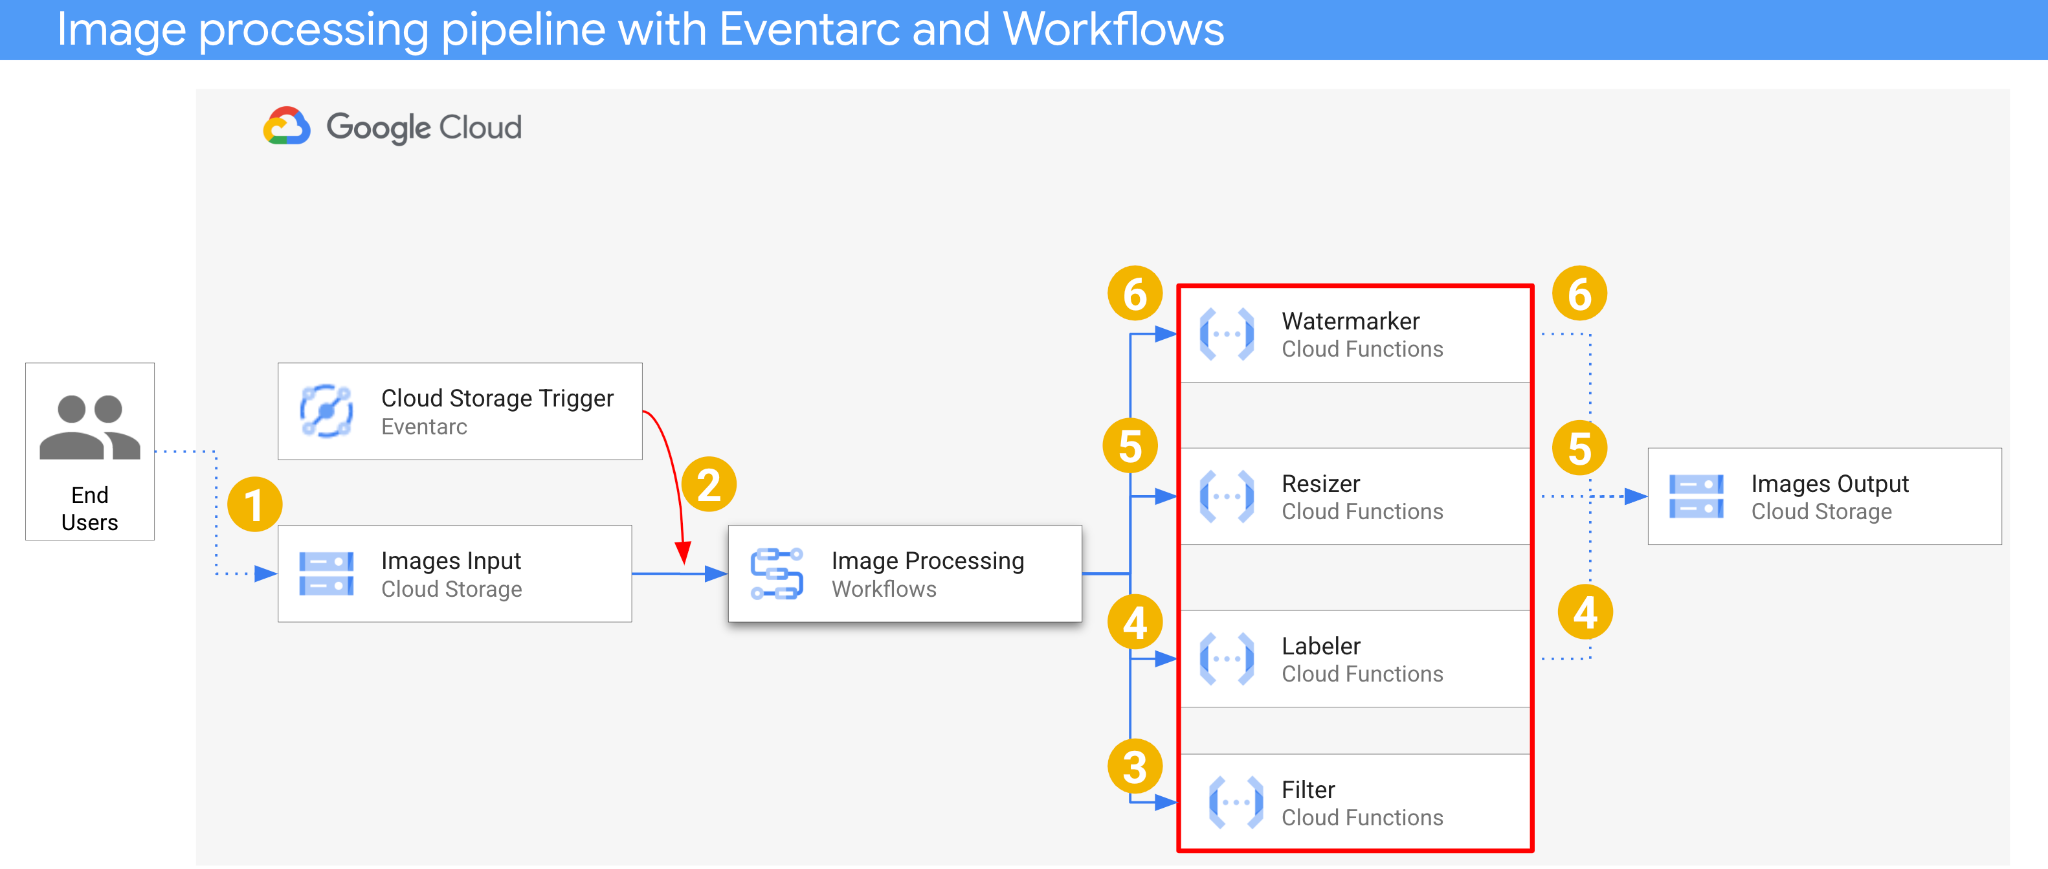
- An image is saved to an input bucket that generates a Cloud Storage create event.
- Cloud Storage create event is read by Eventarc via a Cloud Storage trigger and passed to Workflows as a CloudEvent.
- In the first step of workflow, Filter, a Cloud Function service, uses Vision API to determine if the image is safe. If the image is safe, Workflows continues with the next steps.
- In the second step of workflow, Labeler, a Cloud Function service, extracts labels of the image with Vision API and saves the labels to the output bucket.
- In the third step, Resizer, another Cloud Function service, resizes the image using ImageSharp and saves the resized image to the output bucket.
- In the last step, Watermarker, another Cloud Function service, adds a watermark of labels from Labeler to the resized image using ImageSharp and saves the image to the output bucket.
The application is triggered by a Cloud Storage event, hence it's event-driven. The processing of images happens in a workflow, hence it's an orchestration. In the end, it's an event-driven orchestration for a flexible yet structured serverless architecture to process images.
4. Create buckets
Create an input bucket for users to upload the images to and an output bucket for the image processing pipeline to save the processed images.
Run the following in Cloud Shell:
REGION=us-central1
BUCKET1=$PROJECT_ID-images-input-$RANDOM
BUCKET2=$PROJECT_ID-images-output-$RANDOM

gsutil mb -l $REGION gs://$BUCKET1
gsutil mb -l $REGION gs://$BUCKET2
5. Deploy filter service
Let's start by deploying the first service. This Cloud Functions service receives the bucket and file information, determines if the image is safe with Vision API and returns the result.
First, enable required services for Cloud Functions gen2 and the Vision API:
gcloud services enable \
  artifactregistry.googleapis.com \
  cloudbuild.googleapis.com \
  cloudfunctions.googleapis.com \
  run.googleapis.com \
  vision.googleapis.com
Inside the top level processing-pipelines folder, deploy the service:
SERVICE_NAME=filter

gcloud functions deploy $SERVICE_NAME \
  --gen2 \
  --allow-unauthenticated \
  --runtime dotnet3 \
  --trigger-http \
  --region=$REGION \
  --entry-point Filter.Function \
  --set-build-env-vars GOOGLE_BUILDABLE=image-v3/filter/csharp
Once the function is deployed, set the service URL in a variable, we'll need it later:
FILTER_URL=$(gcloud functions describe $SERVICE_NAME --region=$REGION --gen2 --format 'value(serviceConfig.uri)')
6. Deploy labeler service
The second Cloud Functions service receives the bucket and file information, extracts labels of the image with Vision API and saves the labels to the output bucket.
Inside the top level processing-pipelines folder, deploy the service:
SERVICE_NAME=labeler

gcloud functions deploy $SERVICE_NAME \
  --gen2 \
  --allow-unauthenticated \
  --runtime dotnet3 \
  --trigger-http \
  --region=$REGION \
  --set-env-vars BUCKET=$BUCKET2 \
  --entry-point Labeler.Function \
  --set-build-env-vars GOOGLE_BUILDABLE=image-v2/labeler/csharp
Once the function is deployed, set the service URL in a variable, we'll need it later:
LABELER_URL=$(gcloud functions describe $SERVICE_NAME --region=$REGION --gen2 --format 'value(serviceConfig.uri)')
7. Deploy resizer service
This Cloud Functions service receives the bucket and file information, resizes the image using ImageSharp and saves the image to the output bucket.
Inside the top level processing-pipelines folder, deploy the service:
SERVICE_NAME=resizer

gcloud functions deploy $SERVICE_NAME \
  --gen2 \
  --allow-unauthenticated \
  --runtime dotnet3 \
  --trigger-http \
  --region=$REGION \
  --set-env-vars BUCKET=$BUCKET2 \
  --entry-point Resizer.Function \
  --set-build-env-vars GOOGLE_BUILDABLE=image-v2/resizer/csharp \
  --timeout=120s
Note the timeout value of 2 minutes to allow the resizer function extra time for processing.
Once the function is deployed, set the service URL in a variable, we'll need it later:
RESIZER_URL=$(gcloud functions describe $SERVICE_NAME --region=$REGION --gen2 --format 'value(serviceConfig.uri)')
8. Deploy watermarker service
This Cloud Functions service receives the bucket, file and labels information, reads the file, adds the labels as watermark to the image using ImageSharp and saves the image to the output bucket.
Inside the top level processing-pipelines folder, deploy the service:
SERVICE_NAME=watermarker

gcloud functions deploy $SERVICE_NAME \
  --gen2 \
  --allow-unauthenticated \
  --runtime dotnet3 \
  --trigger-http \
  --region=$REGION \
  --set-env-vars BUCKET=$BUCKET2 \
  --entry-point Watermarker.Function \
  --set-build-env-vars GOOGLE_BUILDABLE=image-v2/watermarker/csharp
Once the function is deployed, set the service URL in a variable, we'll need it later:
WATERMARKER_URL=$(gcloud functions describe $SERVICE_NAME --region=$REGION --gen2 --format 'value(serviceConfig.uri)')
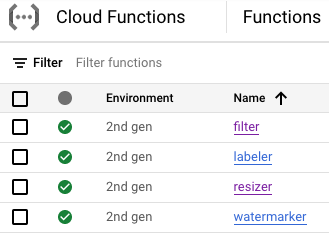
At this point, all four Cloud Functions should be deployed and running:
9. Define and deploy workflow
Use Workflows to bring together filter, labeler, resizer and watermarker services into a workflow. Workflows will orchestrate calling these services in the order and with the parameters that we define.
First, enable required services for Workflows:
gcloud services enable \
  workflows.googleapis.com \
  workflowexecutions.googleapis.com
Define
Workflows receives a CloudEvent as a parameter. This will come from Eventarc once we create a trigger. In the first two steps, Workflows logs the event and extracts the bucket and file info from the event:
main:
  params: [event]
  steps:
  - log_event:
      call: sys.log
      args:
          text: ${event}
          severity: INFO
  - extract_bucket_and_file:
      assign:
      - bucket: ${event.data.bucket}
      - file: ${event.data.name}
In the filter step, Workflows makes a call to the filter service we deployed earlier. It then logs and checks the file safety:
  - filter:
      call: http.post
      args:
        url: FILTER_URL # TODO: Replace
        auth:
          type: OIDC
        body:
            bucket: ${bucket}
            file: ${file}
      result: filterResponse
  - log_safety:
      call: sys.log
      args:
          text: ${filterResponse.body.safe}
          severity: INFO
  - check_safety:
      switch:
        - condition: ${filterResponse.body.safe == true}
          next: label
      next: end
In the label step, Workflows makes a call to the labeler service and captures the response (top 3 labels):
  - label:
      call: http.post
      args:
        url: LABELER_URL # TODO: Replace
        auth:
          type: OIDC
        body:
            bucket: ${bucket}
            file: ${file}
      result: labelResponse
In the resize step, Workflows makes a call to the resizer service and captures the response (the bucket and file of the resized image):
  - resize:
      call: http.post
      args:
        url: RESIZER_URL # TODO: Replace
        auth:
          type: OIDC
        body:
            bucket: ${bucket}
            file: ${file}
      result: resizeResponse
In the watermark step, Workflows calls the watermarker service with the resized image and labels and captures the result (the resized and watermarked image):
  - watermark:
      call: http.post
      args:
        url: WATERMARKER_URL # TODO: Replace
        auth:
          type: OIDC
        body:
            bucket: ${resizeResponse.body.bucket}
            file: ${resizeResponse.body.file}
            labels: ${labelResponse.body.labels}
      result: watermarkResponse
In the final step, the Workflows returns the HTTP status code from labeler, resizer and watermarker services:
  - final:
      return:
        label: ${labelResponse.code}
        resize: ${resizeResponse.code}
        watermark: ${watermarkResponse.code}
Deploy
Before deploying the workflow, make sure the service URLs are replaced with urls of the deployed functions either manually or using sed:
Inside the top level processing-pipelines folder, navigate to the image-v3 folder where workflows.yaml file is located:
cd image-v3/
Run sed to replace the placeholder URLs with the actual URLs of the deployed services:
sed -i -e "s|FILTER_URL|${FILTER_URL}|" workflow.yaml
sed -i -e "s|LABELER_URL|${LABELER_URL}|" workflow.yaml
sed -i -e "s|RESIZER_URL|${RESIZER_URL}|" workflow.yaml
sed -i -e "s|WATERMARKER_URL|${WATERMARKER_URL}|" workflow.yaml
Deploy the workflow:
WORKFLOW_NAME=image-processing

gcloud workflows deploy $WORKFLOW_NAME \
    --source=workflow.yaml \
    --location=$REGION
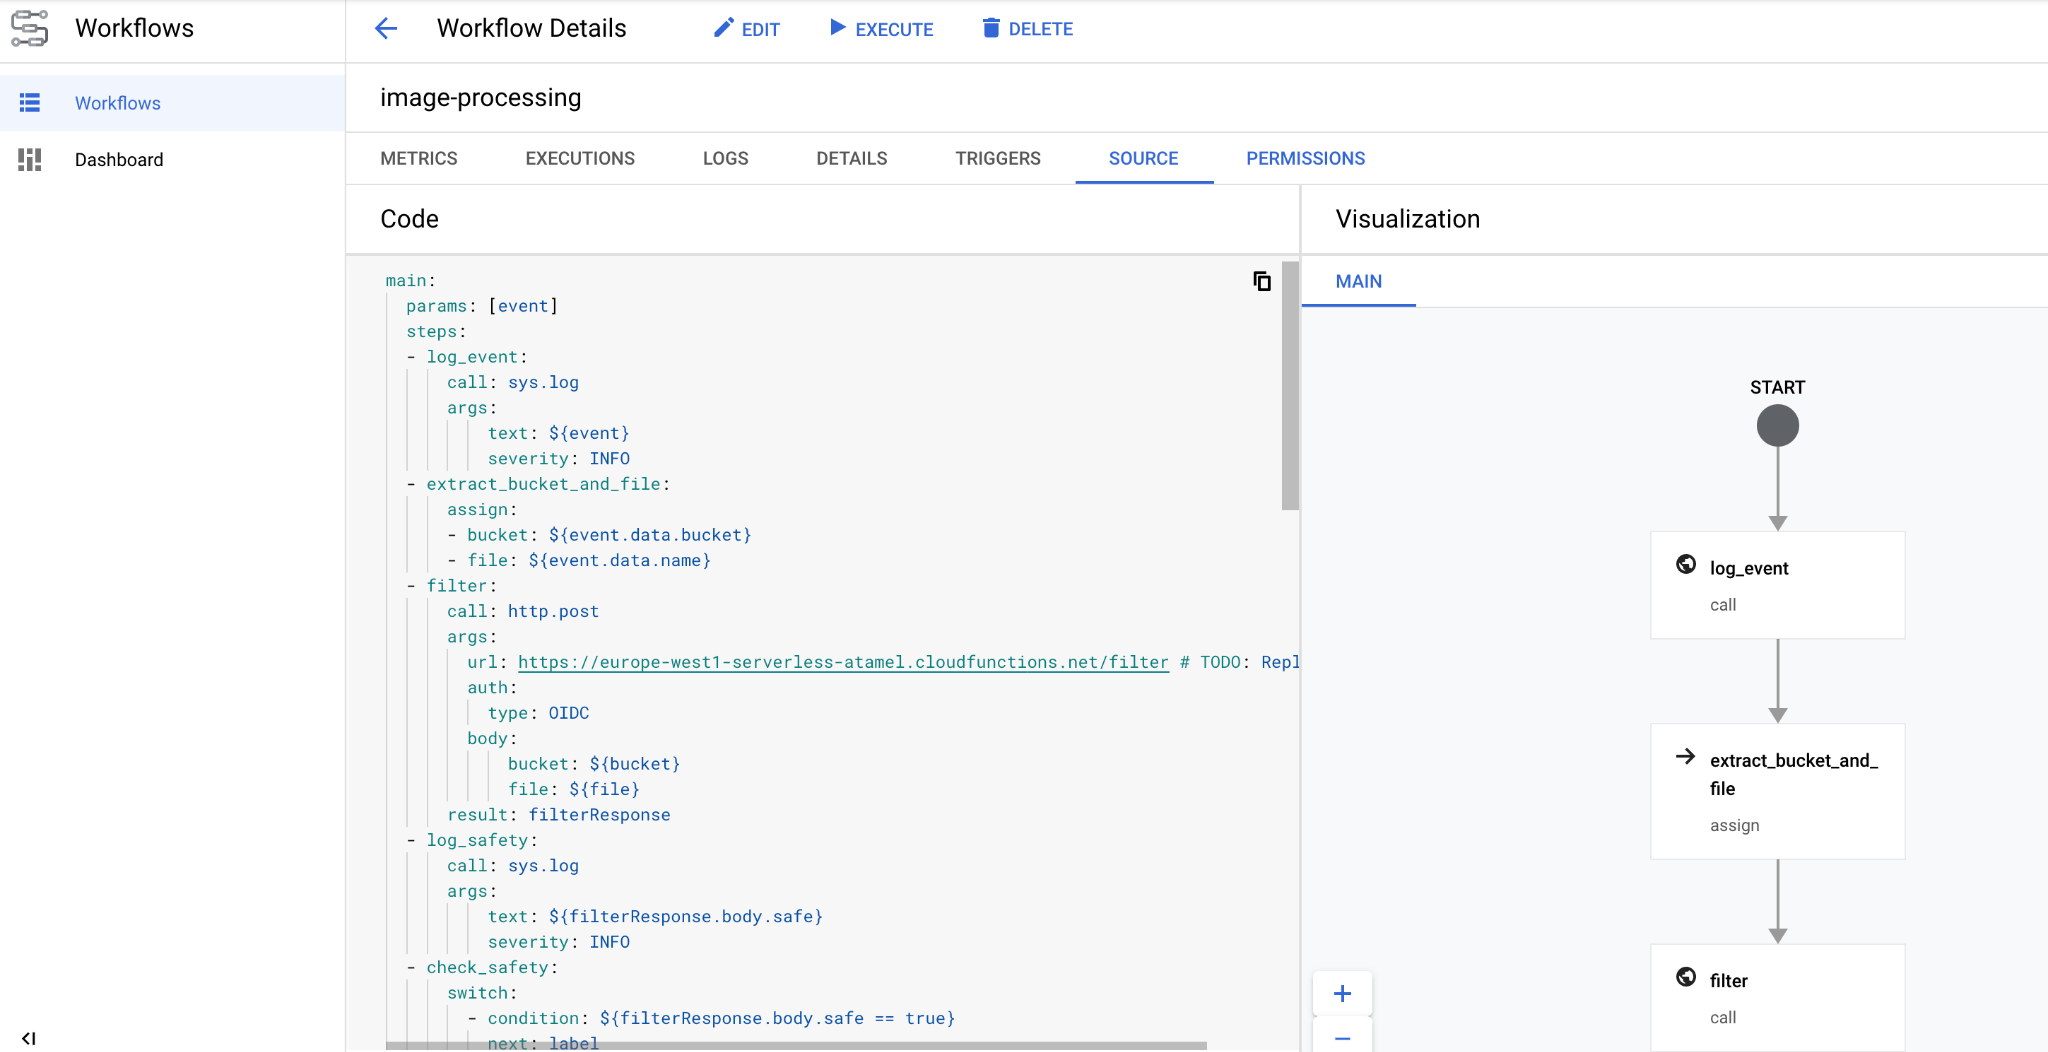
In a few seconds, you should see the workflow deployed in the console:
10. Create trigger
Now that the workflow is deployed, the last step is to connect it to Cloud Storage events with an Eventarc trigger.
One time setup
First, enable required services for Eventarc:
gcloud services enable \
 eventarc.googleapis.com
Create a service account that you will use in the Eventarc trigger.
SERVICE_ACCOUNT=eventarc-trigger-imageproc-sa

gcloud iam service-accounts create $SERVICE_ACCOUNT \
  --display-name="Eventarc trigger image processing service account"
Grant the workflows.invoker role, so the service account can be used to invoke Workflows from Eventarc:
gcloud projects add-iam-policy-binding $PROJECT_ID \
  --role roles/workflows.invoker \
  --member serviceAccount:$SERVICE_ACCOUNT@$PROJECT_ID.iam.gserviceaccount.com
Grant the eventarc.eventReceiver role, o the service account can be used in a
Cloud Storage trigger:
gcloud projects add-iam-policy-binding $PROJECT_ID \
  --role roles/eventarc.eventReceiver \
  --member serviceAccount:$SERVICE_ACCOUNT@$PROJECT_ID.iam.gserviceaccount.com
Grant the pubsub.publisher role to the Cloud Storage service account. This is needed for Eventarc's Cloud Storage trigger:
STORAGE_SERVICE_ACCOUNT="$(gsutil kms serviceaccount -p $PROJECT_ID)"

gcloud projects add-iam-policy-binding $PROJECT_ID \
    --member serviceAccount:$STORAGE_SERVICE_ACCOUNT \
    --role roles/pubsub.publisher
Create
Run the following to create a trigger. This trigger filters for new file creation events from the input Cloud Storage bucket and pass them onto the workflow we defined earlier:
TRIGGER_NAME=trigger-image-processing

gcloud eventarc triggers create $TRIGGER_NAME \
  --location=$REGION \
  --destination-workflow=$WORKFLOW_NAME \
  --destination-workflow-location=$REGION \
  --event-filters="type=google.cloud.storage.object.v1.finalized" \
  --event-filters="bucket=$BUCKET1" \
  --service-account=$SERVICE_ACCOUNT@$PROJECT_ID.iam.gserviceaccount.com
You can see that the trigger is created and ready in Eventarc section of Cloud Console:

11. Test the pipeline
The image processing pipeline is ready to receive events from Cloud Storage. To test the pipeline, upload an image to the input bucket:
gsutil cp beach.jpg gs://$BUCKET1
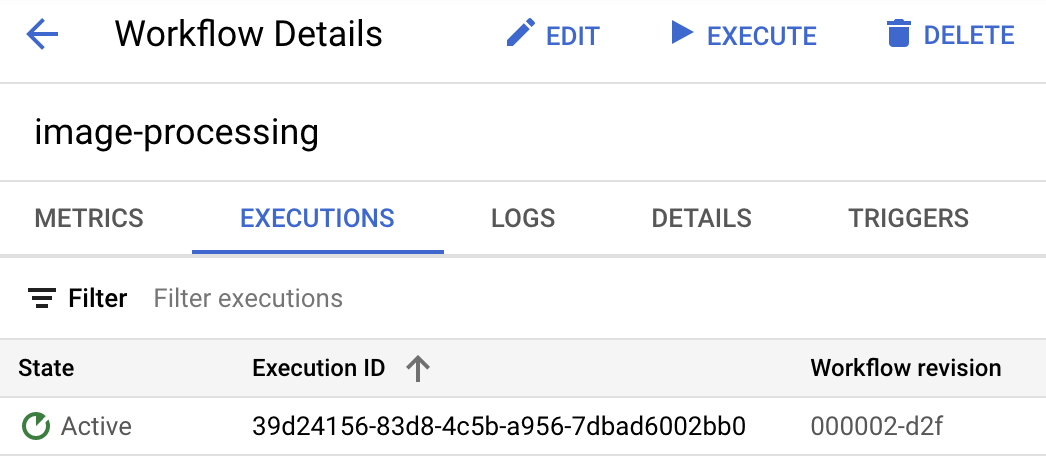
As soon as you upload the picture, you should see a Workflows execution in active state:
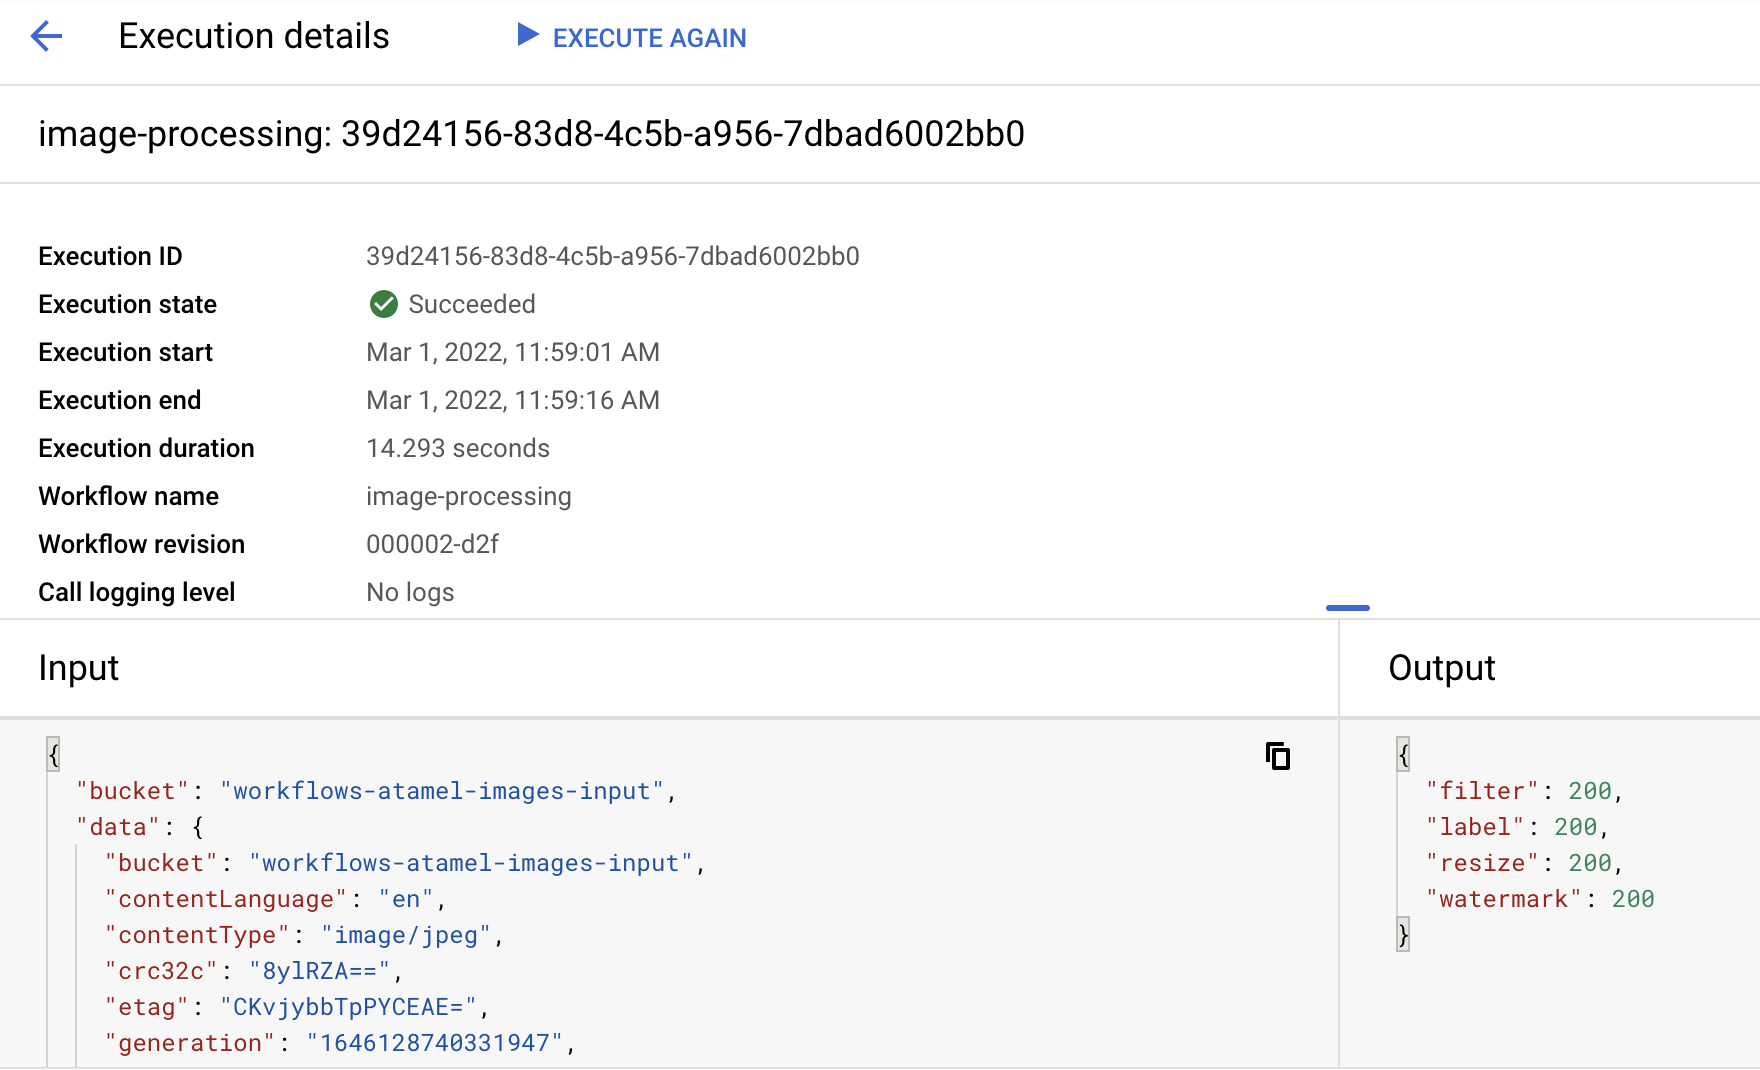
After a minute or so, you should see the execution succeeded. You can also see the input and output of the workflow:
If you list the contents of the output bucket, you should see the resized image, the resized and watermarked image and labels of the image:
gsutil ls gs://$BUCKET2

gs://$PROJECT_ID-images-output-$RANDOM/beach-400x400-watermark.jpeg
gs://$PROJECT_ID-images-output-$RANDOM/beach-400x400.png
gs://$PROJECT_ID-images-output-$RANDOM/beach-labels.txt
To double check, you can open the resized and watermarked image to see the result:
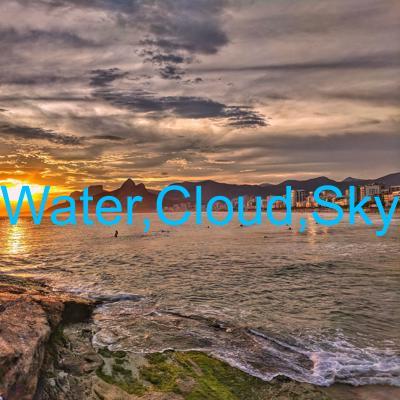
12. Congratulations
Congratulations, you finished the codelab!
What we've covered
- An overview of Eventarc and Workflows
- How to deploy Cloud Functions services
- How to orchestrate services using Workflows
- How to make Workflows respond to Cloud Storage events with Eventarc