
1. はじめに
Spring Framework 5.0 では、Kotlin 専用のサポートが追加され、Kotlin デベロッパーが Spring を簡単に使用できるようになりました。その結果、Spring Cloud GCP によって提供される Google Cloud インテグレーションも Kotlin でシームレスに動作するようになりました。この Codelab では、Kotlin アプリケーションで Google Cloud サービスを簡単に使い始める方法について説明します。
この Codelab では、Kotlin で簡単な登録アプリケーションを設定する手順について説明します。このアプリケーションでは、Cloud Pub/Sub や Cloud SQL などの GCP サービスの使用方法を示します。
作成するアプリの概要
この Codelab では、登録者の情報を受け取り、Cloud Pub/Sub トピックに公開して、Cloud MySQL データベースに永続化する Kotlin Spring Boot アプリケーションを設定します。
学習内容
Kotlin Spring アプリケーションで Google Cloud サービスと統合する方法。
必要なもの
- Google Cloud Platform プロジェクト
- Chrome や Firefox などのブラウザ
このチュートリアルをどのように使用されますか?
HTML/CSS ウェブアプリの作成経験についてお答えください。
Google Cloud Platform サービスのご利用経験についてどのように評価されますか?
2. 設定と要件
セルフペース型の環境設定
- Cloud Console にログインし、新しいプロジェクトを作成するか、既存のプロジェクトを再利用します(Gmail アカウントまたは G Suite アカウントをお持ちでない場合は、アカウントを作成する必要があります)。

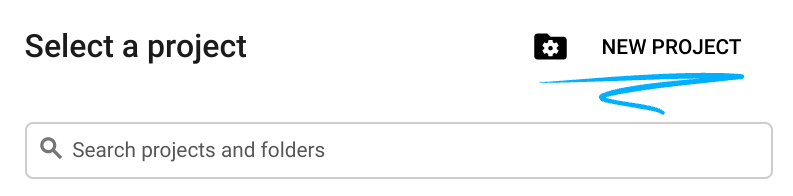
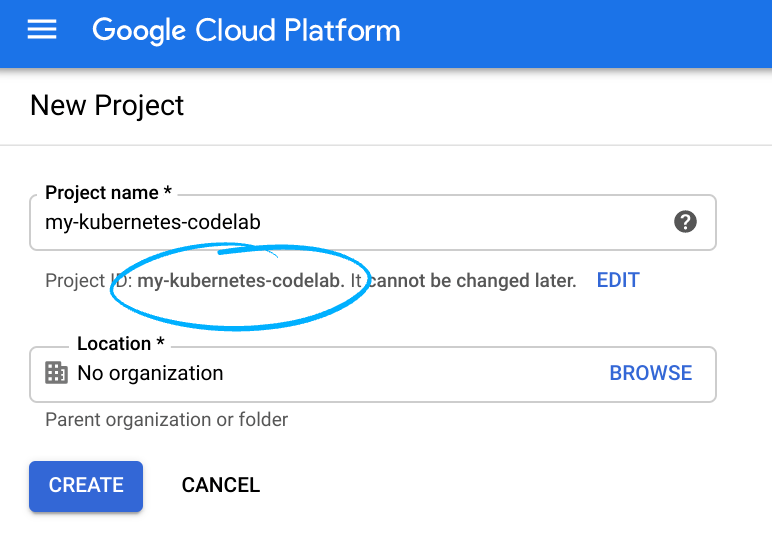
プロジェクト ID を忘れないようにしてください。プロジェクト ID はすべての Google Cloud プロジェクトを通じて一意の名前にする必要があります(上記の名前はすでに使用されているので使用できません)。以降、このコードラボでは PROJECT_ID と呼びます。
- 次に、Google Cloud リソースを使用するために、Cloud Console で課金を有効にする必要があります。
このコードラボを実行しても、費用はほとんどかからないはずです。このチュートリアル以外で請求が発生しないように、リソースのシャットダウン方法を説明する「クリーンアップ」セクションの手順に従うようにしてください。Google Cloud の新規ユーザーは、300 米ドル分の無料トライアル プログラムをご利用いただけます。
Google Cloud Shell
Google Cloud はノートパソコンからリモートで操作できますが、この Codelab では、Google Cloud Shell(Cloud 上で動作するコマンドライン環境)を使用します。
Cloud Shell をアクティブにする
- Cloud Console で、[Cloud Shell をアクティブにする]
をクリックします。

Cloud Shell を起動したことがない場合、その内容を説明する中間画面が(スクロールしなければ見えない範囲に)が表示されます。その場合は、[続行] をクリックします(以後表示されなくなります)。このワンタイム スクリーンは次のようになります。

Cloud Shell のプロビジョニングと接続に少し時間がかかる程度です。

この仮想マシンには、必要な開発ツールがすべて準備されています。5 GB の永続ホーム ディレクトリが用意されており、Google Cloud で稼働するため、ネットワーク パフォーマンスが充実しており認証もスムーズです。このコードラボでの作業のほとんどは、ブラウザまたは Chromebook から実行できます。
Cloud Shell に接続すると、すでに認証は完了しており、プロジェクトに各自のプロジェクト ID が設定されていることがわかります。
- Cloud Shell で次のコマンドを実行して、認証されたことを確認します。
gcloud auth list
コマンド出力
 Credentialed Accounts
ACTIVE  ACCOUNT
*       <my_account>@<my_domain.com>

To set the active account, run:
    $ gcloud config set account `ACCOUNT`
gcloud config list project
コマンド出力
[core]
project = <PROJECT_ID>
上記のようになっていない場合は、次のコマンドで設定できます。
gcloud config set project <PROJECT_ID>
コマンド出力
Updated property [core/project].
3. Pub/Sub リソースをプロビジョニングする
まず、Cloud Pub/Sub トピックとサブスクリプションを設定する必要があります。このアプリケーションでは、登録情報を Pub/Sub トピックにパブリッシュします。この情報は、このトピックから読み取られ、データベースに永続化されます。
このチュートリアルでは、Cloud Shell を使用してリソースをプロビジョニングします。Pub/Sub リソースは、Google Cloud コンソールの Cloud Pub/Sub セクションで構成することもできます。
Cloud Shell ターミナルで、まず Pub/Sub API を有効にします。
$ gcloud services enable pubsub.googleapis.com
次に、このアプリケーション用に registrations という名前の Pub/Sub トピックを作成します。アプリケーションを通じて送信された登録情報は、このトピックに公開されます。
$ gcloud pubsub topics create registrations
最後に、トピックのサブスクリプションを作成します。Pub/Sub サブスクリプションを使用すると、トピックからメッセージを受信できます。
$ gcloud pubsub subscriptions create registrations-sub --topic=registrations
これで、アプリケーション用の Cloud Pub/Sub トピックとサブスクリプションの作成が完了しました。
4. Cloud SQL(MySQL)インスタンスとデータベースを作成する
サンプル アプリケーションでは、登録者の情報を保持するデータベース インスタンスも設定する必要があります。この手順では、Cloud Shell ターミナルを使用して Cloud SQL リソースをプロビジョニングします。Cloud SQL インスタンスは、Google Cloud コンソールで表示および構成することもできます。
まず、Cloud SQL Admin API を有効にします。
$ gcloud services enable sqladmin.googleapis.com
次に、Cloud SQL(MySQL)インスタンスをプロビジョニングします。このコマンドには時間がかかることがあります。
$ gcloud sql instances create codelab-instance --region=us-east1
Cloud SQL インスタンスが正常に作成されたら、インスタンスに registrants という新しいデータベースを作成します。
$ gcloud sql databases create registrants --instance codelab-instance
これで、アプリケーションの Cloud SQL インスタンスとデータベースの設定が完了しました。
5. Spring Boot アプリケーションを初期化する
これで、アプリケーションの作成を開始する準備が整いました。次の手順では、設定手順で説明した Cloud Shell を引き続き使用します。
まず、Initializr を使用して、プロジェクトのスキャフォールディング コードを生成します。Cloud Shell ウィンドウで、次のコマンドを実行します。
$ cd ~
$ curl https://start.spring.io/starter.tgz \
  -d language=kotlin \
  -d bootVersion=2.4.0 \
  -d dependencies=web,data-jpa,integration,cloud-gcp-pubsub,thymeleaf \
  -d baseDir=registrations-codelab | tar -xzvf -
$ cd registrations-codelab
このコマンドは、registrations-codelab/ ディレクトリに、初期 Maven プロジェクトの設定とアプリケーションのスキャフォールディング コードを生成します。以降のセクションでは、動作するアプリケーションを作成するために必要なコードの編集について説明します。
Cloud Shell コードエディタ
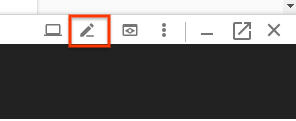
Cloud Shell 環境でコードの変更と表示を開始する最も簡単な方法は、組み込みの Cloud Shell コードエディタを使用することです。
Cloud Shell インスタンスを開いたら、鉛筆アイコンをクリックしてコードエディタを開きます。エディタでは、Initialzr によって生成されたプロジェクト ファイルを直接変更できます。
6. データベース構成
まず、設定した Cloud MySQL データベースに接続できるようにアプリケーションを構成します。Spring Cloud GCP ライブラリには、Cloud MySQL インスタンスへの接続に必要な依存関係を提供する Cloud MySQL スターターが用意されています。
プロジェクトの pom.xml に spring-cloud-gcp-starter-sql-mysql 依存関係を追加します。
registrations-codelab/pom.xml
...
<dependencies>

  ... Other dependencies above ...

  <!-- Add the MySQL starter to the list of dependencies -->
  <dependency>
    <groupId>com.google.cloud</groupId>
    <artifactId>spring-cloud-gcp-starter-sql-mysql</artifactId>
  </dependency>
</dependencies>
また、application.properties 構成ファイルを変更して、データベース構成を記述する必要があります。次のプロパティを application.properties ファイルにコピーします。
データベースのインスタンス接続名を確認します。
$ gcloud sql instances describe codelab-instance \
  --format 'value(connectionName)'
この出力は、接続情報を構成するために application.properties ファイルで使用されます。
src/main/resources/application.properties
# Modify this property using the output from the previous command line.
spring.cloud.gcp.sql.instance-connection-name=INSTANCE_CONNECTION_NAME

# Your database name
spring.cloud.gcp.sql.database-name=registrants

# So app starts despite "table already exists" errors.
spring.datasource.continue-on-error=true

# Enforces database initialization
spring.datasource.initialization-mode=always

# Cloud SQL (MySQL) only supports InnoDB, not MyISAM
spring.jpa.database-platform=org.hibernate.dialect.MySQL55Dialect
spring.jpa.hibernate.ddl-auto=create-drop

# This is used if you want to connect to a different database instance
# user other than root; not used in codelab.
# spring.datasource.username=root

# This is used to specify the password of the database user;
# not used in codelab.
# spring.datasource.password=password
変更する必要があるプロパティは、インスタンス接続名のみです。この値は、YOUR_GCP_PROJECT_ID:REGION:DATABASE_INSTANCE_NAME の形式でコロン区切りの値としてフォーマットする必要があります。
7. 静的コンテンツの作成
まず、アプリケーションのフロントエンドを作成します。このアプリケーションには、個人を登録できるフォームと、登録に成功したすべてのユーザーを表示するビューが必要です。
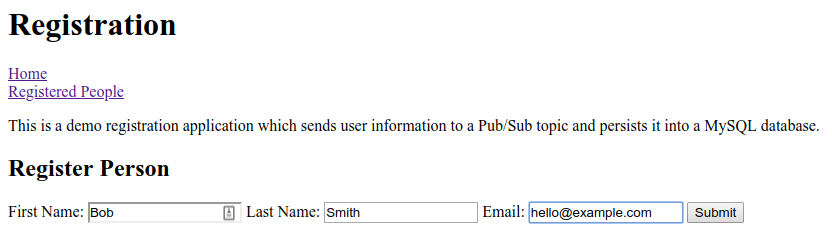
ホームページ用に、登録フォームを含む index.html を作成します。
src/main/resources/static/index.html
<!DOCTYPE html>
<html lang="en">
<head>
  <meta charset="UTF-8">
  <title>Registration Sample Application</title>
</head>
<body>

<h1>Registration</h1>

<div>
  <nav>
    <a href="/">Home</a><br>
    <a href="/registrants">Registered People</a><br>
  </nav>

  <p>
    This is a demo registration application which sends user information to a Pub/Sub topic and
    persists it into a MySQL database.
  </p>

  <h2>Register Person</h2>
  <div>
    <form action="/registerPerson" method="post">
      First Name: <input type="text" name="firstName" />
      Last Name: <input type="text" name="lastName" />
      Email: <input type="text" name="email" />
      <input type="submit" value="Submit"/>
    </form>
  </div>
</div>

</body>
</html>
次に、登録済みユーザーを表示するための registrants.html という名前の Thymeleaf テンプレートを作成します。Thymeleaf は、動的に作成された HTML を構築して提供するために使用するテンプレート フレームワークです。テンプレートは HTML に似ていますが、動的コンテンツを処理するための追加のマークダウン要素が含まれています。このテンプレートは、アプリを通じて登録されたすべての登録者を含む personsList という 1 つのパラメータを受け取ります。
src/main/resources/templates/registrants.html
<!DOCTYPE HTML>
<html xmlns:th="http://www.thymeleaf.org">
<head>
  <title>Registrants List</title>
  <meta http-equiv="Content-Type" content="text/html; charset=UTF-8"/>
</head>
<body>
<h1>Registrants List</h1>
<p>
  This page displays all the people who were registered through the Pub/Sub topic.
  All results are retrieved from the MySQL database.
</p>
<table border="1">
  <tr>
    <th>First Name</th>
    <th>Last Name</th>
    <th>Email</th>
  </tr>
  <tr th:each="person : ${personsList}">
    <td>[[${person.firstName}]]</td>
    <td>[[${person.lastName}]]</td>
    <td>[[${person.email}]]</td>
  </tr>
</table>

</body>
</html>
この時点で、静的コンテンツが配信されていることを確認できます。
Maven を使用してアプリをビルドして実行します。
$ ./mvnw spring-boot:run
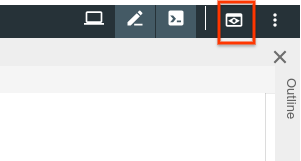
Cloud Shell ウィンドウのプレビュー ボタンをクリックし、ホームページがレンダリングされていることを確認します。ただし、ウェブ コントローラがないため、UI の機能はどれも動作しません。これは次のステップで追加します。
アプリケーションのプレビューが完了したら、CTRL+C を押してアプリケーションを終了します。
8. 登録者を Pub/Sub トピックに送信する
このステップでは、ウェブフォームから送信された登録者が Cloud Pub/Sub トピックに公開される機能を実装します。
データクラスを追加する
まず、いくつかの Kotlin データクラスを作成します。これらは JPA エンティティとなり、フォームから送信された登録者の中間表現としても機能します。
デモ パッケージに、Person クラスと Spring Data PersonRepository の 2 つの新しいファイルを追加します。これらの 2 つのクラスを使用すると、Spring Data JPA を使用して、MySQL データベースから登録エントリを簡単に保存して取得できます。
src/main/kotlin/com/example/demo/Person.kt
package com.example.demo

import javax.persistence.Entity
import javax.persistence.GeneratedValue
import javax.persistence.Id

@Entity
data class Person(
    val firstName: String,
    val lastName: String,
    val email: String,
    @Id @GeneratedValue
    var id: Long? = 0)
src/main/kotlin/com/example/demo/PersonRepository.kt
package com.example.demo

import org.springframework.data.repository.CrudRepository

interface PersonRepository : CrudRepository<Person, Long>
Web コントローラを追加する
次に、フォームから登録者を処理し、先ほど作成した Cloud Pub/Sub トピックに情報を送信する Controller クラスを作成します。このコントローラは、次の 2 つのエンドポイントを作成します。
/registerPerson: 登録者の情報が送信され、Pub/Sub トピックに送信される POST エンドポイント。registerPerson(..)関数では、Spring Cloud GCP Pub/Sub 統合のコンビニエンス クラスであるPubSubTemplateを使用して、登録者の情報が Pub/Sub トピックに送信されます。これにより、Cloud Pub/Sub とのやり取りを開始するために必要なボイラープレート コードが最小限に抑えられます。/registrants: データベースに登録されたすべての登録者が表示されます。この情報は、前の手順で作成した Spring Data リポジトリを使用して MySQL インスタンスから取得されます。
デモ パッケージに次の Controller クラスを作成します。
src/main/kotlin/com/example/demo/Controller.kt
package com.example.demo

import com.google.cloud.spring.pubsub.core.PubSubTemplate
import org.springframework.web.bind.annotation.GetMapping
import org.springframework.web.bind.annotation.PostMapping
import org.springframework.web.bind.annotation.RequestParam
import org.springframework.web.bind.annotation.RestController
import org.springframework.web.servlet.ModelAndView
import org.springframework.web.servlet.view.RedirectView

@RestController
class Controller(val pubSubTemplate: PubSubTemplate, val personRepository: PersonRepository) {

  // The Pub/Sub topic name created earlier.
  val REGISTRATION_TOPIC = "registrations"

  @PostMapping("/registerPerson")
  fun registerPerson(
    @RequestParam("firstName") firstName: String,
    @RequestParam("lastName") lastName: String,
    @RequestParam("email") email: String): RedirectView {

    pubSubTemplate.publish(
        REGISTRATION_TOPIC,
        Person(firstName, lastName, email))
    return RedirectView("/")
  }

  @GetMapping("/registrants")
  fun getRegistrants(): ModelAndView {
    val personsList = personRepository.findAll().toList()
    return ModelAndView("registrants", mapOf("personsList" to personsList))
  }
}
コントローラは、ウェブフォームから送信された登録者の情報を読み取り、その情報を Pub/Sub トピックにパブリッシュします。
JSON オブジェクト マッパー Bean の追加
Controller では、String ではなく Person オブジェクトを Pub/Sub トピックに公開していることに気づいたかもしれません。これは、トピックに送信されるカスタム JSON ペイロードに対する Spring Cloud GCP のサポートを利用しているためです。ライブラリを使用すると、オブジェクトを JSON にシリアル化し、JSON ペイロードをトピックに送信し、受信時にペイロードを逆シリアル化できます。
この機能を利用するには、アプリケーション コンテキストに ObjectMapper Bean を追加する必要があります。この ObjectMapper Bean は、アプリケーションがメッセージを送受信するときに、オブジェクトを JSON にシリアル化したり、JSON からオブジェクトにシリアル化したりするために使用されます。DemoApplication.kt クラスに、JacksonPubSubMessageConverter Spring Bean を追加します。
src/main/kotlin/com/example/demo/DemoApplication.kt
package com.example.demo

import org.springframework.boot.autoconfigure.SpringBootApplication
import org.springframework.boot.runApplication

// new imports to add
import org.springframework.context.annotation.Bean
import com.fasterxml.jackson.databind.ObjectMapper
import com.google.cloud.spring.pubsub.support.converter.JacksonPubSubMessageConverter

@SpringBootApplication
class DemoApplication {
  // This bean enables serialization/deserialization of
  // Java objects to JSON for Pub/Sub payloads
  @Bean
  fun jacksonPubSubMessageConverter(objectMapper: ObjectMapper) =
      JacksonPubSubMessageConverter(objectMapper)
}

fun main(args: Array<String>) {
        runApplication<DemoApplication>(*args)
}
この時点で、次のコマンドを実行してアプリケーションを再度実行できます。
$ ./mvnw spring-boot:run
メインページのウェブフォームから、アプリケーションは作成した Pub/Sub トピックに情報を送信するようになります。ただし、この Pub/Sub トピックから読み取る必要があるため、まだ何も役に立っていません。これは次のステップで実現します。
9. Pub/Sub トピックから登録者を読み取る
最後のステップでは、Pub/Sub トピックから登録者情報を処理し、その情報を Cloud MySQL データベースに永続化します。これでアプリケーションが完了し、フォームから新しい登録者を送信したり、/registrants エンドポイントからすべての登録ユーザーを表示したりできるようになります。
このアプリケーションでは、メッセージングを扱うための便利な抽象化を多数提供する Spring Integration を活用します。PubSubInboundChannelAdapter を追加して、Pub/Sub トピックからメッセージを読み取り、pubsubInputChannel に配置してさらに処理できるようにします。次に、@ServiceActivator を使用して messageReceiver 関数を構成し、pubsubInputChannel に到着したメッセージで呼び出されるようにします。
src/main/kotlin/com/example/demo/DemoApplication.kt
package com.example.demo

import org.springframework.boot.autoconfigure.SpringBootApplication
import org.springframework.boot.runApplication

import org.springframework.context.annotation.Bean
import com.fasterxml.jackson.databind.ObjectMapper
import org.springframework.cloud.gcp.pubsub.support.converter.JacksonPubSubMessageConverter

// new imports to add
import com.google.cloud.spring.pubsub.core.PubSubTemplate
import com.google.cloud.spring.pubsub.integration.AckMode
import com.google.cloud.spring.pubsub.integration.inbound.PubSubInboundChannelAdapter
import com.google.cloud.spring.pubsub.support.BasicAcknowledgeablePubsubMessage
import com.google.cloud.spring.pubsub.support.GcpPubSubHeaders
import org.springframework.beans.factory.annotation.Autowired
import org.springframework.beans.factory.annotation.Qualifier
import org.springframework.integration.annotation.ServiceActivator
import org.springframework.integration.channel.DirectChannel
import org.springframework.messaging.MessageChannel
import org.springframework.messaging.handler.annotation.Header

@SpringBootApplication
class DemoApplication {

  private val REGISTRANT_SUBSCRIPTION = "registrations-sub"

  @Autowired
  private lateinit var personRepository: PersonRepository

  // New Spring Beans to add
  @Bean
  fun pubsubInputChannel() = DirectChannel()

  @Bean
  fun messageChannelAdapter(
      @Qualifier("pubsubInputChannel") inputChannel: MessageChannel,
      pubSubTemplate: PubSubTemplate): PubSubInboundChannelAdapter {

    val adapter = PubSubInboundChannelAdapter(
        pubSubTemplate, REGISTRANT_SUBSCRIPTION)
    adapter.outputChannel = inputChannel
    adapter.ackMode = AckMode.MANUAL
    adapter.payloadType = Person::class.java
    return adapter
  }

  @ServiceActivator(inputChannel = "pubsubInputChannel")
  fun messageReceiver(
      payload: Person,
      @Header(GcpPubSubHeaders.ORIGINAL_MESSAGE) message: BasicAcknowledgeablePubsubMessage) {
    personRepository.save(payload)
    print("Message arrived! Payload: $payload")
    message.ack()
  }

  // ObjectMapper bean from previous step
  @Bean
  fun jacksonPubSubMessageConverter(objectMapper: ObjectMapper) = JacksonPubSubMessageConverter(objectMapper)
}

fun main(args: Array<String>) {
        runApplication<DemoApplication>(*args)
}
これで、アプリケーションの設定は完了です。アプリが正しく動作することを確認するには、次のコマンドを実行します。
$ ./mvnw spring-boot:run
[プレビュー] ボタンをもう一度クリックし、フォームに入力して送信することでユーザーの登録を試します。
[登録者] リンクをクリックして、新しい登録者が表に表示されていることを確認します。
これで完了です。ターミナル ウィンドウで CTRL+C キーを押して、アプリケーションを終了します。
10. クリーンアップ
環境をクリーンアップするには、作成した Pub/Sub トピックと Cloud MySQL インスタンスを削除する必要があります。
Cloud MySQL インスタンスの削除
$ gcloud sql instances delete codelab-instance
Pub/Sub リソースの削除
$ gcloud pubsub subscriptions delete registrations-sub
$ gcloud pubsub topics delete registrations
11. 完了
これで、Cloud Pub/Sub と Cloud SQL(MySQL)を統合する Spring Kotlin アプリケーションの作成が完了しました。
詳細
- GCP プロジェクトの Spring: http://cloud.spring.io/spring-cloud-gcp/
- Spring on GCP GitHub リポジトリ: https://github.com/GoogleCloudPlatform/spring-cloud-gcp
- Google Cloud Platform での Java: https://cloud.google.com/java/
- GCP を使用する Kotlin アプリケーションのサンプル: https://github.com/GoogleCloudPlatform/spring-cloud-gcp/tree/master/spring-cloud-gcp-kotlin-samples
ライセンス
この作業はクリエイティブ・コモンズの表示 2.0 汎用ライセンスにより使用許諾されています。