
1. 简介
Spring Framework 5.0 添加了专用 Kotlin 支持,让 Kotlin 开发者可以轻松使用 Spring。因此,这些更改意味着 Spring Cloud GCP 提供的 Google Cloud 集成也能在 Kotlin 中顺畅运行。在此 Codelab 中,您将了解在 Kotlin 应用中开始使用 Google Cloud 服务是多么简单!
此 Codelab 将引导您在 Kotlin 中设置简单的注册应用,演示如何使用 GCP 服务,包括:Cloud Pub/Sub 和 Cloud SQL。
构建内容
在此 Codelab 中,您将设置一个 Kotlin Spring Boot 应用,该应用接受注册者信息,将其发布到 Cloud Pub/Sub 主题,并将其持久保存到 Cloud MySQL 数据库。
学习内容
如何在 Kotlin Spring 应用中与 Google Cloud 服务集成。
所需条件
- 一个 Google Cloud Platform 项目
- 一个浏览器,例如 Chrome 或 Firefox
您将如何使用本教程?
您如何评价自己在构建 HTML/CSS Web 应用方面的经验水平?
您如何评价自己在使用 Google Cloud Platform 服务方面的经验水平?
2. 设置和要求
自定进度的环境设置

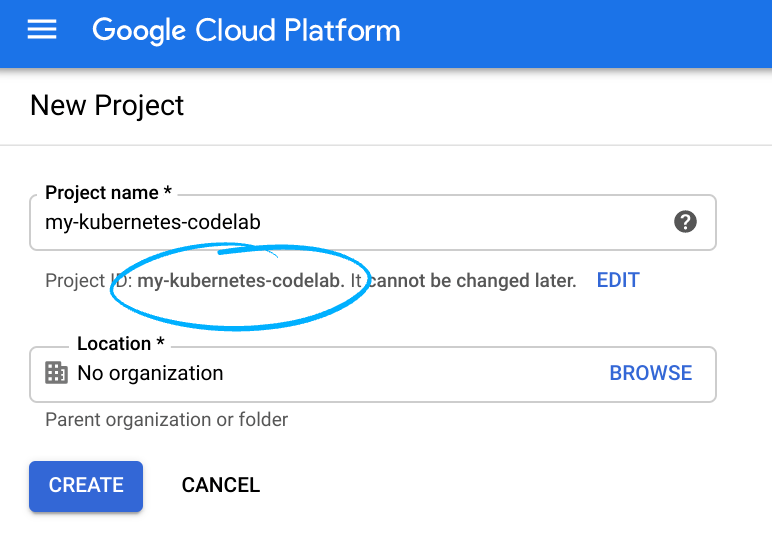
请记住项目 ID,它在所有 Google Cloud 项目中都是唯一的名称(上述名称已被占用,您无法使用,抱歉!)。它稍后将在此 Codelab 中被称为 PROJECT_ID。
- 接下来,您需要在 Cloud 控制台中启用结算功能,才能使用 Google Cloud 资源。
运行此 Codelab 应该不会产生太多的费用(如果有费用的话)。请务必按照“清理”部分中的所有说明操作,该部分介绍了如何关停资源,以免产生超出本教程范围的结算费用。Google Cloud 的新用户符合参与 $300 USD 免费试用计划的条件。
Google Cloud Shell
虽然可以通过笔记本电脑对 Google Cloud 进行远程操作,但在此 Codelab 中,我们将使用 Google Cloud Shell,这是一个在云端运行的命令行环境。
激活 Cloud Shell
- 在 Cloud Console 中,点击激活 Cloud Shell
。

如果您以前从未启动过 Cloud Shell,将看到一个中间屏幕(在折叠下面),描述它是什么。如果是这种情况,请点击继续(您将永远不会再看到它)。一次性屏幕如下所示:

预配和连接到 Cloud Shell 只需花几分钟时间。

这个虚拟机已加载了您需要的所有开发工具。它提供了一个持久的 5GB 主目录,并且在 Google Cloud 中运行,大大增强了网络性能和身份验证。只需使用一个浏览器或 Google Chromebook 即可完成本 Codelab 中的大部分(甚至全部)工作。
在连接到 Cloud Shell 后,您应该会看到自己已通过身份验证,并且相关项目已设置为您的项目 ID:
- 在 Cloud Shell 中运行以下命令以确认您已通过身份验证:
gcloud auth list
命令输出
 Credentialed Accounts
ACTIVE  ACCOUNT
*       <my_account>@<my_domain.com>

To set the active account, run:
    $ gcloud config set account `ACCOUNT`
gcloud config list project
命令输出
[core]
project = <PROJECT_ID>
如果不是上述结果,您可以使用以下命令进行设置:
gcloud config set project <PROJECT_ID>
命令输出
Updated property [core/project].
3. 预配 Pub/Sub 资源
首先,我们需要设置 Cloud Pub/Sub 主题和订阅。在此应用中,我们将向 Pub/Sub 主题发布注册信息;然后从该主题读取信息并将其持久保存到数据库中。
在本教程中,我们将依靠 Cloud Shell 来预配资源。请注意,您还可以通过 Google Cloud 控制台中的 Cloud Pub/Sub 部分配置 Pub/Sub 资源。
在 Cloud Shell 终端中,先启用 Pub/Sub API。
$ gcloud services enable pubsub.googleapis.com
接下来,我们将为此应用创建一个名为 registrations 的 Pub/Sub 主题。通过应用提交的注册信息将发布到此主题。
$ gcloud pubsub topics create registrations
最后,为主题创建订阅。通过 Pub/Sub 订阅,您可以接收来自主题的消息。
$ gcloud pubsub subscriptions create registrations-sub --topic=registrations
您现在已完成为应用创建 Cloud Pub/Sub 主题和订阅。
4. 创建 Cloud SQL (MySQL) 实例和数据库
对于我们的示例应用,我们还需要设置一个数据库实例来保存注册者信息。此步骤还将依赖 Cloud Shell 终端来预配 Cloud SQL 资源。请注意,您也可以通过 Google Cloud 控制台查看和配置 Cloud SQL 实例。
首先,启用 Cloud SQL Admin API。
$ gcloud services enable sqladmin.googleapis.com
接下来,我们将预配 Cloud SQL (MySQL) 实例。此命令可能需要一些时间才能完成。
$ gcloud sql instances create codelab-instance --region=us-east1
成功创建 Cloud SQL 实例后,在该实例中创建一个名为 registrants 的新数据库。
$ gcloud sql databases create registrants --instance codelab-instance
您现在已完成应用的 Cloud SQL 实例和数据库设置。
5. 初始化 Spring Boot 应用
现在,我们已准备好开始编写应用。后续步骤将继续使用设置步骤中介绍的 Cloud Shell。
首先,我们将使用 Initializr 为项目生成框架代码。在 Cloud Shell 窗口中,运行以下命令:
$ cd ~
$ curl https://start.spring.io/starter.tgz \
  -d language=kotlin \
  -d bootVersion=2.4.0 \
  -d dependencies=web,data-jpa,integration,cloud-gcp-pubsub,thymeleaf \
  -d baseDir=registrations-codelab | tar -xzvf -
$ cd registrations-codelab
此命令会在 registrations-codelab/ 目录中生成初始 Maven 项目设置以及应用的框架代码。以下各部分介绍了生成可正常运行的应用所需的代码修改。
Cloud Shell 代码编辑器
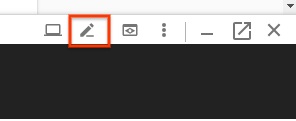
在 Cloud Shell 环境中开始修改和查看代码的最简单方法是使用内置的 Cloud Shell 代码编辑器。
打开 Cloud Shell 实例后,点击铅笔图标即可打开代码编辑器。该编辑器应允许您直接修改 Initialzr 生成的项目文件。
6. 数据库配置
首先,配置应用,使其能够连接到您设置的 Cloud MySQL 数据库。Spring Cloud GCP 库提供了一个 Cloud MySQL 启动器,用于提供连接到 Cloud MySQL 实例所需的依赖项。
将 spring-cloud-gcp-starter-sql-mysql 依赖项添加到项目 pom.xml 中:
registrations-codelab/pom.xml
...
<dependencies>

  ... Other dependencies above ...

  <!-- Add the MySQL starter to the list of dependencies -->
  <dependency>
    <groupId>com.google.cloud</groupId>
    <artifactId>spring-cloud-gcp-starter-sql-mysql</artifactId>
  </dependency>
</dependencies>
此外,您还需要修改 application.properties 配置文件,以描述数据库配置。将以下属性复制到 application.properties 文件中。
查找数据库的实例连接名称:
$ gcloud sql instances describe codelab-instance \
  --format 'value(connectionName)'
此命令的输出将用于在 application.properties 文件中配置连接信息。
src/main/resources/application.properties
# Modify this property using the output from the previous command line.
spring.cloud.gcp.sql.instance-connection-name=INSTANCE_CONNECTION_NAME

# Your database name
spring.cloud.gcp.sql.database-name=registrants

# So app starts despite "table already exists" errors.
spring.datasource.continue-on-error=true

# Enforces database initialization
spring.datasource.initialization-mode=always

# Cloud SQL (MySQL) only supports InnoDB, not MyISAM
spring.jpa.database-platform=org.hibernate.dialect.MySQL55Dialect
spring.jpa.hibernate.ddl-auto=create-drop

# This is used if you want to connect to a different database instance
# user other than root; not used in codelab.
# spring.datasource.username=root

# This is used to specify the password of the database user;
# not used in codelab.
# spring.datasource.password=password
您必须修改的唯一属性是实例连接名称。此值必须采用英文冒号分隔的值格式,形式为:YOUR_GCP_PROJECT_ID:REGION:DATABASE_INSTANCE_NAME。
7. 创建静态内容
首先,我们将为应用创建前端。应用应包含一个表单,允许用户注册个人,还应包含一个视图,用于显示所有成功注册的用户。
对于首页,请创建一个包含注册表单的 index.html。
src/main/resources/static/index.html
<!DOCTYPE html>
<html lang="en">
<head>
  <meta charset="UTF-8">
  <title>Registration Sample Application</title>
</head>
<body>

<h1>Registration</h1>

<div>
  <nav>
    <a href="/">Home</a><br>
    <a href="/registrants">Registered People</a><br>
  </nav>

  <p>
    This is a demo registration application which sends user information to a Pub/Sub topic and
    persists it into a MySQL database.
  </p>

  <h2>Register Person</h2>
  <div>
    <form action="/registerPerson" method="post">
      First Name: <input type="text" name="firstName" />
      Last Name: <input type="text" name="lastName" />
      Email: <input type="text" name="email" />
      <input type="submit" value="Submit"/>
    </form>
  </div>
</div>

</body>
</html>
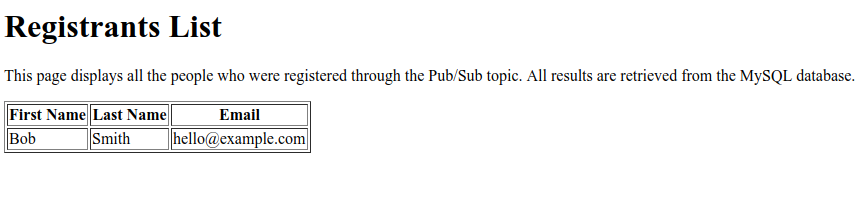
接下来,我们将创建一个名为 registrants.html 的 Thymeleaf 模板,用于显示已注册的用户。Thymeleaf 是一种模板框架,我们使用它来构建和提供动态创建的 HTML。您会看到,该模板看起来像 HTML,但它包含一些额外的 Markdown 元素来处理动态内容。此模板接受一个名为 personsList 的参数,其中包含通过应用注册的所有注册者。
src/main/resources/templates/registrants.html
<!DOCTYPE HTML>
<html xmlns:th="http://www.thymeleaf.org">
<head>
  <title>Registrants List</title>
  <meta http-equiv="Content-Type" content="text/html; charset=UTF-8"/>
</head>
<body>
<h1>Registrants List</h1>
<p>
  This page displays all the people who were registered through the Pub/Sub topic.
  All results are retrieved from the MySQL database.
</p>
<table border="1">
  <tr>
    <th>First Name</th>
    <th>Last Name</th>
    <th>Email</th>
  </tr>
  <tr th:each="person : ${personsList}">
    <td>[[${person.firstName}]]</td>
    <td>[[${person.lastName}]]</td>
    <td>[[${person.email}]]</td>
  </tr>
</table>

</body>
</html>
此时,您可以验证静态内容是否正在传送。
使用 Maven 构建并运行应用:
$ ./mvnw spring-boot:run
点击 Cloud Shell 窗口中的预览按钮,验证是否看到首页正在呈现。不过,界面上的任何功能都将无法正常运行,因为我们缺少 Web 控制器。我们将在下一步中添加此功能。
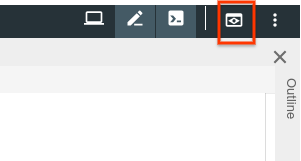
预览应用后,按 CTRL+C 终止应用。
8. 将注册者发送到 Pub/Sub 主题
在此步骤中,我们将实现一项功能,即通过网页表单提交的注册者信息将发布到 Cloud Pub/Sub 主题。
添加数据类
首先,我们将创建一些 Kotlin 数据类;这些类将作为我们的 JPA 实体,同时充当通过表单提交的注册者的中间表示形式。
在演示软件包中,添加两个新文件:一个 Person 类和一个 Spring Data PersonRepository。借助这两个类,我们可以使用 Spring Data JPA 轻松地在 MySQL 数据库中存储和检索注册条目。
src/main/kotlin/com/example/demo/Person.kt
package com.example.demo

import javax.persistence.Entity
import javax.persistence.GeneratedValue
import javax.persistence.Id

@Entity
data class Person(
    val firstName: String,
    val lastName: String,
    val email: String,
    @Id @GeneratedValue
    var id: Long? = 0)
src/main/kotlin/com/example/demo/PersonRepository.kt
package com.example.demo

import org.springframework.data.repository.CrudRepository

interface PersonRepository : CrudRepository<Person, Long>
添加 Web 控制器
接下来,我们将创建一个 Controller 类,用于处理表单中的注册者信息,并将这些信息发送到您之前创建的 Cloud Pub/Sub 主题。此控制器会创建两个端点:
/registerPerson:注册者信息提交到的 POST 端点,然后该信息会被发送到 Pub/Sub 主题。在registerPerson(..)函数中,注册者信息使用PubSubTemplate发送到 Pub/Sub 主题,PubSubTemplate是 Spring Cloud GCP Pub/Sub 集成中的一个便捷类,可最大限度地减少开始与 Cloud Pub/Sub 交互所需的样板代码。/registrants:显示数据库中成功注册的所有注册者。此信息是从 MySQL 实例中检索的,检索时使用的是我们在上一步中创建的 Spring Data 代码库。
在演示软件包中创建以下控制器类:
src/main/kotlin/com/example/demo/Controller.kt
package com.example.demo

import com.google.cloud.spring.pubsub.core.PubSubTemplate
import org.springframework.web.bind.annotation.GetMapping
import org.springframework.web.bind.annotation.PostMapping
import org.springframework.web.bind.annotation.RequestParam
import org.springframework.web.bind.annotation.RestController
import org.springframework.web.servlet.ModelAndView
import org.springframework.web.servlet.view.RedirectView

@RestController
class Controller(val pubSubTemplate: PubSubTemplate, val personRepository: PersonRepository) {

  // The Pub/Sub topic name created earlier.
  val REGISTRATION_TOPIC = "registrations"

  @PostMapping("/registerPerson")
  fun registerPerson(
    @RequestParam("firstName") firstName: String,
    @RequestParam("lastName") lastName: String,
    @RequestParam("email") email: String): RedirectView {

    pubSubTemplate.publish(
        REGISTRATION_TOPIC,
        Person(firstName, lastName, email))
    return RedirectView("/")
  }

  @GetMapping("/registrants")
  fun getRegistrants(): ModelAndView {
    val personsList = personRepository.findAll().toList()
    return ModelAndView("registrants", mapOf("personsList" to personsList))
  }
}
控制器读取通过 Web 表单提交的注册者信息,然后将该信息发布到 Pub/Sub 主题。
添加 JSON 对象映射器 Bean
您可能已经注意到,在控制器中,我们向 Pub/Sub 主题发布的是 Person 对象,而不是字符串。之所以能够实现这一点,是因为我们利用了 Spring Cloud GCP 对发送到主题的自定义 JSON 载荷的支持 - 这些库允许您将对象序列化为 JSON、将 JSON 载荷发送到主题,并在收到载荷时对其进行反序列化。
为了利用此功能,我们必须向您的应用上下文添加一个 ObjectMapper bean。当您的应用发送和接收消息时,此 ObjectMapper bean 将用于将对象序列化为 JSON 以及从 JSON 反序列化对象。在 DemoApplication.kt 类中,添加 JacksonPubSubMessageConverter Spring bean:
src/main/kotlin/com/example/demo/DemoApplication.kt
package com.example.demo

import org.springframework.boot.autoconfigure.SpringBootApplication
import org.springframework.boot.runApplication

// new imports to add
import org.springframework.context.annotation.Bean
import com.fasterxml.jackson.databind.ObjectMapper
import com.google.cloud.spring.pubsub.support.converter.JacksonPubSubMessageConverter

@SpringBootApplication
class DemoApplication {
  // This bean enables serialization/deserialization of
  // Java objects to JSON for Pub/Sub payloads
  @Bean
  fun jacksonPubSubMessageConverter(objectMapper: ObjectMapper) =
      JacksonPubSubMessageConverter(objectMapper)
}

fun main(args: Array<String>) {
        runApplication<DemoApplication>(*args)
}
此时,您可以尝试运行以下命令来再次运行应用:
$ ./mvnw spring-boot:run
现在,应用会通过主页上的 Web 表单将信息发送到您创建的 Pub/Sub 主题。不过,它目前还没有任何实际用途,因为我们还需要从该 Pub/Sub 主题中读取内容!这会在下一步中完成。
9. 从 Pub/Sub 主题读取注册者
在最后一步中,我们将处理来自 Pub/Sub 主题的注册者信息,并将该信息持久保存到 Cloud MySQL 数据库中。这样一来,应用就完成了,您可以通过表单提交新注册者,并通过 /registrants 端点查看所有注册用户。
此应用将利用 Spring Integration,它提供了许多方便的抽象来处理消息传递。我们将添加一个 PubSubInboundChannelAdapter,以便能够从 Pub/Sub 主题读取消息并将其放入 pubsubInputChannel 中以供进一步处理。然后,我们将使用 @ServiceActivator 配置 messageReceiver 函数,以便在 pubsubInputChannel 上收到消息时调用该函数。
src/main/kotlin/com/example/demo/DemoApplication.kt
package com.example.demo

import org.springframework.boot.autoconfigure.SpringBootApplication
import org.springframework.boot.runApplication

import org.springframework.context.annotation.Bean
import com.fasterxml.jackson.databind.ObjectMapper
import org.springframework.cloud.gcp.pubsub.support.converter.JacksonPubSubMessageConverter

// new imports to add
import com.google.cloud.spring.pubsub.core.PubSubTemplate
import com.google.cloud.spring.pubsub.integration.AckMode
import com.google.cloud.spring.pubsub.integration.inbound.PubSubInboundChannelAdapter
import com.google.cloud.spring.pubsub.support.BasicAcknowledgeablePubsubMessage
import com.google.cloud.spring.pubsub.support.GcpPubSubHeaders
import org.springframework.beans.factory.annotation.Autowired
import org.springframework.beans.factory.annotation.Qualifier
import org.springframework.integration.annotation.ServiceActivator
import org.springframework.integration.channel.DirectChannel
import org.springframework.messaging.MessageChannel
import org.springframework.messaging.handler.annotation.Header

@SpringBootApplication
class DemoApplication {

  private val REGISTRANT_SUBSCRIPTION = "registrations-sub"

  @Autowired
  private lateinit var personRepository: PersonRepository

  // New Spring Beans to add
  @Bean
  fun pubsubInputChannel() = DirectChannel()

  @Bean
  fun messageChannelAdapter(
      @Qualifier("pubsubInputChannel") inputChannel: MessageChannel,
      pubSubTemplate: PubSubTemplate): PubSubInboundChannelAdapter {

    val adapter = PubSubInboundChannelAdapter(
        pubSubTemplate, REGISTRANT_SUBSCRIPTION)
    adapter.outputChannel = inputChannel
    adapter.ackMode = AckMode.MANUAL
    adapter.payloadType = Person::class.java
    return adapter
  }

  @ServiceActivator(inputChannel = "pubsubInputChannel")
  fun messageReceiver(
      payload: Person,
      @Header(GcpPubSubHeaders.ORIGINAL_MESSAGE) message: BasicAcknowledgeablePubsubMessage) {
    personRepository.save(payload)
    print("Message arrived! Payload: $payload")
    message.ack()
  }

  // ObjectMapper bean from previous step
  @Bean
  fun jacksonPubSubMessageConverter(objectMapper: ObjectMapper) = JacksonPubSubMessageConverter(objectMapper)
}

fun main(args: Array<String>) {
        runApplication<DemoApplication>(*args)
}
至此,您已完成应用的设置。如需验证应用是否正常运行,请运行以下命令:
$ ./mvnw spring-boot:run
再次点击预览按钮,然后尝试通过填写表单并提交来注册用户。
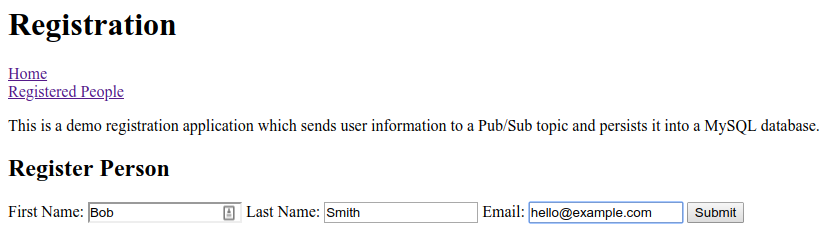
点击已注册人员链接,验证新注册者是否显示在表格中。
恭喜,您已完成!在终端窗口中按 CTRL+C 终止应用。
10. 清理
如需清理环境,您需要删除创建的 Pub/Sub 主题和 Cloud MySQL 实例。
删除 Cloud MySQL 实例
$ gcloud sql instances delete codelab-instance
删除 Pub/Sub 资源
$ gcloud pubsub subscriptions delete registrations-sub
$ gcloud pubsub topics delete registrations
11. 恭喜!
您现在已完成编写与 Cloud Pub/Sub 和 Cloud SQL (MySQL) 集成的 Spring Kotlin 应用。
了解详情
- GCP 上的 Spring 项目:http://cloud.spring.io/spring-cloud-gcp/
- GCP GitHub 代码库上的 Spring:https://github.com/GoogleCloudPlatform/spring-cloud-gcp
- Google Cloud Platform 上的 Java:https://cloud.google.com/java/
- 使用 GCP 的 Kotlin 应用示例:https://github.com/GoogleCloudPlatform/spring-cloud-gcp/tree/master/spring-cloud-gcp-kotlin-samples
许可
此作品已获得 Creative Commons Attribution 2.0 通用许可授权。