
1. Overview
AI agents are rapidly growing in popularity, revolutionizing task automation and decision-making with their ability to operate autonomously, learn, and interact with their environment to achieve goals.
But how exactly does one go about building an agent? This codelab will help you get started by showing you how to build a currency agent that can convert between different countries' currencies. With the goal of walking through the latest technologies to help you understand those acronyms that you may have seen floating around the internet (MCP, ADK, A2A).
Model Context Protocol (MCP)
Model Context Protocol (MCP) is an open protocol that standardizes how applications provide context to LLMs. MCP provides a standardized way to connect AI models to resources, prompts and tools.
Agent Development Kit (ADK)
Agent Development Kit (ADK) is a flexible orchestration framework for developing and deploying AI agents. ADK is model-agnostic, deployment-agnostic, and is built for compatibility with other frameworks. ADK was designed to make agent development feel more like software development, to make it easier for developers to create, deploy, and orchestrate agentic architectures that range from simple tasks to complex workflows.
Agent2Agent (A2A) Protocol
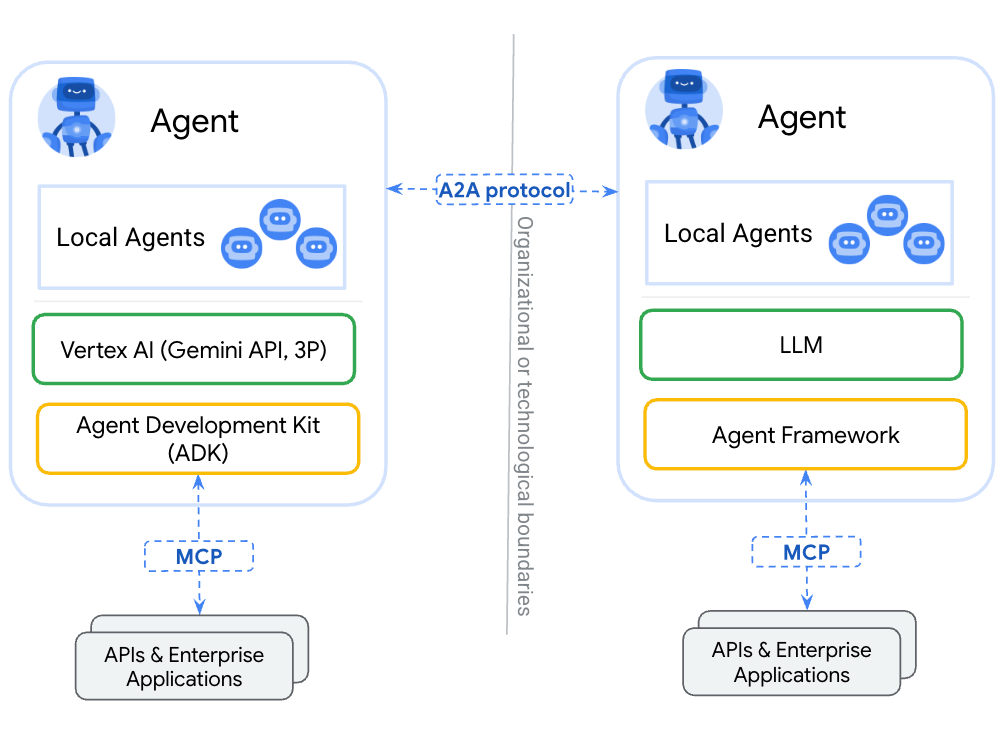
The Agent2Agent (A2A) Protocol is an open standard designed to enable seamless communication and collaboration between AI agents. Just like how MCP provides a standardized way to give LLMs access to data and tools, A2A provides a standardized way for agents to talk to other agents! In a world where agents are built using diverse frameworks and by different vendors, A2A provides a common language, breaking down silos and fostering interoperability.
What you'll learn
- How to create a local MCP server
- Deploying the MCP server to Cloud Run
- How to build an Agent with Agent Development Kit that uses MCP tools
- How to expose an ADK agent as an A2A Server
- Testing the A2A Server using the A2A Client
What you'll need
2. Before you begin
Create a project
- In the Google Cloud Console, on the project selector page, select or create a Google Cloud project.
- Make sure that billing is enabled for your Cloud project. Learn how to check if billing is enabled on a project.
- Activate Cloud Shell by clicking this link. You can toggle between Cloud Shell Terminal (for running cloud commands) and Editor (for building projects) by clicking on the corresponding button from Cloud Shell.
- Once connected to Cloud Shell, you check that you're already authenticated and that the project is set to your project ID using the following command:
gcloud auth list
- Run the following command in Cloud Shell to confirm that the gcloud command knows about your project.
gcloud config list project
- Use the following command to set your project:
export PROJECT_ID=<YOUR_PROJECT_ID>
gcloud config set project $PROJECT_ID
- Enable the required APIs using the following command. This could take a few minutes.
gcloud services enable cloudresourcemanager.googleapis.com \
                       servicenetworking.googleapis.com \
                       run.googleapis.com \
                       cloudbuild.googleapis.com \
                       artifactregistry.googleapis.com \
                       aiplatform.googleapis.com \
                       compute.googleapis.com
- Make sure to have Python 3.10+
Refer to the documentation for gcloud commands and usage.
3. Installation
- Clone the repository:
git clone https://github.com/jackwotherspoon/currency-agent.git
cd currency-agent
- Install uv (used to manage dependencies):
# macOS and Linux
curl -LsSf https://astral.sh/uv/install.sh | sh

# Windows (uncomment below line)
# powershell -ExecutionPolicy ByPass -c "irm https://astral.sh/uv/install.ps1 | iex"
- Configure environment variables (via
.envfile):
Create a .env file by running the following:
echo "GOOGLE_GENAI_USE_VERTEXAI=TRUE" >> .env \
&& echo "GOOGLE_CLOUD_PROJECT=$PROJECT_ID" >> .env \
&& echo "GOOGLE_CLOUD_LOCATION=us-central1" >> .env
4. Create a local MCP Server
Before you get to orchestrating your currency agent, you will first create an MCP server for exposing your tool(s) that your agent will need.
An MCP server let's you write lightweight programs to expose specific capabilities (like fetching currency exchange rates) as tools. An agent or even multiple agents can then access these tools using the standardized Model Context Protocol (MCP).
The FastMCP Python package can be leveraged to create an MCP server that exposes a single tool called get_exchange_rate. The get_exchange_rate tool makes a call over the internet to the Frankfurter API to get the current exchange rate between two currencies.
The code for the MCP server can be found in the mcp-server/server.py file:
import logging
import os

import httpx
from fastmcp import FastMCP

# Set up logging
logger = logging.getLogger(__name__)
logging.basicConfig(format="[%(levelname)s]: %(message)s", level=logging.INFO)

mcp = FastMCP("Currency MCP Server 💵")

@mcp.tool()
def get_exchange_rate(
    currency_from: str = 'USD',
    currency_to: str = 'EUR',
    currency_date: str = 'latest',
):
    """Use this to get current exchange rate.

    Args:
        currency_from: The currency to convert from (e.g., "USD").
        currency_to: The currency to convert to (e.g., "EUR").
        currency_date: The date for the exchange rate or "latest". Defaults to "latest".

    Returns:
        A dictionary containing the exchange rate data, or an error message if the request fails.
    """
    logger.info(f"--- 🛠️ Tool: get_exchange_rate called for converting {currency_from} to {currency_to} ---")
    try:
        response = httpx.get(
            f'https://api.frankfurter.app/{currency_date}',
            params={'from': currency_from, 'to': currency_to},
        )
        response.raise_for_status()

        data = response.json()
        if 'rates' not in data:
            return {'error': 'Invalid API response format.'}
        logger.info(f'✅ API response: {data}')
        return data
    except httpx.HTTPError as e:
        return {'error': f'API request failed: {e}'}
    except ValueError:
        return {'error': 'Invalid JSON response from API.'}

if __name__ == "__main__":
    logger.info(f"🚀 MCP server started on port {os.getenv('PORT', 8080)}")
    # Could also use 'sse' transport, host="0.0.0.0" required for Cloud Run.
    asyncio.run(
        mcp.run_async(
            transport="http",
            host="0.0.0.0",
            port=os.getenv("PORT", 8080),
        )
    )
To start the MCP server locally, open a terminal and run the following command (server will start on http://localhost:8080):
uv run mcp-server/server.py
Test that the MCP server is functioning properly and that the get_exchange_rate tool is accessible using the Model Context Protocol.
In a new terminal window (so that you don't stop the local MCP server) run the following:
uv run mcp-server/test_server.py
You should see the current exchange rate of 1 USD (US dollar) to EUR (Euro) outputted:
--- 🛠️ Tool found: get_exchange_rate ---
--- 🪛 Calling get_exchange_rate tool for USD to EUR ---
--- ✅ Success: {
  "amount": 1.0,
  "base": "USD",
  "date": "2025-05-26",
  "rates": {
    "EUR": 0.87866
  }
} ---
Awesome! You successfully have a working MCP server with a tool that your agent will be able to access.
Before moving on to the next station, stop the locally running MCP server by running Ctrl+C (or Command+C on Mac) in the terminal where you started it.
5. Deploy your MCP Server to Cloud Run
Now you are ready to deploy the MCP server as a remote MCP server to Cloud Run 🚀☁️
Benefits of running an MCP server remotely
Running an MCP server remotely on Cloud Run can provide several benefits:
- 📈Scalability: Cloud Run is built to rapidly scale out to handle all incoming requests. Cloud Run will scale your MCP server automatically based on demand.
- 👥Centralized server: You can share access to a centralized MCP server with team members through IAM privileges, allowing them to connect to it from their local machines instead of all running their own servers locally. If a change is made to the MCP server, all team members will benefit from it.
- 🔐Security: Cloud Run provides an easy way to force authenticated requests. This allows only secure connections to your MCP server, preventing unauthorized access.
Change into the mcp-server directory:
cd mcp-server
Deploy the MCP server to Cloud Run:
gcloud run deploy mcp-server --no-allow-unauthenticated --region=us-central1 --source .
If your service has successfully deployed you will see a message like the following:
Service [mcp-server] revision [mcp-server-12345-abc] has been deployed and is serving 100 percent of traffic.
Authenticating MCP Clients
Since you specified --no-allow-unauthenticated to require authentication, any MCP client connecting to the remote MCP server will need to authenticate.
The official docs for Host MCP servers on Cloud Run provides more information on this topic depending on where you are running your MCP client.
You will need to run the Cloud Run proxy to create an authenticated tunnel to the remote MCP server on your local machine.
By default, the URL of Cloud Run services requires all requests to be authorized with the Cloud Run Invoker (roles/run.invoker) IAM role. This IAM policy binding ensures that a strong security mechanism is used to authenticate your local MCP client.
You should make sure that you or any team members trying to access the remote MCP server have the roles/run.invoker IAM role bound to their IAM principal (Google Cloud account).
gcloud run services proxy mcp-server --region=us-central1
You should see the following output:
Proxying to Cloud Run service [mcp-server] in project [<YOUR_PROJECT_ID>] region [us-central1]
http://127.0.0.1:8080 proxies to https://mcp-server-abcdefgh-uc.a.run.app
All traffic to http://127.0.0.1:8080 will now be authenticated and forwarded to the remote MCP server.
Test the remote MCP server
In a new terminal, head back to the root folder and re-run the mcp-server/test_server.py file to make sure the remote MCP server is working.
cd ..
uv run mcp-server/test_server.py
You should see a similar output as you did when running the server locally:
--- 🛠️ Tool found: get_exchange_rate ---
--- 🪛 Calling get_exchange_rate tool for USD to EUR ---
--- ✅ Success: {
  "amount": 1.0,
  "base": "USD",
  "date": "2025-05-26",
  "rates": {
    "EUR": 0.87866
  }
} ---
You can query the logs of the deployed Cloud Run MCP server if you would like to verify that the remote server was indeed called:
gcloud run services logs read mcp-server --region us-central1 --limit 5
You should see the following outputted in the logs:
2025-06-04 14:28:29,871 [INFO]: --- 🛠️ Tool: get_exchange_rate called for converting USD to EUR ---
2025-06-04 14:28:30,610 [INFO]: HTTP Request: GET https://api.frankfurter.app/latest?from=USD&to=EUR "HTTP/1.1 200 OK"
2025-06-04 14:28:30,611 [INFO]: ✅ API response: {'amount': 1.0, 'base': 'USD', 'date': '2025-06-03', 'rates': {'EUR': 0.87827}}
Now that you have a remote MCP server, you can move on to creating an agent! 🤖
6. Create an Agent with Agent Development Kit (ADK)
You have a deployed MCP server, now it is time to create the currency agent using Agent Development Kit (ADK).
Agent Development Kit recently released its v1.0.0 stable release. This milestone signifies that the Python ADK is now production-ready, offering a reliable and robust platform for developers to confidently build and deploy their agents in live environments.
ADK makes creating agents extremely lightweight and allows them to easily connect to MCP servers with built-in support for MCP Tools. The currency agent will access the get_exchange_rate tool by using ADK's MCPToolset class.
The code for the currency agent is located in currency_agent/agent.py:
import logging
import os

from dotenv import load_dotenv
from google.adk.agents import LlmAgent
from google.adk.a2a.utils.agent_to_a2a import to_a2a
from google.adk.tools.mcp_tool import MCPToolset, StreamableHTTPConnectionParams

logger = logging.getLogger(__name__)
logging.basicConfig(format="[%(levelname)s]: %(message)s", level=logging.INFO)

load_dotenv()

SYSTEM_INSTRUCTION = (
    "You are a specialized assistant for currency conversions. "
    "Your sole purpose is to use the 'get_exchange_rate' tool to answer questions about currency exchange rates. "
    "If the user asks about anything other than currency conversion or exchange rates, "
    "politely state that you cannot help with that topic and can only assist with currency-related queries. "
    "Do not attempt to answer unrelated questions or use tools for other purposes."
)

logger.info("--- 🔧 Loading MCP tools from MCP Server... ---")
logger.info("--- 🤖 Creating ADK Currency Agent... ---")

root_agent = LlmAgent(
    model="gemini-2.5-flash",
    name="currency_agent",
    description="An agent that can help with currency conversions",
    instruction=SYSTEM_INSTRUCTION,
    tools=[
        MCPToolset(
            connection_params=StreamableHTTPConnectionParams(
                url=os.getenv("MCP_SERVER_URL", "http://localhost:8080/mcp")
            )
        )
    ],
)
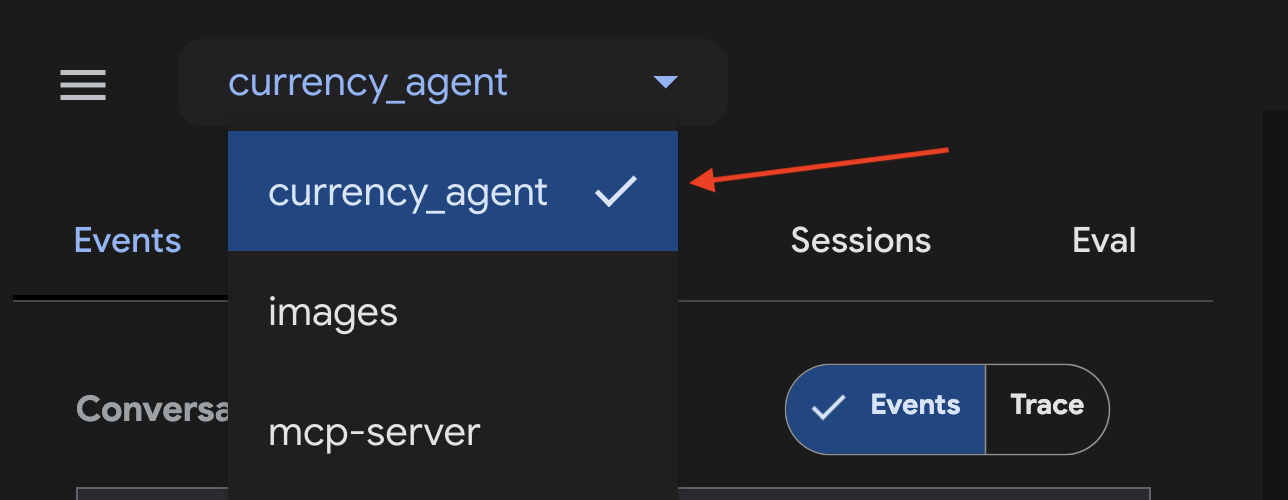
To quickly test out the currency agent you can take advantage of ADK's dev UI, accessed by running adk web:
uv run adk web
In a browser, head over to http://localhost:8000 to see and test the agent!
Make sure that currency_agent is selected as the agent in the top left corner of the web UI.
Ask your agent in the chat area something like "What is 250 CAD to USD?". You should see the agent call our get_exchange_rate MCP tool before it gives a response.
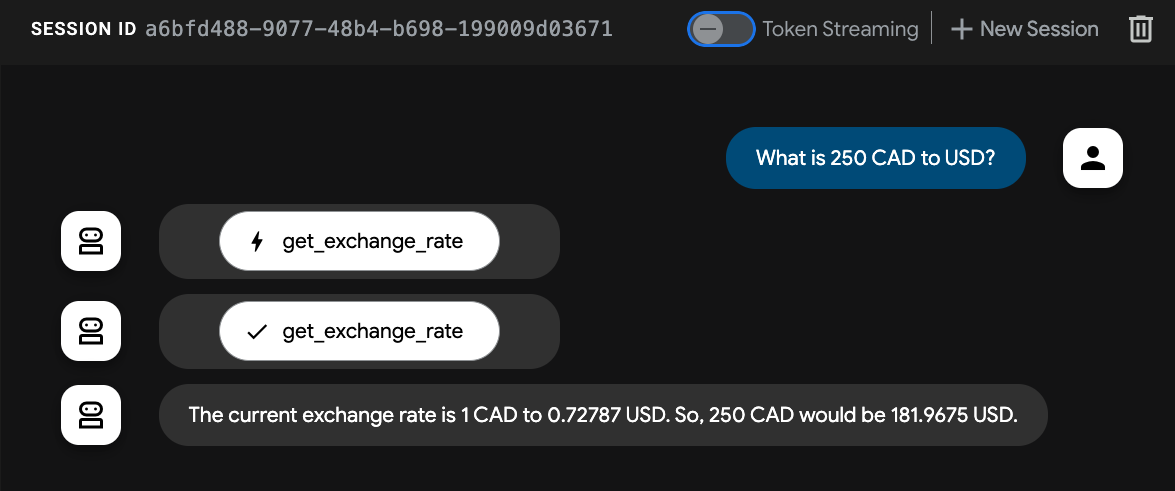
The agent works! It can handle queries that revolve around currency conversions 💸.
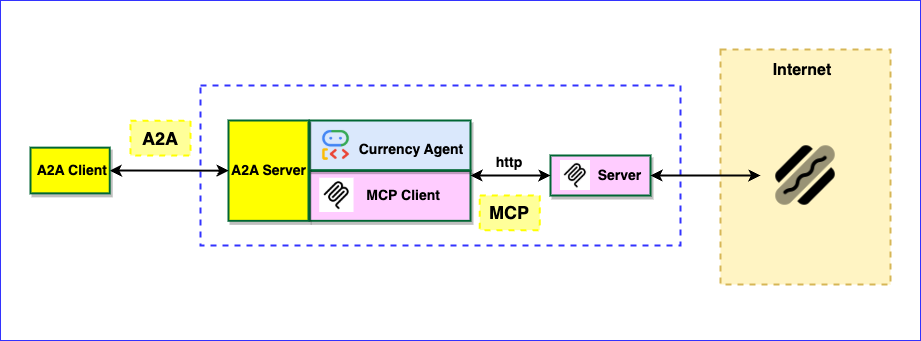
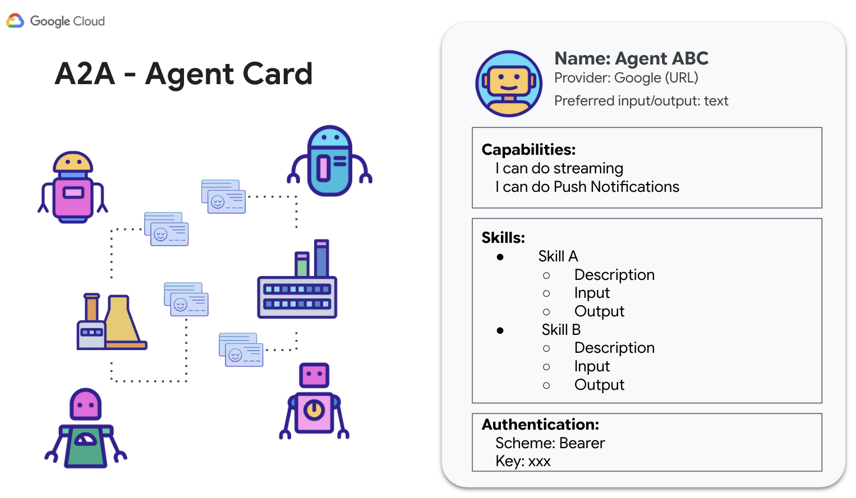
7. Agent2Agent (A2A) Protocol
The Agent2Agent (A2A) Protocol is an open standard designed to enable seamless communication and collaboration between AI agents. This allows agents that are built using diverse frameworks and by different vendors, to communicate with one another in a common language, breaking down silos and fostering interoperability.
A2A allows agents to:
- Discover: Find other agents and learn their skills (AgentSkill) and capabilities (AgentCapabilities) using standardized Agent Cards.
- Communicate: Exchange messages and data securely.
- Collaborate: Delegate tasks and coordinate actions to achieve complex goals.
The A2A protocol facilitates this communication through mechanisms like "Agent Cards" that act as digital business cards agents can use to advertise their capabilities and connection information.
Now it is time to expose the currency agent using A2A so that it can be called by other agents and clients.
A2A Python SDK
The A2A Python SDK provides Pydantic models for each of the aforementioned resources; AgentSkill, AgentCapabilities and AgentCard. This provides an interface for expediting development and integration with the A2A protocol.
An AgentSkill is how you will advertise to other agents that the currency agent has a tool for get_exchange_rate:
# A2A Agent Skill definition
skill = AgentSkill(
    id='get_exchange_rate',
    name='Currency Exchange Rates Tool',
    description='Helps with exchange values between various currencies',
    tags=['currency conversion', 'currency exchange'],
    examples=['What is exchange rate between USD and GBP?'],
)
Then as part of the AgentCard it will list the agent's skills and capabilities alongside additional details like input and output modes that the agent can handle:
# A2A Agent Card definition
agent_card = AgentCard(
    name='Currency Agent',
    description='Helps with exchange rates for currencies',
    url=f'http://{host}:{port}/',
    version='1.0.0',
    defaultInputModes=["text"],
    defaultOutputModes=["text"],
    capabilities=AgentCapabilities(streaming=True),
    skills=[skill],
)
The time has come to put it all together with the currency agent and showcase the power of A2A!
8. Exposing the Currency Agent A2A Server
ADK simplifies the process of building and connecting agents using the A2A protocol for you. Making an an existing ADK agent accessible (exposing) as an A2A server is done with ADK's to_a2a(root_agent) function (See the ADK documentation for the full details).
The to_a2a function converts an existing agent to work with A2A, and be able to expose it as a server through uvicorn. This means that you have tighter control over what you want to expose if you plan to productionize your agent. The to_a2a() function auto-generates an agent card based on your agent code using the A2A Python SDK under the hood.
Taking a look inside the file currency_agent/agent.py you can see the use of to_a2a and how the currency agent is exposed as an A2A server with only two lines of code!
from google.adk.a2a.utils.agent_to_a2a import to_a2a
# ... see file for full code

# Make the agent A2A-compatible
a2a_app = to_a2a(root_agent, port=10000)
To run the A2A server, in a new terminal run the following:
uv run uvicorn currency_agent.agent:a2a_app --host localhost --port 10000
If the server starts successfully, the output will look as follows indicating it is running on port 10000:
[INFO]: --- 🔧 Loading MCP tools from MCP Server... ---
[INFO]: --- 🤖 Creating ADK Currency Agent... ---
INFO:     Started server process [45824]
INFO:     Waiting for application startup.
INFO:     Application startup complete.
INFO:     Uvicorn running on http://localhost:10000 (Press CTRL+C to quit)
The currency agent is now successfully running as an A2A server, with the ability to be called by other agents or clients using the A2A protocol!
Verify the Remote Agent is Running
You can double-check that your agent is up and running by visiting the agent card URL for the currency agent that was auto-generated by the to_a2a() function.
In your browser, head to [http://localhost:10000/.well-known/agent.json]
You should see the following agent card:
{
  "capabilities": {

  },
  "defaultInputModes": [
    "text/plain"
  ],
  "defaultOutputModes": [
    "text/plain"
  ],
  "description": "An agent that can help with currency conversions",
  "name": "currency_agent",
  "preferredTransport": "JSONRPC",
  "protocolVersion": "0.3.0",
  "skills": [
    {
      "description": "An agent that can help with currency conversions I am a specialized assistant for currency conversions. my sole purpose is to use the 'get_exchange_rate' tool to answer questions about currency exchange rates. If the user asks about anything other than currency conversion or exchange rates, politely state that I cannot help with that topic and can only assist with currency-related queries. Do not attempt to answer unrelated questions or use tools for other purposes.",
      "id": "currency_agent",
      "name": "model",
      "tags": [
        "llm"
      ]
    },
    {
      "description": "Use this to get current exchange rate.\n\nArgs:\n    currency_from: The currency to convert from (e.g., \"USD\").\n    currency_to: The currency to convert to (e.g., \"EUR\").\n    currency_date: The date for the exchange rate or \"latest\". Defaults to \"latest\".\n\nReturns:\n    A dictionary containing the exchange rate data, or an error message if the request fails.",
      "id": "currency_agent-get_exchange_rate",
      "name": "get_exchange_rate",
      "tags": [
        "llm",
        "tools"
      ]
    }
  ],
  "supportsAuthenticatedExtendedCard": false,
  "url": "http://localhost:10000",
  "version": "0.0.1"
}
Test the A2A Server
You can now test the server by sending it some requests using A2A!
The A2A Python SDK provides an a2a.client.A2AClient class that simplifies this for you.
The file currency_agent/test_client.py contains code that runs through several different test cases against the A2A server.
# ... see file for full code

# Example test using A2AClient
async def run_single_turn_test(client: A2AClient) -> None:
    """Runs a single-turn non-streaming test."""

    send_message_payload = create_send_message_payload(text="how much is 100 USD in CAD?")
    request = SendMessageRequest(
        id=str(uuid4()), params=MessageSendParams(**send_message_payload)
    )

    print("--- ✉️  Single Turn Request ---")
    # Send Message
    response: SendMessageResponse = await client.send_message(request)
    print_json_response(response, "📥 Single Turn Request Response")
    if not isinstance(response.root, SendMessageSuccessResponse):
        print("received non-success response. Aborting get task ")
        return

    if not isinstance(response.root.result, Task):
        print("received non-task response. Aborting get task ")
        return

    task_id: str = response.root.result.id
    print("--- ❔ Query Task ---")
    # query the task
    get_request = GetTaskRequest(id=str(uuid4()), params=TaskQueryParams(id=task_id))
    get_response: GetTaskResponse = await client.get_task(get_request)
    print_json_response(get_response, "📥 Query Task Response")

# ----- Main Entrypoint (Create client --> Run tests) -----
async def main() -> None:
    """Main function to run the tests."""
    print(f'--- 🔄 Connecting to agent at {AGENT_URL}... ---')
    try:
        async with httpx.AsyncClient() as httpx_client:
            # Create a resolver to fetch the agent card
            resolver = A2ACardResolver(
                httpx_client=httpx_client,
                base_url=AGENT_URL,
            )
            agent_card = await resolver.get_agent_card()
            # Create a client to interact with the agent
            client = A2AClient(
                httpx_client=httpx_client,
                agent_card=agent_card,
            )
            print('--- ✅ Connection successful. ---')

            await run_single_turn_test(client)
            await run_multi_turn_test(client)

    except Exception as e:
        traceback.print_exc()
        print(f'--- ❌ An error occurred: {e} ---')
        print('Ensure the agent server is running.')
Run the tests using the following command:
uv run currency_agent/test_client.py
A successful test run will result in the following:
--- 🔄 Connecting to agent at http://localhost:10000... ---
--- ✅ Connection successful. ---
--- ✉️ Single Turn Request ---
--- 📥 Single Turn Request Response ---
{"id":"3bc92d7b-d857-4e93-9ff0-b2fb865f6e35","jsonrpc":"2.0","result":{"artifacts":[{"artifactId":"35e89e14-b977-4397-a23b-92c84bc32379","parts":[{"kind":"text","text":"Based on the current exchange rate, 1 USD is equivalent to 1.3704 CAD. Therefore, 100 USD would be 137.04 CAD.\n"}]}],"contextId":"2d66f277-152c-46ef-881d-7fe32866e9f5","history":[{"contextId":"2d66f277-152c-46ef-881d-7fe32866e9f5","kind":"message","messageId":"59819269f7d04849b0bfca7d43ec073c","parts":[{"kind":"text","text":"how much is 100 USD in CAD?"}],"role":"user","taskId":"52ae2392-84f5-429a-a14b-8413d3d20d97"},{"contextId":"2d66f277-152c-46ef-881d-7fe32866e9f5","kind":"message","messageId":"286095c6-12c9-40cb-9596-a9676d570dbd","parts":[],"role":"agent","taskId":"52ae2392-84f5-429a-a14b-8413d3d20d97"}],"id":"52ae2392-84f5-429a-a14b-8413d3d20d97","kind":"task","status":{"state":"completed"}}}

// ...

--- 🚀 First turn completed, no further input required for this test case. ---
It works! You have successfully tested that you can communicate with the currency agent over an A2A server! 🎉
Check out the a2a-samples repository on GitHub to see more advanced use-cases!
Looking to deploy your agent? Vertex AI Agent Engine provides a managed experience for deploying AI agents to production!
9. Congratulations
Congratulations! You have successfully built and deployed a remote MCP server, created a currency agent using Agent Development Kit (ADK) that connects to tools using MCP, and exposed your agent using the Agent2Agent (A2A) protocol! The currency agent is now available to interact with other agents of any framework using A2A!
Here is a link to the full code documentation.
What we've covered
- How to create a local MCP server
- Deploying the MCP server to Cloud Run
- How to build an Agent with Agent Development Kit that uses MCP tools
- How to expose an ADK agent as an A2A Server
- Testing the A2A Server using the A2A Client
Clean up
To avoid incurring charges to your Google Cloud account for the resources used in this lab, follow these steps:
- In the Google Cloud console, go to the Manage resources page.
- In the project list, select the project that you want to delete, and then click Delete.
- In the dialog, type the project ID, and then click Shut down to delete the project.