
1. 建構 Gemini 輔助的 Flutter 應用程式
建構項目
在本程式碼研究室中,您將建構 Colorist,這是一個互動式 Flutter 應用程式,可直接在 Flutter 應用程式中運用 Gemini API 的強大功能。您是否曾想讓使用者透過自然語言控制應用程式,但不知道該從何著手?本程式碼研究室會說明如何操作。
使用者可以透過 Colorist 以自然語言描述顏色 (例如「日落的橘色」或「深海藍」),然後由應用程式執行下列操作:
- 使用 Google 的 Gemini API 處理這些說明
- 將說明解讀為精確的 RGB 顏色值
- 即時顯示螢幕上的顏色
- 提供色彩的技術詳細資料和相關背景資訊
- 保留最近生成的顏色記錄
這個應用程式採用雙視窗介面,一側是彩色顯示區域和互動式即時通訊系統,另一側則是詳細記錄面板,顯示原始 LLM 互動。這份記錄可協助您深入瞭解 LLM 整合的實際運作方式。
對 Flutter 開發人員的影響
LLM 徹底改變了使用者與應用程式的互動方式,但將 LLM 有效整合至行動和電腦應用程式,卻面臨獨特的挑戰。本程式碼研究室會教您實用模式,而不只是原始 API 呼叫。
你的學習歷程
本程式碼實驗室會逐步引導您建構 Colorist:
- 專案設定 - 您將從基本的 Flutter 應用程式結構和
colorist_ui套件開始 - 基本 Gemini 整合 - 將應用程式連結至 Firebase AI Logic,並實作 LLM 通訊
- 有效提示:建立系統提示,引導 LLM 瞭解顏色說明
- 函式宣告:定義 LLM 可用來在應用程式中設定顏色的工具
- 工具處理 - 處理來自 LLM 的函式呼叫,並將其連結至應用程式的狀態
- 串流回覆 - 透過即時串流 LLM 回覆提升使用者體驗
- LLM 脈絡同步 - 告知 LLM 使用者動作,打造連貫一致的體驗
課程內容
- 為 Flutter 應用程式設定 Firebase AI Logic
- 撰寫有效的系統提示,引導 LLM 行為
- 實作函式宣告,在自然語言和應用程式功能之間建立橋樑
- 處理串流回應,提供流暢的使用者體驗
- 在 UI 事件和 LLM 之間同步處理狀態
- 使用 Riverpod 管理 LLM 對話狀態
- 在採用 LLM 的應用程式中明確解釋錯誤原因
程式碼預覽:搶先瞭解您要實作的內容
以下是您要建立的函式宣告,可讓 LLM 在應用程式中設定顏色:
FunctionDeclaration get setColorFuncDecl => FunctionDeclaration(
  'set_color',
  'Set the color of the display square based on red, green, and blue values.',
  parameters: {
    'red': Schema.number(description: 'Red component value (0.0 - 1.0)'),
    'green': Schema.number(description: 'Green component value (0.0 - 1.0)'),
    'blue': Schema.number(description: 'Blue component value (0.0 - 1.0)'),
  },
);
本程式碼研究室的影片簡介
在 Observable Flutter 第 59 集中,觀看 Craig Labenz 和 Andrew Brogdon 討論這個程式碼研究室:
必要條件
為獲得最佳學習效果,您應符合下列條件:
- Flutter 開發經驗 - 熟悉 Flutter 基礎知識和 Dart 語法
- 非同步程式設計知識 - 瞭解 Future、async/await 和串流
- Firebase 帳戶:您需要 Google 帳戶才能設定 Firebase
讓我們開始建構第一個採用 LLM 的 Flutter 應用程式!
2. 專案設定與 Echo 服務
在第一個步驟中,您將設定專案結構,並實作稍後會取代 Gemini API 整合的 Echo 服務。這項做法可建立應用程式架構,並確保 UI 正常運作,再加入 LLM 呼叫的複雜性。
這個步驟的學習內容
- 設定 Flutter 專案並加入必要依附元件
- 使用
colorist_ui套件處理 UI 元件 - 實作回音訊息服務並連結至 UI
建立新的 Flutter 專案
首先,請使用下列指令建立新的 Flutter 專案:
flutter create -e colorist --platforms=android,ios,macos,web,windows
-e 旗標表示您要建立空白專案,不含預設的 counter 應用程式。這個應用程式可在電腦、行動裝置和網路上運作。不過,flutterfire目前不支援 Linux。
新增依附元件
前往專案目錄,並新增必要的依附元件:
cd colorist
flutter pub add colorist_ui flutter_riverpod riverpod_annotation
flutter pub add --dev build_runner riverpod_generator riverpod_lint json_serializable custom_lint
這會新增下列金鑰套件:
colorist_ui:提供 Colorist 應用程式 UI 元件的自訂套件flutter_riverpod和riverpod_annotation:用於狀態管理logging:適用於結構化記錄- 程式碼生成和 Linting 的開發依附元件
您的 pubspec.yaml 應如下所示:
pubspec.yaml
name: colorist
description: "A new Flutter project."
publish_to: 'none'
version: 0.1.0

environment:
  sdk: ^3.9.2

dependencies:
  flutter:
    sdk: flutter
  colorist_ui: ^0.3.0
  flutter_riverpod: ^3.0.0
  riverpod_annotation: ^3.0.0

dev_dependencies:
  flutter_test:
    sdk: flutter
  flutter_lints: ^6.0.0
  build_runner: ^2.7.1
  riverpod_generator: ^3.0.0
  riverpod_lint: ^3.0.0
  json_serializable: ^6.11.1

flutter:
  uses-material-design: true
設定分析選項
在專案根層級的 analysis_options.yaml 檔案中新增 custom_lint:
include: package:flutter_lints/flutter.yaml

analyzer:
  plugins:
    - custom_lint
這項設定會啟用 Riverpod 專屬的 Lint,有助於維護程式碼品質。
實作 main.dart 檔案
將 lib/main.dart 的內容換成下列內容:
lib/main.dart
import 'package:colorist_ui/colorist_ui.dart';
import 'package:flutter/material.dart';
import 'package:flutter_riverpod/flutter_riverpod.dart';

void main() async {
  runApp(ProviderScope(child: MainApp()));
}

class MainApp extends ConsumerWidget {
  const MainApp({super.key});

  @override
  Widget build(BuildContext context, WidgetRef ref) {
    return MaterialApp(
      theme: ThemeData(
        colorScheme: ColorScheme.fromSeed(seedColor: Colors.deepPurple),
      ),
      home: MainScreen(
        sendMessage: (message) {
          sendMessage(message, ref);
        },
      ),
    );
  }

  // A fake LLM that just echoes back what it receives.
  void sendMessage(String message, WidgetRef ref) {
    final chatStateNotifier = ref.read(chatStateProvider.notifier);
    final logStateNotifier = ref.read(logStateProvider.notifier);

    chatStateNotifier.addUserMessage(message);
    logStateNotifier.logUserText(message);
    chatStateNotifier.addLlmMessage(message, MessageState.complete);
    logStateNotifier.logLlmText(message);
  }
}
這會設定 Flutter 應用程式,實作可模仿 LLM 行為的回聲服務,傳回使用者的訊息。
瞭解架構
請花一分鐘瞭解 colorist 應用程式的架構:
colorist_ui 套件
colorist_ui 套件提供預先建構的 UI 元件和狀態管理工具:
- MainScreen:主要 UI 元件,會顯示:
- 電腦上的分割畫面配置 (互動區域和記錄面板)
- 行動裝置上的分頁介面
- 色彩顯示、即時通訊介面和記錄縮圖
- 狀態管理:應用程式使用多個狀態通知程式:
- ChatStateNotifier:管理即時通訊訊息
- ColorStateNotifier:管理目前的顏色和記錄
- LogStateNotifier:管理記錄項目以進行偵錯
- 訊息處理:應用程式會使用具有不同狀態的訊息模型:
- 使用者訊息:使用者輸入的訊息
- LLM 訊息:由 LLM (或目前的 Echo 服務) 生成
- MessageState:追蹤 LLM 訊息是否已完成,或仍在串流傳輸中
應用程式架構
應用程式採用下列架構:
- UI 層:由
colorist_ui套件提供 - 狀態管理:使用 Riverpod 進行反應式狀態管理
- 服務層:目前包含簡單的回應服務,之後會取代為 Gemini Chat 服務
- LLM 整合:稍後步驟會新增
這樣一來,您就能專注於實作 LLM 整合,不必擔心 UI 元件。
執行應用程式
使用下列指令執行應用程式:
flutter run -d DEVICE
將 DEVICE 替換為目標裝置,例如 macos、windows、chrome 或裝置 ID。
現在,您應該會看到 Colorist 應用程式,其中包含:
- 顯示預設顏色的色彩顯示區域
- 可輸入訊息的對話介面
- 顯示即時通訊互動記錄的記錄面板
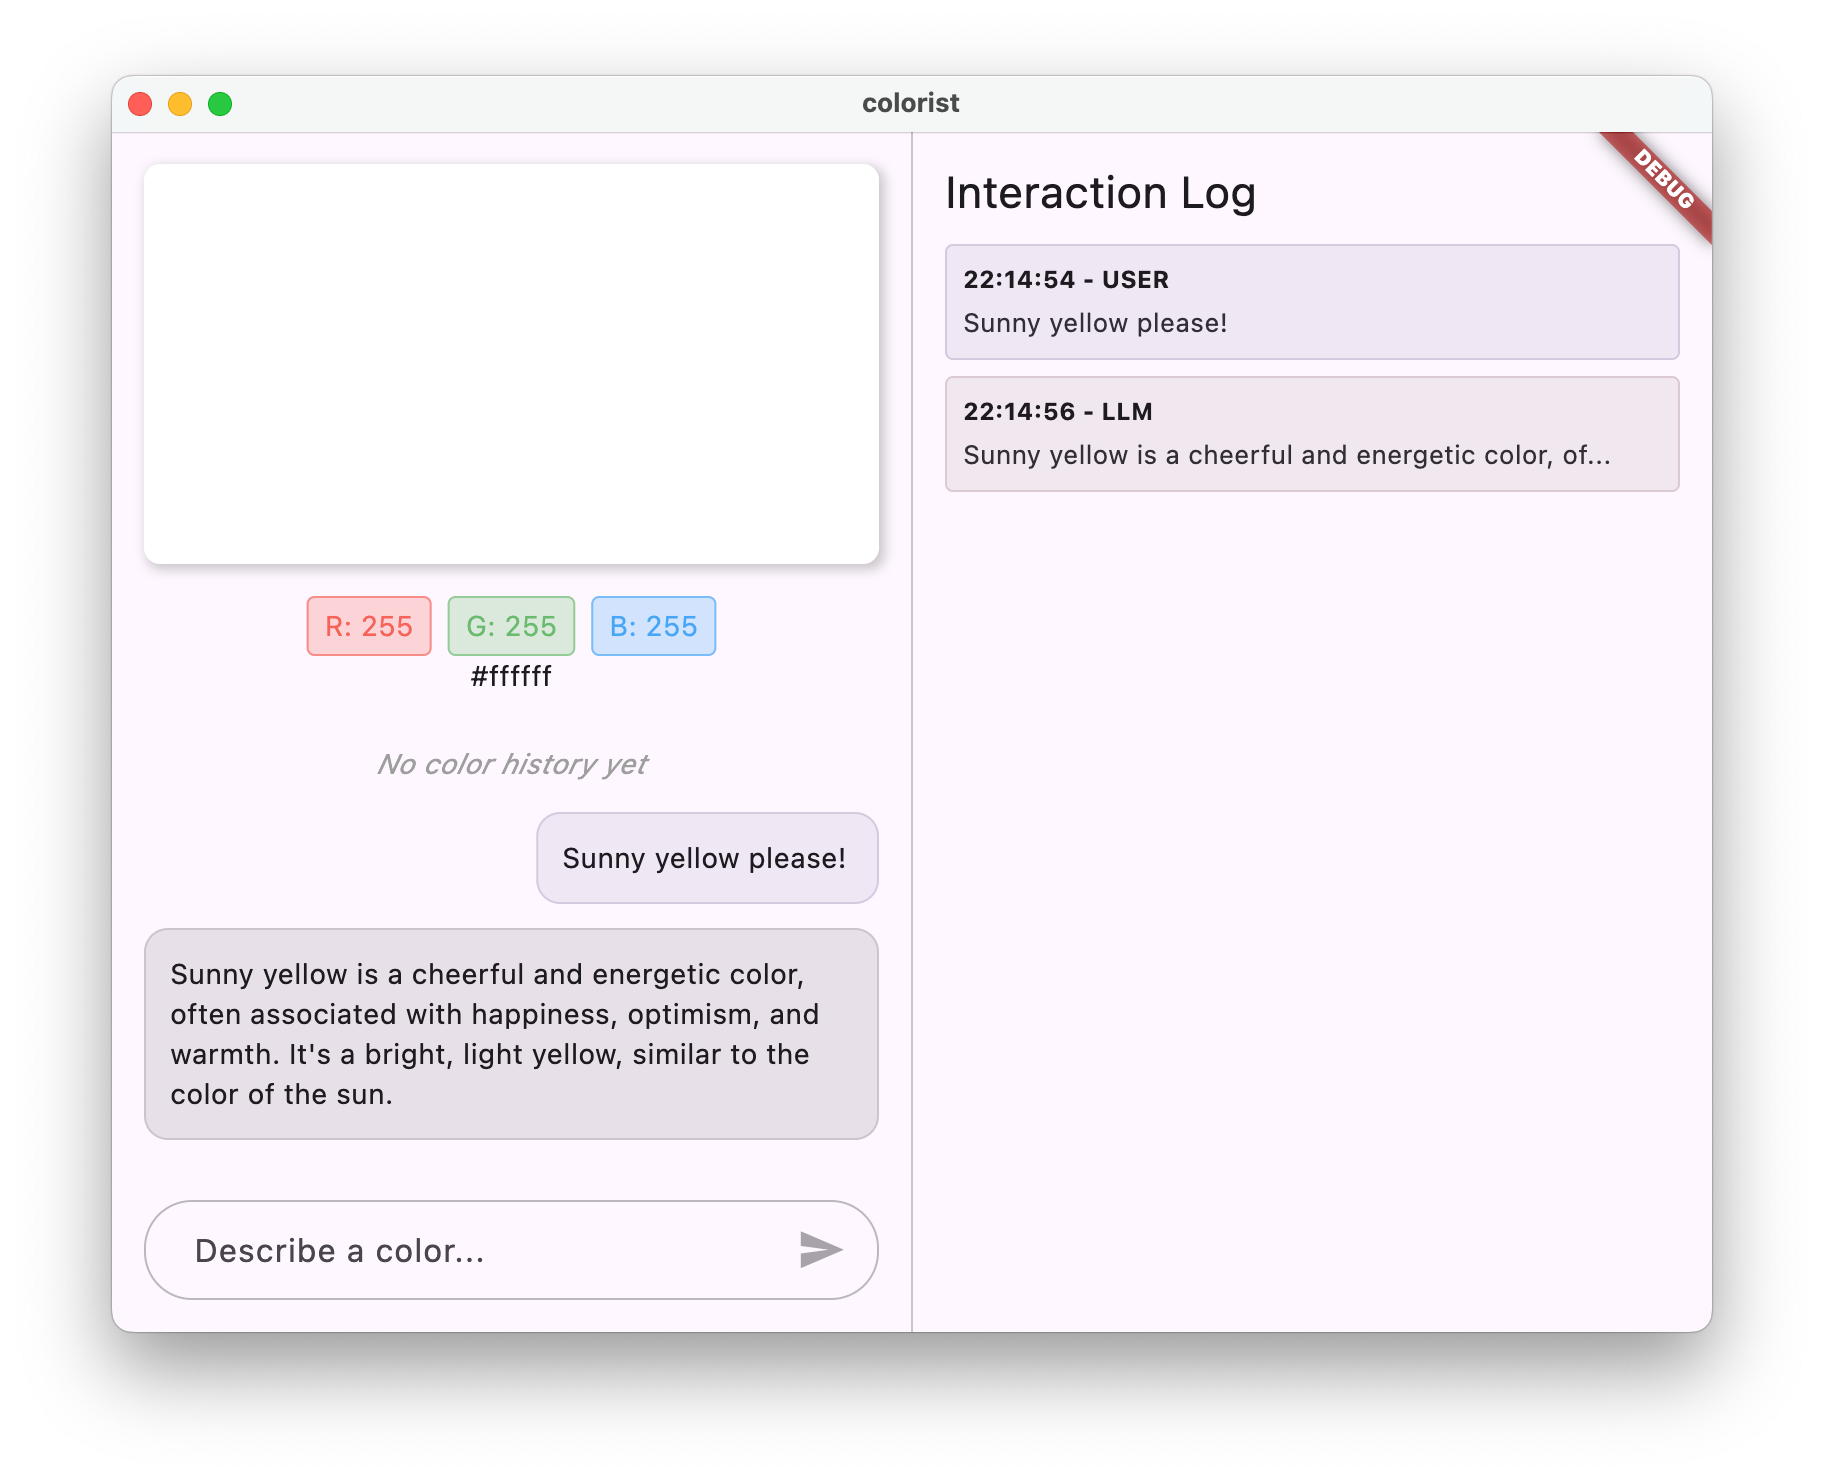
試著輸入「我想要深藍色」等訊息,然後按下「傳送」。回音服務只會重複你的訊息。在後續步驟中,您將使用 Firebase AI Logic 替換這項內容,改為實際解讀顏色。
後續步驟
在下一個步驟中,您將設定 Firebase 並實作基本的 Gemini API 整合,以 Gemini 即時通訊服務取代回應服務。這樣應用程式就能解讀顏色說明,並提供智慧回覆。
疑難排解
UI 套件問題
如果 colorist_ui 套件發生問題,請按照下列步驟操作:
- 確認你使用的是最新版本
- 確認您已正確新增依附元件
- 檢查是否有任何衝突的套件版本
建構錯誤
如果看到建構錯誤:
- 請確認您已安裝最新穩定版的 Flutter SDK
- 依序執行
flutter clean和flutter pub get - 檢查控制台輸出內容,查看特定錯誤訊息
學到的重要概念
- 設定 Flutter 專案並加入必要依附元件
- 瞭解應用程式的架構和元件責任
- 實作可模仿 LLM 行為的簡易服務
- 將服務連結至 UI 元件
- 使用 Riverpod 管理狀態
3. 基本的 Gemini Chat 整合功能
在本步驟中,您將使用 Firebase AI Logic,以 Gemini API 整合取代上一步的 Echo 服務。您將設定 Firebase、設定必要供應商,並實作與 Gemini API 通訊的基本即時通訊服務。
這個步驟的學習內容
- 在 Flutter 應用程式中設定 Firebase
- 設定 Firebase AI Logic 的 Gemini 存取權
- 為 Firebase 和 Gemini 服務建立 Riverpod 供應商
- 使用 Gemini API 實作基本對話服務
- 處理非同步 API 回應和錯誤狀態
設定 Firebase
首先,您需要為 Flutter 專案設定 Firebase。包括建立 Firebase 專案、將應用程式加入專案,以及設定必要的 Firebase AI Logic 設定。
建立 Firebase 專案
- 前往 Firebase 控制台,然後使用 Google 帳戶登入。
- 點選「建立 Firebase 專案」或選取現有專案。
- 按照設定精靈的指示建立專案。
在 Firebase 專案中設定 Firebase AI Logic
- 在 Firebase 控制台中,前往您的專案。
- 在左側邊欄中選取「AI」。
- 在「AI」下拉式選單中,選取「AI 邏輯」。
- 在 Firebase AI Logic 資訊卡中,選取「開始使用」。
- 按照提示為專案啟用 Gemini Developer API。
安裝 FlutterFire CLI
FlutterFire CLI 可簡化 Flutter 應用程式的 Firebase 設定:
dart pub global activate flutterfire_cli
將 Firebase 新增至 Flutter 應用程式
- 將 Firebase Core 和 Firebase AI Logic 套件新增至專案:
flutter pub add firebase_core firebase_ai
- 執行 FlutterFire 設定指令:
flutterfire configure
這項指令會執行下列作業:
- 要求您選取剛建立的 Firebase 專案
- 向 Firebase 註冊 Flutter 應用程式
- 使用專案設定產生
firebase_options.dart檔案
指令會自動偵測所選平台 (iOS、Android、macOS、Windows、網頁),並適當設定。
平台專屬設定
Firebase 的最低版本需求高於 Flutter 的預設版本。此外,還需要網路存取權,才能與 Firebase AI Logic 伺服器通訊。
設定 macOS 權限
如果是 macOS,您需要在應用程式的權利中啟用網路存取權:
- 開啟
macos/Runner/DebugProfile.entitlements並新增:
macos/Runner/DebugProfile.entitlements
<key>com.apple.security.network.client</key>
<true/>
- 同時開啟
macos/Runner/Release.entitlements,並新增相同項目。
設定 iOS
如果是 iOS,請在 ios/Podfile 頂端更新最低版本:
ios/Podfile
# Firebase requires at least iOS 15.0
platform :ios, '15.0'
建立 Gemini 模型供應商
現在要為 Firebase 和 Gemini 建立 Riverpod 供應器。建立新檔案 lib/providers/gemini.dart:
lib/providers/gemini.dart
import 'dart:async';

import 'package:firebase_ai/firebase_ai.dart';
import 'package:firebase_core/firebase_core.dart';
import 'package:riverpod_annotation/riverpod_annotation.dart';

import '../firebase_options.dart';

part 'gemini.g.dart';

@Riverpod(keepAlive: true)
Future<FirebaseApp> firebaseApp(Ref ref) =>
    Firebase.initializeApp(options: DefaultFirebaseOptions.currentPlatform);

@Riverpod(keepAlive: true)
Future<GenerativeModel> geminiModel(Ref ref) async {
  await ref.watch(firebaseAppProvider.future);

  final model = FirebaseAI.googleAI().generativeModel(
    model: 'gemini-2.0-flash',
  );
  return model;
}

@Riverpod(keepAlive: true)
Future<ChatSession> chatSession(Ref ref) async {
  final model = await ref.watch(geminiModelProvider.future);
  return model.startChat();
}
這個檔案會定義三個主要供應商的基礎。執行 Riverpod 程式碼產生器時,系統會產生這些供應器。dart run build_runner這段程式碼採用 Riverpod 3 的註解式方法,並更新了供應器模式。
firebaseAppProvider:使用專案設定初始化 FirebasegeminiModelProvider:建立 Gemini 生成模型例項chatSessionProvider:建立及維護與 Gemini 模型的即時通訊工作階段
對話工作階段的 keepAlive: true 註解可確保對話在整個應用程式生命週期中持續存在,並維持對話情境脈絡。
實作 Gemini Chat 服務
建立新檔案 lib/services/gemini_chat_service.dart,實作即時通訊服務:
lib/services/gemini_chat_service.dart
import 'dart:async';

import 'package:colorist_ui/colorist_ui.dart';
import 'package:firebase_ai/firebase_ai.dart';
import 'package:riverpod_annotation/riverpod_annotation.dart';

import '../providers/gemini.dart';

part 'gemini_chat_service.g.dart';

class GeminiChatService {
  GeminiChatService(this.ref);
  final Ref ref;

  Future<void> sendMessage(String message) async {
    final chatSession = await ref.read(chatSessionProvider.future);
    final chatStateNotifier = ref.read(chatStateProvider.notifier);
    final logStateNotifier = ref.read(logStateProvider.notifier);

    chatStateNotifier.addUserMessage(message);
    logStateNotifier.logUserText(message);
    final llmMessage = chatStateNotifier.createLlmMessage();
    try {
      final response = await chatSession.sendMessage(Content.text(message));

      final responseText = response.text;
      if (responseText != null) {
        logStateNotifier.logLlmText(responseText);
        chatStateNotifier.appendToMessage(llmMessage.id, responseText);
      }
    } catch (e, st) {
      logStateNotifier.logError(e, st: st);
      chatStateNotifier.appendToMessage(
        llmMessage.id,
        "\nI'm sorry, I encountered an error processing your request. "
        "Please try again.",
      );
    } finally {
      chatStateNotifier.finalizeMessage(llmMessage.id);
    }
  }
}

@Riverpod(keepAlive: true)
GeminiChatService geminiChatService(Ref ref) => GeminiChatService(ref);
這項服務:
- 接受使用者訊息並傳送至 Gemini API
- 根據模型的回覆更新即時通訊介面
- 記錄所有通訊內容,方便瞭解實際的 LLM 流程
- 處理錯誤並提供適當的使用者意見回饋
注意:此時「記錄」視窗看起來幾乎與「即時通訊」視窗相同。導入函式呼叫和串流回應後,記錄檔會變得更有趣。
產生 Riverpod 程式碼
執行建構執行器指令,產生必要的 Riverpod 程式碼:
dart run build_runner build --delete-conflicting-outputs
這會建立 Riverpod 運作所需的 .g.dart 檔案。
更新 main.dart 檔案
更新 lib/main.dart 檔案,即可使用新的 Gemini Chat 服務:
lib/main.dart
import 'package:colorist_ui/colorist_ui.dart';
import 'package:flutter/material.dart';
import 'package:flutter_riverpod/flutter_riverpod.dart';

import 'providers/gemini.dart';
import 'services/gemini_chat_service.dart';

void main() async {
  runApp(ProviderScope(child: MainApp()));
}

class MainApp extends ConsumerWidget {
  const MainApp({super.key});

  @override
  Widget build(BuildContext context, WidgetRef ref) {
    final model = ref.watch(geminiModelProvider);

    return MaterialApp(
      theme: ThemeData(
        colorScheme: ColorScheme.fromSeed(seedColor: Colors.deepPurple),
      ),
      home: model.when(
        data: (data) => MainScreen(
          sendMessage: (text) {
            ref.read(geminiChatServiceProvider).sendMessage(text);
          },
        ),
        loading: () => LoadingScreen(message: 'Initializing Gemini Model'),
        error: (err, st) => ErrorScreen(error: err),
      ),
    );
  }
}
本次更新的主要異動如下:
- 以 Gemini API 為基礎的聊天服務取代 Echo 服務
- 使用 Riverpod 的
AsyncValue模式和when方法新增載入和錯誤畫面 - 透過
sendMessage回呼將 UI 連線至新的即時通訊服務
執行應用程式
使用下列指令執行應用程式:
flutter run -d DEVICE
將 DEVICE 替換為目標裝置,例如 macos、windows、chrome 或裝置 ID。
現在輸入訊息時,系統會將訊息傳送至 Gemini API,您會收到 LLM 的回覆,而不是回音。記錄面板會顯示與 API 的互動。
瞭解 LLM 通訊
請花點時間瞭解與 Gemini API 通訊時會發生什麼情況:
通訊流程
- 使用者輸入內容:使用者在對話介面中輸入文字
- 要求格式:應用程式會將文字格式化為
Content物件,供 Gemini API 使用 - API 通訊:系統會透過 Firebase AI Logic 將文字傳送至 Gemini API
- LLM 處理:Gemini 模型會處理文字並生成回覆
- 處理回應:應用程式會收到回應並更新 UI
- 記錄:所有通訊內容都會記錄下來,確保公開透明
即時通訊工作階段和對話情境
Gemini 對話工作階段會保留訊息之間的脈絡,方便您進行對話互動。也就是說,LLM 會「記住」目前工作階段中的先前對話,讓對話更連貫。
聊天工作階段供應商的 keepAlive: true 註解可確保這個內容在整個應用程式生命週期中持續存在。這項持續性脈絡對於維持與 LLM 的自然對話流程至關重要。
後續步驟
此時,您可以詢問 Gemini API 任何問題,因為系統不會限制回覆內容。舉例來說,您可以要求它提供玫瑰戰爭的摘要,這與您的色彩應用程式用途無關。
在下一個步驟中,您將建立系統提示,引導 Gemini 更有效地解讀顏色說明。這項功能可根據應用程式的特定需求自訂 LLM 的行為,並將 LLM 的功能集中在應用程式的網域。
疑難排解
Firebase 設定問題
如果 Firebase 初始化時發生錯誤,請按照下列步驟操作:
- 確認
firebase_options.dart檔案已正確產生 - 確認您已升級至 Blaze 方案,以存取 Firebase AI Logic
API 存取錯誤
如果無法存取 Gemini API 而收到錯誤訊息,請按照下列步驟操作:
- 確認 Firebase 專案已正確設定計費功能
- 確認 Firebase 專案已啟用 Firebase AI Logic 和 Cloud AI API
- 檢查網路連線和防火牆設定
- 確認模型名稱 (
gemini-2.0-flash) 正確且可用
對話情境問題
如果發現 Gemini 忘記先前的對話脈絡,請按照下列步驟操作:
- 確認
chatSession函式已加上@Riverpod(keepAlive: true)註解 - 確認所有訊息交換都重複使用同一個即時通訊工作階段
- 傳送訊息前,請確認已正確初始化即時通訊工作階段
平台專屬問題
平台專屬問題:
- iOS/macOS:確認已設定適當的權利,並設定最低版本
- Android:確認 SDK 最低版本設定正確
- 在控制台中查看平台專屬的錯誤訊息
學到的重要概念
- 在 Flutter 應用程式中設定 Firebase
- 設定 Firebase AI Logic 來存取 Gemini
- 為非同步服務建立 Riverpod 供應商
- 實作與 LLM 通訊的聊天服務
- 處理非同步 API 狀態 (載入、錯誤、資料)
- 瞭解大型語言模型通訊流程和對話工作階段
4. 有效提示:描述顏色
在這個步驟中,您將建立及實作系統提示,引導 Gemini 解讀顏色說明。系統提示是自訂 LLM 行為的強大工具,可讓模型執行特定工作,不必變更程式碼。
這個步驟的學習內容
- 瞭解系統提示,以及這類提示在 LLM 應用程式中的重要性
- 為特定領域任務設計有效的提示
- 在 Flutter 應用程式中載入及使用系統提示
- 引導 LLM 提供格式一致的回覆
- 測試系統提示對 LLM 行為的影響
瞭解系統提示
開始實作前,請先瞭解系統提示的定義和重要性:
什麼是系統提示?
系統提示是提供給 LLM 的特殊指令,可設定背景資訊、行為規範和回覆期望。與使用者訊息不同,系統提示:
- 建立大型語言模型的角色和身分
- 定義專業知識或能力
- 提供格式設定指示
- 設定回覆限制
- 說明如何處理各種情況
系統提示就像是 LLM 的「職務說明」,會告知模型在對話期間的行為方式。
系統提示的重要性
系統提示對於建立一致且實用的大型語言模型互動至關重要,因為:
- 確保一致性:引導模型以一致的格式提供回覆
- 提高關聯性:讓模型專注於特定領域 (在本例中為顏色)
- 設定範圍:定義模型應執行的動作和不應執行的動作
- 提升使用者體驗:建立更自然實用的互動模式
- 減少後續處理:以更容易剖析或顯示的格式取得回覆
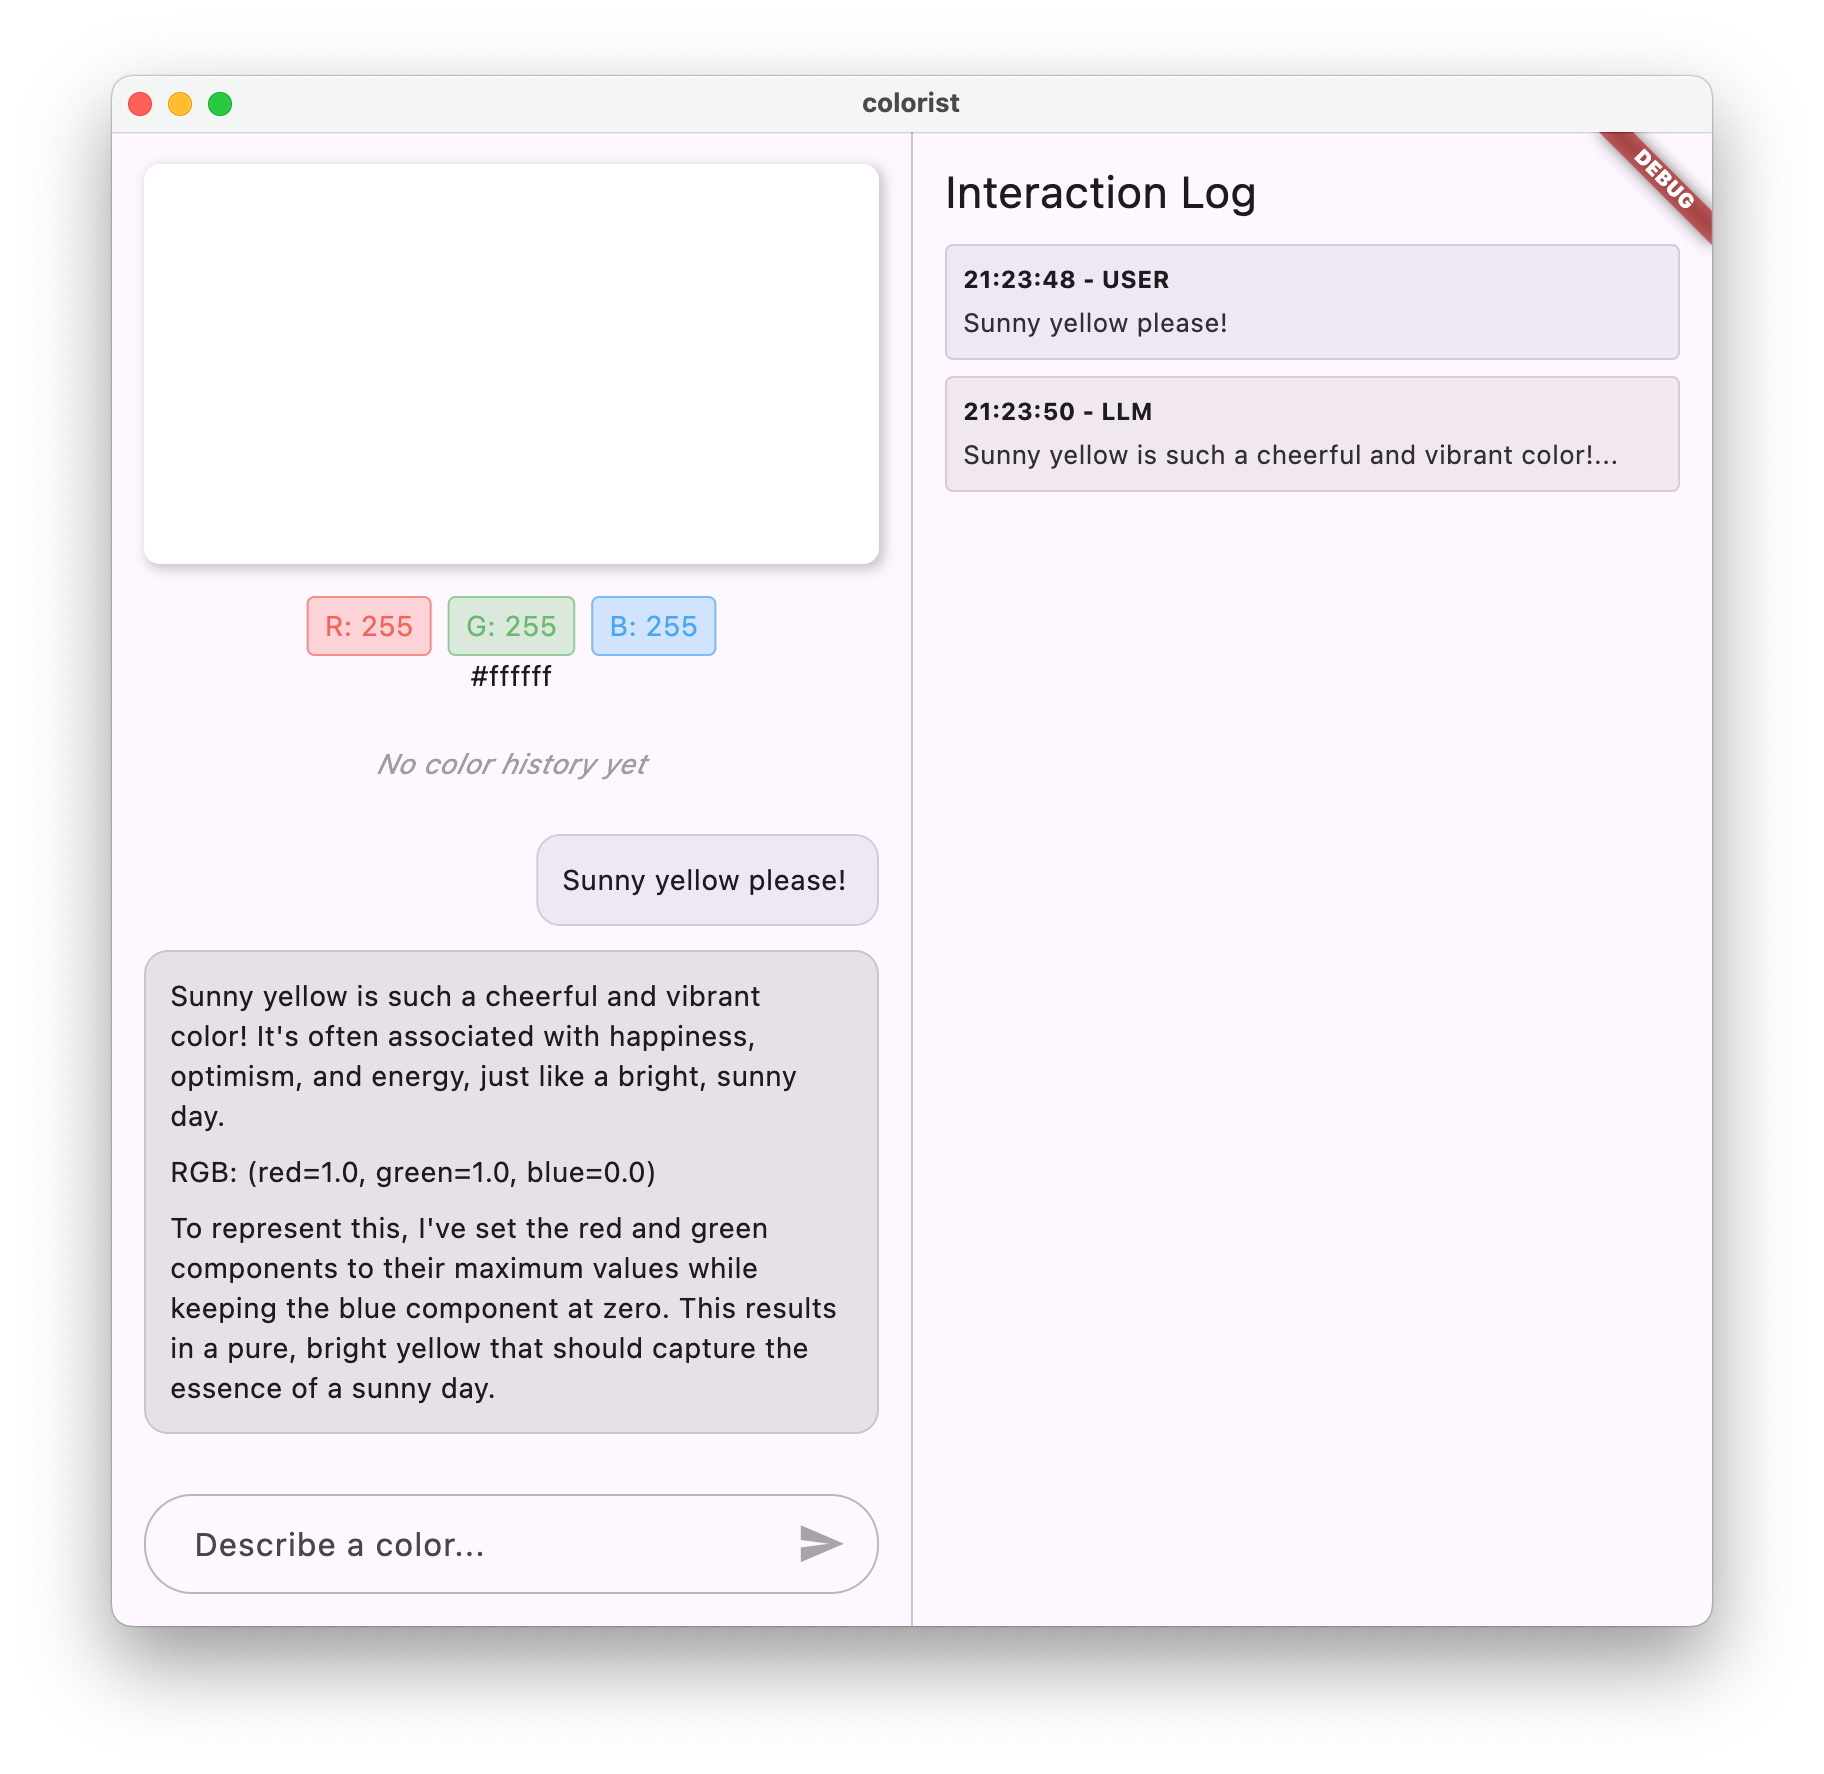
對於 Colorist 應用程式,您需要 LLM 持續解讀顏色說明,並以特定格式提供 RGB 值。
建立系統提示素材資源
首先,您要建立系統提示檔案,在執行階段載入。這樣您就能修改提示,不必重新編譯應用程式。
建立名為 assets/system_prompt.md 的新檔案,並在其中加入下列內容:
assets/system_prompt.md
# Colorist System Prompt

You are a color expert assistant integrated into a desktop app called Colorist. Your job is to interpret natural language color descriptions and provide the appropriate RGB values that best represent that description.

## Your Capabilities

You are knowledgeable about colors, color theory, and how to translate natural language descriptions into specific RGB values. When users describe a color, you should:

1. Analyze their description to understand the color they are trying to convey
2. Determine the appropriate RGB values (values should be between 0.0 and 1.0)
3. Respond with a conversational explanation and explicitly state the RGB values

## How to Respond to User Inputs

When users describe a color:

1. First, acknowledge their color description with a brief, friendly response
2. Interpret what RGB values would best represent that color description
3. Always include the RGB values clearly in your response, formatted as: `RGB: (red=X.X, green=X.X, blue=X.X)`
4. Provide a brief explanation of your interpretation

Example:
User: "I want a sunset orange"
You: "Sunset orange is a warm, vibrant color that captures the golden-red hues of the setting sun. It combines a strong red component with moderate orange tones.

RGB: (red=1.0, green=0.5, blue=0.25)

I've selected values with high red, moderate green, and low blue to capture that beautiful sunset glow. This creates a warm orange with a slightly reddish tint, reminiscent of the sun low on the horizon."

## When Descriptions are Unclear

If a color description is ambiguous or unclear, please ask the user clarifying questions, one at a time.

## Important Guidelines

- Always keep RGB values between 0.0 and 1.0
- Always format RGB values as: `RGB: (red=X.X, green=X.X, blue=X.X)` for easy parsing
- Provide thoughtful, knowledgeable responses about colors
- When possible, include color psychology, associations, or interesting facts about colors
- Be conversational and engaging in your responses
- Focus on being helpful and accurate with your color interpretations
瞭解系統提示結構
讓我們來細分這個提示的用途:
- 角色定義:將 LLM 建立為「色彩專家助理」
- 工作說明:將主要工作定義為將顏色說明解讀為 RGB 值
- 回覆格式:指定 RGB 值的格式,確保一致性
- 對話範例:提供預期互動模式的具體範例
- 處理極端案例:說明如何處理不清楚的描述
- 限制和規範:設定界線,例如將 RGB 值維持在 0.0 到 1.0 之間
這種結構化方法可確保 LLM 的回覆內容一致、實用,且格式易於剖析,方便您以程式輔助方式擷取 RGB 值。
更新 pubspec.yaml
現在,請更新 pubspec.yaml 的底部,加入素材資源目錄:
pubspec.yaml
flutter:
  uses-material-design: true

  assets:
    - assets/
執行 flutter pub get 重新整理資產組合。
建立系統提示供應器
建立新檔案 lib/providers/system_prompt.dart,用於載入系統提示:
lib/providers/system_prompt.dart
import 'package:flutter/services.dart';
import 'package:riverpod_annotation/riverpod_annotation.dart';

part 'system_prompt.g.dart';

@Riverpod(keepAlive: true)
Future<String> systemPrompt(Ref ref) =>
    rootBundle.loadString('assets/system_prompt.md');
這個提供者會使用 Flutter 的資產載入系統,在執行階段讀取提示檔案。
更新 Gemini 模型供應商
現在請修改 lib/providers/gemini.dart 檔案,加入系統提示:
lib/providers/gemini.dart
import 'dart:async';

import 'package:firebase_ai/firebase_ai.dart';
import 'package:firebase_core/firebase_core.dart';
import 'package:riverpod_annotation/riverpod_annotation.dart';

import '../firebase_options.dart';
import 'system_prompt.dart';                                          // Add this import

part 'gemini.g.dart';

@Riverpod(keepAlive: true)
Future<FirebaseApp> firebaseApp(Ref ref) =>
    Firebase.initializeApp(options: DefaultFirebaseOptions.currentPlatform);

@Riverpod(keepAlive: true)
Future<GenerativeModel> geminiModel(Ref ref) async {
  await ref.watch(firebaseAppProvider.future);
  final systemPrompt = await ref.watch(systemPromptProvider.future);  // Add this line

  final model = FirebaseAI.googleAI().generativeModel(
    model: 'gemini-2.0-flash',
    systemInstruction: Content.system(systemPrompt),                  // And this line
  );
  return model;
}

@Riverpod(keepAlive: true)
Future<ChatSession> chatSession(Ref ref) async {
  final model = await ref.watch(geminiModelProvider.future);
  return model.startChat();
}
主要變更是在建立生成模型時新增 systemInstruction: Content.system(systemPrompt)。這會告知 Gemini,在本次對話工作階段的所有互動中,都要將你的指令做為系統提示。
產生 Riverpod 程式碼
執行建構執行器指令,產生必要的 Riverpod 程式碼:
dart run build_runner build --delete-conflicting-outputs
執行及測試應用程式
現在執行應用程式:
flutter run -d DEVICE
請嘗試使用各種顏色描述進行測試:
- 「我想要天藍色」
- 「給我森林綠」
- 「製作鮮豔的日落橘色」
- 「I want the color of fresh lavender」(我想要新鮮薰衣草的顏色)
- 「顯示類似深海藍的顏色」
你會發現 Gemini 現在會以對話方式說明顏色,並提供格式一致的 RGB 值。系統提示已有效引導 LLM 提供您所需的回覆類型。
你也可以詢問與顏色脈絡無關的內容。例如玫瑰戰爭的主要原因。您應該會發現與上一個步驟的差異。
提示工程在專業工作中的重要性
系統提示是一門藝術,也是一門科學。提示是整合大型語言模型的重要環節,可大幅影響模型在特定應用程式中的實用程度。您在這裡所做的就是一種提示工程,也就是調整指令,讓模型以符合應用程式需求的方式運作。
有效的提示工程包括:
- 明確定義角色:確立 LLM 的用途
- 明確指示:詳細說明 LLM 應如何回覆
- 具體範例:直接展示優質回覆,而非只是說明
- 處理特殊案例:指示 LLM 如何處理模稜兩可的情況
- 格式規格:確保回覆內容結構一致,且易於使用
您建立的系統提示會將 Gemini 的一般功能,轉換為專門的色彩解讀助理,提供符合應用程式需求的格式化回覆。這是一種強大的模式,適用於許多不同領域和工作。
後續步驟
在下一個步驟中,您將以這個基礎為依據,新增函式宣告,讓 LLM 不僅能建議 RGB 值,還能實際呼叫應用程式中的函式,直接設定顏色。這項功能可讓您瞭解 LLM 如何彌合自然語言與具體應用程式功能之間的差距。
疑難排解
素材資源載入問題
如果載入系統提示時發生錯誤,請按照下列步驟操作:
- 確認
pubspec.yaml正確列出資產目錄 - 確認
rootBundle.loadString()中的路徑與檔案位置相符 - 執行
flutter clean,然後執行flutter pub get,重新整理資產組合
回覆內容不一致
如果 LLM 無法持續遵循格式指示,請採取下列行動:
- 在系統提示中明確指出格式規定
- 新增更多範例,說明預期模式
- 確保要求模型提供的格式合理
API 頻率限制
如果遇到與速率限制相關的錯誤,請按照下列步驟操作:
- 請注意,Firebase AI Logic 服務有使用限制
- 考慮使用指數輪詢策略執行重試邏輯
- 在 Firebase 控制台中檢查是否有任何配額問題
學到的重要概念
- 瞭解系統提示在 LLM 應用程式中的角色和重要性
- 提供明確的指令、範例和限制,製作有效的提示
- 在 Flutter 應用程式中載入及使用系統提示
- 引導 LLM 執行特定領域的任務
- 運用提示工程調整大型語言模型回覆
這個步驟會示範如何透過在系統提示中提供明確的指令,大幅自訂 LLM 行為,而不必變更程式碼。
5. LLM 工具的函式宣告
在這個步驟中,您將實作函式宣告,開始啟用 Gemini 在應用程式中執行的動作。這項強大功能可讓 LLM 不僅建議 RGB 值,還能透過專用工具呼叫,在應用程式的 UI 中實際設定這些值。不過,您必須執行下一個步驟,才能查看在 Flutter 應用程式中執行的 LLM 要求。
這個步驟的學習內容
- 瞭解 LLM 函式呼叫及其對 Flutter 應用程式的優點
- 為 Gemini 定義以結構定義為準的函式宣告
- 將函式宣告與 Gemini 模型整合
- 更新系統提示,善用工具功能
瞭解函式呼叫
實作函式宣告前,請先瞭解函式宣告的用途和價值:
什麼是函式呼叫?
函式呼叫 (有時稱為「工具使用」) 是一項功能,可讓 LLM 執行下列操作:
- 判斷使用者要求是否適合叫用特定函式
- 使用該函式所需的參數,產生結構化 JSON 物件
- 讓應用程式使用這些參數執行函式
- 接收函式結果並納入回覆內容
LLM 不僅能說明該怎麼做,還能透過函式呼叫在應用程式中觸發具體動作。
為什麼函式呼叫對 Flutter 應用程式很重要
函式呼叫功能在自然語言和應用程式功能之間建立強大的橋樑:
- 直接操作:使用者可以自然語言描述所需內容,應用程式會回應具體動作
- 結構化輸出內容:LLM 會產生乾淨的結構化資料,而非需要剖析的文字
- 複雜作業:讓 LLM 存取外部資料、執行計算或修改應用程式狀態
- 更優質的使用者體驗:在對話和功能之間建立無縫整合
在 Colorist 應用程式中,使用者可以透過函式呼叫功能說出「我想要森林綠」,UI 就會立即更新為該顏色,不必從文字剖析 RGB 值。
定義函式宣告
建立新的 lib/services/gemini_tools.dart 檔案來定義函式宣告:
lib/services/gemini_tools.dart
import 'package:firebase_ai/firebase_ai.dart';
import 'package:riverpod_annotation/riverpod_annotation.dart';

part 'gemini_tools.g.dart';

class GeminiTools {
  GeminiTools(this.ref);

  final Ref ref;

  FunctionDeclaration get setColorFuncDecl => FunctionDeclaration(
    'set_color',
    'Set the color of the display square based on red, green, and blue values.',
    parameters: {
      'red': Schema.number(description: 'Red component value (0.0 - 1.0)'),
      'green': Schema.number(description: 'Green component value (0.0 - 1.0)'),
      'blue': Schema.number(description: 'Blue component value (0.0 - 1.0)'),
    },
  );

  List<Tool> get tools => [
    Tool.functionDeclarations([setColorFuncDecl]),
  ];
}

@Riverpod(keepAlive: true)
GeminiTools geminiTools(Ref ref) => GeminiTools(ref);
瞭解函式宣告
以下說明這段程式碼的用途:
- 函式命名:將函式命名為
set_color,清楚指出其用途 - 函式說明:提供清楚的說明,協助 LLM 瞭解何時該使用函式
- 參數定義:您可以定義結構化參數及其說明:
red:RGB 的紅色元件,指定為介於 0.0 和 1.0 之間的數字green:RGB 的綠色分量,指定為介於 0.0 和 1.0 之間的數字blue:RGB 的藍色元件,指定為介於 0.0 和 1.0 之間的數字
- 結構定義類型:您可以使用
Schema.number()指出這些是數值 - 工具集合:建立包含函式宣告的工具清單
這種結構化方法有助於 Gemini LLM 瞭解:
- 呼叫此函式的時機
- 需要提供的參數
- 這些參數適用的限制 (例如值範圍)
更新 Gemini 模型供應商
現在,請修改 lib/providers/gemini.dart 檔案,在初始化 Gemini 模型時加入函式宣告:
lib/providers/gemini.dart
import 'dart:async';

import 'package:firebase_ai/firebase_ai.dart';
import 'package:firebase_core/firebase_core.dart';
import 'package:riverpod_annotation/riverpod_annotation.dart';

import '../firebase_options.dart';
import '../services/gemini_tools.dart';                              // Add this import
import 'system_prompt.dart';

part 'gemini.g.dart';

@Riverpod(keepAlive: true)
Future<FirebaseApp> firebaseApp(Ref ref) =>
    Firebase.initializeApp(options: DefaultFirebaseOptions.currentPlatform);

@Riverpod(keepAlive: true)
Future<GenerativeModel> geminiModel(Ref ref) async {
  await ref.watch(firebaseAppProvider.future);
  final systemPrompt = await ref.watch(systemPromptProvider.future);
  final geminiTools = ref.watch(geminiToolsProvider);                // Add this line

  final model = FirebaseAI.googleAI().generativeModel(
    model: 'gemini-2.0-flash',
    systemInstruction: Content.system(systemPrompt),
    tools: geminiTools.tools,                                        // And this line
  );
  return model;
}

@Riverpod(keepAlive: true)
Future<ChatSession> chatSession(Ref ref) async {
  final model = await ref.watch(geminiModelProvider.future);
  return model.startChat();
}
主要變更是在建立生成模型時新增 tools: geminiTools.tools 參數。這會讓 Gemini 瞭解可供呼叫的函式。
更新系統提示
現在您需要修改系統提示,指示 LLM 使用新的 set_color 工具。更新 assets/system_prompt.md:
assets/system_prompt.md
# Colorist System Prompt

You are a color expert assistant integrated into a desktop app called Colorist. Your job is to interpret natural language color descriptions and set the appropriate color values using a specialized tool.

## Your Capabilities

You are knowledgeable about colors, color theory, and how to translate natural language descriptions into specific RGB values. You have access to the following tool:

`set_color` - Sets the RGB values for the color display based on a description

## How to Respond to User Inputs

When users describe a color:

1. First, acknowledge their color description with a brief, friendly response
2. Interpret what RGB values would best represent that color description
3. Use the `set_color` tool to set those values (all values should be between 0.0 and 1.0)
4. After setting the color, provide a brief explanation of your interpretation

Example:
User: "I want a sunset orange"
You: "Sunset orange is a warm, vibrant color that captures the golden-red hues of the setting sun. It combines a strong red component with moderate orange tones."

[Then you would call the set_color tool with approximately: red=1.0, green=0.5, blue=0.25]

After the tool call: "I've set a warm orange with strong red, moderate green, and minimal blue components that is reminiscent of the sun low on the horizon."

## When Descriptions are Unclear

If a color description is ambiguous or unclear, please ask the user clarifying questions, one at a time.

## Important Guidelines

- Always keep RGB values between 0.0 and 1.0
- Provide thoughtful, knowledgeable responses about colors
- When possible, include color psychology, associations, or interesting facts about colors
- Be conversational and engaging in your responses
- Focus on being helpful and accurate with your color interpretations
系統提示的主要異動如下:
- 工具簡介:現在你只要向 LLM 說明
set_color工具, - 修改後的程序:您將步驟 3 從「在回應中設定值的格式」變更為「使用工具設定值」
- 更新後的範例:您說明回覆應包含工具呼叫,而非格式化文字
- 移除格式規定:由於您使用的是結構化函式呼叫,因此不再需要特定文字格式
更新後的提示會引導 LLM 使用函式呼叫,而不是僅以文字形式提供 RGB 值。
產生 Riverpod 程式碼
執行建構執行器指令,產生必要的 Riverpod 程式碼:
dart run build_runner build --delete-conflicting-outputs
執行應用程式
此時,Gemini 會生成嘗試使用函式呼叫的內容,但您尚未實作函式呼叫的處理常式。執行應用程式並描述顏色時,你會看到 Gemini 回應,彷彿已叫用工具,但要等到下一個步驟,UI 才會顯示任何顏色變化。
執行應用程式:
flutter run -d DEVICE
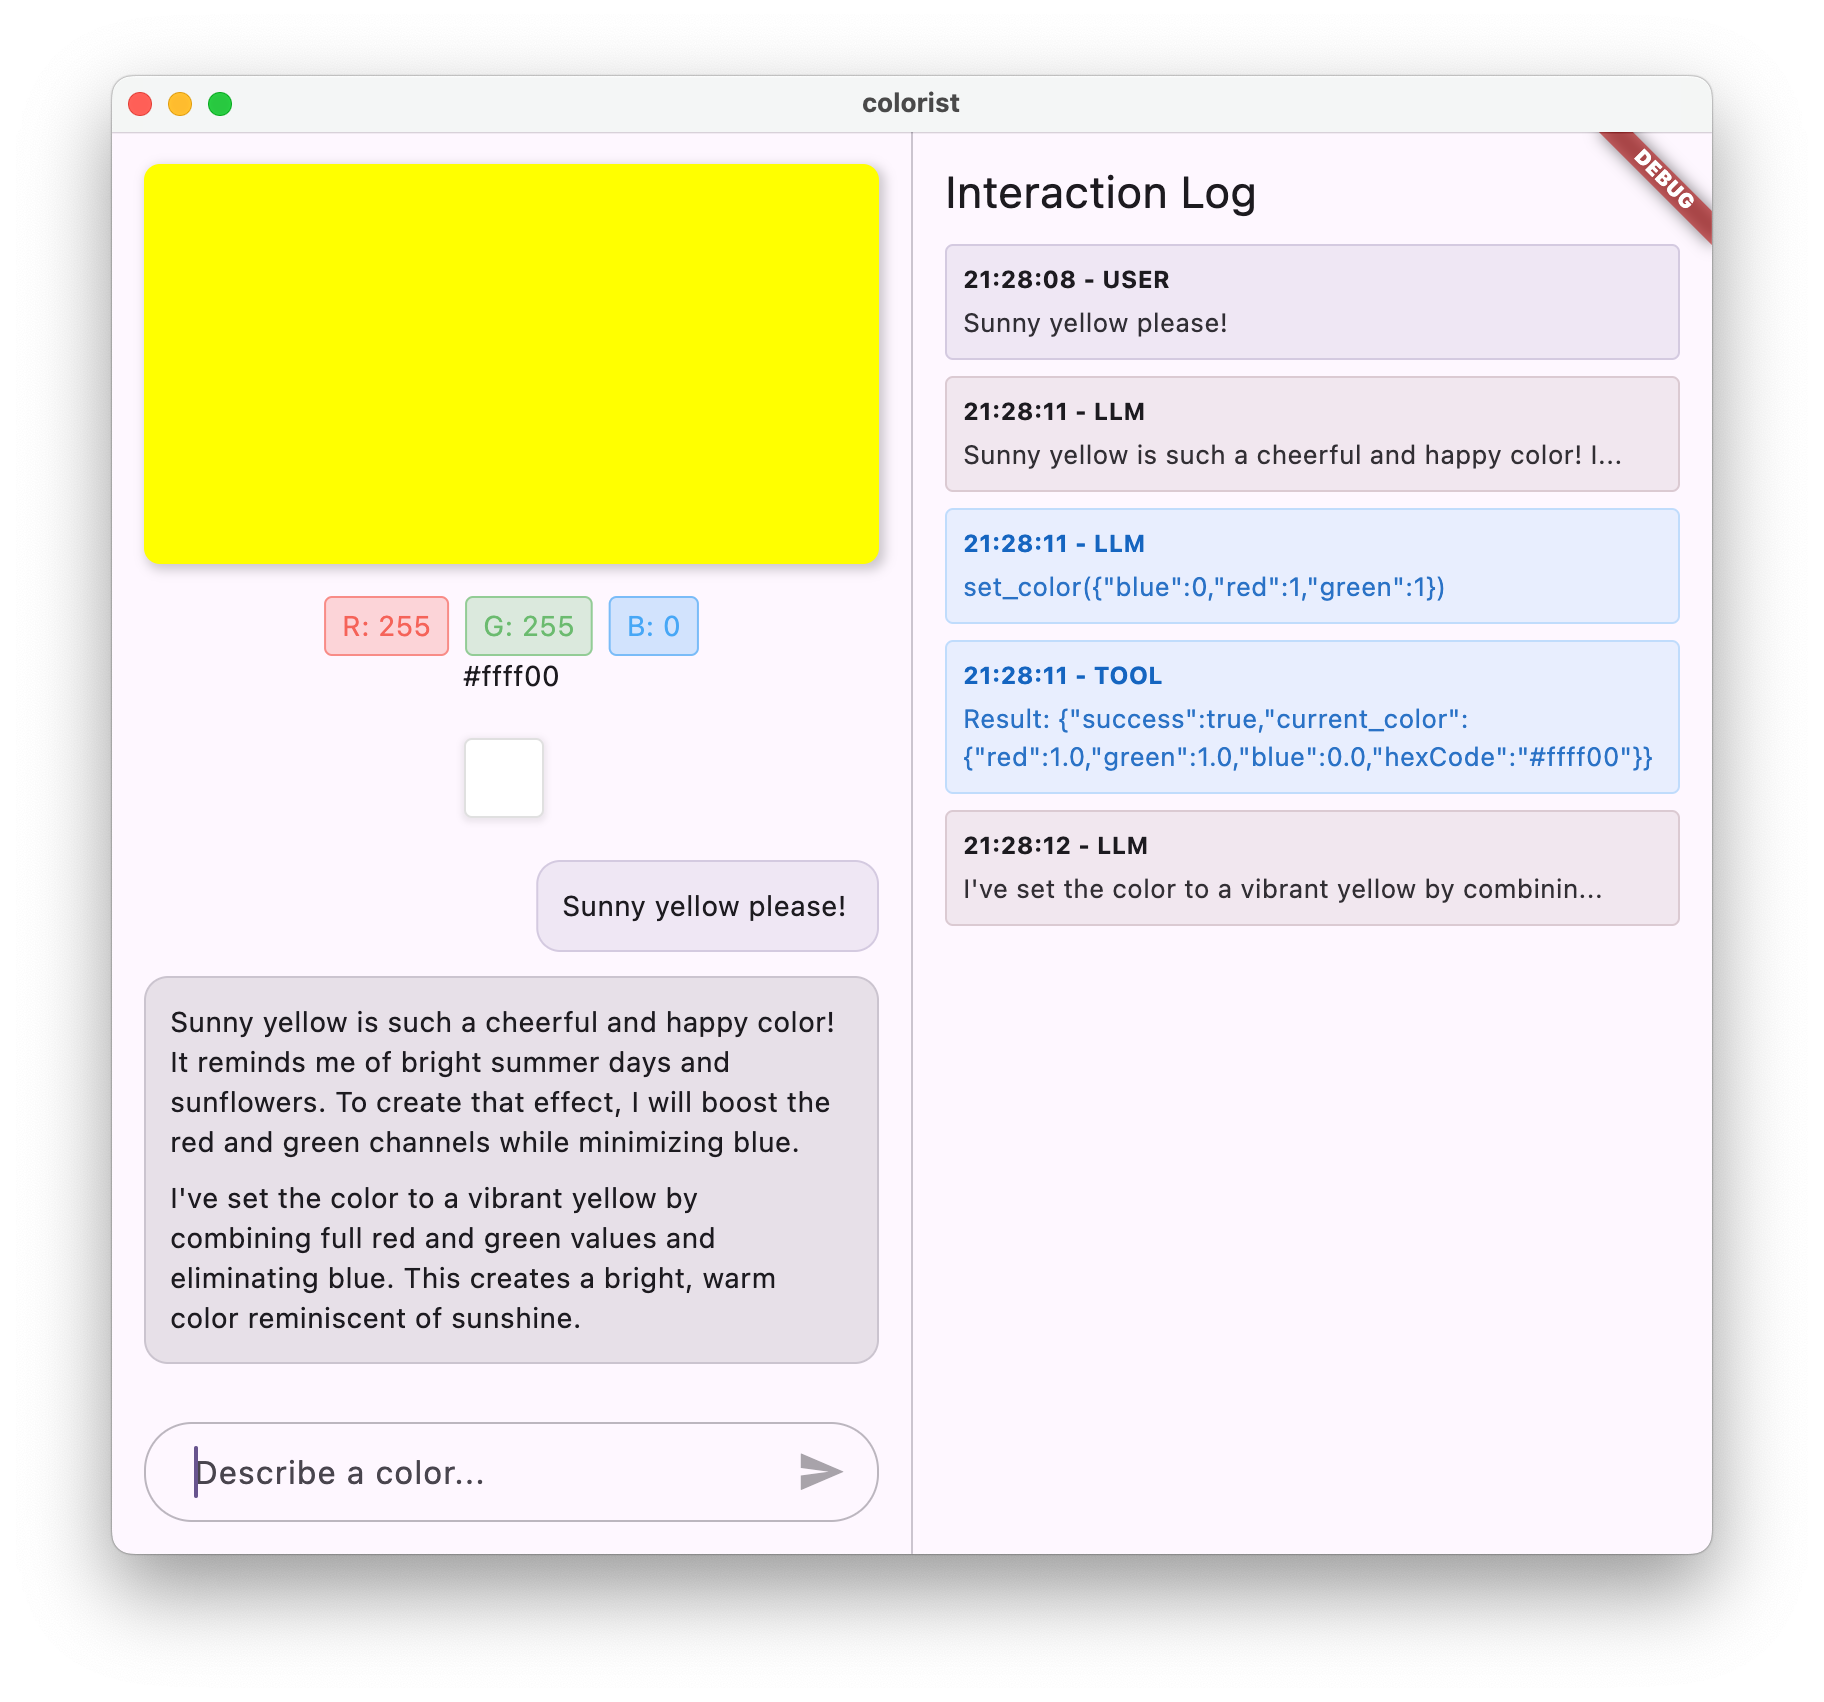
嘗試描述顏色,例如「深海藍」或「森林綠」,並觀察回覆內容。LLM 正在嘗試呼叫上述函式,但您的程式碼尚未偵測到函式呼叫。
函式呼叫程序
讓我們瞭解 Gemini 使用函式呼叫時會發生什麼情況:
- 函式選取:LLM 會根據使用者的要求,判斷呼叫函式是否有幫助
- 產生參數:大型語言模型會產生符合函式結構定義的參數值
- 函式呼叫格式:大型語言模型會在回覆中傳送結構化函式呼叫物件
- 應用程式處理:應用程式會收到這項呼叫,並執行相關函式 (在下一個步驟中實作)
- 整合回覆:在多輪對話中,LLM 會預期傳回函式的結果
在應用程式的目前狀態中,前三個步驟正在進行,但您尚未實作步驟 4 或 5 (處理函式呼叫),這會在下一個步驟中完成。
技術細節:Gemini 如何決定何時使用函式
Gemini 會根據下列因素,智慧判斷何時使用函式:
- 使用者意圖:使用者要求是否最適合由函式處理
- 功能相關性:可用功能與工作內容的相符程度
- 參數可用性:是否能準確判斷參數值
- 系統指示:系統提示提供的函式使用方式指引
您已提供清楚的函式宣告和系統指令,讓 Gemini 能夠將顏色說明要求視為呼叫 set_color 函式的機會。
後續步驟
在下一個步驟中,您將實作來自 Gemini 的函式呼叫處理常式。這樣一來,使用者描述就能透過 LLM 的函式呼叫,在 UI 中觸發實際的顏色變化,完成整個流程。
疑難排解
函式宣告問題
如果函式宣告發生錯誤,請按照下列步驟操作:
- 確認參數名稱和類型符合預期
- 確認函式名稱清楚且具描述性
- 確認功能說明如實解釋用途
系統提示問題
如果 LLM 未嘗試使用函式:
- 確認系統提示明確指示 LLM 使用
set_color工具 - 確認系統提示中的範例會示範函式用法
- 嘗試更明確地說明如何使用工具
一般問題
如果遇到其他問題:
- 檢查主控台是否有與函式宣告相關的錯誤
- 確認工具已正確傳遞至模型
- 確保所有 Riverpod 產生的程式碼都是最新版本
學到的重要概念
- 定義函式宣告,在 Flutter 應用程式中擴充 LLM 功能
- 建立結構化資料收集的參數結構定義
- 將函式宣告與 Gemini 模型整合
- 更新系統提示,鼓勵使用函式
- 瞭解 LLM 如何選取及呼叫函式
這個步驟會示範 LLM 如何彌合自然語言輸入內容與結構化函式呼叫之間的差距,為對話與應用程式功能之間的無縫整合奠定基礎。
6. 實作工具處理常式
在這個步驟中,您將實作處理常式,處理來自 Gemini 的函式呼叫。這樣一來,自然語言輸入內容和具體應用程式功能之間的通訊環就完成了,LLM 就能根據使用者描述直接操控 UI。
這個步驟的學習內容
- 瞭解 LLM 應用程式中的完整函式呼叫管道
- 在 Flutter 應用程式中處理 Gemini 的函式呼叫
- 實作會修改應用程式狀態的函式處理常式
- 處理函式回應,並將結果傳回 LLM
- 建立 LLM 與 UI 之間的完整通訊流程
- 記錄函式呼叫和回應,確保透明度
瞭解函式呼叫管道
在深入瞭解實作方式之前,請先瞭解完整的函式呼叫管道:
端對端流程
- 使用者輸入內容:使用者以自然語言描述顏色 (例如「深藍色」)。「森林綠」)
- LLM 處理:Gemini 會分析說明,並決定呼叫
set_color函式 - 生成函式呼叫:Gemini 會建立含有參數 (紅、綠、藍值) 的結構化 JSON
- 接收函式呼叫:應用程式會從 Gemini 接收這項結構化資料
- 執行函式:應用程式會使用提供的參數執行函式
- 狀態更新:函式會更新應用程式的狀態 (變更顯示的顏色)
- 生成回覆:函式會將結果傳回 LLM
- 納入回覆:LLM 會將這些結果納入最終回覆
- 更新 UI:UI 會對狀態變更做出反應,顯示新顏色
完整的通訊週期是正確整合 LLM 的必要條件。LLM 進行函式呼叫時,不會只是傳送要求並繼續執行,而是等待應用程式執行函式並傳回結果。接著,LLM 會根據這些結果擬定最終回覆,建立自然對話流程,確認已執行的動作。
實作函式處理常式
讓我們更新 lib/services/gemini_tools.dart 檔案,為函式呼叫新增處理常式:
lib/services/gemini_tools.dart
import 'package:colorist_ui/colorist_ui.dart';
import 'package:firebase_ai/firebase_ai.dart';
import 'package:riverpod_annotation/riverpod_annotation.dart';

part 'gemini_tools.g.dart';

class GeminiTools {
  GeminiTools(this.ref);

  final Ref ref;

  FunctionDeclaration get setColorFuncDecl => FunctionDeclaration(
    'set_color',
    'Set the color of the display square based on red, green, and blue values.',
    parameters: {
      'red': Schema.number(description: 'Red component value (0.0 - 1.0)'),
      'green': Schema.number(description: 'Green component value (0.0 - 1.0)'),
      'blue': Schema.number(description: 'Blue component value (0.0 - 1.0)'),
    },
  );

  List<Tool> get tools => [
    Tool.functionDeclarations([setColorFuncDecl]),
  ];

  Map<String, Object?> handleFunctionCall(                           // Add from here
    String functionName,
    Map<String, Object?> arguments,
  ) {
    final logStateNotifier = ref.read(logStateProvider.notifier);
    logStateNotifier.logFunctionCall(functionName, arguments);
    return switch (functionName) {
      'set_color' => handleSetColor(arguments),
      _ => handleUnknownFunction(functionName),
    };
  }

  Map<String, Object?> handleSetColor(Map<String, Object?> arguments) {
    final colorStateNotifier = ref.read(colorStateProvider.notifier);
    final red = (arguments['red'] as num).toDouble();
    final green = (arguments['green'] as num).toDouble();
    final blue = (arguments['blue'] as num).toDouble();
    final functionResults = {
      'success': true,
      'current_color': colorStateNotifier
          .updateColor(red: red, green: green, blue: blue)
          .toLLMContextMap(),
    };

    final logStateNotifier = ref.read(logStateProvider.notifier);
    logStateNotifier.logFunctionResults(functionResults);
    return functionResults;
  }

  Map<String, Object?> handleUnknownFunction(String functionName) {
    final logStateNotifier = ref.read(logStateProvider.notifier);
    logStateNotifier.logWarning('Unsupported function call $functionName');
    return {
      'success': false,
      'reason': 'Unsupported function call $functionName',
    };
  }                                                                  // To here.
}

@Riverpod(keepAlive: true)
GeminiTools geminiTools(Ref ref) => GeminiTools(ref);
瞭解函式處理常式
現在,讓我們來細分這些函式處理常式的作用:
handleFunctionCall:中央調度器,可:- 在記錄面板中記錄函式呼叫,以確保透明度
- 根據函式名稱將要求轉送至適當的處理常式
- 傳回結構化回應,並傳送回大型語言模型
handleSetColor:set_color函式的特定處理常式,可執行下列操作:- 從引數對映中擷取 RGB 值
- 將其轉換為預期類型 (雙精度浮點數)
- 使用
colorStateNotifier更新應用程式的顏色狀態 - 建立結構化回應,其中包含成功狀態和目前的顏色資訊
- 記錄函式結果以進行偵錯
handleUnknownFunction:不明函式的備用處理常式,可執行下列操作:- 記錄有關不支援函式的警告
- 向 LLM 傳回錯誤回應
handleSetColor 函式特別重要,因為它彌合了 LLM 的自然語言理解能力與具體 UI 變更之間的差距。
更新 Gemini Chat 服務,處理函式呼叫和回覆
現在,請更新 lib/services/gemini_chat_service.dart 檔案,處理 LLM 回應中的函式呼叫,並將結果傳回 LLM:
lib/services/gemini_chat_service.dart
import 'dart:async';

import 'package:colorist_ui/colorist_ui.dart';
import 'package:firebase_ai/firebase_ai.dart';
import 'package:riverpod_annotation/riverpod_annotation.dart';

import '../providers/gemini.dart';
import 'gemini_tools.dart';                                          // Add this import

part 'gemini_chat_service.g.dart';

class GeminiChatService {
  GeminiChatService(this.ref);
  final Ref ref;

  Future<void> sendMessage(String message) async {
    final chatSession = await ref.read(chatSessionProvider.future);
    final chatStateNotifier = ref.read(chatStateProvider.notifier);
    final logStateNotifier = ref.read(logStateProvider.notifier);

    chatStateNotifier.addUserMessage(message);
    logStateNotifier.logUserText(message);
    final llmMessage = chatStateNotifier.createLlmMessage();
    try {
      final response = await chatSession.sendMessage(Content.text(message));

      final responseText = response.text;
      if (responseText != null) {
        logStateNotifier.logLlmText(responseText);
        chatStateNotifier.appendToMessage(llmMessage.id, responseText);
      }

      if (response.functionCalls.isNotEmpty) {                       // Add from here
        final geminiTools = ref.read(geminiToolsProvider);
        final functionResultResponse = await chatSession.sendMessage(
          Content.functionResponses([
            for (final functionCall in response.functionCalls)
              FunctionResponse(
                functionCall.name,
                geminiTools.handleFunctionCall(
                  functionCall.name,
                  functionCall.args,
                ),
              ),
          ]),
        );
        final responseText = functionResultResponse.text;
        if (responseText != null) {
          logStateNotifier.logLlmText(responseText);
          chatStateNotifier.appendToMessage(llmMessage.id, responseText);
        }
      }                                                              // To here.
    } catch (e, st) {
      logStateNotifier.logError(e, st: st);
      chatStateNotifier.appendToMessage(
        llmMessage.id,
        "\nI'm sorry, I encountered an error processing your request. "
        "Please try again.",
      );
    } finally {
      chatStateNotifier.finalizeMessage(llmMessage.id);
    }
  }
}

@Riverpod(keepAlive: true)
GeminiChatService geminiChatService(Ref ref) => GeminiChatService(ref);
瞭解通訊流程
這裡新增的重點是完整處理函式呼叫和回應:
if (response.functionCalls.isNotEmpty) {
  final geminiTools = ref.read(geminiToolsProvider);
  final functionResultResponse = await chatSession.sendMessage(
    Content.functionResponses([
      for (final functionCall in response.functionCalls)
        FunctionResponse(
          functionCall.name,
          geminiTools.handleFunctionCall(
            functionCall.name,
            functionCall.args,
          ),
        ),
    ]),
  );
  final responseText = functionResultResponse.text;
  if (responseText != null) {
    logStateNotifier.logLlmText(responseText);
    chatStateNotifier.appendToMessage(llmMessage.id, responseText);
  }
}
這段程式碼:
- 檢查大型語言模型的回應是否包含任何函式呼叫
- 每次呼叫函式時,都會使用函式名稱和引數叫用
handleFunctionCall方法 - 收集每次函式呼叫的結果
- 使用
Content.functionResponses將這些結果傳回 LLM - 處理 LLM 對函式結果的回覆
- 使用最終回覆文字更新 UI
這樣會建立往返流程:
- 使用者 → LLM:要求顏色
- 大型語言模型 → 應用程式:含參數的函式呼叫
- 應用程式 → 使用者:顯示新顏色
- 應用程式 → LLM:函式結果
- LLM → 使用者:納入函式結果的最終回覆
產生 Riverpod 程式碼
執行建構執行器指令,產生必要的 Riverpod 程式碼:
dart run build_runner build --delete-conflicting-outputs
執行並測試完整流程
現在執行應用程式:
flutter run -d DEVICE
嘗試輸入各種顏色描述:
- 「我想要深紅色的」
- 「顯示寧靜的天藍色」
- 「Give me the color of fresh mint leaves」(給我新鮮薄荷葉的顏色)
- 「我想看暖色調的日落橘」
- 「將顏色改為深紫色」
現在您應該會看到:
- 聊天介面中顯示的訊息
- Gemini 在對話中顯示的回覆
- 記錄面板中記錄的函式呼叫
- 函式結果會在函式執行完畢後立即記錄
- 色彩矩形更新,顯示所描述的顏色
- RGB 值會更新,顯示新顏色的元件
- Gemini 顯示最終回覆,通常會針對設定的顏色提供建議
記錄面板可深入瞭解幕後發生的情況。您會看到:
- Gemini 執行的確切函式呼叫
- 為每個 RGB 值選擇的參數
- 函式傳回的結果
- Gemini 的後續回覆
顏色狀態通知器
您用來更新顏色的 colorStateNotifier 屬於 colorist_ui 套件。管理:
- 使用者介面中顯示的目前顏色
- 色彩記錄 (最近 10 種顏色)
- 通知 UI 元件狀態變更
使用新的 RGB 值呼叫 updateColor 時,會發生下列情況:
- 使用提供的值建立新的
ColorData物件 - 更新應用程式狀態中的目前顏色
- 將顏色新增至記錄
- 透過 Riverpod 的狀態管理觸發 UI 更新
colorist_ui 套件中的 UI 元件會監控這個狀態,並在狀態變更時自動更新,打造反應式體驗。
瞭解錯誤處理機制
實作完善的錯誤處理機制:
- Try-catch 區塊:包裝所有 LLM 互動,以偵測任何例外狀況
- 記錄錯誤:在記錄面板中記錄錯誤,並提供堆疊追蹤
- 使用者意見回饋:在對話中提供友善的錯誤訊息
- 狀態清除:即使發生錯誤,也會完成訊息狀態
即使 LLM 服務或函式執行發生問題,也能確保應用程式保持穩定,並提供適當的回饋。
函式呼叫功能如何提升使用者體驗
您在這裡完成的作業,展現了大型語言模型如何建立強大的自然介面:
- 自然語言介面:使用者以日常用語表達意圖
- 智慧解讀:LLM 會將模糊的說明轉換為精確值
- 直接操作:使用者介面會根據自然語言更新
- 符合情境的回覆:大型語言模型會提供有關變更的對話情境
- 認知負荷低:使用者不需要瞭解 RGB 值或色彩理論
除了選取顏色,您還能將這種使用 LLM 函式呼叫來連結自然語言和 UI 動作的模式,擴展到無數其他領域。
後續步驟
在下一個步驟中,您將實作串流回應,進一步提升使用者體驗。您不必等待完整的回覆,而是會在收到文字區塊和函式呼叫時立即處理,打造更具回應性且引人入勝的應用程式。
疑難排解
函式呼叫問題
如果 Gemini 未呼叫函式或參數不正確,請採取下列行動:
- 確認函式宣告與系統提示中的說明相符
- 確認參數名稱和類型一致
- 確認系統提示明確指示 LLM 使用工具
- 確認處理常式中的函式名稱與宣告中的名稱完全一致
- 檢查記錄面板,瞭解函式呼叫的詳細資訊
函式回應問題
如果函式結果無法正確傳回 LLM:
- 確認函式傳回的 Map 格式正確
- 確認 Content.functionResponses 是否正確建構
- 在記錄中尋找與函式回應相關的錯誤
- 確認回覆時使用相同的即時通訊工作階段
色彩顯示問題
如果顏色無法正常顯示,請按照下列步驟操作:
- 確認 RGB 值已正確轉換為雙精度浮點數 (LLM 可能會將其傳送為整數)
- 確認值在預期範圍內 (0.0 到 1.0)
- 確認是否正確呼叫顏色狀態通知器
- 檢查記錄檔,瞭解傳遞至函式的確切值
一般問題
一般問題:
- 檢查記錄中的錯誤或警告
- 驗證 Firebase AI Logic 連線
- 檢查函式參數是否有任何類型不符的情況
- 確保所有 Riverpod 產生的程式碼都是最新版本
學到的重要概念
- 在 Flutter 中實作完整的函式呼叫管道
- 在 LLM 與應用程式之間建立完整通訊
- 處理 LLM 回覆中的結構化資料
- 將函式結果傳回大型語言模型,以便納入回覆內容
- 使用記錄面板深入瞭解 LLM 應用程式互動
- 將自然語言輸入內容連結至具體的 UI 變更
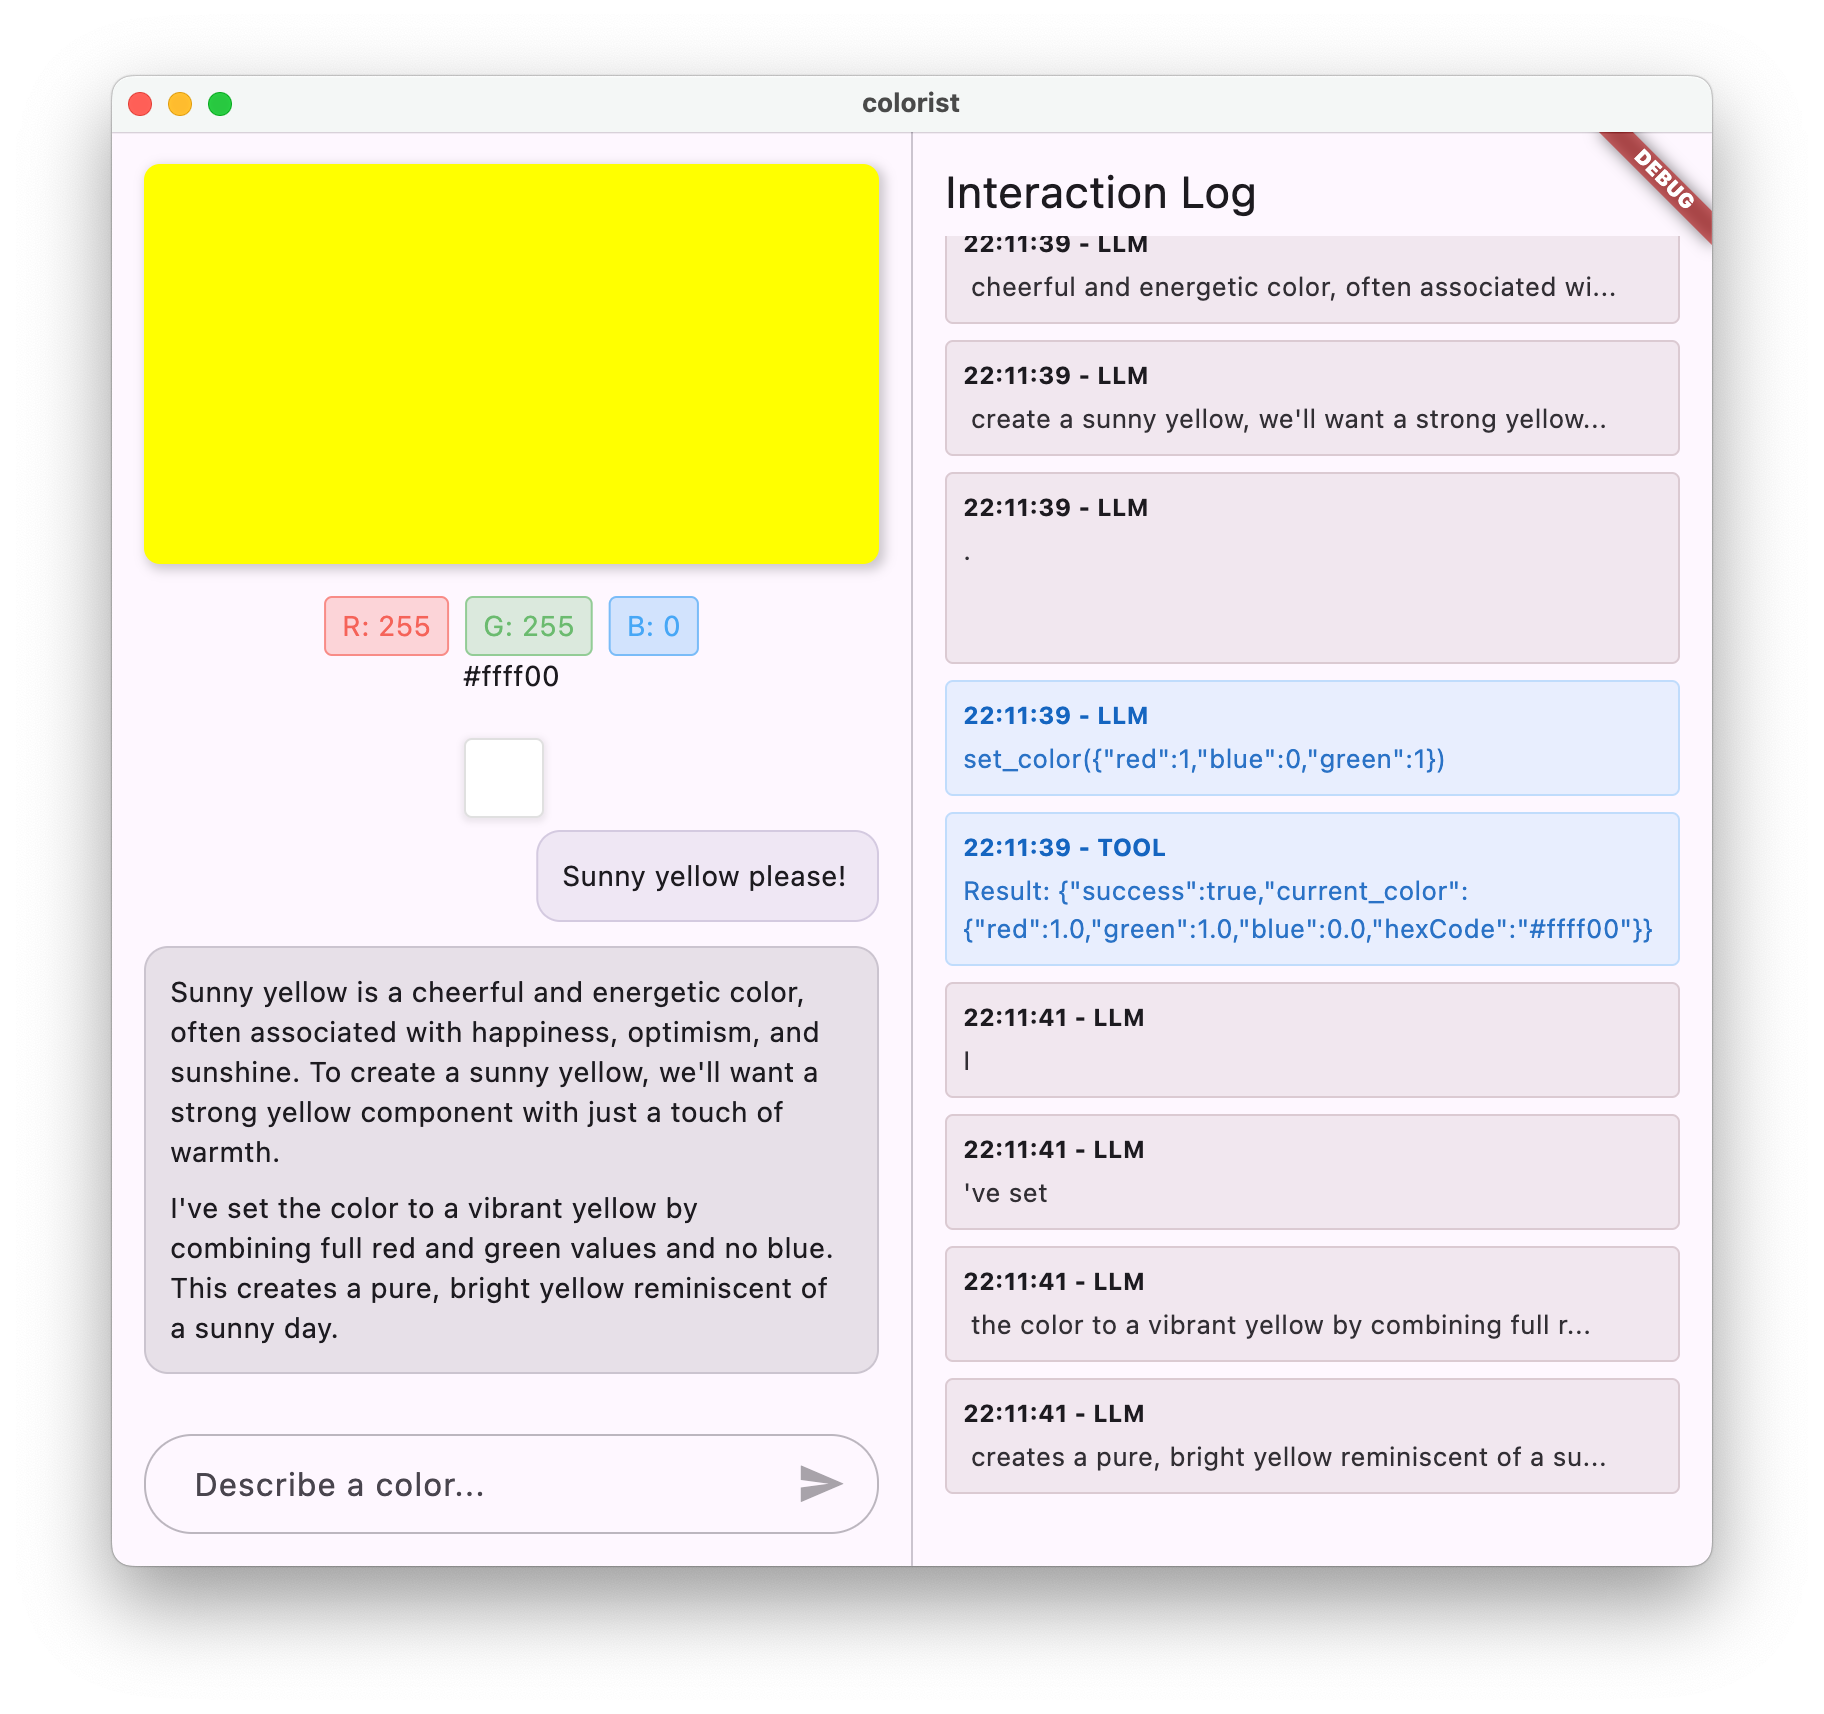
完成這個步驟後,您的應用程式現在會展示 LLM 整合最強大的模式之一:將自然語言輸入內容轉換為具體的 UI 動作,同時維持連貫的對話,確認這些動作。這項技術可建立直覺式的對話介面,讓使用者感覺就像魔法一樣。
7. 逐句顯示回覆,提升使用者體驗
在這個步驟中,您將實作 Gemini 的串流回覆,提升使用者體驗。您不必等待系統生成完整的回覆,而是會在收到文字區塊和函式呼叫時處理這些內容,打造更具回應性和吸引力的應用程式。
這個步驟的內容
- 串流功能對 LLM 驅動應用程式的重要性
- 在 Flutter 應用程式中實作 LLM 逐句顯示回覆
- 在 API 傳送部分文字區塊時進行處理
- 管理對話狀態,避免訊息衝突
- 處理串流回應中的函式呼叫
- 為進行中的回覆建立視覺指標
為什麼串流對 LLM 應用程式很重要
實作前,請先瞭解串流回應為何對使用 LLM 打造優質使用者體驗至關重要:
提升使用者體驗
串流回應可帶來多項重大使用者體驗優勢:
- 縮短感知延遲時間:使用者會立即看到文字開始顯示 (通常在 100 到 300 毫秒內),不必等待幾秒鐘才收到完整的回覆。這種即時性認知可大幅提升使用者滿意度。
- 自然對話節奏:文字會逐步顯示,模擬人類的溝通方式,營造更自然的對話體驗。
- 逐步處理資訊:使用者可以開始處理收到的資訊,不必一次處理大量文字。
- 提早中斷的機會:在完整應用程式中,如果使用者發現 LLM 的方向不對,可能會中斷或重新導向。
- 活動的視覺確認:串流文字會立即回報系統運作情形,減少不確定性。
技術優勢
除了改善使用者體驗,串流還提供以下技術優勢:
- 提早執行函式:系統偵測到函式呼叫出現在串流中時,就會立即執行,不必等待完整的回覆。
- UI 增量更新:您可以在收到新資訊時逐步更新 UI,打造更動態的體驗。
- 對話狀態管理:串流功能會清楚指出回覆是否完成,有助於管理狀態。
- 降低逾時風險:如果使用非串流回應,長時間執行的生成作業可能會導致連線逾時。串流會提早建立連線並維持連線狀態。
以 Colorist 應用程式為例,導入串流功能後,使用者會發現文字回覆和顏色變化出現得更快,體驗更即時。
新增對話狀態管理功能
首先,請新增狀態供應器,追蹤應用程式目前是否正在處理串流回應。更新 lib/services/gemini_chat_service.dart 檔案:
lib/services/gemini_chat_service.dart
import 'dart:async';

import 'package:colorist_ui/colorist_ui.dart';
import 'package:firebase_ai/firebase_ai.dart';
import 'package:flutter_riverpod/flutter_riverpod.dart';
import 'package:riverpod_annotation/riverpod_annotation.dart';

import '../providers/gemini.dart';
import 'gemini_tools.dart';

part 'gemini_chat_service.g.dart';

class ConversationStateNotifier extends Notifier<ConversationState> {  // Add from here...
  @override
  ConversationState build() => ConversationState.idle;

  void busy() {
    state = ConversationState.busy;
  }

  void idle() {
    state = ConversationState.idle;
  }
}

final conversationStateProvider =
    NotifierProvider<ConversationStateNotifier, ConversationState>(
      ConversationStateNotifier.new,
    );                                                                 // To here.

class GeminiChatService {
  GeminiChatService(this.ref);
  final Ref ref;

  Future<void> sendMessage(String message) async {
    final chatSession = await ref.read(chatSessionProvider.future);
    final conversationState = ref.read(conversationStateProvider);   // Add this line
    final chatStateNotifier = ref.read(chatStateProvider.notifier);
    final logStateNotifier = ref.read(logStateProvider.notifier);

    if (conversationState == ConversationState.busy) {               // Add from here...
      logStateNotifier.logWarning(
        "Can't send a message while a conversation is in progress",
      );
      throw Exception(
        "Can't send a message while a conversation is in progress",
      );
    }
    final conversationStateNotifier = ref.read(
      conversationStateProvider.notifier,
    );
    conversationStateNotifier.busy();                                // To here.
    chatStateNotifier.addUserMessage(message);
    logStateNotifier.logUserText(message);
    final llmMessage = chatStateNotifier.createLlmMessage();
    try {                                                            // Modify from here...
      final responseStream = chatSession.sendMessageStream(
        Content.text(message),
      );
      await for (final block in responseStream) {
        await _processBlock(block, llmMessage.id);
      }                                                              // To here.
    } catch (e, st) {
      logStateNotifier.logError(e, st: st);
      chatStateNotifier.appendToMessage(
        llmMessage.id,
        "\nI'm sorry, I encountered an error processing your request. "
        "Please try again.",
      );
    } finally {
      chatStateNotifier.finalizeMessage(llmMessage.id);
      conversationStateNotifier.idle();                              // Add this line.
    }
  }

  Future<void> _processBlock(                                        // Add from here...
    GenerateContentResponse block,
    String llmMessageId,
  ) async {
    final chatSession = await ref.read(chatSessionProvider.future);
    final chatStateNotifier = ref.read(chatStateProvider.notifier);
    final logStateNotifier = ref.read(logStateProvider.notifier);
    final blockText = block.text;
    if (blockText != null) {
      logStateNotifier.logLlmText(blockText);
      chatStateNotifier.appendToMessage(llmMessageId, blockText);
    }

    if (block.functionCalls.isNotEmpty) {
      final geminiTools = ref.read(geminiToolsProvider);
      final responseStream = chatSession.sendMessageStream(
        Content.functionResponses([
          for (final functionCall in block.functionCalls)
            FunctionResponse(
              functionCall.name,
              geminiTools.handleFunctionCall(
                functionCall.name,
                functionCall.args,
              ),
            ),
        ]),
      );
      await for (final response in responseStream) {
        final responseText = response.text;
        if (responseText != null) {
          logStateNotifier.logLlmText(responseText);
          chatStateNotifier.appendToMessage(llmMessageId, responseText);
        }
      }
    }
  }                                                                  // To here.
}

@Riverpod(keepAlive: true)
GeminiChatService geminiChatService(Ref ref) => GeminiChatService(ref);
瞭解串流實作方式
以下說明這段程式碼的用途:
- 追蹤對話狀態:
conversationStateProvider會追蹤應用程式目前是否正在處理回應- 處理期間,狀態會從
idle轉換為busy,然後再返回idle - 這可避免多個可能衝突的並行要求
- 初始化串流:
sendMessageStream()會傳回回應區塊的串流,而不是包含完整回應的Future- 每個區塊可能包含文字、函式呼叫或兩者
- 漸進式處理:
await for即時處理每個區塊- 文字會立即附加至使用者介面,產生串流效果
- 系統偵測到函式呼叫後,會立即執行
- 函式呼叫處理:
- 如果區塊中偵測到函式呼叫,系統會立即執行
- 結果會透過另一個串流呼叫傳回大型語言模型
- 大型語言模型對這些結果的回覆也會以串流方式處理
- 處理錯誤和清除:
try/catch提供強大的錯誤處理機制finally區塊可確保對話狀態正確重設- 即使發生錯誤,訊息一律會完成
這項實作方式可建立反應靈敏且可靠的串流體驗,同時維持適當的對話狀態。
更新主畫面以連結對話狀態
修改 lib/main.dart 檔案,將對話狀態傳遞至主畫面:
lib/main.dart
import 'package:colorist_ui/colorist_ui.dart';
import 'package:flutter/material.dart';
import 'package:flutter_riverpod/flutter_riverpod.dart';

import 'providers/gemini.dart';
import 'services/gemini_chat_service.dart';

void main() async {
  runApp(ProviderScope(child: MainApp()));
}

class MainApp extends ConsumerWidget {
  const MainApp({super.key});

  @override
  Widget build(BuildContext context, WidgetRef ref) {
    final model = ref.watch(geminiModelProvider);
    final conversationState = ref.watch(conversationStateProvider);  // Add this line

    return MaterialApp(
      theme: ThemeData(
        colorScheme: ColorScheme.fromSeed(seedColor: Colors.deepPurple),
      ),
      home: model.when(
        data: (data) => MainScreen(
          conversationState: conversationState,                      // And this line
          sendMessage: (text) {
            ref.read(geminiChatServiceProvider).sendMessage(text);
          },
        ),
        loading: () => LoadingScreen(message: 'Initializing Gemini Model'),
        error: (err, st) => ErrorScreen(error: err),
      ),
    );
  }
}
這裡的主要變更,是將 conversationState 傳遞至 MainScreen 小工具。MainScreen (由 colorist_ui 套件提供) 會使用這個狀態,在處理回覆時停用文字輸入功能。
這樣一來,使用者體驗會更加連貫,因為 UI 會反映對話的目前狀態。
產生 Riverpod 程式碼
執行建構執行器指令,產生必要的 Riverpod 程式碼:
dart run build_runner build --delete-conflicting-outputs
執行及測試串流回應
執行應用程式:
flutter run -d DEVICE
現在請嘗試使用各種顏色描述測試串流行為。你可以嘗試以下描述:
- 「Show me the deep teal color of the ocean at twilight」(顯示黃昏時深藍綠色的海洋)
- 「我想看到色彩鮮豔的珊瑚,讓人想起熱帶花卉」
- 「Create a muted olive green like old army fatigues」(建立類似舊軍裝的柔和橄欖綠)
串流技術流程詳情
我們來看看串流回覆時會發生什麼事:
建立連線
呼叫 sendMessageStream() 時,會發生下列情況:
- 應用程式會建立與 Firebase AI Logic 服務的連線
- 使用者要求會傳送至服務
- 伺服器開始處理要求
- 串流連線會保持開啟,隨時可以傳輸區塊
傳輸區塊
Gemini 生成內容時,系統會透過串流傳送區塊:
- 伺服器會在生成文字區塊時傳送 (通常是幾個字或句子)
- 當 Gemini 決定要進行函式呼叫時,會傳送函式呼叫資訊
- 函式呼叫後可能會出現其他文字區塊
- 系統會持續串流,直到生成完成為止
漸進式處理
應用程式會以遞增方式處理每個區塊:
- 每個文字區塊都會附加至現有回覆
- 系統偵測到函式呼叫後,會立即執行
- UI 會即時更新文字和函式結果
- 追蹤狀態,顯示回應仍在串流
完成串流
生成完成後:
- 伺服器關閉串流
await for迴圈自然結束- 訊息已標示為完成
- 對話狀態會設回閒置
- 使用者介面會更新,反映完成狀態
串流與非串流比較
為進一步瞭解串流的優點,我們將比較串流與非串流方法:
切面 | 非串流 | 串流 |
感覺到的延遲 | 在完整回覆準備就緒前,使用者不會看到任何內容 | 使用者在幾毫秒內就能看到第一個字 |
使用者體驗 | 等待許久後,文字突然顯示 | 自然呈現文字,逐步顯示 |
狀態管理 | 較簡單 (訊息不是待處理就是已完成) | 更複雜 (訊息可能處於串流狀態) |
函式執行 | 只會在完整回覆後發生 | 在生成回覆時發生 |
導入複雜度 | 導入方式輕鬆簡單 | 需要額外的狀態管理 |
錯誤復原 | 全有或全無的回覆 | 部分回應可能仍有幫助 |
程式碼複雜度 | 較簡單 | 由於串流處理作業,因此較為複雜 |
對於 Colorist 這類應用程式,串流的 UX 優勢大於實作複雜度,尤其是可能需要幾秒才能生成的色彩解讀。
串流使用者體驗最佳做法
在自己的大型語言模型應用程式中導入串流功能時,請考慮採用下列最佳做法:
- 清楚的視覺指標:一律提供清楚的視覺提示,區分串流訊息和完整訊息
- 輸入封鎖:在串流期間停用使用者輸入,避免多個要求重疊
- 錯誤復原:設計 UI,在串流中斷時妥善處理復原程序
- 狀態轉換:確保閒置、串流和完成狀態之間能順利轉換
- 進度視覺化:考慮使用細微的動畫或指標,顯示處理中的活動
- 取消選項:在完整應用程式中,提供取消生成作業的方法
- 整合函式結果:設計 UI,處理串流中途出現的函式結果
- 效能最佳化:在快速串流更新期間,盡量減少 UI 重建次數
colorist_ui 套件會為您導入許多最佳做法,但這些都是導入串流 LLM 時的重要考量。
後續步驟
在下一個步驟中,您會在使用者從記錄選取顏色時通知 Gemini,藉此實作 LLM 同步處理。這樣一來,LLM 就能瞭解使用者對應用程式狀態所做的變更,進而提供更連貫的體驗。
疑難排解
串流處理問題
如果串流處理發生問題,請按照下列步驟操作:
- 症狀:部分回應、缺少文字或串流突然終止
- 解決方案:檢查網路連線,並確保程式碼中的非同步/等待模式正確無誤
- 診斷:檢查記錄面板,找出與串流處理相關的錯誤訊息或警告
- 修正:請確保所有串流處理作業都使用適當的錯誤處理機制,並搭配
try/catch區塊
缺少函式呼叫
如果系統未在串流中偵測到函式呼叫:
- 症狀:文字會顯示,但顏色不會更新,或記錄檔未顯示函式呼叫
- 解決方法:確認系統提示中關於使用函式呼叫的指示
- 診斷:檢查記錄面板,確認是否收到函式呼叫
- 修正:調整系統提示,更明確地指示 LLM 使用
set_color工具
一般錯誤處理
如有其他問題:
- 步驟 1:檢查記錄面板是否有錯誤訊息
- 步驟 2:驗證 Firebase AI Logic 連線
- 步驟 3:確保所有 Riverpod 產生的程式碼都是最新版本
- 步驟 4:檢查串流實作項目,確認是否有遺漏的 await 陳述式
學到的重要概念
- 使用 Gemini API 實作串流回應,提升使用者體驗
- 管理對話狀態,正確處理串流互動
- 即時處理收到的文字和函式呼叫
- 建立回應式 UI,在串流期間逐步更新
- 使用適當的非同步模式處理並行串流
- 在串流回應期間提供適當的視覺回饋
導入串流後,Colorist 應用程式的使用者體驗大幅提升,介面更靈敏、更引人入勝,真正實現對話式體驗。
8. 大型語言模型情境同步
在這個加分步驟中,您將實作 LLM 情境同步功能,在使用者從記錄選取顏色時通知 Gemini。這樣一來,大型語言模型就能瞭解使用者在介面中的動作,而不只是他們明確傳達的訊息,進而提供更連貫的體驗。
這個步驟的內容
- 在 UI 與 LLM 之間建立 LLM 內容同步
- 將 UI 事件序列化為大型語言模型可理解的內容
- 根據使用者動作更新對話情境
- 透過不同的互動方式打造一致的體驗
- 除了明確的即時通訊訊息,還能提升 LLM 的脈絡感知能力
瞭解 LLM 情境同步
傳統聊天機器人只會回應明確的使用者訊息,因此使用者透過其他方式與應用程式互動時,聊天機器人無法提供協助。LLM Context Synchronization 可解決這項限制:
LLM 脈絡同步的重要性
使用者透過 UI 元素與應用程式互動時 (例如從記錄中選取顏色),除非您明確告知,否則 LLM 無法得知發生了什麼事。大型語言模型情境同步:
- 維持脈絡:讓 LLM 掌握所有相關使用者動作
- 建立連貫性:產生連貫的體驗,讓 LLM 能夠辨識 UI 互動
- 提升智慧程度:允許 LLM 對所有使用者動作做出適當回應
- 提升使用者體驗:讓整個應用程式更整合且反應更快速
- 減少使用者負擔:使用者不必手動說明 UI 動作
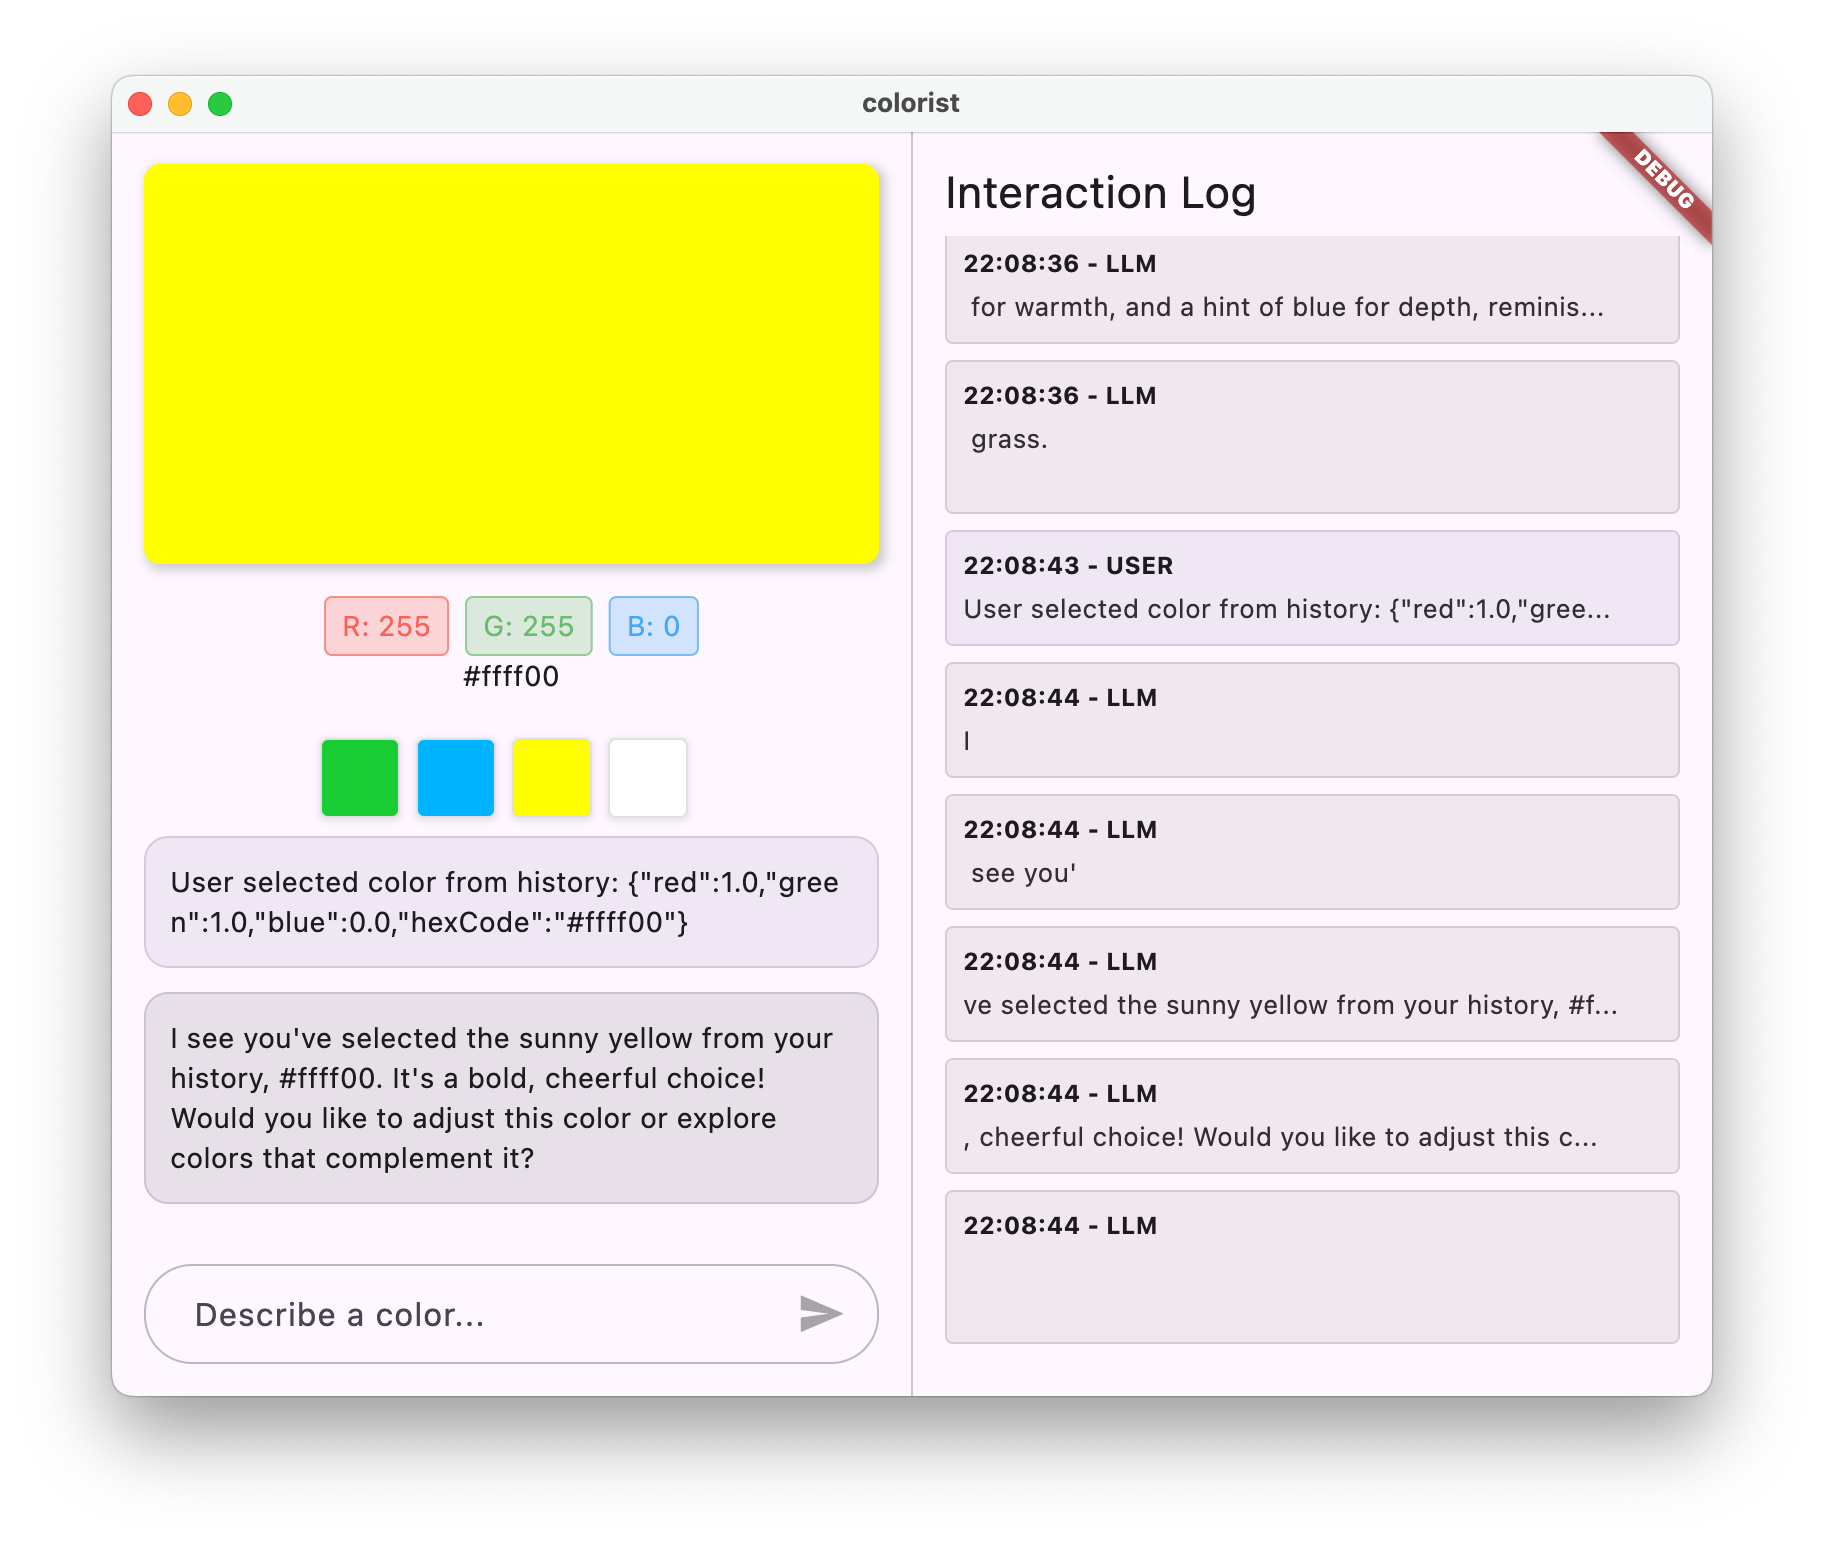
在 Colorist 應用程式中,當使用者從記錄選取顏色時,您希望 Gemini 能夠確認這項動作,並針對所選顏色提供智慧評論,維持流暢的助理體驗。
更新 Gemini Chat 服務,接收顏色選取通知
首先,您要在 GeminiChatService 中新增方法,以便在使用者從記錄中選取顏色時通知 LLM。更新 lib/services/gemini_chat_service.dart 檔案:
lib/services/gemini_chat_service.dart
import 'dart:async';
import 'dart:convert';                                               // Add this import

import 'package:colorist_ui/colorist_ui.dart';
import 'package:firebase_ai/firebase_ai.dart';
import 'package:flutter_riverpod/flutter_riverpod.dart';
import 'package:riverpod_annotation/riverpod_annotation.dart';

import '../providers/gemini.dart';
import 'gemini_tools.dart';

part 'gemini_chat_service.g.dart';

class ConversationStateNotifier extends Notifier<ConversationState> {
  @override
  ConversationState build() => ConversationState.idle;

  void busy() {
    state = ConversationState.busy;
  }

  void idle() {
    state = ConversationState.idle;
  }
}

final conversationStateProvider =
    NotifierProvider<ConversationStateNotifier, ConversationState>(
      ConversationStateNotifier.new,
    );

class GeminiChatService {
  GeminiChatService(this.ref);
  final Ref ref;

  Future<void> notifyColorSelection(ColorData color) => sendMessage(  // Add from here...
    'User selected color from history: ${json.encode(color.toLLMContextMap())}',
  );                                                                  // To here.

  Future<void> sendMessage(String message) async {
    final chatSession = await ref.read(chatSessionProvider.future);
    final conversationState = ref.read(conversationStateProvider);
    final chatStateNotifier = ref.read(chatStateProvider.notifier);
    final logStateNotifier = ref.read(logStateProvider.notifier);

    if (conversationState == ConversationState.busy) {
      logStateNotifier.logWarning(
        "Can't send a message while a conversation is in progress",
      );
      throw Exception(
        "Can't send a message while a conversation is in progress",
      );
    }
    final conversationStateNotifier = ref.read(
      conversationStateProvider.notifier,
    );
    conversationStateNotifier.busy();
    chatStateNotifier.addUserMessage(message);
    logStateNotifier.logUserText(message);
    final llmMessage = chatStateNotifier.createLlmMessage();
    try {
      final responseStream = chatSession.sendMessageStream(
        Content.text(message),
      );
      await for (final block in responseStream) {
        await _processBlock(block, llmMessage.id);
      }
    } catch (e, st) {
      logStateNotifier.logError(e, st: st);
      chatStateNotifier.appendToMessage(
        llmMessage.id,
        "\nI'm sorry, I encountered an error processing your request. "
        "Please try again.",
      );
    } finally {
      chatStateNotifier.finalizeMessage(llmMessage.id);
      conversationStateNotifier.idle();
    }
  }

  Future<void> _processBlock(
    GenerateContentResponse block,
    String llmMessageId,
  ) async {
    final chatSession = await ref.read(chatSessionProvider.future);
    final chatStateNotifier = ref.read(chatStateProvider.notifier);
    final logStateNotifier = ref.read(logStateProvider.notifier);
    final blockText = block.text;
    if (blockText != null) {
      logStateNotifier.logLlmText(blockText);
      chatStateNotifier.appendToMessage(llmMessageId, blockText);
    }

    if (block.functionCalls.isNotEmpty) {
      final geminiTools = ref.read(geminiToolsProvider);
      final responseStream = chatSession.sendMessageStream(
        Content.functionResponses([
          for (final functionCall in block.functionCalls)
            FunctionResponse(
              functionCall.name,
              geminiTools.handleFunctionCall(
                functionCall.name,
                functionCall.args,
              ),
            ),
        ]),
      );
      await for (final response in responseStream) {
        final responseText = response.text;
        if (responseText != null) {
          logStateNotifier.logLlmText(responseText);
          chatStateNotifier.appendToMessage(llmMessageId, responseText);
        }
      }
    }
  }
}

@Riverpod(keepAlive: true)
GeminiChatService geminiChatService(Ref ref) => GeminiChatService(ref);
主要新增項目是 notifyColorSelection 方法,可執行下列操作:
- 接受代表所選顏色的
ColorData物件 - 將其編碼為可納入訊息的 JSON 格式
- 傳送特殊格式的訊息給 LLM,指出使用者選取了某項內容
- 重複使用現有的
sendMessage方法來處理通知
這種做法會利用現有的訊息處理基礎架構,避免重複作業。
更新主要應用程式,連結顏色選取通知
現在,請修改 lib/main.dart 檔案,將顏色選取通知函式傳遞至主畫面:
lib/main.dart
import 'package:colorist_ui/colorist_ui.dart';
import 'package:flutter/material.dart';
import 'package:flutter_riverpod/flutter_riverpod.dart';

import 'providers/gemini.dart';
import 'services/gemini_chat_service.dart';

void main() async {
  runApp(ProviderScope(child: MainApp()));
}

class MainApp extends ConsumerWidget {
  const MainApp({super.key});

  @override
  Widget build(BuildContext context, WidgetRef ref) {
    final model = ref.watch(geminiModelProvider);
    final conversationState = ref.watch(conversationStateProvider);

    return MaterialApp(
      theme: ThemeData(
        colorScheme: ColorScheme.fromSeed(seedColor: Colors.deepPurple),
      ),
      home: model.when(
        data: (data) => MainScreen(
          conversationState: conversationState,
          notifyColorSelection: (color) {                            // Add from here...
            ref.read(geminiChatServiceProvider).notifyColorSelection(color);
          },                                                         // To here.
          sendMessage: (text) {
            ref.read(geminiChatServiceProvider).sendMessage(text);
          },
        ),
        loading: () => LoadingScreen(message: 'Initializing Gemini Model'),
        error: (err, st) => ErrorScreen(error: err),
      ),
    );
  }
}
主要變更內容是新增 notifyColorSelection 回呼,將 UI 事件 (從記錄中選取顏色) 連線至 LLM 通知系統。
更新系統提示
現在,您需要更新系統提示,指示 LLM 如何回應顏色選取通知。修改 assets/system_prompt.md 檔案:
assets/system_prompt.md
# Colorist System Prompt

You are a color expert assistant integrated into a desktop app called Colorist. Your job is to interpret natural language color descriptions and set the appropriate color values using a specialized tool.

## Your Capabilities

You are knowledgeable about colors, color theory, and how to translate natural language descriptions into specific RGB values. You have access to the following tool:

`set_color` - Sets the RGB values for the color display based on a description

## How to Respond to User Inputs

When users describe a color:

1. First, acknowledge their color description with a brief, friendly response
2. Interpret what RGB values would best represent that color description
3. Use the `set_color` tool to set those values (all values should be between 0.0 and 1.0)
4. After setting the color, provide a brief explanation of your interpretation

Example:
User: "I want a sunset orange"
You: "Sunset orange is a warm, vibrant color that captures the golden-red hues of the setting sun. It combines a strong red component with moderate orange tones."

[Then you would call the set_color tool with approximately: red=1.0, green=0.5, blue=0.25]

After the tool call: "I've set a warm orange with strong red, moderate green, and minimal blue components that is reminiscent of the sun low on the horizon."

## When Descriptions are Unclear

If a color description is ambiguous or unclear, please ask the user clarifying questions, one at a time.

## When Users Select Historical Colors

Sometimes, the user will manually select a color from the history panel. When this happens, you'll receive a notification about this selection that includes details about the color. Acknowledge this selection with a brief response that recognizes what they've done and comments on the selected color.

Example notification:
User: "User selected color from history: {red: 0.2, green: 0.5, blue: 0.8, hexCode: #3380CC}"
You: "I see you've selected an ocean blue from your history. This tranquil blue with a moderate intensity has a calming, professional quality to it. Would you like to explore similar shades or create a contrasting color?"

## Important Guidelines

- Always keep RGB values between 0.0 and 1.0
- Provide thoughtful, knowledgeable responses about colors
- When possible, include color psychology, associations, or interesting facts about colors
- Be conversational and engaging in your responses
- Focus on being helpful and accurate with your color interpretations
主要新增內容是「使用者選取歷來顏色時」部分,其中:
- 向 LLM 說明記錄選取通知的概念
- 提供這些通知的顯示方式範例
- 顯示適當的回覆範例
- 設定確認選取顏色和加上註解的預期行為
這有助於 LLM 瞭解如何適當回覆這些特殊訊息。
生成 Riverpod 程式碼
執行建構執行器指令,產生必要的 Riverpod 程式碼:
dart run build_runner build --delete-conflicting-outputs
執行及測試 LLM 內容同步
執行應用程式:
flutter run -d DEVICE
測試 LLM 脈絡同步處理的步驟如下:
- 首先,在對話中描述顏色,生成幾種顏色
- 「顯示鮮豔的紫色」
- 「我想要森林綠」
- 「Give me a bright red」(給我亮紅色)
- 然後按一下記錄列中的其中一個顏色縮圖
您應該會看到:
- 所選顏色會顯示在主畫面
- 聊天室中會顯示使用者訊息,指出所選顏色
- LLM 會回覆確認選取內容,並對顏色做出評論
- 整個互動過程自然流暢
這樣一來,LLM 就能瞭解並適當回應直接訊息和 UI 互動,提供順暢的體驗。
LLM 情境同步的運作方式
接下來,我們將深入探討這項同步功能的技術細節:
資料流
- 使用者動作:使用者點選記錄列中的顏色
- UI 事件:
MainScreen小工具會偵測到這項選取項目 - 執行回呼:觸發
notifyColorSelection回呼 - 建立訊息:系統會使用顏色資料建立特定格式的訊息
- LLM 處理:系統會將訊息傳送給 Gemini,Gemini 會辨識格式
- 符合情境的回覆:Gemini 會根據系統提示做出適當回應
- 使用者介面更新:回覆會顯示在對話中,提供連貫一致的體驗
資料序列化
這種做法的關鍵在於如何序列化顏色資料:
'User selected color from history: ${json.encode(color.toLLMContextMap())}'
toLLMContextMap() 方法 (由 colorist_ui 套件提供) 會將 ColorData 物件轉換為地圖,其中包含 LLM 可瞭解的鍵值屬性。通常包括:
- RGB 值 (紅、綠、藍)
- 十六進位代碼表示法
- 與顏色相關聯的任何名稱或說明
只要格式一致並將資料納入訊息中,就能確保 LLM 擁有適當回應所需的所有資訊。
LLM 脈絡同步的應用範圍更廣
除了顏色選取以外,這種通知 LLM UI 事件的模式還有許多應用:
其他使用情況
- 篩選器變更:在使用者對資料套用篩選器時通知 LLM
- 導覽事件:在使用者前往不同區塊時通知 LLM
- 選取項目變更:使用者從清單或格線選取項目時,更新 LLM
- 偏好設定更新:在使用者變更設定或偏好設定時通知 LLM
- 資料操縱:在使用者新增、編輯或刪除資料時通知 LLM
在上述兩種情況下,模式都相同:
- 偵測 UI 事件
- 序列化相關資料
- 以特定格式傳送通知給 LLM
- 透過系統提示引導 LLM 做出適當回覆
大型語言模型內容同步的最佳做法
根據您的實作方式,以下提供一些有效同步大型語言模型環境的最佳做法:
1. 格式一致
請使用一致的通知格式,方便 LLM 辨識:
"User [action] [object]: [structured data]"
2. 豐富內容
在通知中提供足夠的詳細資料,讓 LLM 能夠智慧回覆。如果是顏色,則代表 RGB 值、十六進位代碼和任何其他相關屬性。
3. 清楚的操作說明
在系統提示中提供明確的操作說明,說明如何處理通知,最好附上範例。
4. 自然整合
設計通知時,請確保通知能自然融入對話,而不是中斷對話。
5. 選擇性通知
只將與對話相關的動作通知 LLM。並非每個 UI 事件都需要傳達。
疑難排解
通知問題
如果 LLM 無法正確回應顏色選取:
- 確認通知訊息格式與系統提示中說明的格式相符
- 確認顏色資料已正確序列化
- 確認系統提示包含處理選取項目的明確指示
- 傳送通知時,檢查即時通訊服務是否有任何錯誤
管理資訊脈絡
如果 LLM 似乎失去脈絡:
- 確認系統是否正常維護即時通訊工作階段
- 確認對話狀態轉換正確無誤
- 確認通知是透過同一個即時通訊工作階段傳送
一般問題
一般問題:
- 檢查記錄中的錯誤或警告
- 驗證 Firebase AI Logic 連線
- 檢查函式參數是否有任何類型不符的情況
- 確保所有 Riverpod 產生的程式碼都是最新版本
學到的重要概念
- 在 UI 和 LLM 之間建立 LLM 內容同步
- 將 UI 事件序列化為適合 LLM 的情境
- 引導 LLM 針對不同互動模式做出適當行為
- 在訊息和非訊息互動中打造一致的體驗
- 提升 LLM 對更廣泛應用程式狀態的認知
實作 LLM 脈絡同步後,您就能打造真正整合的體驗,讓 LLM 感覺像是能感知情境、回應迅速的助理,而不只是文字生成器。這項模式可套用至無數其他應用程式,打造更自然直覺的 AI 輔助介面。
9. 恭喜!
您已成功完成 Colorist 程式碼研究室!🎉
建構項目
您已建立功能完善的 Flutter 應用程式,整合 Google 的 Gemini API 來解讀自然語言的顏色說明。您的應用程式現在可以:
- 處理自然語言描述,例如「日落橘」或「深海藍」
- 使用 Gemini 將這些說明智慧轉換為 RGB 值
- 透過串流回應即時顯示解讀的顏色
- 透過聊天和 UI 元素處理使用者互動
- 在不同互動方法中維持情境意識
下一步該做什麼?
您已掌握將 Gemini 與 Flutter 整合的基本知識,接下來可以透過下列方式繼續學習:
強化 Colorist 應用程式
- 調色盤:新增功能,產生互補或相符的色彩配置
- 語音輸入:整合語音辨識功能,透過口語描述顏色
- 記錄管理:新增選項,可命名、整理及匯出色集
- 自訂提示:建立介面,供使用者自訂系統提示
- 進階數據分析:追蹤哪些說明效果最佳或造成困難
探索更多 Gemini 功能
- 多模態輸入:新增圖片輸入內容,從相片中擷取顏色
- 生成內容:使用 Gemini 生成與顏色相關的內容,例如說明或故事
- 函式呼叫功能強化:使用多個函式建立更複雜的工具整合
- 安全設定:瞭解不同安全設定及其對回覆的影響
將這些模式套用至其他網域
- 文件分析:建立可解讀及分析文件的應用程式
- 創意寫作輔助:建構寫作工具,提供 LLM 輔助建議
- 工作自動化:設計可將自然語言轉換為自動化工作的應用程式
- 知識型應用程式:在特定領域建立專家系統
資源
歡迎參考下列實用資源,繼續學習:
官方文件
提示撰寫課程和指南
社群
Observable Flutter Agentic 系列
在第 59 集,Craig Labenz 和 Andrew Brogden 探索了這個程式碼研究室,並重點介紹應用程式建構的有趣部分。
在第 60 集中,再次與 Craig 和 Andrew 一起為程式碼研究室應用程式擴充新功能,並努力讓 LLM 聽從指令。
在第 61 集,Craig 邀請 Chris Sells 一同分析新聞標題,並生成相應的圖片。
意見回饋
歡迎分享您對這個程式碼研究室的體驗!歡迎透過下列方式提供意見回饋:
感謝您完成本程式碼研究室,希望您能繼續探索 Flutter 和 AI 結合的無限可能!