
1. खास जानकारी
Confidential GKE (CGKE) नोड यह पक्का करते हैं कि वर्कलोड में मौजूद डेटा का इस्तेमाल एन्क्रिप्ट (सुरक्षित) किए गए फ़ॉर्मैट में किया जा रहा हो. CGKE वर्कलोड के लिए vTPM डिवाइस को चालू करने से, वर्कलोड को vTPM की सुविधाओं का इस्तेमाल करने की अनुमति मिलती है. इस कोडलैब में, आपको vTPM की दो सुविधाओं के बारे में बताया गया है.
- vTPM रिमोट अटेस्टेशन की मदद से, रिमोट पार्टी यह पुष्टि कर सकती है कि वर्कलोड होस्ट करने वाले CGKE नोड, कॉन्फ़िडेंशियल वीएम (सीवीएम) पर चल रहे हैं.
- vTPM की पुष्टि करना और vTPM सील करना.
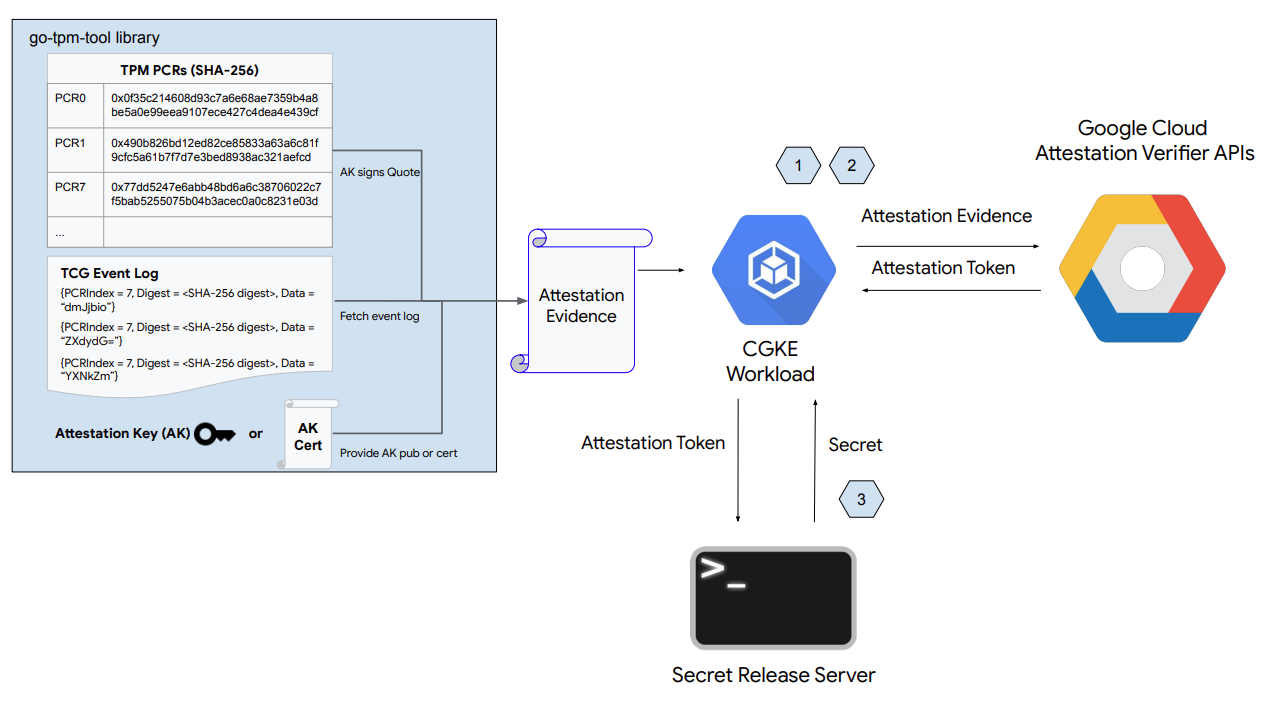
ऊपर दिए गए डायग्राम में दिखाया गया है कि इस कोडलैब के पहले हिस्से में ये चरण शामिल हैं:
- CGKE नोड, चुने गए वर्कलोड के लिए vTPM डिवाइस को सेटअप और चालू करते हैं.
- किसी वर्कलोड को डिप्लॉय करें और उस वर्कलोड को होस्ट करने वाले CGKE नोड की पुष्टि करें.
- सीक्रेट रिलीज़ वेब सर्वर सेटअप.
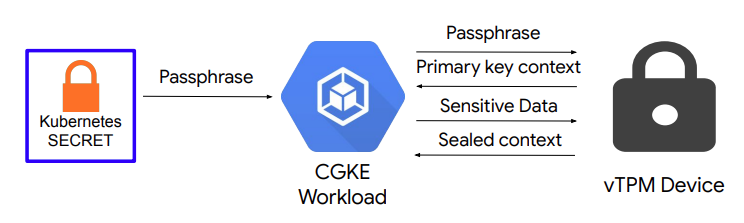
ऊपर दिए गए डायग्राम में दिखाया गया है कि इस कोडलैब के दूसरे हिस्से में ये चीज़ें शामिल हैं:
- सीजीकेई नोड पर वीटीपीएम की अनुमति देने का सेटअप और वीटीपीएम सीलिंग.
आपको क्या सीखने को मिलेगा
- सीजीकेई वर्कलोड के लिए, vTPM डिवाइस को कैसे ऐक्सेस किया जा सकता है.
- सीजीकेई वर्कलोड पर, Confidential Computing API (Attestation Verifier सेवा) के ज़रिए रिमोट अटेस्टेशन कैसे किया जाता है.
- वीटीपीएम ऑथराइज़ेशन सेट अप करने और वीटीपीएम सीलिंग करने का तरीका.
आपको इन चीज़ों की ज़रूरत होगी
- Google Cloud Platform प्रोजेक्ट
- Chrome या Firefox जैसे ब्राउज़र
- Google Compute Engine ( codelab), Confidential VM, Confidential GKE nodes, और Artifact Registry के बारे में बुनियादी जानकारी
2. सेटअप और ज़रूरी शर्तें:
ज़रूरी एपीआई चालू करने के लिए, क्लाउड कंसोल या अपने लोकल डेवलपमेंट एनवायरमेंट में यह कमांड चलाएं:
gcloud auth login

gcloud services enable \
    cloudapis.googleapis.com \
    cloudshell.googleapis.com \
    container.googleapis.com \
    containerregistry.googleapis.com \
    confidentialcomputing.googleapis.com \
    iamcredentials.googleapis.com \
    compute.googleapis.com
3. CGKE नोड सेट अप करना और चुने गए वर्कलोड के लिए vTPM डिवाइस को ऐक्सेस करने की अनुमति देना
इस चरण से, इस कोडलैब का पहला हिस्सा शुरू होता है. इस चरण में, CGKE क्लस्टर शुरू किया जाता है. साथ ही, CVM vTPM डिवाइस को वर्कलोड के लिए उपलब्ध कराने के लिए, डिवाइस प्लगिन लागू किया जाता है. कमांड चलाने के लिए, क्लाउड कंसोल या अपने लोकल डेवलपमेंट एनवायरमेंट पर जाएं.
1). CGKE क्लस्टर बनाएं. साथ ही, CGKE वर्कलोड को GCP कॉन्फ़िडेंशियल कंप्यूटिंग एपीआई का इस्तेमाल करने की अनुमति देने के लिए, Workload Identity Pool का इस्तेमाल करें. Workload Identity Pool ज़रूरी है, क्योंकि CGKE वर्कलोड को GCP संसाधनों को ऐक्सेस करना होता है. साथ ही, GCP संसाधनों को ऐक्सेस करने के लिए, CGKE वर्कलोड की पहचान होना ज़रूरी है.
gcloud container clusters create cgke-attestation-codelab \
    --machine-type=n2d-standard-2        \
    --enable-confidential-nodes \
--zone us-central1-c \
--workload-pool=${PROJECT_ID}.svc.id.goog \
--workload-metadata=GKE_METADATA
इनकी जगह ये डालें:
project-idप्रोजेक्ट का यूनीक आइडेंटिफ़ायर है.
2). डिवाइस प्लगिन शुरू करें, ताकि CGKE क्लस्टर, वर्कलोड के लिए vTPM डिवाइस को ऐक्सेस करने की अनुमति दे सके. हम नया संसाधन google.com/cc बनाने के लिए, Kubernetes डिवाइस प्लगिन का इस्तेमाल करते हैं. नई संसाधन से जुड़ा कोई भी वर्कलोड, वर्कर नोड पर vTPM डिवाइस को देख पाएगा.
gcloud container clusters get-credentials cgke-attestation-codelab --zone us-central1-c --project ${PROJECT_ID}

kubectl create -f https://raw.githubusercontent.com/google/cc-device-plugin/main/manifests/cc-device-plugin.yaml
इनकी जगह ये डालें:
project-idप्रोजेक्ट का यूनीक आइडेंटिफ़ायर है.
नीचे दिए गए निर्देश से, डिप्लॉय किए गए cc-device-plugin को देखा जा सकता है.
kubectl get pods -A | grep "cc-device-plugin"
ध्यान दें: अगर GKE क्लस्टर में गोपनीय और गैर-गोपनीय, दोनों तरह के GKE वर्कर नोड हैं, तो हमारा सुझाव है कि ऑपरेटर, cc-device-plugin को सिर्फ़ गोपनीय GKE वर्कर नोड पर डिप्लॉय करे.
(ज़रूरी नहीं). CGKE पॉड के लिए, Prometheus मॉनिटरिंग लागू करें. निगरानी की सुविधा चालू करने पर, आपको डिवाइस प्लगिन के स्टेटस के बारे में जानकारी मिलती है.
kubectl apply -f https://raw.githubusercontent.com/google/cc-device-plugin/main/manifests/cc-device-plugin-pod-monitoring.yaml
https://console.cloud.google.com/monitoring/metrics-explorer पर जाएं और cc-device-plugin मेट्रिक ढूंढें या PROMQL का इस्तेमाल करें. उदाहरण के लिए, यहां दी गई PROMQL कमांड से, cc-device-plugin की हर प्रोसेस के लिए सीपीयू सेकंड का पता चलता है.
rate(process_cpu_seconds_total[${__interval}])
4. वर्कलोड को डिप्लॉय करना और वर्कलोड पर रिमोट अटेस्टेशन करना
इस चरण में, पिछले चरण में बनाए गए CGKE क्लस्टर पर एक वर्कलोड बनाया और डिप्लॉय किया जाता है. साथ ही, वर्कर नोड पर पुष्टि करने वाला टोकन (OIDC टोकन) पाने के लिए, vTPM की रिमोट पुष्टि की जाती है.
1). ऐप्लिकेशन कंटेनर इमेज बनाएं और उसे Artifact Registry में पुश करें. ऐप्लिकेशन कंटेनर इमेज में go-tpm टूल होता है. यह पुष्टि करने के सबूत इकट्ठा कर सकता है और इसे Attestation Verifier सेवा को भेज सकता है. इससे Attestation Token (एक OIDC टोकन) मिलता है.
- ऐप्लिकेशन कंटेनर इमेज के लिए Dockerfile बनाएं.
Dockerfile
FROM golang:1.21.0 as builder
WORKDIR /
RUN git clone https://github.com/google/go-tpm-tools.git
WORKDIR /go-tpm-tools/cmd/gotpm
RUN CGO_ENABLED=0 GOOS=linux go build -o /gotpm

FROM debian:trixie
WORKDIR /
RUN apt-get update -y
RUN DEBIAN_FRONTEND=noninteractive apt-get install -y ca-certificates
RUN rm -rf /etc/apt/sources.list.d
COPY --from=builder /gotpm /gotpm
CMD ["tail", "-f", "/dev/null"]
- Artifact Registry बनाएं.
gcloud artifacts repositories create codelab-repo \
    --repository-format=docker \
    --location=us
- ऐप्लिकेशन कंटेनर इमेज को Artifact Registry में पुश करें.
docker build -t us-docker.pkg.dev/${PROJECT_ID}/codelab-repo/go-tpm:latest .
docker push us-docker.pkg.dev/${PROJECT_ID}/codelab-repo/go-tpm:latest
2). Kubernetes सेवा खाता सेट अप करें, ताकि वह GCP संसाधनों पर GCP सेवा खाते की अनुमतियां पा सके.
- Kubernetes सेवा खाता बनाएं
codelab-ksa.
kubectl create serviceaccount codelab-ksa \
    --namespace default
Confidential_Computing_Workload_Userभूमिका बनाता है और भूमिका को कॉन्फ़िडेंशियल कंप्यूटिंग एपीआई ऐक्सेस करने की अनुमतियां देता है.
gcloud iam roles create Confidential_Computing_Workload_User --project=<project-id> \
    --title="CGKE Workload User" --description="Grants the ability to generate an attestation token in a GKE workload." \
 --permissions="confidentialcomputing.challenges.create,confidentialcomputing.challenges.verify,confidentialcomputing.locations.get,confidentialcomputing.locations.list" --stage=GA
इनकी जगह ये डालें:
project-idप्रोजेक्ट का यूनीक आइडेंटिफ़ायर है.
- GCP सेवा खाता
codelab-csaबनाएं और उसे उस भूमिका से जोड़ेंConfidential_Computing_Workload_User. So that codelab-csaजिसके पास कॉन्फ़िडेंशियल कंप्यूटिंग एपीआई को ऐक्सेस करने की अनुमतियां हैं.
gcloud iam service-accounts create codelab-csa \
    --project=<project-id>

gcloud projects add-iam-policy-binding <project-id> \
    --member "serviceAccount:codelab-csa@<project-id>.iam.gserviceaccount.com" \
    --role "projects/<project-id>/roles/Confidential_Computing_Workload_User"

gcloud iam service-accounts add-iam-policy-binding codelab-csa@<project-id>.iam.gserviceaccount.com \
    --role roles/iam.workloadIdentityUser \
    --member "serviceAccount:<project-id>.svc.id.goog[default/codelab-ksa]"
इनकी जगह ये डालें:
project-idप्रोजेक्ट का यूनीक आइडेंटिफ़ायर है.
- Kubernetes सेवा खाते
codelab-ksaको GCP सेवा खातेcodelab-csaसे बाइंड करें. इससेcodelab-ksaको कॉन्फ़िडेंशियल कंप्यूटिंग एपीआई ऐक्सेस करने की अनुमतियां मिल जाएंगी.
kubectl annotate serviceaccount codelab-ksa \
    --namespace default \
    iam.gke.io/gcp-service-account=codelab-csa@<project-id>.iam.gserviceaccount.com
इनकी जगह ये डालें:
project-idप्रोजेक्ट का यूनीक आइडेंटिफ़ायर है.
3). डेमो ऐप्लिकेशन के लिए, ऐप्लिकेशन डिप्लॉयमेंट का YAML बनाएं. चुने गए वर्कलोड को Kubernetes सेवा खाता codelab-ksa असाइन करें.
deploy.yaml
apiVersion: v1
kind: Pod
metadata:
  name: go-tpm-demo
  labels:
    app.kubernetes.io/name: go-tpm-demo
spec:
  serviceAccountName: codelab-ksa
  nodeSelector:
    iam.gke.io/gke-metadata-server-enabled: "true"
  containers:
  - name: go-tpm
    image: us-docker.pkg.dev/<project-id>/codelab-repo/go-tpm:latest
    resources:
      limits:
        google.com/cc: 1
इनकी जगह ये डालें:
project-idप्रोजेक्ट का यूनीक आइडेंटिफ़ायर है.
4). CGKE क्लस्टर पर डिप्लॉयमेंट लागू करें.
kubectl create -f deploy.yaml
5). वर्कलोड से कनेक्ट करें और रिमोट अटेंशन लॉन्च करें, ताकि अटेंशन टोकन (ओआईडीसी टोकन) फ़ेच किया जा सके
kubectl exec -it go-tpm-demo -- /bin/bash
./gotpm token --event-log=/run/cc-device-plugin/binary_bios_measurements > attestation_token
दावे देखने के लिए, पुष्टि करने वाले टोकन को jwt.io में डिकोड करें!
5. सीक्रेट रिलीज़ वेब सर्वर सेट अप करना
इस चरण में, पिछले SSH सेशन से बाहर निकलें और दूसरी वर्चुअल मशीन सेट अप करें. इस वीएम पर, आपको सीक्रेट रिलीज़ वेब सर्वर सेट अप करना होगा. वेब सर्वर, मिले हुए Attestation Token और उसके दावों की पुष्टि करता है. अगर पुष्टि हो जाती है, तो यह अनुरोध करने वाले व्यक्ति को सीक्रेट पास कर देता है.
1). Cloud Console या अपने लोकल डेवलपमेंट एनवायरमेंट पर जाएं. वर्चुअल मशीन बनाएं.
gcloud config set project <project-id>

gcloud compute instances create cgke-attestation-codelab-web-server \
    --machine-type=n2d-standard-2 \
    --zone=us-central1-c \
    --image=ubuntu-2204-jammy-v20240228 \
    --image-project=ubuntu-os-cloud
इनकी जगह ये डालें:
project-idप्रोजेक्ट का यूनीक आइडेंटिफ़ायर है.
2). अपने नए वीएम से एसएसएच करें.
gcloud compute ssh --zone us-central1-c cgke-attestation-codelab-web-server
3). Go एनवायरमेंट सेट अप करें.
wget https://go.dev/dl/go1.22.0.linux-amd64.tar.gz
sudo tar -C /usr/local -xzf go1.22.0.linux-amd64.tar.gz
export PATH=$PATH:/usr/local/go/bin
4). नीचे दी गई दो फ़ाइलें बनाएं. इनमें सीक्रेट रिलीज़ वेब सर्वर का सोर्स कोड सेव करें (nano की मदद से कॉपी करके चिपकाएं).
main.go
package main

import (
        "fmt"
        "net/http"
        "strings"
        "time"
        "log"

        "github.com/golang-jwt/jwt/v4"
)

const (
        theSecret = "This is the super secret information!"
)

func homePage(w http.ResponseWriter, r *http.Request) {
        tokenString := r.Header.Get("Authorization")
        if tokenString != "" {
                tokenString, err := extractToken(tokenString)
                if err != nil {
                        http.Error(w, err.Error(), http.StatusUnauthorized)
                }

                tokenBytes := []byte(tokenString)
                // A method to return a public key from the well-known endpoint
                keyFunc := getRSAPublicKeyFromJWKsFile

                token, err := decodeAndValidateToken(tokenBytes, keyFunc)
                if err != nil {
                        http.Error(w, "Invalid JWT Token", http.StatusUnauthorized)
                }

                if ok, err := isValid(token.Claims.(jwt.MapClaims)); ok {
                        fmt.Fprintln(w, theSecret)
                } else {
                        if err != nil {
                                http.Error(w, "Error validating JWT claims: "+err.Error(), http.StatusUnauthorized)
                        } else {
                                http.Error(w, "Invalid JWT token Claims", http.StatusUnauthorized)
                        }
                }
        } else {
                http.Error(w, "Authorization token required", http.StatusUnauthorized)
        }
}

func extractToken(tokenString string) (string, error) {
        if strings.HasPrefix(tokenString, "Bearer ") {
                return strings.TrimPrefix(tokenString, "Bearer "), nil
        }
        return "", fmt.Errorf("invalid token format")
}

func isValid(claims jwt.MapClaims) (bool, error) {
        // 1. Evaluating Standard Claims:
        subject, ok := claims["sub"].(string)
        if !ok {
                return false, fmt.Errorf("missing or invalid 'sub' claim")
        }
        fmt.Println("Subject:", subject)
        // e.g. "sub":"https://www.googleapis.com/compute/v1/projects/<project_id>/zones/<project_zone>/instances/<instance_name>"

        issuedAt, ok := claims["iat"].(float64)
        if !ok {
                return false, fmt.Errorf("missing or invalid 'iat' claim")
        }
        fmt.Println("Issued At:", time.Unix(int64(issuedAt), 0))

        // 2. Evaluating Remote Attestation Claims:
        hwModel, ok := claims["hwmodel"].(string)
        if !ok || hwModel != "GCP_AMD_SEV" {
                return false, fmt.Errorf("missing or invalid 'hwModel'")
        }
        fmt.Println("hwmodel:", hwModel)

        swName, ok := claims["swname"].(string)
        if !ok || swName != "GCE" {
                return false, fmt.Errorf("missing or invalid 'hwModel'")
        }
        fmt.Println("swname:", swName)

        return true, nil
}

func main() {
        http.HandleFunc("/", homePage)
        fmt.Println("Server listening on :8080")
        err := http.ListenAndServe(":8080", nil)
        if err != nil {
                log.Fatalf("Server failed to start: %v", err)
        }
}
helper.go
package main

import (
        "crypto/rsa"
        "encoding/base64"
        "encoding/json"
        "errors"
        "fmt"
        "io"
        "math/big"
        "net/http"

        "github.com/golang-jwt/jwt/v4"
)

const (
        socketPath     = "/run/container_launcher/teeserver.sock"
        expectedIssuer = "https://confidentialcomputing.googleapis.com"
        wellKnownPath  = "/.well-known/openid-configuration"
)

type jwksFile struct {
        Keys []jwk `json:"keys"`
}

type jwk struct {
        N   string `json:"n"`   // "nMMTBwJ7H6Id8zUCZd-L7uoNyz9b7lvoyse9izD9l2rtOhWLWbiG-7pKeYJyHeEpilHP4KdQMfUo8JCwhd-OMW0be_XtEu3jXEFjuq2YnPSPFk326eTfENtUc6qJohyMnfKkcOcY_kTE11jM81-fsqtBKjO_KiSkcmAO4wJJb8pHOjue3JCP09ZANL1uN4TuxbM2ibcyf25ODt3WQn54SRQTV0wn098Y5VDU-dzyeKYBNfL14iP0LiXBRfHd4YtEaGV9SBUuVhXdhx1eF0efztCNNz0GSLS2AEPLQduVuFoUImP4s51YdO9TPeeQ3hI8aGpOdC0syxmZ7LsL0rHE1Q",
        E   string `json:"e"`   // "AQAB" or 65537 as an int
        Kid string `json:"kid"` // "1f12fa916c3a0ef585894b4b420ad17dc9d6cdf5",

        // Unused fields:
        // Alg string `json:"alg"` // "RS256",
        // Kty string `json:"kty"` // "RSA",
        // Use string `json:"use"` // "sig",
}

type wellKnown struct {
        JwksURI string `json:"jwks_uri"` // "https://www.googleapis.com/service_accounts/v1/metadata/jwk/signer@confidentialspace-sign.iam.gserviceaccount.com"

        // Unused fields:
        // Iss                                   string `json:"issuer"`                                // "https://confidentialcomputing.googleapis.com"
        // Subject_types_supported               string `json:"subject_types_supported"`               // [ "public" ]
        // Response_types_supported              string `json:"response_types_supported"`              // [ "id_token" ]
        // Claims_supported                      string `json:"claims_supported"`                      // [ "sub", "aud", "exp", "iat", "iss", "jti", "nbf", "dbgstat", "eat_nonce", "google_service_accounts", "hwmodel", "oemid", "secboot", "submods", "swname", "swversion" ]
        // Id_token_signing_alg_values_supported string `json:"id_token_signing_alg_values_supported"` // [ "RS256" ]
        // Scopes_supported                      string `json:"scopes_supported"`                      // [ "openid" ]
}

func getWellKnownFile() (wellKnown, error) {
        httpClient := http.Client{}
        resp, err := httpClient.Get(expectedIssuer + wellKnownPath)
        if err != nil {
                return wellKnown{}, fmt.Errorf("failed to get raw .well-known response: %w", err)
        }

        wellKnownJSON, err := io.ReadAll(resp.Body)
        if err != nil {
                return wellKnown{}, fmt.Errorf("failed to read .well-known response: %w", err)
        }

        wk := wellKnown{}
        json.Unmarshal(wellKnownJSON, &wk)
        return wk, nil
}

func getJWKFile() (jwksFile, error) {
        wk, err := getWellKnownFile()
        if err != nil {
                return jwksFile{}, fmt.Errorf("failed to get .well-known json: %w", err)
        }

        // Get JWK URI from .wellknown
        uri := wk.JwksURI
        fmt.Printf("jwks URI: %v\n", uri)

        httpClient := http.Client{}
        resp, err := httpClient.Get(uri)
        if err != nil {
                return jwksFile{}, fmt.Errorf("failed to get raw JWK response: %w", err)
        }

        jwkbytes, err := io.ReadAll(resp.Body)
        if err != nil {
                return jwksFile{}, fmt.Errorf("failed to read JWK body: %w", err)
        }

        file := jwksFile{}
        err = json.Unmarshal(jwkbytes, &file)
        if err != nil {
                return jwksFile{}, fmt.Errorf("failed to unmarshall JWK content: %w", err)
        }

        return file, nil
}

// N and E are 'base64urlUInt' encoded: https://www.rfc-editor.org/rfc/rfc7518#section-6.3
func base64urlUIntDecode(s string) (*big.Int, error) {
        b, err := base64.RawURLEncoding.DecodeString(s)
        if err != nil {
                return nil, err
        }
        z := new(big.Int)
        z.SetBytes(b)
        return z, nil
}

func getRSAPublicKeyFromJWKsFile(t *jwt.Token) (any, error) {
        keysfile, err := getJWKFile()
        if err != nil {
                return nil, fmt.Errorf("failed to fetch the JWK file: %w", err)
        }

        // Multiple keys are present in this endpoint to allow for key rotation.
        // This method finds the key that was used for signing to pass to the validator.
        kid := t.Header["kid"]
        for _, key := range keysfile.Keys {
                if key.Kid != kid {
                        continue // Select the key used for signing
                }

                n, err := base64urlUIntDecode(key.N)
                if err != nil {
                        return nil, fmt.Errorf("failed to decode key.N %w", err)
                }
                e, err := base64urlUIntDecode(key.E)
                if err != nil {
                        return nil, fmt.Errorf("failed to decode key.E %w", err)
                }

                // The parser expects an rsa.PublicKey: https://github.com/golang-jwt/jwt/blob/main/rsa.go#L53
                // or an array of keys. We chose to show passing a single key in this example as its possible
                // not all validators accept multiple keys for validation.
                return &rsa.PublicKey{
                        N: n,
                        E: int(e.Int64()),
                }, nil
        }

        return nil, fmt.Errorf("failed to find key with kid '%v' from well-known endpoint", kid)
}

func decodeAndValidateToken(tokenBytes []byte, keyFunc func(t *jwt.Token) (any, error)) (*jwt.Token, error) {
        var err error
        fmt.Println("Unmarshalling token and checking its validity...")
        token, err := jwt.NewParser().Parse(string(tokenBytes), keyFunc)

        fmt.Printf("Token valid: %v\n", token.Valid)
        if token.Valid {
                return token, nil
        }
        if ve, ok := err.(*jwt.ValidationError); ok {
                if ve.Errors&jwt.ValidationErrorMalformed != 0 {
                        return nil, fmt.Errorf("token format invalid. Please contact the Confidential Space team for assistance")
                }
                if ve.Errors&(jwt.ValidationErrorNotValidYet) != 0 {
                        // If device time is not synchronized with the Attestation Service you may need to account for that here.
                        return nil, errors.New("token is not active yet")
                }
                if ve.Errors&(jwt.ValidationErrorExpired) != 0 {
                        return nil, fmt.Errorf("token is expired")
                }
                return nil, fmt.Errorf("unknown validation error: %v", err)
        }

        return nil, fmt.Errorf("couldn't handle this token or couldn't read a validation error: %v", err)
}
5). वेब सर्वर बनाने और उसे चलाने के लिए, यहां दिए गए कमांड चलाएं. इससे :8080 पोर्ट पर सीक्रेट रिलीज़ वेबसर्वर शुरू होता है.
go mod init google.com/codelab
go mod tidy
go get github.com/golang-jwt/jwt/v4
go build
./codelab
समस्या हल करना: आपको यह चेतावनी दिख सकती है. go mod tidy: चलाने पर इसे अनदेखा किया जा सकता है
go: finding module for package github.com/golang-jwt/jwt/v4
go: downloading github.com/golang-jwt/jwt v3.2.2+incompatible
go: downloading github.com/golang-jwt/jwt/v4 v4.5.0
go: found github.com/golang-jwt/jwt/v4 in github.com/golang-jwt/jwt/v4 v4.5.0
go: google.com/codelab/go/pkg/mod/github.com/golang-jwt/jwt@v3.2.2+incompatible: import path "google.com/codelab/go/pkg/mod/github.com/golang-jwt/jwt@v3.2.2+incompatible" should not have @version
go: google.com/codelab/go/pkg/mod/github.com/golang-jwt/jwt@v3.2.2+incompatible/cmd/jwt: import path "google.com/codelab/go/pkg/mod/github.com/golang-jwt/jwt@v3.2.2+incompatible/cmd/jwt" should not have @version
go: google.com/codelab/go/pkg/mod/github.com/golang-jwt/jwt@v3.2.2+incompatible/request: import path "google.com/codelab/go/pkg/mod/github.com/golang-jwt/jwt@v3.2.2+incompatible/request" should not have @version
go: google.com/codelab/go/pkg/mod/github.com/golang-jwt/jwt@v3.2.2+incompatible/test: import path "google.com/codelab/go/pkg/mod/github.com/golang-jwt/jwt@v3.2.2+incompatible/test" should not have @version
6). Cloud Console का कोई दूसरा टैब या लोकल डेवलपमेंट एनवायरमेंट सेशन शुरू करें. इसके बाद, यहां दिया गया निर्देश चलाएं. इससे आपको cgke-attestation-codelab-web-server-internal-ip मिल जाएगा.
gcloud compute instances describe cgke-attestation-codelab-web-server --format='get(networkInterfaces[0].networkIP)' --zone=us-central1-c
7). अपने CGKE वर्कलोड से कनेक्ट करें और रिमोट अटेंशन लॉन्च करें, ताकि अटेंशन टोकन (एक OIDC टोकन) फ़ेच किया जा सके. इसके बाद, attestation-token और cgke-attestation-codelab-web-server-internal-ip के कॉन्टेंट को यहां दिए गए निर्देश में एम्बेड करें. इससे आपको सीक्रेट रिलीज़ वेब सर्वर का सीक्रेट मिल जाएगा!
kubectl exec -it go-tpm-demo -- /bin/bash
./gotpm token --event-log=/run/cc-device-plugin/binary_bios_measurements > attestation_token
curl http://<cgke-attestation-codelab-web-server-internal-ip>:8080 -H "Authorization: Bearer $(cat ./attestation_token)"
इनकी जगह ये डालें:
cgke-attestation-codelab-web-server-internal-ip,cgke-attestation-codelab-web-serverवीएम इंस्टेंस का इंटरनल आईपी है.
6. CGKE नोड पर vTPM सीलिंग
इस चरण से, इस कोडलैब का दूसरा हिस्सा शुरू होता है. इस चरण में, CGKE नोड पर vTPM के मालिक की पुष्टि करने की सुविधा सेट अप की जाती है. साथ ही, vTPM के मालिक के पासफ़्रेज़ का इस्तेमाल करके वर्कलोड डिप्लॉय किया जाता है. इसके बाद, vTPM की सीलिंग की सुविधा का इस्तेमाल करके, वर्कलोड में डेटा को सील और अनसील करने के लिए, vTPM प्राइमरी कुंजी बनाई जाती है.
1). CGKE नोड पर, vTPM के मालिक की पुष्टि करने की सुविधा सेट अप करें.
- एक बार के काम के लिए कंटेनर इमेज बनाएं. एक बार की जाने वाली यह प्रोसेस, सभी vTPM के लिए मालिक का पासवर्ड सेट करती है. कंटेनर इमेज बनाने के लिए, यहां dockerfile दिया गया है.
Dockerfile
FROM debian:latest

RUN echo 'debconf debconf/frontend select Noninteractive' | debconf-set-selections
RUN apt-get update

RUN apt -y install \
  autoconf-archive \
  libcmocka0 \
  libcmocka-dev \
  net-tools \
  build-essential \
  git \
  pkg-config \
  gcc \
  g++ \
  m4 \
  libtool \
  automake \
  libgcrypt20-dev \
  libssl-dev \
  uthash-dev \
  autoconf \
  uuid-dev \
  libcurl4-openssl-dev \
  libjson-c-dev

RUN mkdir /src

WORKDIR /src
RUN git clone https://github.com/tpm2-software/tpm2-tss
WORKDIR /src/tpm2-tss
RUN ./bootstrap
RUN ./configure --prefix=/usr/local
RUN make all install

WORKDIR /src
RUN git clone https://github.com/tpm2-software/tpm2-tools
WORKDIR /src/tpm2-tools
RUN apt-get -y install libcurl4 libcurl4-openssl-dev pandoc man-db
RUN ./bootstrap
RUN ./configure --prefix=/usr/local
RUN make all install

RUN apt-get -y install vim

ENTRYPOINT ["/bin/bash"]
- एक बार के काम के लिए कंटेनर इमेज बनाएं और उसे आर्टफ़ैक्ट रजिस्ट्री में पुश करें.
docker build -t us-docker.pkg.dev/<project-id>/codelab-repo/tpm-tools:latest .
docker push us-docker.pkg.dev/<project-id>/codelab-repo/tpm-tools:latest
इनकी जगह ये डालें:
project-idप्रोजेक्ट का यूनीक आइडेंटिफ़ायर है.
- Kubernetes जॉब के ज़रिए, एक बार होने वाली जॉब को पूरा करें. (चेतावनी: यह जॉब, हर CVM पर vTPM को मिटा देती है. अगर आपका CVM, डिस्क को एन्क्रिप्ट (सुरक्षित) करने के लिए vTPM का इस्तेमाल करता है, तो रीबूट करने के बाद यह जॉब आपके CVM को इस्तेमाल करने लायक नहीं छोड़ेगी. यह देखा जा सकता है कि आपकी डिस्क में FSTYPE
crypto_LUKSहै या नहीं (lsblk -fकमांड का इस्तेमाल करके)
tpm-tools-task.yaml
apiVersion: batch/v1
kind: Job
metadata:
  name: tpm-tools-task
spec:
  template:
    spec:
      containers:
      - name: tpm-tools
        image: us-docker.pkg.dev/<project-id>/codelab-repo/tpm-tools:latest
        command: ["/bin/sh", "-c"]
        args: ["tpm2_clear; tpm2_changeauth -c owner this_is_passphrase"]
        resources:
          limits:
            google.com/cc: 1
      restartPolicy: Never
इनकी जगह ये डालें:
project-idप्रोजेक्ट का यूनीक आइडेंटिफ़ायर है.
- एक बार चलने वाले जॉब को लॉन्च करें. यह जॉब, सभी वर्कर नोड पर vTPM के मालिक का पासफ़्रेज़ सेट करती है.
kubectl create -f tpm-tools-task.yaml
2). vTPM के मालिक का लंबा पासवर्ड सेव करने के लिए, Kubernetes सीक्रेट बनाएं.
kubectl create secret generic tpm-secret --from-literal=passphrase='this_is_passphrase'
3). एक डेमो ऐप्लिकेशन कंटेनर बनाएं और उसमें लंबा पासवर्ड डालें. डेमो ऐप्लिकेशन कंटेनर में, vTPM के साथ इंटरैक्ट करने के लिए tpm2 टूल शामिल होते हैं.
- डेमो ऐप्लिकेशन कंटेनर के लिए, डिप्लॉयमेंट की YAML फ़ाइल बनाएं.
deploy_demo.yaml
apiVersion: v1
kind: Pod
metadata:
  name: tpm-tools-demo
  labels:
    app.kubernetes.io/name: tpm-tools-demo
spec:
  containers:
  - name: tpm-tools
    image: us-docker.pkg.dev/<project-id>/codelab-repo/tpm-tools:latest
    command: ["tail", "-f", "/dev/null"]
    resources:
      limits:
        google.com/cc: 1
    volumeMounts:
      - name: secret-volume
        mountPath: "/etc/tpmsecret"
        readOnly: true
  volumes:
    - name: secret-volume
      secret:
        secretName: tpm-secret
इनकी जगह ये डालें:
project-idप्रोजेक्ट का यूनीक आइडेंटिफ़ायर है.
- डेमो ऐप्लिकेशन को डिप्लॉय करें.
kubectl create -f deploy_demo.yaml
4). डेमो ऐप्लिकेशन कंटेनर में vTPM सीलिंग की सुविधा का इस्तेमाल करें.
- डेमो ऐप्लिकेशन कंटेनर से कनेक्ट करें और पासफ़्रेज़ के साथ प्राइमरी कुंजी सेट करें.
kubectl exec -it tpm-tools-demo -- /bin/bash
tpm2_createprimary -C o -c primary.ctx -P $(cat /etc/tpmsecret/passphrase)
tpm2_createprimary, vTPM के साथ इंटरैक्ट करके, तय की गई हैरारकी और टेंप्लेट के आधार पर प्राइमरी ऑब्जेक्ट जनरेट करता है.
- -C o: इससे पता चलता है कि प्राइमरी कुंजी, टीपीएम के मालिक के पदानुक्रम में बनाई जाएगी.
- -c primary.ctx: इससे बनाए गए प्राइमरी ऑब्जेक्ट का कॉन्टेक्स्ट (हैंडल और उससे जुड़ा डेटा) primary.ctx फ़ाइल में सेव हो जाता है. बाद की कार्रवाइयों के लिए, यह कॉन्टेक्स्ट ज़रूरी है.
वर्कलोड, प्राइमरी कुंजी बनाने के लिए मालिक के गलत पासफ़्रेज़ का इस्तेमाल नहीं कर सकता.
tpm2_createprimary -C o -P wrong_passphrase
इस कमांड से ये गड़बड़ियां दिखती हैं:
WARNING:esys:src/tss2-esys/api/Esys_CreatePrimary.c:401:Esys_CreatePrimary_Finish() Received TPM Error
ERROR:esys:src/tss2-esys/api/Esys_CreatePrimary.c:135:Esys_CreatePrimary() Esys Finish ErrorCode (0x000009a2)
ERROR: Esys_CreatePrimary(0x9A2) - tpm:session(1):authorization failure without DA implications
ERROR: Unable to run tpm2_createprimary
- इसके बाद, बनाई गई प्राइमरी कुंजी का इस्तेमाल डेटा को सील और अनसील करने के लिए किया जा सकता है.
echo "This is my secret message" > secret.txt
tpm2_create -C primary.ctx -u sealed.pub -r sealed.priv -i secret.txt
tpm2_load -C primary.ctx -u sealed.pub -r sealed.priv -c sealed.ctx
tpm2_unseal -c sealed.ctx -o unsealed.txt
tpm2_create, क्रिप्टोग्राफ़िक ऑब्जेक्ट जनरेट करने के लिए vTPM के साथ इंटरैक्ट करता है.
- -C primary.ctx: यह उस प्राइमरी कुंजी के कॉन्टेक्स्ट का इस्तेमाल करता है जिसे हमने पहले बनाया था.
- -u sealed.pub: सीलिंग की के सार्वजनिक हिस्से को sealed.pub में सेव करता है. इसकी ज़रूरत अनसीलिंग के लिए होती है.
- -r sealed.priv: सीलिंग की के निजी हिस्से को sealed.priv में सेव करता है.
- -i secret.txt: यह सील की जाने वाली फ़ाइल है.
tpm2_load: यह सीलिंग की को टीपीएम में लोड करता है. इसके लिए, सार्वजनिक और निजी हिस्से (sealed.pub, sealed.priv) का इस्तेमाल करता है. साथ ही, इसके कॉन्टेक्स्ट को sealed.ctx में सेव करता है.
tpm2_unseal: इस फ़ंक्शन का इस्तेमाल करके, उस डेटा को डिक्रिप्ट (अनसील) किया जाता है जिसे पहले vTPM सीलिंग ऑब्जेक्ट का इस्तेमाल करके एन्क्रिप्ट (सील) किया गया था.
ध्यान दें कि: primary.ctx और sealed.priv फ़ाइलों का इस्तेमाल सिर्फ़ एक vTPM डिवाइस पर किया जा सकता है. साथ ही, जिस व्यक्ति के पास vTPM डिवाइस और इन फ़ाइलों का ऐक्सेस है वह सील किए गए डेटा को ऐक्सेस कर सकता है. डेटा को सील करने के लिए, पीसीआर वैल्यू पर नीति का इस्तेमाल किया जा सकता है. हालांकि, यह इस कोडलैब के दायरे से बाहर है.
7. साफ़-सफ़ाई सेवा
क्लाउड कंसोल या अपने लोकल डेवलपमेंट एनवायरमेंट में, यहां दिए गए निर्देश चलाएं:
gcloud config set project <project-id>

# Delete the CGKE cluster
gcloud container clusters delete cgke-attestation-codelab --zone us-central1-c

# Delete the Artifact Registry
gcloud artifacts repositories delete codelab-repo --location=us

# Delete the web server VM instance
gcloud compute instances delete cgke-attestation-codelab-web-server --zone=us-central1-c

# Delete the GCP service account
gcloud iam service-accounts delete codelab-csa@<project-id>.iam.gserviceaccount.com

# Delete the role
gcloud iam roles delete Confidential_Computing_Workload_User
इनकी जगह ये डालें:
project-idप्रोजेक्ट का यूनीक आइडेंटिफ़ायर है.
8. आगे क्या करना है
Confidential GKE Nodes के बारे में ज़्यादा जानें.