
1. 概要
Confidential GKE(CGKE)ノードは、ワークロード内のデータが使用中に暗号化されることを保証します。vTPM デバイスを CGKE ワークロードに公開すると、ワークロードで vTPM 機能を使用できるようになります。この Codelab では、vTPM の 2 つの機能を紹介します。
- vTPM リモート認証により、リモート当事者は、ワークロードをホストする CGKE ノードが Confidential VMs(CVM)で実行されていることを確認できます。
- vTPM 認証と vTPM シーリング。
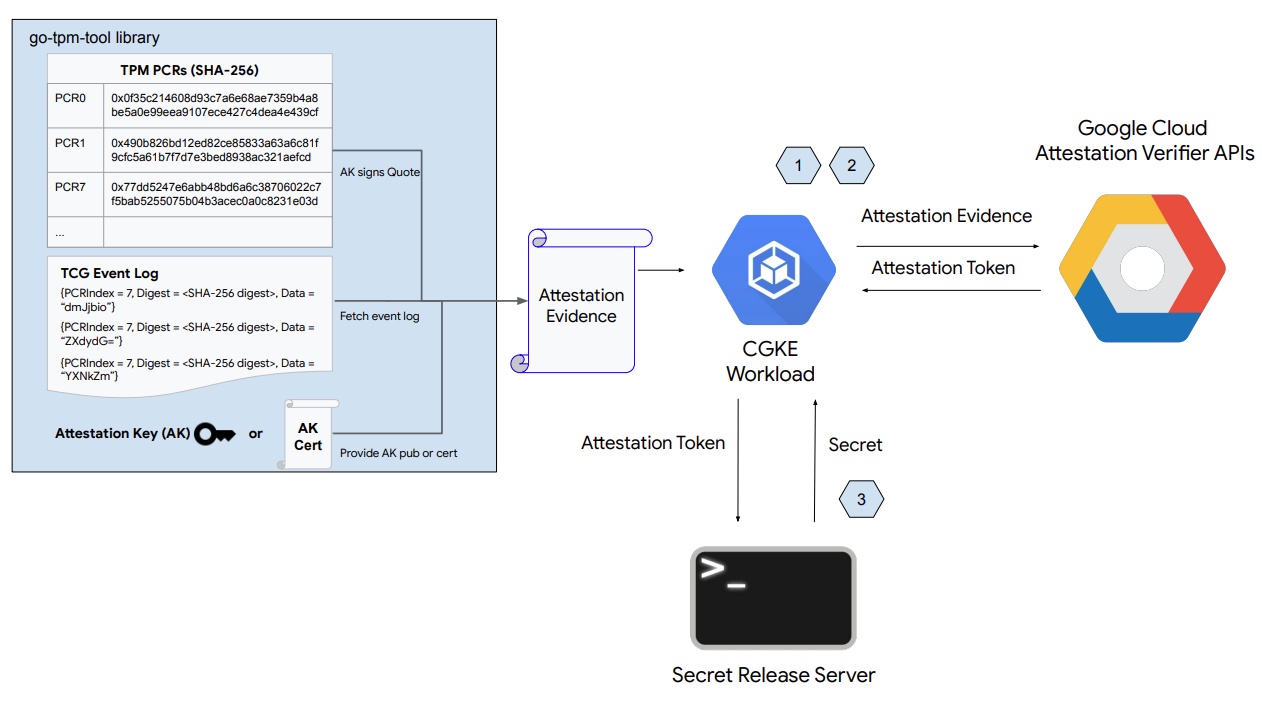
上の図に示すように、この Codelab の最初の部分には次の手順が含まれています。
- CGKE ノードは、vTPM デバイスを設定して、選択したワークロードに公開します。
- ワークロードをデプロイし、ワークロードをホストする CGKE ノードをリモートで構成証明します。
- Secret Release Web Server の設定。
上の図に示すように、この Codelab の第 2 部には次のものが含まれています。
- CGKE ノードでの vTPM 認可設定と vTPM シーリング。
学習内容
- vTPM デバイスを CGKE ワークロードに公開する方法。
- CGKE ワークロードで Confidential Computing API(Attestation Verifier サービス)を使用してリモート認証を行う方法。
- vTPM 認証を設定して vTPM シーリングを実行する方法。
必要なもの
- Google Cloud Platform プロジェクト
- Chrome や Firefox などのブラウザ
- Google Compute Engine(codelab)、Confidential VM、Confidential GKE Node、Artifact Registry に関する基本的な知識
2. 設定と要件:
必要な API を有効にするには、Cloud コンソールまたはローカル開発環境で次のコマンドを実行します。
gcloud auth login

gcloud services enable \
    cloudapis.googleapis.com \
    cloudshell.googleapis.com \
    container.googleapis.com \
    containerregistry.googleapis.com \
    confidentialcomputing.googleapis.com \
    iamcredentials.googleapis.com \
    compute.googleapis.com
3. CGKE ノードを設定し、選択したワークロードに vTPM デバイスを公開する
このステップから、この Codelab の最初の部分が始まります。このステップでは、CGKE クラスタを起動し、デバイス プラグインを適用して、CVM vTPM デバイスをワークロードに公開します。コマンドを実行する Cloud コンソールまたはローカル開発環境に移動します。
1)。CGKE クラスタを作成し、Workload Identity プールを使用して、CGKE ワークロードが GCP Confidential Computing API を使用できるようにします。CGKE ワークロードが GCP リソースにアクセスする必要があるため、Workload Identity プールが必要です。また、GCP リソースにアクセスするには、CGKE ワークロードに ID が必要です。
gcloud container clusters create cgke-attestation-codelab \
    --machine-type=n2d-standard-2        \
    --enable-confidential-nodes \
--zone us-central1-c \
--workload-pool=${PROJECT_ID}.svc.id.goog \
--workload-metadata=GKE_METADATA
次のように置き換えます。
project-idはプロジェクトの一意の識別子です。
2)。デバイス プラグインを起動して、CGKE クラスタが vTPM デバイスをワークロードに公開できるようにします。kubernetes デバイス プラグインを使用して、新しいリソース google.com/cc を作成します。新しいリソースに関連付けられたワークロードは、ワーカーノードで vTPM デバイスを確認できます。
gcloud container clusters get-credentials cgke-attestation-codelab --zone us-central1-c --project ${PROJECT_ID}

kubectl create -f https://raw.githubusercontent.com/google/cc-device-plugin/main/manifests/cc-device-plugin.yaml
次のように置き換えます。
project-idはプロジェクトの一意の識別子です。
次のコマンドを実行すると、デプロイされた cc-device-plugin を確認できます。
kubectl get pods -A | grep "cc-device-plugin"
注: 混合モードの Confidential GKE クラスタ(Confidential GKE ワーカーノードと非 Confidential GKE ワーカーノードの両方を含む)の場合、オペレーターは cc-device-plugin を Confidential GKE ワーカーノードにのみデプロイすることをおすすめします。
(省略可)CGKE Pod の Prometheus モニタリングを適用します。モニタリングをオンにすると、デバイス プラグインのステータスを確認できます。
kubectl apply -f https://raw.githubusercontent.com/google/cc-device-plugin/main/manifests/cc-device-plugin-pod-monitoring.yaml
https://console.cloud.google.com/monitoring/metrics-explorer に移動して、cc-device-plugin 指標を見つけるか、PROMQL を使用します。たとえば、次の PROMQL コマンドは、各 cc-device-plugin プロセスの CPU 秒数を示します。
rate(process_cpu_seconds_total[${__interval}])
4. ワークロードをデプロイし、ワークロードでリモート証明書を取得する
このステップでは、前のステップで作成した CGKE クラスタにワークロードを作成してデプロイし、vTPM リモート証明書を取得して、ワーカーノードで証明書トークン(OIDC トークン)を取得します。
1)。アプリケーション コンテナ イメージを作成して Artifact Registry に push します。アプリケーション コンテナ イメージには、証明書を取得して証明書検証サービスに送信し、証明書トークン(OIDC トークン)を取得できる go-tpm ツールが含まれています。
- アプリケーション コンテナ イメージの Dockerfile を作成します。
Dockerfile
FROM golang:1.21.0 as builder
WORKDIR /
RUN git clone https://github.com/google/go-tpm-tools.git
WORKDIR /go-tpm-tools/cmd/gotpm
RUN CGO_ENABLED=0 GOOS=linux go build -o /gotpm

FROM debian:trixie
WORKDIR /
RUN apt-get update -y
RUN DEBIAN_FRONTEND=noninteractive apt-get install -y ca-certificates
RUN rm -rf /etc/apt/sources.list.d
COPY --from=builder /gotpm /gotpm
CMD ["tail", "-f", "/dev/null"]
- Artifact Registry を作成します。
gcloud artifacts repositories create codelab-repo \
    --repository-format=docker \
    --location=us
- アプリケーション コンテナ イメージを Artifact Registry に push します。
docker build -t us-docker.pkg.dev/${PROJECT_ID}/codelab-repo/go-tpm:latest .
docker push us-docker.pkg.dev/${PROJECT_ID}/codelab-repo/go-tpm:latest
2)。GCP リソースに対する GCP サービス アカウントの権限を継承するように Kubernetes サービス アカウントを設定します。
- Kubernetes サービス アカウント
codelab-ksaを作成します。
kubectl create serviceaccount codelab-ksa \
    --namespace default
- ロール
Confidential_Computing_Workload_Userを作成し、Confidential Computing API にアクセスするロール権限を付与します。
gcloud iam roles create Confidential_Computing_Workload_User --project=<project-id> \
    --title="CGKE Workload User" --description="Grants the ability to generate an attestation token in a GKE workload." \
 --permissions="confidentialcomputing.challenges.create,confidentialcomputing.challenges.verify,confidentialcomputing.locations.get,confidentialcomputing.locations.list" --stage=GA
次のように置き換えます。
project-idはプロジェクトの一意の識別子です。
- GCP サービス アカウント
codelab-csaを作成し、Confidential Computing APIs へのアクセス権限を持つロールConfidential_Computing_Workload_User. So that codelab-csaにバインドします。
gcloud iam service-accounts create codelab-csa \
    --project=<project-id>

gcloud projects add-iam-policy-binding <project-id> \
    --member "serviceAccount:codelab-csa@<project-id>.iam.gserviceaccount.com" \
    --role "projects/<project-id>/roles/Confidential_Computing_Workload_User"

gcloud iam service-accounts add-iam-policy-binding codelab-csa@<project-id>.iam.gserviceaccount.com \
    --role roles/iam.workloadIdentityUser \
    --member "serviceAccount:<project-id>.svc.id.goog[default/codelab-ksa]"
次のように置き換えます。
project-idはプロジェクトの一意の識別子です。
- Kubernetes サービス アカウント
codelab-ksaを GCP サービス アカウントcodelab-csaにバインドします。これにより、codelab-ksaに Confidential Computing API へのアクセス権が付与されます。
kubectl annotate serviceaccount codelab-ksa \
    --namespace default \
    iam.gke.io/gcp-service-account=codelab-csa@<project-id>.iam.gserviceaccount.com
次のように置き換えます。
project-idはプロジェクトの一意の識別子です。
3)。デモ アプリケーションのアプリケーション デプロイ yaml を作成します。選択したワークロードに Kubernetes サービス アカウント codelab-ksa を割り当てます。
deploy.yaml
apiVersion: v1
kind: Pod
metadata:
  name: go-tpm-demo
  labels:
    app.kubernetes.io/name: go-tpm-demo
spec:
  serviceAccountName: codelab-ksa
  nodeSelector:
    iam.gke.io/gke-metadata-server-enabled: "true"
  containers:
  - name: go-tpm
    image: us-docker.pkg.dev/<project-id>/codelab-repo/go-tpm:latest
    resources:
      limits:
        google.com/cc: 1
次のように置き換えます。
project-idはプロジェクトの一意の識別子です。
4)。Deployment を CGKE クラスタに適用します。
kubectl create -f deploy.yaml
5)。ワークロードに接続し、リモート認証を起動して証明書トークン(OIDC トークン)を取得します。
kubectl exec -it go-tpm-demo -- /bin/bash
./gotpm token --event-log=/run/cc-device-plugin/binary_bios_measurements > attestation_token
jwt.io で構成証明トークンをデコードして、クレームを表示できます。
5. シークレット リリース ウェブサーバーの設定
このステップでは、前の SSH セッションを終了し、別の VM を設定します。この VM に、シークレット リリース ウェブサーバーを設定します。ウェブサーバーは、受信した証明書トークンとそのクレームを検証します。検証に成功すると、シークレットがリクエスト元に渡されます。
1)。Cloud コンソールまたはローカル開発環境に移動します。仮想マシンを作成します。
gcloud config set project <project-id>

gcloud compute instances create cgke-attestation-codelab-web-server \
    --machine-type=n2d-standard-2 \
    --zone=us-central1-c \
    --image=ubuntu-2204-jammy-v20240228 \
    --image-project=ubuntu-os-cloud
次のように置き換えます。
project-idはプロジェクトの一意の識別子です。
2)。新しい VM に SSH で接続します。
gcloud compute ssh --zone us-central1-c cgke-attestation-codelab-web-server
3)。Go 環境を設定します。
wget https://go.dev/dl/go1.22.0.linux-amd64.tar.gz
sudo tar -C /usr/local -xzf go1.22.0.linux-amd64.tar.gz
export PATH=$PATH:/usr/local/go/bin
4)。シークレット リリース ウェブサーバーのソースコードを格納する次の 2 つのファイルを作成します(nano でコピーして貼り付けます)。
main.go
package main

import (
        "fmt"
        "net/http"
        "strings"
        "time"
        "log"

        "github.com/golang-jwt/jwt/v4"
)

const (
        theSecret = "This is the super secret information!"
)

func homePage(w http.ResponseWriter, r *http.Request) {
        tokenString := r.Header.Get("Authorization")
        if tokenString != "" {
                tokenString, err := extractToken(tokenString)
                if err != nil {
                        http.Error(w, err.Error(), http.StatusUnauthorized)
                }

                tokenBytes := []byte(tokenString)
                // A method to return a public key from the well-known endpoint
                keyFunc := getRSAPublicKeyFromJWKsFile

                token, err := decodeAndValidateToken(tokenBytes, keyFunc)
                if err != nil {
                        http.Error(w, "Invalid JWT Token", http.StatusUnauthorized)
                }

                if ok, err := isValid(token.Claims.(jwt.MapClaims)); ok {
                        fmt.Fprintln(w, theSecret)
                } else {
                        if err != nil {
                                http.Error(w, "Error validating JWT claims: "+err.Error(), http.StatusUnauthorized)
                        } else {
                                http.Error(w, "Invalid JWT token Claims", http.StatusUnauthorized)
                        }
                }
        } else {
                http.Error(w, "Authorization token required", http.StatusUnauthorized)
        }
}

func extractToken(tokenString string) (string, error) {
        if strings.HasPrefix(tokenString, "Bearer ") {
                return strings.TrimPrefix(tokenString, "Bearer "), nil
        }
        return "", fmt.Errorf("invalid token format")
}

func isValid(claims jwt.MapClaims) (bool, error) {
        // 1. Evaluating Standard Claims:
        subject, ok := claims["sub"].(string)
        if !ok {
                return false, fmt.Errorf("missing or invalid 'sub' claim")
        }
        fmt.Println("Subject:", subject)
        // e.g. "sub":"https://www.googleapis.com/compute/v1/projects/<project_id>/zones/<project_zone>/instances/<instance_name>"

        issuedAt, ok := claims["iat"].(float64)
        if !ok {
                return false, fmt.Errorf("missing or invalid 'iat' claim")
        }
        fmt.Println("Issued At:", time.Unix(int64(issuedAt), 0))

        // 2. Evaluating Remote Attestation Claims:
        hwModel, ok := claims["hwmodel"].(string)
        if !ok || hwModel != "GCP_AMD_SEV" {
                return false, fmt.Errorf("missing or invalid 'hwModel'")
        }
        fmt.Println("hwmodel:", hwModel)

        swName, ok := claims["swname"].(string)
        if !ok || swName != "GCE" {
                return false, fmt.Errorf("missing or invalid 'hwModel'")
        }
        fmt.Println("swname:", swName)

        return true, nil
}

func main() {
        http.HandleFunc("/", homePage)
        fmt.Println("Server listening on :8080")
        err := http.ListenAndServe(":8080", nil)
        if err != nil {
                log.Fatalf("Server failed to start: %v", err)
        }
}
helper.go
package main

import (
        "crypto/rsa"
        "encoding/base64"
        "encoding/json"
        "errors"
        "fmt"
        "io"
        "math/big"
        "net/http"

        "github.com/golang-jwt/jwt/v4"
)

const (
        socketPath     = "/run/container_launcher/teeserver.sock"
        expectedIssuer = "https://confidentialcomputing.googleapis.com"
        wellKnownPath  = "/.well-known/openid-configuration"
)

type jwksFile struct {
        Keys []jwk `json:"keys"`
}

type jwk struct {
        N   string `json:"n"`   // "nMMTBwJ7H6Id8zUCZd-L7uoNyz9b7lvoyse9izD9l2rtOhWLWbiG-7pKeYJyHeEpilHP4KdQMfUo8JCwhd-OMW0be_XtEu3jXEFjuq2YnPSPFk326eTfENtUc6qJohyMnfKkcOcY_kTE11jM81-fsqtBKjO_KiSkcmAO4wJJb8pHOjue3JCP09ZANL1uN4TuxbM2ibcyf25ODt3WQn54SRQTV0wn098Y5VDU-dzyeKYBNfL14iP0LiXBRfHd4YtEaGV9SBUuVhXdhx1eF0efztCNNz0GSLS2AEPLQduVuFoUImP4s51YdO9TPeeQ3hI8aGpOdC0syxmZ7LsL0rHE1Q",
        E   string `json:"e"`   // "AQAB" or 65537 as an int
        Kid string `json:"kid"` // "1f12fa916c3a0ef585894b4b420ad17dc9d6cdf5",

        // Unused fields:
        // Alg string `json:"alg"` // "RS256",
        // Kty string `json:"kty"` // "RSA",
        // Use string `json:"use"` // "sig",
}

type wellKnown struct {
        JwksURI string `json:"jwks_uri"` // "https://www.googleapis.com/service_accounts/v1/metadata/jwk/signer@confidentialspace-sign.iam.gserviceaccount.com"

        // Unused fields:
        // Iss                                   string `json:"issuer"`                                // "https://confidentialcomputing.googleapis.com"
        // Subject_types_supported               string `json:"subject_types_supported"`               // [ "public" ]
        // Response_types_supported              string `json:"response_types_supported"`              // [ "id_token" ]
        // Claims_supported                      string `json:"claims_supported"`                      // [ "sub", "aud", "exp", "iat", "iss", "jti", "nbf", "dbgstat", "eat_nonce", "google_service_accounts", "hwmodel", "oemid", "secboot", "submods", "swname", "swversion" ]
        // Id_token_signing_alg_values_supported string `json:"id_token_signing_alg_values_supported"` // [ "RS256" ]
        // Scopes_supported                      string `json:"scopes_supported"`                      // [ "openid" ]
}

func getWellKnownFile() (wellKnown, error) {
        httpClient := http.Client{}
        resp, err := httpClient.Get(expectedIssuer + wellKnownPath)
        if err != nil {
                return wellKnown{}, fmt.Errorf("failed to get raw .well-known response: %w", err)
        }

        wellKnownJSON, err := io.ReadAll(resp.Body)
        if err != nil {
                return wellKnown{}, fmt.Errorf("failed to read .well-known response: %w", err)
        }

        wk := wellKnown{}
        json.Unmarshal(wellKnownJSON, &wk)
        return wk, nil
}

func getJWKFile() (jwksFile, error) {
        wk, err := getWellKnownFile()
        if err != nil {
                return jwksFile{}, fmt.Errorf("failed to get .well-known json: %w", err)
        }

        // Get JWK URI from .wellknown
        uri := wk.JwksURI
        fmt.Printf("jwks URI: %v\n", uri)

        httpClient := http.Client{}
        resp, err := httpClient.Get(uri)
        if err != nil {
                return jwksFile{}, fmt.Errorf("failed to get raw JWK response: %w", err)
        }

        jwkbytes, err := io.ReadAll(resp.Body)
        if err != nil {
                return jwksFile{}, fmt.Errorf("failed to read JWK body: %w", err)
        }

        file := jwksFile{}
        err = json.Unmarshal(jwkbytes, &file)
        if err != nil {
                return jwksFile{}, fmt.Errorf("failed to unmarshall JWK content: %w", err)
        }

        return file, nil
}

// N and E are 'base64urlUInt' encoded: https://www.rfc-editor.org/rfc/rfc7518#section-6.3
func base64urlUIntDecode(s string) (*big.Int, error) {
        b, err := base64.RawURLEncoding.DecodeString(s)
        if err != nil {
                return nil, err
        }
        z := new(big.Int)
        z.SetBytes(b)
        return z, nil
}

func getRSAPublicKeyFromJWKsFile(t *jwt.Token) (any, error) {
        keysfile, err := getJWKFile()
        if err != nil {
                return nil, fmt.Errorf("failed to fetch the JWK file: %w", err)
        }

        // Multiple keys are present in this endpoint to allow for key rotation.
        // This method finds the key that was used for signing to pass to the validator.
        kid := t.Header["kid"]
        for _, key := range keysfile.Keys {
                if key.Kid != kid {
                        continue // Select the key used for signing
                }

                n, err := base64urlUIntDecode(key.N)
                if err != nil {
                        return nil, fmt.Errorf("failed to decode key.N %w", err)
                }
                e, err := base64urlUIntDecode(key.E)
                if err != nil {
                        return nil, fmt.Errorf("failed to decode key.E %w", err)
                }

                // The parser expects an rsa.PublicKey: https://github.com/golang-jwt/jwt/blob/main/rsa.go#L53
                // or an array of keys. We chose to show passing a single key in this example as its possible
                // not all validators accept multiple keys for validation.
                return &rsa.PublicKey{
                        N: n,
                        E: int(e.Int64()),
                }, nil
        }

        return nil, fmt.Errorf("failed to find key with kid '%v' from well-known endpoint", kid)
}

func decodeAndValidateToken(tokenBytes []byte, keyFunc func(t *jwt.Token) (any, error)) (*jwt.Token, error) {
        var err error
        fmt.Println("Unmarshalling token and checking its validity...")
        token, err := jwt.NewParser().Parse(string(tokenBytes), keyFunc)

        fmt.Printf("Token valid: %v\n", token.Valid)
        if token.Valid {
                return token, nil
        }
        if ve, ok := err.(*jwt.ValidationError); ok {
                if ve.Errors&jwt.ValidationErrorMalformed != 0 {
                        return nil, fmt.Errorf("token format invalid. Please contact the Confidential Space team for assistance")
                }
                if ve.Errors&(jwt.ValidationErrorNotValidYet) != 0 {
                        // If device time is not synchronized with the Attestation Service you may need to account for that here.
                        return nil, errors.New("token is not active yet")
                }
                if ve.Errors&(jwt.ValidationErrorExpired) != 0 {
                        return nil, fmt.Errorf("token is expired")
                }
                return nil, fmt.Errorf("unknown validation error: %v", err)
        }

        return nil, fmt.Errorf("couldn't handle this token or couldn't read a validation error: %v", err)
}
5)。次のコマンドを実行して、ウェブサーバーをビルドして実行します。これにより、:8080 ポートでシークレット リリース ウェブサーバーが起動します。
go mod init google.com/codelab
go mod tidy
go get github.com/golang-jwt/jwt/v4
go build
./codelab
トラブルシューティング: go mod tidy: を実行すると、次の警告が表示されることがあります。この警告は無視してかまいません。
go: finding module for package github.com/golang-jwt/jwt/v4
go: downloading github.com/golang-jwt/jwt v3.2.2+incompatible
go: downloading github.com/golang-jwt/jwt/v4 v4.5.0
go: found github.com/golang-jwt/jwt/v4 in github.com/golang-jwt/jwt/v4 v4.5.0
go: google.com/codelab/go/pkg/mod/github.com/golang-jwt/jwt@v3.2.2+incompatible: import path "google.com/codelab/go/pkg/mod/github.com/golang-jwt/jwt@v3.2.2+incompatible" should not have @version
go: google.com/codelab/go/pkg/mod/github.com/golang-jwt/jwt@v3.2.2+incompatible/cmd/jwt: import path "google.com/codelab/go/pkg/mod/github.com/golang-jwt/jwt@v3.2.2+incompatible/cmd/jwt" should not have @version
go: google.com/codelab/go/pkg/mod/github.com/golang-jwt/jwt@v3.2.2+incompatible/request: import path "google.com/codelab/go/pkg/mod/github.com/golang-jwt/jwt@v3.2.2+incompatible/request" should not have @version
go: google.com/codelab/go/pkg/mod/github.com/golang-jwt/jwt@v3.2.2+incompatible/test: import path "google.com/codelab/go/pkg/mod/github.com/golang-jwt/jwt@v3.2.2+incompatible/test" should not have @version
6)。別の Cloud コンソール タブまたはローカル開発環境セッションを開始し、次のコマンドを実行します。これにより、cgke-attestation-codelab-web-server-internal-ip が取得されます。
gcloud compute instances describe cgke-attestation-codelab-web-server --format='get(networkInterfaces[0].networkIP)' --zone=us-central1-c
7)。CGKE ワークロードに接続し、リモート認証を起動して構成証明トークン(OIDC トークン)を取得します。次に、attestation-token と cgke-attestation-codelab-web-server-internal-ip の内容を次のコマンドに埋め込みます。これにより、シークレット リリース ウェブサーバーが保持するシークレットが取得されます。
kubectl exec -it go-tpm-demo -- /bin/bash
./gotpm token --event-log=/run/cc-device-plugin/binary_bios_measurements > attestation_token
curl http://<cgke-attestation-codelab-web-server-internal-ip>:8080 -H "Authorization: Bearer $(cat ./attestation_token)"
次のように置き換えます。
cgke-attestation-codelab-web-server-internal-ipは、cgke-attestation-codelab-web-serverVM インスタンスの内部 IP です。
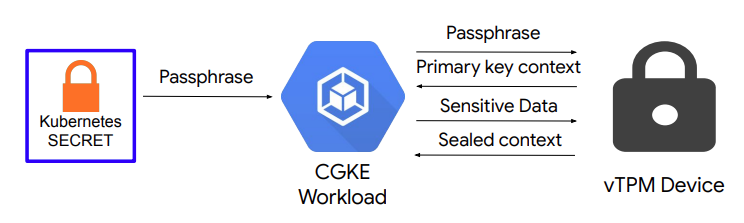
6. CGKE ノードでの vTPM シーリング
このステップから、この Codelab の後半が始まります。このステップでは、CGKE ノードで vTPM オーナー認証を設定し、vTPM オーナー パスフレーズを使用してワークロードをデプロイします。その後、vTPM シーリング機能を使用して、ワークロード内のデータをシールおよびシール解除するための vTPM プライマリ鍵を作成します。
1)。CGKE ノードで vTPM オーナー認証を設定します。
- 1 回限りのジョブ コンテナ イメージを作成します。1 回限りのジョブで、すべての vTPM のオーナー パスワードを設定します。コンテナ イメージを作成する Dockerfile は次のとおりです。
Dockerfile
FROM debian:latest

RUN echo 'debconf debconf/frontend select Noninteractive' | debconf-set-selections
RUN apt-get update

RUN apt -y install \
  autoconf-archive \
  libcmocka0 \
  libcmocka-dev \
  net-tools \
  build-essential \
  git \
  pkg-config \
  gcc \
  g++ \
  m4 \
  libtool \
  automake \
  libgcrypt20-dev \
  libssl-dev \
  uthash-dev \
  autoconf \
  uuid-dev \
  libcurl4-openssl-dev \
  libjson-c-dev

RUN mkdir /src

WORKDIR /src
RUN git clone https://github.com/tpm2-software/tpm2-tss
WORKDIR /src/tpm2-tss
RUN ./bootstrap
RUN ./configure --prefix=/usr/local
RUN make all install

WORKDIR /src
RUN git clone https://github.com/tpm2-software/tpm2-tools
WORKDIR /src/tpm2-tools
RUN apt-get -y install libcurl4 libcurl4-openssl-dev pandoc man-db
RUN ./bootstrap
RUN ./configure --prefix=/usr/local
RUN make all install

RUN apt-get -y install vim

ENTRYPOINT ["/bin/bash"]
- 1 回限りのジョブ コンテナ イメージをビルドして、アーティファクト レジストリに push します。
docker build -t us-docker.pkg.dev/<project-id>/codelab-repo/tpm-tools:latest .
docker push us-docker.pkg.dev/<project-id>/codelab-repo/tpm-tools:latest
次のように置き換えます。
project-idはプロジェクトの一意の識別子です。
- Kubernetes ジョブを使用して 1 回限りのジョブを実行します。(警告: このジョブは各 CVM の vTPM をクリアします。CVM が vTPM を使用してディスクを暗号化している場合、このジョブを実行すると、再起動後に CVM が使用できなくなります。
lsblk -fコマンドを使用して、ディスクの FSTYPE がcrypto_LUKSかどうかを確認できます。
tpm-tools-task.yaml
apiVersion: batch/v1
kind: Job
metadata:
  name: tpm-tools-task
spec:
  template:
    spec:
      containers:
      - name: tpm-tools
        image: us-docker.pkg.dev/<project-id>/codelab-repo/tpm-tools:latest
        command: ["/bin/sh", "-c"]
        args: ["tpm2_clear; tpm2_changeauth -c owner this_is_passphrase"]
        resources:
          limits:
            google.com/cc: 1
      restartPolicy: Never
次のように置き換えます。
project-idはプロジェクトの一意の識別子です。
- 1 回限りのジョブを起動します。このジョブは、すべてのワーカーノードに vTPM 所有者のパスフレーズを設定します。
kubectl create -f tpm-tools-task.yaml
2)。vTPM オーナーのパスフレーズを保持する Kubernetes Secret を作成します。
kubectl create secret generic tpm-secret --from-literal=passphrase='this_is_passphrase'
3)。デモ アプリケーション コンテナを作成し、パスフレーズを渡します。デモ アプリケーション コンテナには、vTPM とやり取りするための tpm2 ツールが含まれています。
- デモ アプリケーション コンテナのデプロイ yaml ファイルを作成します。
deploy_demo.yaml
apiVersion: v1
kind: Pod
metadata:
  name: tpm-tools-demo
  labels:
    app.kubernetes.io/name: tpm-tools-demo
spec:
  containers:
  - name: tpm-tools
    image: us-docker.pkg.dev/<project-id>/codelab-repo/tpm-tools:latest
    command: ["tail", "-f", "/dev/null"]
    resources:
      limits:
        google.com/cc: 1
    volumeMounts:
      - name: secret-volume
        mountPath: "/etc/tpmsecret"
        readOnly: true
  volumes:
    - name: secret-volume
      secret:
        secretName: tpm-secret
次のように置き換えます。
project-idはプロジェクトの一意の識別子です。
- デモ アプリケーションをデプロイします。
kubectl create -f deploy_demo.yaml
4)。デモ アプリケーション コンテナで vTPM シーリングを実行します。
- デモ アプリケーション コンテナに接続し、パスフレーズで主キーを設定します。
kubectl exec -it tpm-tools-demo -- /bin/bash
tpm2_createprimary -C o -c primary.ctx -P $(cat /etc/tpmsecret/passphrase)
tpm2_createprimary は vTPM と連携して、指定された階層とテンプレートに基づいてプライマリ オブジェクトを生成します。
- -C o: プライマリ キーが TPM の所有者階層の下に作成されることを示します。
- -c primary.ctx: 作成されたプライマリ オブジェクトのコンテキスト(ハンドルと関連データ)をファイル primary.ctx に保存します。このコンテキストは、後続のオペレーションに不可欠です。
ワークロードは、間違ったオーナー パスフレーズを使用して主キーを作成できません。
tpm2_createprimary -C o -P wrong_passphrase
このコマンドは次のエラーを返します。
WARNING:esys:src/tss2-esys/api/Esys_CreatePrimary.c:401:Esys_CreatePrimary_Finish() Received TPM Error
ERROR:esys:src/tss2-esys/api/Esys_CreatePrimary.c:135:Esys_CreatePrimary() Esys Finish ErrorCode (0x000009a2)
ERROR: Esys_CreatePrimary(0x9A2) - tpm:session(1):authorization failure without DA implications
ERROR: Unable to run tpm2_createprimary
- 作成された主キーは、データのシールとシール解除に使用できます。
echo "This is my secret message" > secret.txt
tpm2_create -C primary.ctx -u sealed.pub -r sealed.priv -i secret.txt
tpm2_load -C primary.ctx -u sealed.pub -r sealed.priv -c sealed.ctx
tpm2_unseal -c sealed.ctx -o unsealed.txt
tpm2_create は vTPM と連携して、必要な暗号オブジェクトを生成します。
- -C primary.ctx: 先ほど作成した主キー コンテキストを使用します。
- -u sealed.pub: 封印鍵の公開部分(封印解除に必要)を sealed.pub に保存します。
- -r sealed.priv: シーリング鍵の秘密部分を sealed.priv に保存します。
- -i secret.txt: シールするシークレットを含むファイル。
tpm2_load: 公開部分と秘密部分(sealed.pub、sealed.priv)を使用してシーリング鍵を TPM に読み込み、そのコンテキストを sealed.ctx に保存します。
tpm2_unseal: vTPM シーリング オブジェクトを使用して以前に暗号化(シール)されたデータを復号(シール解除)します。
primary.ctx ファイルと sealed.priv ファイルは 1 つの vTPM デバイスでのみ使用できます。また、vTPM デバイスとこれらのファイルにアクセスできるユーザーは、封印されたデータにアクセスできます。PCR 値のポリシーを使用してデータを封印することもできますが、この Codelab の範囲外です。
7. クリーンアップ
Cloud コンソールまたはローカル開発環境で次のコマンドを実行します。
gcloud config set project <project-id>

# Delete the CGKE cluster
gcloud container clusters delete cgke-attestation-codelab --zone us-central1-c

# Delete the Artifact Registry
gcloud artifacts repositories delete codelab-repo --location=us

# Delete the web server VM instance
gcloud compute instances delete cgke-attestation-codelab-web-server --zone=us-central1-c

# Delete the GCP service account
gcloud iam service-accounts delete codelab-csa@<project-id>.iam.gserviceaccount.com

# Delete the role
gcloud iam roles delete Confidential_Computing_Workload_User
次のように置き換えます。
project-idはプロジェクトの一意の識別子です。
8. 次のステップ
Confidential GKE Node の詳細を確認する。