
1. 總覽
Confidential GKE (CGKE) 節點可確保工作負載中的資料在使用時經過加密。將 vTPM 裝置公開給 CGKE 工作負載,可讓工作負載使用 vTPM 功能。本程式碼研究室會展示 vTPM 的兩項功能。
- 透過 vTPM 遠端認證,遠端方可以驗證代管工作負載的 CGKE 節點是否在機密虛擬機器 (CVM) 上執行。
- vTPM 授權和 vTPM 封存。
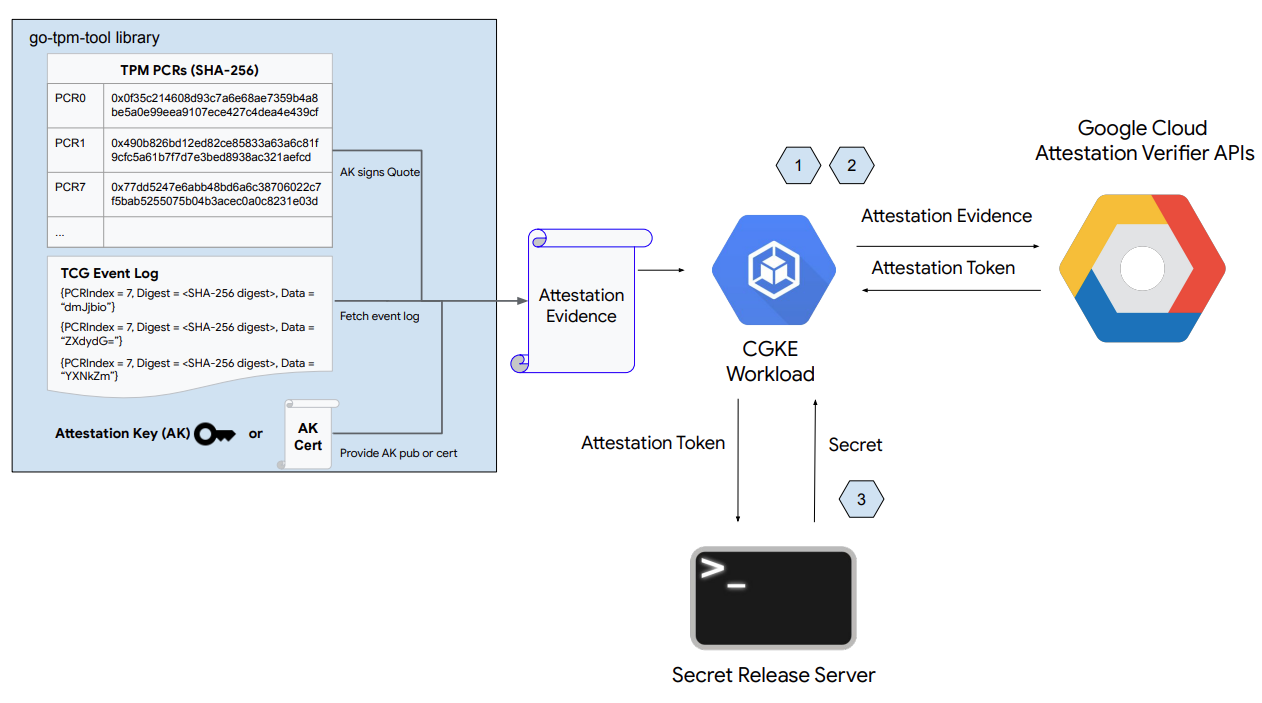
如上圖所示,本程式碼研究室的第一部分包含下列步驟:
- 設定 CGKE 節點,並向所選工作負載公開 vTPM 裝置。
- 部署工作負載,並遠端驗證代管工作負載的 CGKE 節點。
- 設定 Secret Release 網路伺服器。
如上圖所示,本程式碼研究室的第二部分包含:
- 在 CGKE 節點上設定 vTPM 授權和 vTPM 密封功能。
課程內容
- 如何向 CGKE 工作負載公開 vTPM 裝置。
- 如何透過 CGKE 工作負載上的 機密運算 API (認證驗證器服務) 進行遠端認證。
- 如何設定 vTPM 授權,以及執行 vTPM 封存。
軟硬體需求
- Google Cloud Platform 專案
- Chrome 或 Firefox 等瀏覽器
- Google Compute Engine ( Codelabs)、Confidential VM、機密 GKE 節點和 Artifact Registry 的基本知識
2. 設定和需求:
如要啟用必要的 API,請在 Cloud Shell 或本機開發環境中執行下列指令:
gcloud auth login

gcloud services enable \
    cloudapis.googleapis.com \
    cloudshell.googleapis.com \
    container.googleapis.com \
    containerregistry.googleapis.com \
    confidentialcomputing.googleapis.com \
    iamcredentials.googleapis.com \
    compute.googleapis.com
3. 設定 CGKE 節點,並向所選工作負載公開 vTPM 裝置
這個步驟會啟動本程式碼研究室的第一部分。在本步驟中,您將啟動 CGKE 叢集,並套用裝置外掛程式,將 CVM vTPM 裝置公開給工作負載。前往 Cloud 控制台或本機開發環境,執行指令。
1)。建立 CGKE 叢集,並使用Workload Identity 集區,允許 CGKE 工作負載使用 GCP 機密運算 API。由於 CGKE 工作負載需要存取 GCP 資源,因此必須使用工作負載身分集區。如要存取 GCP 資源,CGKE 工作負載必須具備身分。
gcloud container clusters create cgke-attestation-codelab \
    --machine-type=n2d-standard-2        \
    --enable-confidential-nodes \
--zone us-central1-c \
--workload-pool=${PROJECT_ID}.svc.id.goog \
--workload-metadata=GKE_METADATA
更改下列內容:
project-id是專案的專屬 ID。
2)。啟動裝置外掛程式,允許 CGKE 叢集將 vTPM 裝置公開給工作負載。我們使用 kubernetes 裝置外掛程式建立新資源 - google.com/cc。與新資源相關聯的任何工作負載,都能在 worker 節點上看到 vTPM 裝置。
gcloud container clusters get-credentials cgke-attestation-codelab --zone us-central1-c --project ${PROJECT_ID}

kubectl create -f https://raw.githubusercontent.com/google/cc-device-plugin/main/manifests/cc-device-plugin.yaml
更改下列內容:
project-id是專案的專屬 ID。
執行下列指令即可查看已部署的 cc-device-plugin。
kubectl get pods -A | grep "cc-device-plugin"
注意:如果是混合模式的 GKE 叢集 (同時包含 Confidential GKE 和非機密 GKE 工作站節點),建議運算子只在 Confidential GKE 工作站節點上部署 cc-device-plugin。
(選用) 套用 CGKE Pod Prometheus 監控功能。開啟監控功能後,您就能觀察裝置外掛程式狀態。
kubectl apply -f https://raw.githubusercontent.com/google/cc-device-plugin/main/manifests/cc-device-plugin-pod-monitoring.yaml
前往 https://console.cloud.google.com/monitoring/metrics-explorer,找出 cc-device-plugin 指標或使用 PROMQL。例如,下列 PROMQL 指令會顯示每個 cc-device-plugin 程序的 CPU 秒數。
rate(process_cpu_seconds_total[${__interval}])
4. 部署工作負載,並對工作負載執行遠端認證
在這個步驟中,您將建立工作負載並部署到上一個步驟建立的 CGKE 叢集,然後執行 vTPM 遠端驗證,在 worker 節點上擷取驗證權杖 (OIDC 權杖)。
1)。建立應用程式容器映像檔,並推送至 Artifact Registry。應用程式容器映像檔包含 go-tpm 工具,可收集認證證據並傳送至認證驗證器服務,以取得認證權杖 (OIDC 權杖)。
- 為應用程式容器映像檔建立 Dockerfile。
Dockerfile
FROM golang:1.21.0 as builder
WORKDIR /
RUN git clone https://github.com/google/go-tpm-tools.git
WORKDIR /go-tpm-tools/cmd/gotpm
RUN CGO_ENABLED=0 GOOS=linux go build -o /gotpm

FROM debian:trixie
WORKDIR /
RUN apt-get update -y
RUN DEBIAN_FRONTEND=noninteractive apt-get install -y ca-certificates
RUN rm -rf /etc/apt/sources.list.d
COPY --from=builder /gotpm /gotpm
CMD ["tail", "-f", "/dev/null"]
- 建立 Artifact Registry。
gcloud artifacts repositories create codelab-repo \
    --repository-format=docker \
    --location=us
- 將應用程式容器映像檔推送至 Artifact Registry。
docker build -t us-docker.pkg.dev/${PROJECT_ID}/codelab-repo/go-tpm:latest .
docker push us-docker.pkg.dev/${PROJECT_ID}/codelab-repo/go-tpm:latest
2)。設定 Kubernetes 服務帳戶,在 GCP 資源上沿用 GCP 服務帳戶的權限。
- 建立 Kubernetes 服務帳戶
codelab-ksa。
kubectl create serviceaccount codelab-ksa \
    --namespace default
- 建立角色
Confidential_Computing_Workload_User,並授予該角色存取機密運算 API 的權限。
gcloud iam roles create Confidential_Computing_Workload_User --project=<project-id> \
    --title="CGKE Workload User" --description="Grants the ability to generate an attestation token in a GKE workload." \
 --permissions="confidentialcomputing.challenges.create,confidentialcomputing.challenges.verify,confidentialcomputing.locations.get,confidentialcomputing.locations.list" --stage=GA
更改下列內容:
project-id是專案的專屬 ID。
- 建立 GCP 服務帳戶
codelab-csa,並將其繫結至具有機密運算 API 存取權的角色Confidential_Computing_Workload_User. So that codelab-csa。
gcloud iam service-accounts create codelab-csa \
    --project=<project-id>

gcloud projects add-iam-policy-binding <project-id> \
    --member "serviceAccount:codelab-csa@<project-id>.iam.gserviceaccount.com" \
    --role "projects/<project-id>/roles/Confidential_Computing_Workload_User"

gcloud iam service-accounts add-iam-policy-binding codelab-csa@<project-id>.iam.gserviceaccount.com \
    --role roles/iam.workloadIdentityUser \
    --member "serviceAccount:<project-id>.svc.id.goog[default/codelab-ksa]"
更改下列內容:
project-id是專案的專屬 ID。
- 將 Kubernetes 服務帳戶
codelab-ksa繫結至 GCP 服務帳戶codelab-csa。這樣codelab-ksa才能存取機密運算 API。
kubectl annotate serviceaccount codelab-ksa \
    --namespace default \
    iam.gke.io/gcp-service-account=codelab-csa@<project-id>.iam.gserviceaccount.com
更改下列內容:
project-id是專案的專屬 ID。
3)。為示範應用程式建立應用程式部署作業 yaml。將 Kubernetes 服務帳戶 codelab-ksa 指派給選取的工作負載。
deploy.yaml
apiVersion: v1
kind: Pod
metadata:
  name: go-tpm-demo
  labels:
    app.kubernetes.io/name: go-tpm-demo
spec:
  serviceAccountName: codelab-ksa
  nodeSelector:
    iam.gke.io/gke-metadata-server-enabled: "true"
  containers:
  - name: go-tpm
    image: us-docker.pkg.dev/<project-id>/codelab-repo/go-tpm:latest
    resources:
      limits:
        google.com/cc: 1
更改下列內容:
project-id是專案的專屬 ID。
4)。將 Deployment 套用至 CGKE 叢集。
kubectl create -f deploy.yaml
5)。連線至工作負載並啟動遠端認證,以擷取認證權杖 (OIDC 權杖)
kubectl exec -it go-tpm-demo -- /bin/bash
./gotpm token --event-log=/run/cc-device-plugin/binary_bios_measurements > attestation_token
您可以在 jwt.io 中解碼驗證權杖,查看權杖附加資訊!
5. 設定 Secret Release 網路伺服器
在這個步驟中,您會結束先前的 SSH 工作階段,並設定另一個 VM。您會在該 VM 上設定機密發布網路伺服器。網路伺服器會驗證收到的認證權杖及其聲明。如果驗證成功,系統就會將密鑰傳送給要求者。
1)。前往 Cloud 控制台或本機開發環境。建立虛擬機器。
gcloud config set project <project-id>

gcloud compute instances create cgke-attestation-codelab-web-server \
    --machine-type=n2d-standard-2 \
    --zone=us-central1-c \
    --image=ubuntu-2204-jammy-v20240228 \
    --image-project=ubuntu-os-cloud
更改下列內容:
project-id是專案的專屬 ID。
2)。透過 SSH 連線至新的 VM。
gcloud compute ssh --zone us-central1-c cgke-attestation-codelab-web-server
3)。設定 Go 環境。
wget https://go.dev/dl/go1.22.0.linux-amd64.tar.gz
sudo tar -C /usr/local -xzf go1.22.0.linux-amd64.tar.gz
export PATH=$PATH:/usr/local/go/bin
4)。建立下列兩個檔案,儲存密碼發布網路伺服器的原始碼 (使用 nano 複製並貼上)。
main.go
package main

import (
        "fmt"
        "net/http"
        "strings"
        "time"
        "log"

        "github.com/golang-jwt/jwt/v4"
)

const (
        theSecret = "This is the super secret information!"
)

func homePage(w http.ResponseWriter, r *http.Request) {
        tokenString := r.Header.Get("Authorization")
        if tokenString != "" {
                tokenString, err := extractToken(tokenString)
                if err != nil {
                        http.Error(w, err.Error(), http.StatusUnauthorized)
                }

                tokenBytes := []byte(tokenString)
                // A method to return a public key from the well-known endpoint
                keyFunc := getRSAPublicKeyFromJWKsFile

                token, err := decodeAndValidateToken(tokenBytes, keyFunc)
                if err != nil {
                        http.Error(w, "Invalid JWT Token", http.StatusUnauthorized)
                }

                if ok, err := isValid(token.Claims.(jwt.MapClaims)); ok {
                        fmt.Fprintln(w, theSecret)
                } else {
                        if err != nil {
                                http.Error(w, "Error validating JWT claims: "+err.Error(), http.StatusUnauthorized)
                        } else {
                                http.Error(w, "Invalid JWT token Claims", http.StatusUnauthorized)
                        }
                }
        } else {
                http.Error(w, "Authorization token required", http.StatusUnauthorized)
        }
}

func extractToken(tokenString string) (string, error) {
        if strings.HasPrefix(tokenString, "Bearer ") {
                return strings.TrimPrefix(tokenString, "Bearer "), nil
        }
        return "", fmt.Errorf("invalid token format")
}

func isValid(claims jwt.MapClaims) (bool, error) {
        // 1. Evaluating Standard Claims:
        subject, ok := claims["sub"].(string)
        if !ok {
                return false, fmt.Errorf("missing or invalid 'sub' claim")
        }
        fmt.Println("Subject:", subject)
        // e.g. "sub":"https://www.googleapis.com/compute/v1/projects/<project_id>/zones/<project_zone>/instances/<instance_name>"

        issuedAt, ok := claims["iat"].(float64)
        if !ok {
                return false, fmt.Errorf("missing or invalid 'iat' claim")
        }
        fmt.Println("Issued At:", time.Unix(int64(issuedAt), 0))

        // 2. Evaluating Remote Attestation Claims:
        hwModel, ok := claims["hwmodel"].(string)
        if !ok || hwModel != "GCP_AMD_SEV" {
                return false, fmt.Errorf("missing or invalid 'hwModel'")
        }
        fmt.Println("hwmodel:", hwModel)

        swName, ok := claims["swname"].(string)
        if !ok || swName != "GCE" {
                return false, fmt.Errorf("missing or invalid 'hwModel'")
        }
        fmt.Println("swname:", swName)

        return true, nil
}

func main() {
        http.HandleFunc("/", homePage)
        fmt.Println("Server listening on :8080")
        err := http.ListenAndServe(":8080", nil)
        if err != nil {
                log.Fatalf("Server failed to start: %v", err)
        }
}
helper.go
package main

import (
        "crypto/rsa"
        "encoding/base64"
        "encoding/json"
        "errors"
        "fmt"
        "io"
        "math/big"
        "net/http"

        "github.com/golang-jwt/jwt/v4"
)

const (
        socketPath     = "/run/container_launcher/teeserver.sock"
        expectedIssuer = "https://confidentialcomputing.googleapis.com"
        wellKnownPath  = "/.well-known/openid-configuration"
)

type jwksFile struct {
        Keys []jwk `json:"keys"`
}

type jwk struct {
        N   string `json:"n"`   // "nMMTBwJ7H6Id8zUCZd-L7uoNyz9b7lvoyse9izD9l2rtOhWLWbiG-7pKeYJyHeEpilHP4KdQMfUo8JCwhd-OMW0be_XtEu3jXEFjuq2YnPSPFk326eTfENtUc6qJohyMnfKkcOcY_kTE11jM81-fsqtBKjO_KiSkcmAO4wJJb8pHOjue3JCP09ZANL1uN4TuxbM2ibcyf25ODt3WQn54SRQTV0wn098Y5VDU-dzyeKYBNfL14iP0LiXBRfHd4YtEaGV9SBUuVhXdhx1eF0efztCNNz0GSLS2AEPLQduVuFoUImP4s51YdO9TPeeQ3hI8aGpOdC0syxmZ7LsL0rHE1Q",
        E   string `json:"e"`   // "AQAB" or 65537 as an int
        Kid string `json:"kid"` // "1f12fa916c3a0ef585894b4b420ad17dc9d6cdf5",

        // Unused fields:
        // Alg string `json:"alg"` // "RS256",
        // Kty string `json:"kty"` // "RSA",
        // Use string `json:"use"` // "sig",
}

type wellKnown struct {
        JwksURI string `json:"jwks_uri"` // "https://www.googleapis.com/service_accounts/v1/metadata/jwk/signer@confidentialspace-sign.iam.gserviceaccount.com"

        // Unused fields:
        // Iss                                   string `json:"issuer"`                                // "https://confidentialcomputing.googleapis.com"
        // Subject_types_supported               string `json:"subject_types_supported"`               // [ "public" ]
        // Response_types_supported              string `json:"response_types_supported"`              // [ "id_token" ]
        // Claims_supported                      string `json:"claims_supported"`                      // [ "sub", "aud", "exp", "iat", "iss", "jti", "nbf", "dbgstat", "eat_nonce", "google_service_accounts", "hwmodel", "oemid", "secboot", "submods", "swname", "swversion" ]
        // Id_token_signing_alg_values_supported string `json:"id_token_signing_alg_values_supported"` // [ "RS256" ]
        // Scopes_supported                      string `json:"scopes_supported"`                      // [ "openid" ]
}

func getWellKnownFile() (wellKnown, error) {
        httpClient := http.Client{}
        resp, err := httpClient.Get(expectedIssuer + wellKnownPath)
        if err != nil {
                return wellKnown{}, fmt.Errorf("failed to get raw .well-known response: %w", err)
        }

        wellKnownJSON, err := io.ReadAll(resp.Body)
        if err != nil {
                return wellKnown{}, fmt.Errorf("failed to read .well-known response: %w", err)
        }

        wk := wellKnown{}
        json.Unmarshal(wellKnownJSON, &wk)
        return wk, nil
}

func getJWKFile() (jwksFile, error) {
        wk, err := getWellKnownFile()
        if err != nil {
                return jwksFile{}, fmt.Errorf("failed to get .well-known json: %w", err)
        }

        // Get JWK URI from .wellknown
        uri := wk.JwksURI
        fmt.Printf("jwks URI: %v\n", uri)

        httpClient := http.Client{}
        resp, err := httpClient.Get(uri)
        if err != nil {
                return jwksFile{}, fmt.Errorf("failed to get raw JWK response: %w", err)
        }

        jwkbytes, err := io.ReadAll(resp.Body)
        if err != nil {
                return jwksFile{}, fmt.Errorf("failed to read JWK body: %w", err)
        }

        file := jwksFile{}
        err = json.Unmarshal(jwkbytes, &file)
        if err != nil {
                return jwksFile{}, fmt.Errorf("failed to unmarshall JWK content: %w", err)
        }

        return file, nil
}

// N and E are 'base64urlUInt' encoded: https://www.rfc-editor.org/rfc/rfc7518#section-6.3
func base64urlUIntDecode(s string) (*big.Int, error) {
        b, err := base64.RawURLEncoding.DecodeString(s)
        if err != nil {
                return nil, err
        }
        z := new(big.Int)
        z.SetBytes(b)
        return z, nil
}

func getRSAPublicKeyFromJWKsFile(t *jwt.Token) (any, error) {
        keysfile, err := getJWKFile()
        if err != nil {
                return nil, fmt.Errorf("failed to fetch the JWK file: %w", err)
        }

        // Multiple keys are present in this endpoint to allow for key rotation.
        // This method finds the key that was used for signing to pass to the validator.
        kid := t.Header["kid"]
        for _, key := range keysfile.Keys {
                if key.Kid != kid {
                        continue // Select the key used for signing
                }

                n, err := base64urlUIntDecode(key.N)
                if err != nil {
                        return nil, fmt.Errorf("failed to decode key.N %w", err)
                }
                e, err := base64urlUIntDecode(key.E)
                if err != nil {
                        return nil, fmt.Errorf("failed to decode key.E %w", err)
                }

                // The parser expects an rsa.PublicKey: https://github.com/golang-jwt/jwt/blob/main/rsa.go#L53
                // or an array of keys. We chose to show passing a single key in this example as its possible
                // not all validators accept multiple keys for validation.
                return &rsa.PublicKey{
                        N: n,
                        E: int(e.Int64()),
                }, nil
        }

        return nil, fmt.Errorf("failed to find key with kid '%v' from well-known endpoint", kid)
}

func decodeAndValidateToken(tokenBytes []byte, keyFunc func(t *jwt.Token) (any, error)) (*jwt.Token, error) {
        var err error
        fmt.Println("Unmarshalling token and checking its validity...")
        token, err := jwt.NewParser().Parse(string(tokenBytes), keyFunc)

        fmt.Printf("Token valid: %v\n", token.Valid)
        if token.Valid {
                return token, nil
        }
        if ve, ok := err.(*jwt.ValidationError); ok {
                if ve.Errors&jwt.ValidationErrorMalformed != 0 {
                        return nil, fmt.Errorf("token format invalid. Please contact the Confidential Space team for assistance")
                }
                if ve.Errors&(jwt.ValidationErrorNotValidYet) != 0 {
                        // If device time is not synchronized with the Attestation Service you may need to account for that here.
                        return nil, errors.New("token is not active yet")
                }
                if ve.Errors&(jwt.ValidationErrorExpired) != 0 {
                        return nil, fmt.Errorf("token is expired")
                }
                return nil, fmt.Errorf("unknown validation error: %v", err)
        }

        return nil, fmt.Errorf("couldn't handle this token or couldn't read a validation error: %v", err)
}
5)。執行下列指令,建構並執行網路伺服器。這會在 :8080 通訊埠啟動密鑰發布網路伺服器。
go mod init google.com/codelab
go mod tidy
go get github.com/golang-jwt/jwt/v4
go build
./codelab
疑難排解:執行 go mod tidy: 時,您可能會看到下列警告,可以忽略這些警告。
go: finding module for package github.com/golang-jwt/jwt/v4
go: downloading github.com/golang-jwt/jwt v3.2.2+incompatible
go: downloading github.com/golang-jwt/jwt/v4 v4.5.0
go: found github.com/golang-jwt/jwt/v4 in github.com/golang-jwt/jwt/v4 v4.5.0
go: google.com/codelab/go/pkg/mod/github.com/golang-jwt/jwt@v3.2.2+incompatible: import path "google.com/codelab/go/pkg/mod/github.com/golang-jwt/jwt@v3.2.2+incompatible" should not have @version
go: google.com/codelab/go/pkg/mod/github.com/golang-jwt/jwt@v3.2.2+incompatible/cmd/jwt: import path "google.com/codelab/go/pkg/mod/github.com/golang-jwt/jwt@v3.2.2+incompatible/cmd/jwt" should not have @version
go: google.com/codelab/go/pkg/mod/github.com/golang-jwt/jwt@v3.2.2+incompatible/request: import path "google.com/codelab/go/pkg/mod/github.com/golang-jwt/jwt@v3.2.2+incompatible/request" should not have @version
go: google.com/codelab/go/pkg/mod/github.com/golang-jwt/jwt@v3.2.2+incompatible/test: import path "google.com/codelab/go/pkg/mod/github.com/golang-jwt/jwt@v3.2.2+incompatible/test" should not have @version
6)。啟動另一個 Cloud Shell 分頁或本機開發環境工作階段,然後執行下列指令。這樣就能取得 cgke-attestation-codelab-web-server-internal-ip。
gcloud compute instances describe cgke-attestation-codelab-web-server --format='get(networkInterfaces[0].networkIP)' --zone=us-central1-c
7)。連線至 CGKE 工作負載,並啟動遠端認證來擷取驗證權杖 (OIDC 權杖)。然後在下列指令中嵌入 attestation-token 和 cgke-attestation-codelab-web-server-internal-ip 的內容。這會擷取密鑰發布網路伺服器持有的密鑰!
kubectl exec -it go-tpm-demo -- /bin/bash
./gotpm token --event-log=/run/cc-device-plugin/binary_bios_measurements > attestation_token
curl http://<cgke-attestation-codelab-web-server-internal-ip>:8080 -H "Authorization: Bearer $(cat ./attestation_token)"
更改下列內容:
cgke-attestation-codelab-web-server-internal-ip是cgke-attestation-codelab-web-serverVM 執行個體的內部 IP。
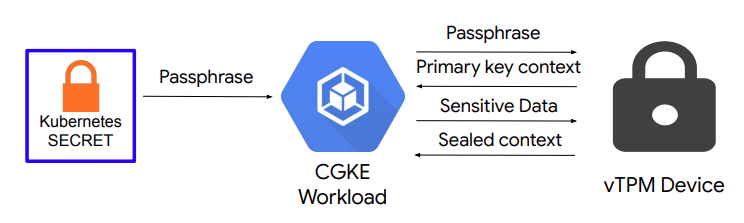
6. CGKE 節點的 vTPM 密封功能
這個步驟會開始本程式碼研究室的第二部分。在這個步驟中,您會在 CGKE 節點上設定 vTPM 擁有者授權,並使用 vTPM 擁有者密碼片部署工作負載。接著,您會建立 vTPM 主金鑰,透過 vTPM 封存功能封存及解除封存工作負載中的資料。
1)。在 CGKE 節點上設定 vTPM 擁有者授權。
- 建立一次性工作容器映像檔。這項一次性工作會為所有 vTPM 設定擁有者密碼。以下是建立容器映像檔的 Dockerfile。
Dockerfile
FROM debian:latest

RUN echo 'debconf debconf/frontend select Noninteractive' | debconf-set-selections
RUN apt-get update

RUN apt -y install \
  autoconf-archive \
  libcmocka0 \
  libcmocka-dev \
  net-tools \
  build-essential \
  git \
  pkg-config \
  gcc \
  g++ \
  m4 \
  libtool \
  automake \
  libgcrypt20-dev \
  libssl-dev \
  uthash-dev \
  autoconf \
  uuid-dev \
  libcurl4-openssl-dev \
  libjson-c-dev

RUN mkdir /src

WORKDIR /src
RUN git clone https://github.com/tpm2-software/tpm2-tss
WORKDIR /src/tpm2-tss
RUN ./bootstrap
RUN ./configure --prefix=/usr/local
RUN make all install

WORKDIR /src
RUN git clone https://github.com/tpm2-software/tpm2-tools
WORKDIR /src/tpm2-tools
RUN apt-get -y install libcurl4 libcurl4-openssl-dev pandoc man-db
RUN ./bootstrap
RUN ./configure --prefix=/usr/local
RUN make all install

RUN apt-get -y install vim

ENTRYPOINT ["/bin/bash"]
- 建構一次性工作容器映像檔,並推送至構件登錄檔。
docker build -t us-docker.pkg.dev/<project-id>/codelab-repo/tpm-tools:latest .
docker push us-docker.pkg.dev/<project-id>/codelab-repo/tpm-tools:latest
更改下列內容:
project-id是專案的專屬 ID。
- 透過 Kubernetes 工作執行一次性工作。(警告:這項工作會清除每個 CVM 上的 vTPM。如果 CVM 使用 vTPM 加密磁碟,這項工作會導致 CVM 在重新啟動後無法使用。你可以使用
lsblk -f指令檢查磁碟是否具有 FSTYPEcrypto_LUKS)
tpm-tools-task.yaml
apiVersion: batch/v1
kind: Job
metadata:
  name: tpm-tools-task
spec:
  template:
    spec:
      containers:
      - name: tpm-tools
        image: us-docker.pkg.dev/<project-id>/codelab-repo/tpm-tools:latest
        command: ["/bin/sh", "-c"]
        args: ["tpm2_clear; tpm2_changeauth -c owner this_is_passphrase"]
        resources:
          limits:
            google.com/cc: 1
      restartPolicy: Never
更改下列內容:
project-id是專案的專屬 ID。
- 啟動一次性工作。這項工作會在所有 worker 節點上設定 vTPM 擁有者通關密語。
kubectl create -f tpm-tools-task.yaml
2)。建立 Kubernetes Secret,保存 vTPM 擁有者通關密語。
kubectl create secret generic tpm-secret --from-literal=passphrase='this_is_passphrase'
3)。建立試用版應用程式容器,並將通關密語傳遞至該容器。示範應用程式容器包含 tpm2 工具,可與 vTPM 互動。
- 為試用版應用程式容器建立部署作業 YAML 檔案。
deploy_demo.yaml
apiVersion: v1
kind: Pod
metadata:
  name: tpm-tools-demo
  labels:
    app.kubernetes.io/name: tpm-tools-demo
spec:
  containers:
  - name: tpm-tools
    image: us-docker.pkg.dev/<project-id>/codelab-repo/tpm-tools:latest
    command: ["tail", "-f", "/dev/null"]
    resources:
      limits:
        google.com/cc: 1
    volumeMounts:
      - name: secret-volume
        mountPath: "/etc/tpmsecret"
        readOnly: true
  volumes:
    - name: secret-volume
      secret:
        secretName: tpm-secret
更改下列內容:
project-id是專案的專屬 ID。
- 部署示範應用程式。
kubectl create -f deploy_demo.yaml
4)。在示範應用程式容器中執行 vTPM 密封作業。
- 連線至試用版應用程式容器,並使用密碼設定主鍵。
kubectl exec -it tpm-tools-demo -- /bin/bash
tpm2_createprimary -C o -c primary.ctx -P $(cat /etc/tpmsecret/passphrase)
tpm2_createprimary 會與 vTPM 互動,根據指定的階層和範本產生主要物件。
- -C o:表示主鍵將在 TPM 的擁有者階層下建立。
- -c primary.ctx:將所建立主要物件的內容 (控制代碼和相關聯的資料) 儲存至 primary.ctx 檔案。這個環境對於後續作業至關重要。
工作負載無法使用錯誤的擁有者密碼片語建立主鍵。
tpm2_createprimary -C o -P wrong_passphrase
指令會傳回下列錯誤:
WARNING:esys:src/tss2-esys/api/Esys_CreatePrimary.c:401:Esys_CreatePrimary_Finish() Received TPM Error
ERROR:esys:src/tss2-esys/api/Esys_CreatePrimary.c:135:Esys_CreatePrimary() Esys Finish ErrorCode (0x000009a2)
ERROR: Esys_CreatePrimary(0x9A2) - tpm:session(1):authorization failure without DA implications
ERROR: Unable to run tpm2_createprimary
- 建立主鍵後,即可用於密封及解除密封資料。
echo "This is my secret message" > secret.txt
tpm2_create -C primary.ctx -u sealed.pub -r sealed.priv -i secret.txt
tpm2_load -C primary.ctx -u sealed.pub -r sealed.priv -c sealed.ctx
tpm2_unseal -c sealed.ctx -o unsealed.txt
tpm2_create 會與 vTPM 互動,產生所需的密碼編譯物件。
- -C primary.ctx:使用我們稍早建立的主鍵內容。
- -u sealed.pub:將密封金鑰的公開部分 (解封時需要) 儲存在 sealed.pub 中。
- -r sealed.priv:將密封金鑰的私密部分儲存在 sealed.priv 中。
- -i secret.txt:包含要密封的密鑰的檔案。
tpm2_load:使用公開和私密部分 (sealed.pub、sealed.priv) 將密封金鑰載入 TPM,並將其內容儲存至 sealed.ctx。
tpm2_unseal:解密 (解除密封) 先前使用 vTPM 密封物件加密 (密封) 的資料。
請注意:primary.ctx 和 sealed.priv 檔案只能在一部 vTPM 裝置上使用。只要能存取 vTPM 裝置和這些檔案,就能存取密封資料。您還可以進一步使用 PCR 值政策密封資料,但這不在本程式碼研究室的範圍內。
7. 清除
在 Cloud 控制台或本機開發環境中執行下列指令:
gcloud config set project <project-id>

# Delete the CGKE cluster
gcloud container clusters delete cgke-attestation-codelab --zone us-central1-c

# Delete the Artifact Registry
gcloud artifacts repositories delete codelab-repo --location=us

# Delete the web server VM instance
gcloud compute instances delete cgke-attestation-codelab-web-server --zone=us-central1-c

# Delete the GCP service account
gcloud iam service-accounts delete codelab-csa@<project-id>.iam.gserviceaccount.com

# Delete the role
gcloud iam roles delete Confidential_Computing_Workload_User
更改下列內容:
project-id是專案的專屬 ID。
8. 後續步驟
進一步瞭解機密 GKE 節點。