
1. Introduction
This document provides a reference architecture for configuring a custom domain to access AgentSpace. Instead of the Google-managed URL assigned during Agentspace app creation, users can utilize a custom domain. This codelab demonstrates access to Agentspace calendar and drive applications using the nip.io domain. nip.io is a free, open-source service that provides wildcard DNS for any IP address. Essentially, it allows you to create a hostname that resolves to a specific IP address without needing to set up your own DNS server or modify your /etc/hosts file.
Using your own domain is recommended, however for demonstration purposes nip.io is used in the tutorial.
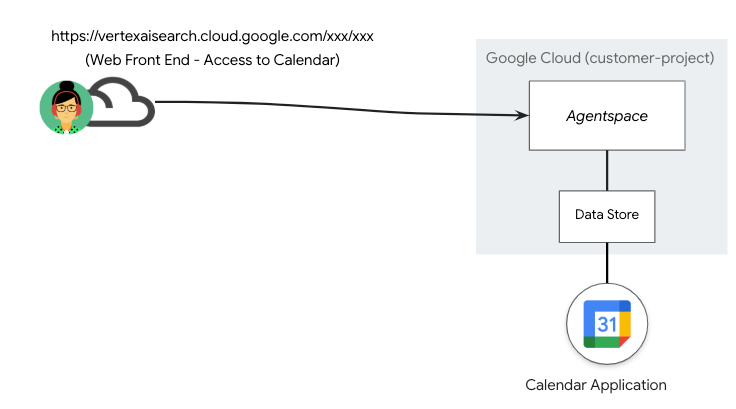
In the depicted deployment scenario below (Figure 1) AgentSpace published a datastore containing a Calendar Application accessed via a public Google-managed URL.
Figure 1
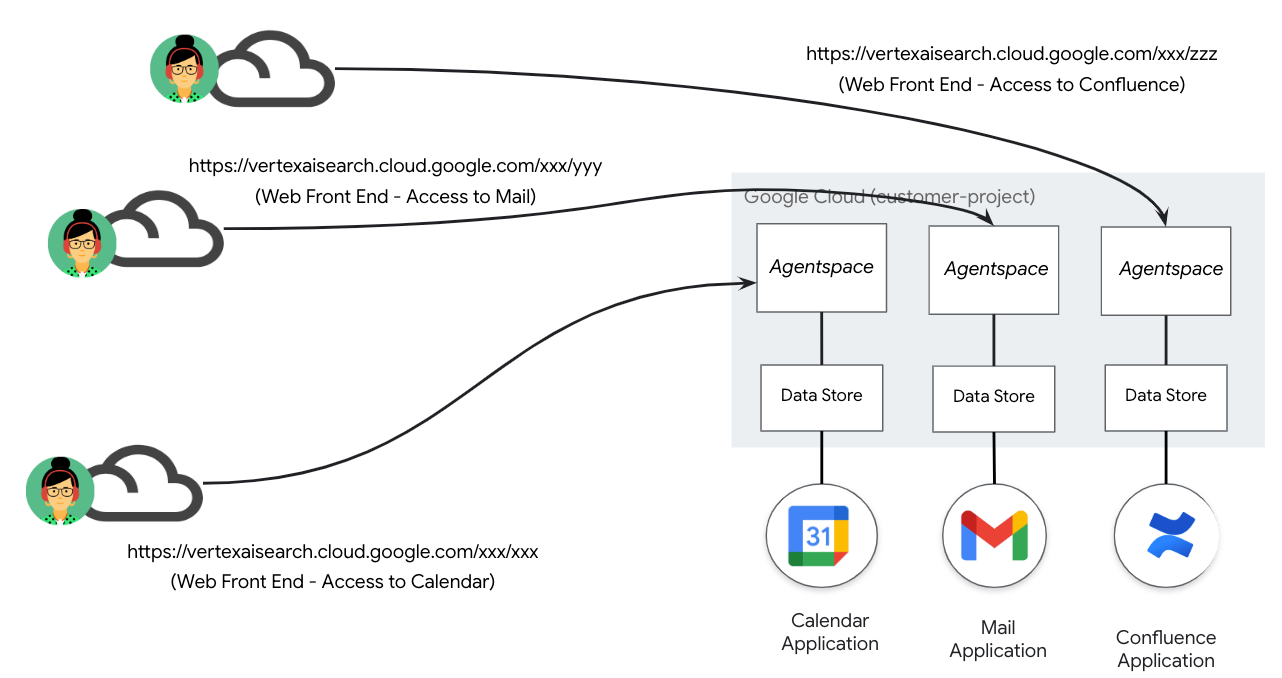
Continued growth of datastore and subsequent applications results in further management of Public Google-managed URLs as depicted in the deployment scenario below, (Figure 2) resulting in a 1:1 mapping of Agentspace applications and URL.
Figure 2.
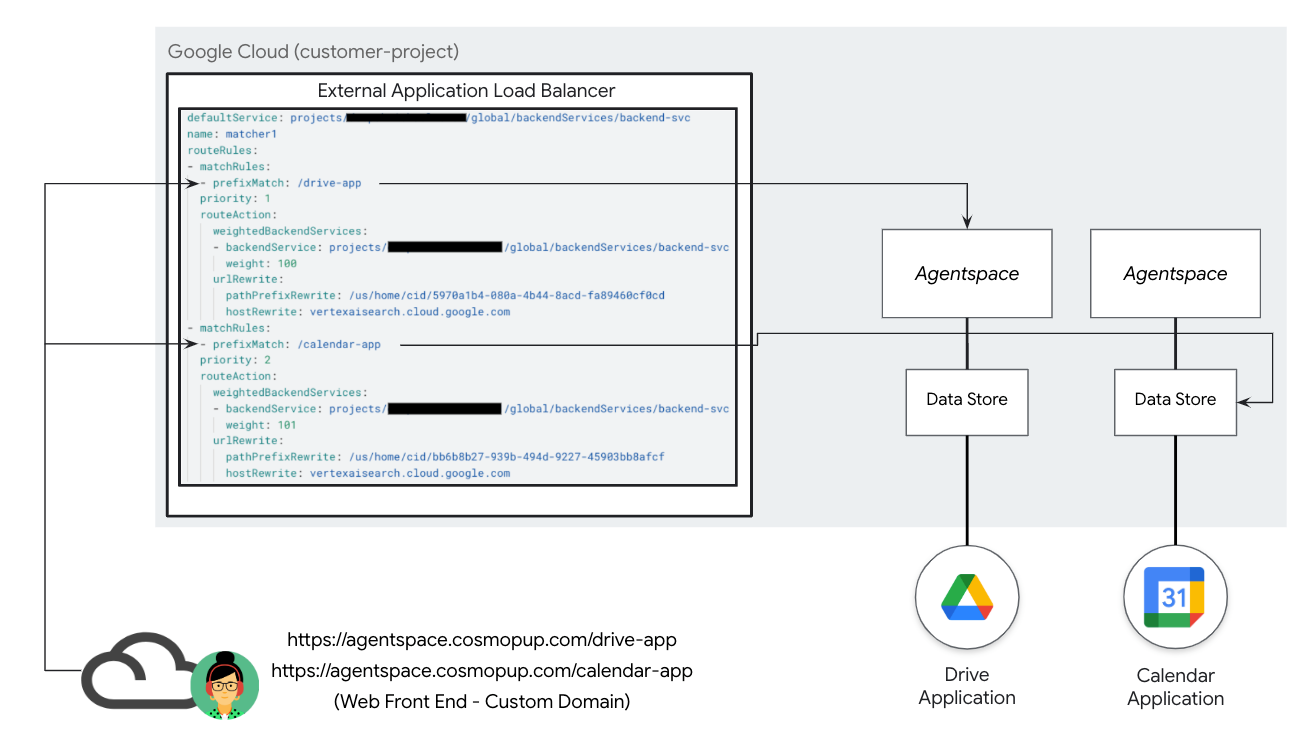
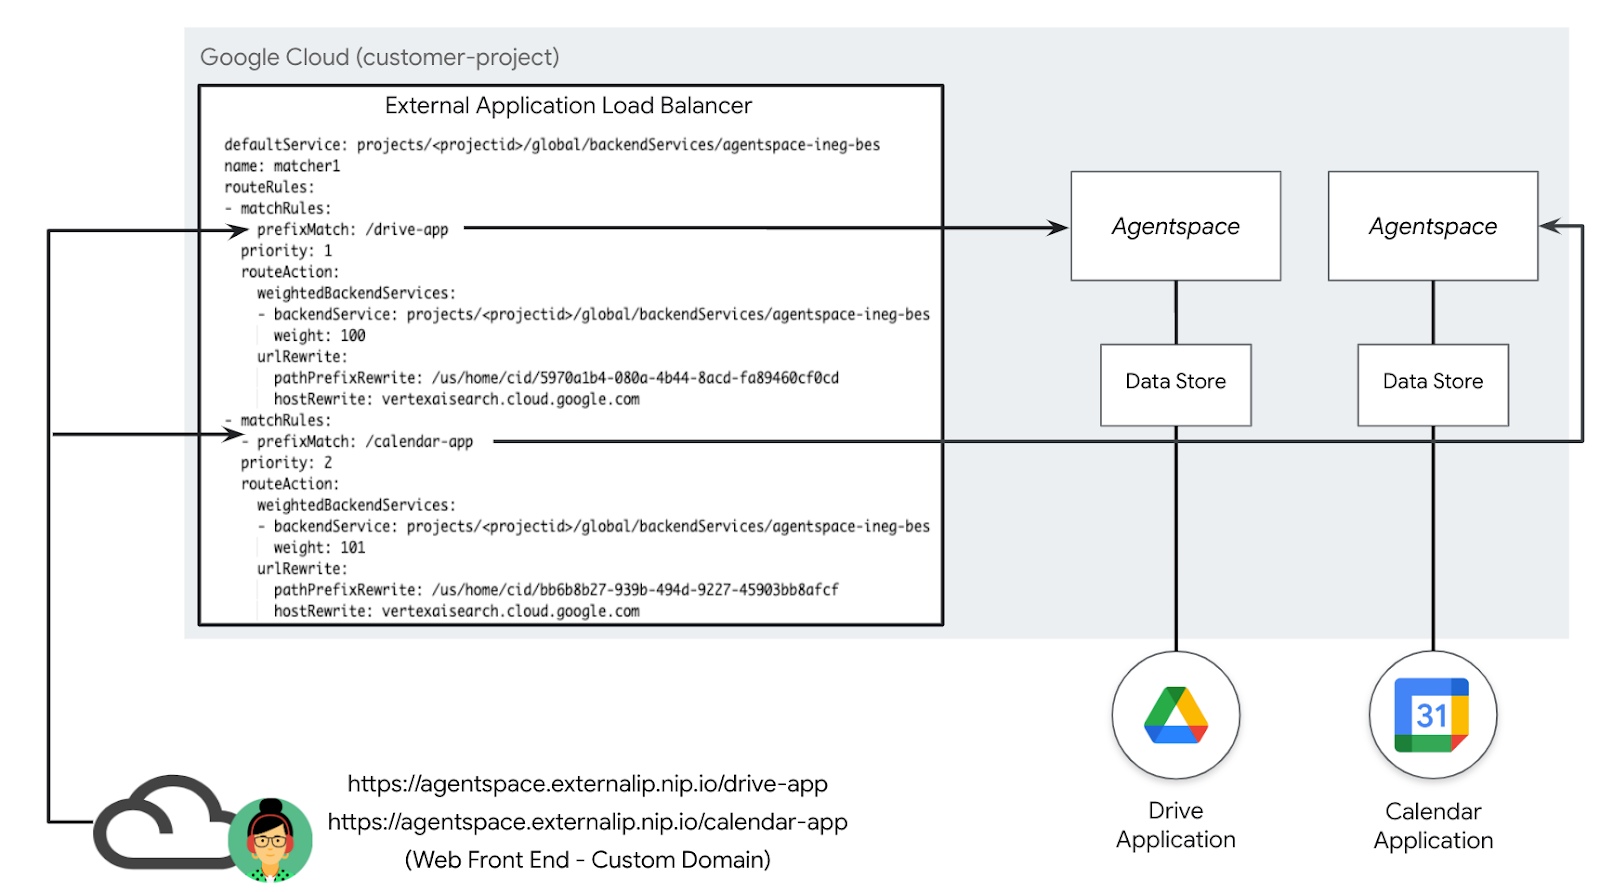
A custom domain enables the mapping of various AgentSpace applications to a single, user-specified customer domain. This feature allows for a specific URL path to be associated with each Agentspace application, offering greater flexibility as depicted in the deployment scenario below, (Figure 3). As an example, a customer managed domain agentspace.cosmopup.com is segmented into path rules, each mapped to a specific Agentspace application, example include:
- agentspace.cosmopup.com/drive-app that maps to the Agentspace application for Workspace Drive
- agentspace.cosmopup.com/calendar-app that maps to the Agentspace application for Workspace Calendar
The External Application Load Balancer's host and path rules, configured via the URL MAP, control the logic that maps the custom domain to the Google-managed URL. It performs the following function using the example agentspace.cosmopup.com/drive-app
- Custom domain host path agentspace.cosmopup.com/drive-app is received by the loadbalancer
- URL Map is configured for Advanced host and path rule matching
- Hosts agentspace.cosmopup.com is eligible for path matching and rewrite
- Custom domain host path agentspace.cosmopup.com/drive-app is subject to UrlRewrite
- PathPrefixRewrite is the Agentspace path: /us/home/cid/5970a1b4-080a-4b44-8acd-fa89460cf0cd
- hostRewrite is the Agentspace host: vertexaisearch.cloud.google.com
- Rewrite operation is performed before routing to the backend service
- Backend service routes traffic to the drive-app application based on the Agentspace URL
Figure 3
What you'll learn
- Create a Global External Application Load Balancer
- Create a backend service rewrite utilizing a custom domain and rewrite operation to a Agentspace application
- How to integrate nip.io and Cloud DNS to create a custom domain
- How to validate access to an Agentspace custom domain
What you'll need
- Google Cloud Project with Owner permissions
- Existing Agentspace application URL(s)
- Self-owner Custom Domain (optional)
- Certificates - Self Signed or Google Managed
2. What you'll build
You'll establish a Global External Application Load Balancer with advanced traffic management capabilities to enable custom domain path match for Agentspace applications using host and path rewrite. Once deployed, you'll perform the following actions to validate access to the Agentspace application:
- Access your Agentspace application by opening a web browser and navigating to your custom domain and specified path.
3. Network requirements
Below is the breakdown of network requirements:
Components | Description |
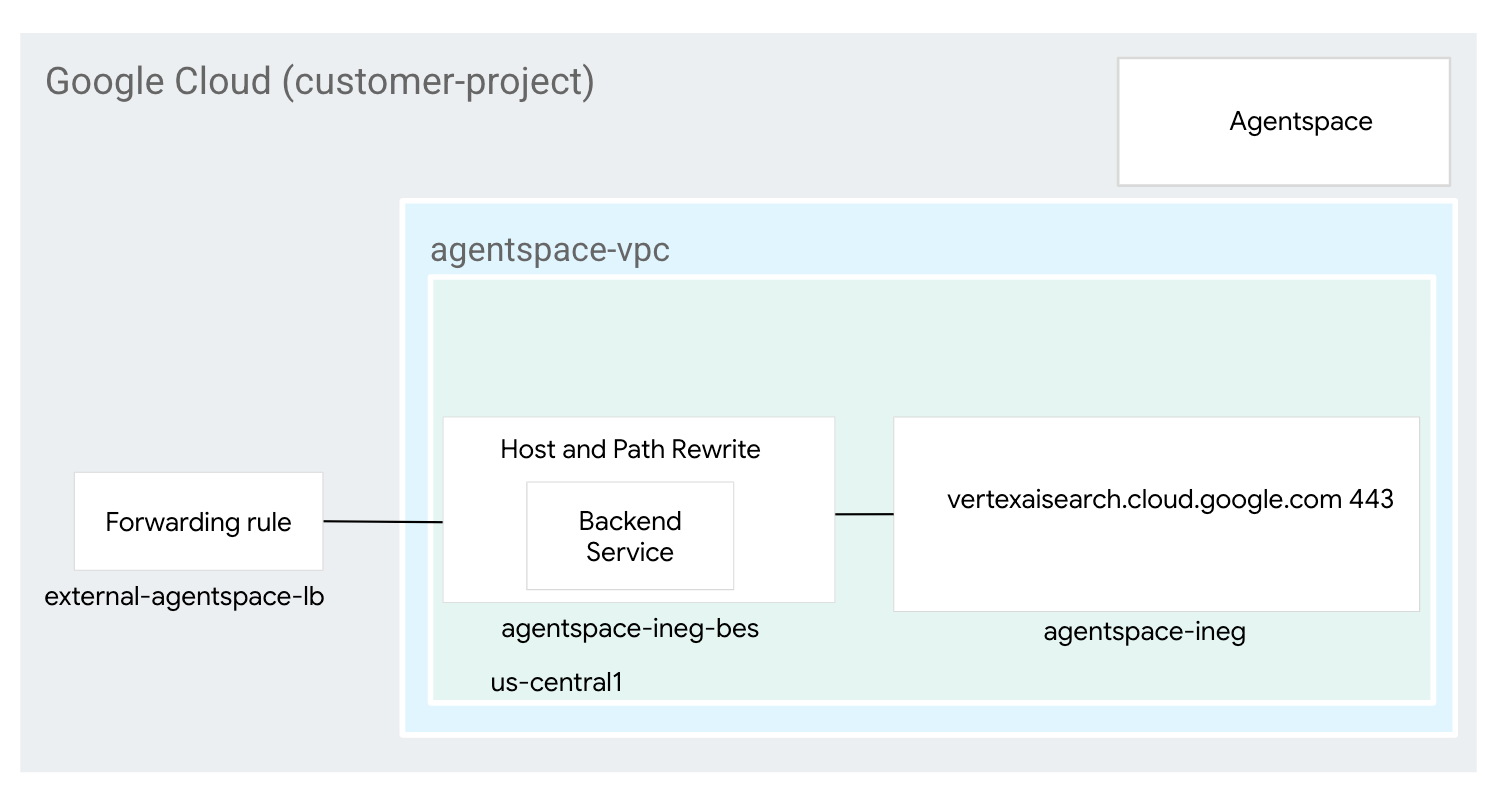
VPC (agentspace-vpc) | Custom mode VPC |
Internet NEG | A resource used to define an external backend for the load balancer configured as FQDN denoting the Agentspace Google-Manged FQDN (vertexaisearch.cloud.google.com). Internet FQDN performs DNS lookup within the VPC for resolution. |
Backend Service | A backend service acts as a bridge between your load balancer and your backend resources. In the tutorial, the backend service is associated with the Internet NEG. |
Certificates | To configure certificates for an Application Load Balancer in Google Cloud, you'll use the Certificate Manager service and either Google-managed or self-managed SSL certificates |
Cloud DNS | Cloud DNS public zone is used to resolve the external application load balancer external IP to nip.io (agentspace.externalip.nip.io). Alternatively, use your custom domain and A record consisting of the load balancer's IP Address. |
4. Codelab topology
5. Setup and Requirements
Self-paced environment setup
- Sign-in to the Google Cloud Console and create a new project or reuse an existing one. If you don't already have a Gmail or Google Workspace account, you must create one.

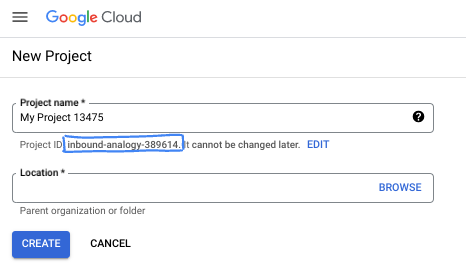
- The Project name is the display name for this project's participants. It is a character string not used by Google APIs. You can always update it.
- The Project ID is unique across all Google Cloud projects and is immutable (cannot be changed after it has been set). The Cloud Console auto-generates a unique string; usually you don't care what it is. In most codelabs, you'll need to reference your Project ID (typically identified as
PROJECT_ID). If you don't like the generated ID, you might generate another random one. Alternatively, you can try your own, and see if it's available. It can't be changed after this step and remains for the duration of the project. - For your information, there is a third value, a Project Number, which some APIs use. Learn more about all three of these values in the documentation.
- Next, you'll need to enable billing in the Cloud Console to use Cloud resources/APIs. Running through this codelab won't cost much, if anything at all. To shut down resources to avoid incurring billing beyond this tutorial, you can delete the resources you created or delete the project. New Google Cloud users are eligible for the $300 USD Free Trial program.
Start Cloud Shell
While Google Cloud can be operated remotely from your laptop, in this codelab you will be using Google Cloud Shell, a command line environment running in the Cloud.
From the Google Cloud Console, click the Cloud Shell icon on the top right toolbar:

It should only take a few moments to provision and connect to the environment. When it is finished, you should see something like this:

This virtual machine is loaded with all the development tools you'll need. It offers a persistent 5GB home directory, and runs on Google Cloud, greatly enhancing network performance and authentication. All of your work in this codelab can be done within a browser. You do not need to install anything.
6. Before you begin
Enable APIs
Inside Cloud Shell, make sure that your project id is set up:
gcloud config list project
gcloud config set project [YOUR-PROJECT-ID]
project=[YOUR-PROJECT-ID]
region=[YOUR-REGION]
echo $project
echo $region
Enable all necessary services:
gcloud services enable compute.googleapis.com
gcloud services enable dns.googleapis.com
7. Create VPC Network
VPC Network
Inside Cloud Shell, perform the following:
gcloud compute networks create agentspace-vpc --subnet-mode custom
8. Set up the Load Balancer Components
Reserve the load balancer's external IP address
Inside Cloud Shell, reserve an external IP address for the load balancer:
gcloud compute addresses create external-ip \
    --network-tier=PREMIUM \
    --ip-version=IPV4 \
    --global
Inside Cloud Shell, view the reserved IP Address:
gcloud compute addresses describe external-ip \
  --global | grep -i address:
Example output:
user@cloudshell$ gcloud compute addresses describe external-ip \
  --global | grep -i address:
address: 34.54.158.206
Set up the Internet NEG
Create an Internet NEG, and set the –network-endpoint-type to internet-fqdn-port (the hostname and port where your external backend can be reached). To resolve Agentspace the FQDN vertexaisearch.cloud.google.com and PORT 443 is used.
gcloud compute network-endpoint-groups create agentspace-ineg \
    --network-endpoint-type="internet-fqdn-port" \
    --global
gcloud compute network-endpoint-groups update agentspace-ineg \
    --add-endpoint="fqdn=vertexaisearch.cloud.google.com,port=443" \
    --global
Create the Load Balancer
Inside Cloud Shell, perform the following:
gcloud compute backend-services create agentspace-ineg-bes \
      --load-balancing-scheme=EXTERNAL_MANAGED \
      --protocol=HTTPS \
      --global
gcloud compute backend-services add-backend agentspace-ineg-bes \
      --network-endpoint-group=agentspace-ineg \
      --global-network-endpoint-group \
      --global
Create the Certificate
At this point, you have created the internet neg and backend service, in the following section you will need to create a certificate resource to use in the HTTPs target proxy. You can create an SSL certificate resource by using either a Google-managed SSL certificate or a self-managed SSL certificate. We recommend using Google-managed certificates because Google Cloud obtains, manages, and renews these certificates automatically.
To find out more about supported certificates for the Global external Application Load Balancer used in this tutorial refer to the following:
SSL certificates overview | Load Balancing | Google Cloud
In the following section, you will create a self signed certificate (although a google managed certificate can be used instead) that requires the mapping of the common name to the fully qualified domain name (agentspace.YOUR-EXTERNAL-IP.nip.io) corresponds to the load balancer's external IP address generated earlier, example below:
Common Name: agentspace.34.54.158.206.nip.io
Inside Cloud Shell, create the private key
openssl genrsa -out private-key-file.pem 2048
Inside Cloud Shell create a config.txt file used to generate the pem file. Specify the fully qualified domain name in the DNS 1 entry agentspace.YOUR-EXTERNAL-IP.nip.io e.g. agentspace.34.54.158.206.nip.io in the config below.
cat <<'EOF' >config.txt
[req]
default_bits              = 2048
req_extensions            = extension_requirements
distinguished_name        = dn_requirements

[extension_requirements]
basicConstraints          = CA:FALSE
keyUsage                  = nonRepudiation, digitalSignature, keyEncipherment
subjectAltName            = @sans_list

[dn_requirements]
countryName               = Country Name (2 letter code)
stateOrProvinceName       = State or Province Name (full name)
localityName              = Locality Name (eg, city)
organizationName          = Organization Name (eg, company)
organizationalUnitName    = Organizational Unit Name (eg, section)
commonName                = Common Name (e.g. server FQDN or YOUR name)
emailAddress              = Email Address

[sans_list]
DNS.1                     = agentspace.YOUR-EXTERNAL-IP.nip.io

EOF
Inside Cloud Shell, validate the config.txt and private-key-file.pem are generated.
user@cloudshell:$ ls
config.txt  private-key-file.pem
Inside Cloud Shell perform the following.
sudo openssl req -new -key private-key-file.pem \
    -out csr.pem \
    -config config.txt
Example:
user@cloudshell:$ sudo openssl req -new -key private-key-file.pem \
    -out csr.pem \
    -config config.txt
You are about to be asked to enter information that will be incorporated
into your certificate request.
What you are about to enter is what is called a Distinguished Name or a DN.
There are quite a few fields but you can leave some blank
For some fields there will be a default value,
If you enter '.', the field will be left blank.
-----
Country Name (2 letter code) []:
State or Province Name (full name) []:
Locality Name (eg, city) []:
Organization Name (eg, company) []:
Organizational Unit Name (eg, section) []:
Common Name (e.g. server FQDN or YOUR name)[]:agentspace.34.54.158.206.nip.io
Email Address []:
Inside Cloud Shell, validate the creation of the certificate signing required pem.
user@cloudshell:$ ls
config.txt  csr.pem  private-key-file.pem
Inside Cloud Shell, generate the certificate.
sudo openssl x509 -req \
    -signkey private-key-file.pem \
    -in csr.pem \
    -out cert.cert \
    -extfile config.txt \
    -extensions extension_requirements \
    -days 365
Example Output:
user@cloudshell:$ sudo openssl x509 -req \
    -signkey private-key-file.pem \
    -in csr.pem \
    -out cert.cert \
    -extfile config.txt \
    -extensions extension_requirements \
    -days 365
Certificate request self-signature ok
subject=CN = agentspace.34.54.158.206.nip.io
Inside Cloud Shell, validate the creation of the file, cert.cert
user@cloudshell:$ ls
cert.cert  config.txt  csr.pem  private-key-file.pem
Create a certificate resource to associate with your external load balancer. Replace the certificate and private-key parameters with your specific file names.
In Cloud Shell, perform the following:
gcloud compute ssl-certificates create agentspace-self-signed-cert \
    --certificate=cert.cert \
    --private-key=private-key-file.pem \
    --global
In Cloud Shell, perform the following:
gcloud compute url-maps create agentspace-lb \
      --default-service=agentspace-ineg-bes \
      --global
In Cloud Shell, perform the following:
gcloud compute target-https-proxies create https-proxy \
      --ssl-certificates=agentspace-self-signed-cert \
      --url-map=agentspace-lb \
      --global
In Cloud Shell, perform the following:
gcloud compute forwarding-rules create agentspace-fr \
      --load-balancing-scheme=EXTERNAL_MANAGED \
      --network-tier=PREMIUM \
      --address=external-ip \
      --target-https-proxy=https-proxy \
      --global \
      --ports=443
9. Create Public DNS Zone
In the following section, you'll create a Public DNS Zone used by nip.io to resolve against the external load balancer IP Address.
In Cloud Shell, perform following to create a variable for your external load balancer IP address:
externalip=<YOUR-EXTERNAL-IP>
echo $externalip
In Cloud Shell, perform the following:
gcloud dns --project=$project managed-zones create agentspace-dns --description="Agentspace public dns" --dns-name="$externalip.nip.io." --visibility="public"
In Cloud Shell, perform the following:
gcloud dns --project=$project record-sets create agentspace.$externalip.nip.io. --zone="agentspace-dns" --type="A" --ttl="300" --rrdatas="$externalip"
10. OAuth Credentials
In the following section, you'll create an Oauth credential for Web applications that redirects the Google-managed URL to oauth-redirect for authentication. The credentials generated are not required for the tutorial.
To find out more about Oauth, refer to the following:
Add Google Calendar and Gmail actions | Google Agentspace
Create an OAuth app and add scopes
- Go to the APIs & Services > OAuth consent screen: Go to the OAuth consent screen
- Select Internal and then click Create.
- Enter a name for your OAuth app.
- Enter a user support email.
- Enter developer contact information.
- Click Save and continue.
Create an OAuth client ID
This procedure describes how to create a new OAuth client ID for Google Cloud actions. This OAuth client ID and secret can also be used for other Google Cloud actions. If you have an existing Google Cloud OAuth client ID for Google Cloud actions, you can use that client ID and secret for Google Calendar actions instead of creating a new client ID.
- Go to the Credentials page and click Create credentials > OAuth client ID.
- Select Web application.
- Enter a name for your client ID.
- Click Add URI and enter the following URI: https://vertexaisearch.cloud.google.com/oauth-redirect
- Click Create and copy the following information:
- Client ID
- Client secret
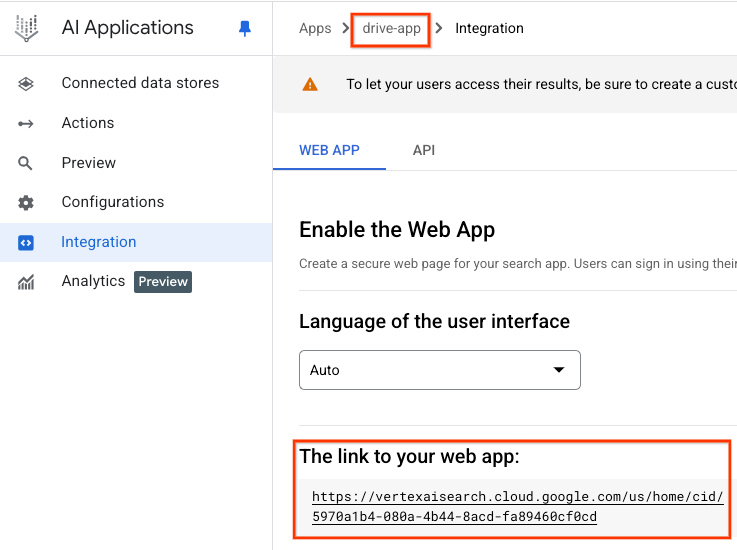
11. Identify Agentspace application URLs
The following procedure identifies the Google-managed Agentspace Public URLs generated by Google that are mapped to Agentspace each application. The output of the URLs are examples based on the reference architecture, therefore you must ensure your URLs are accurate.
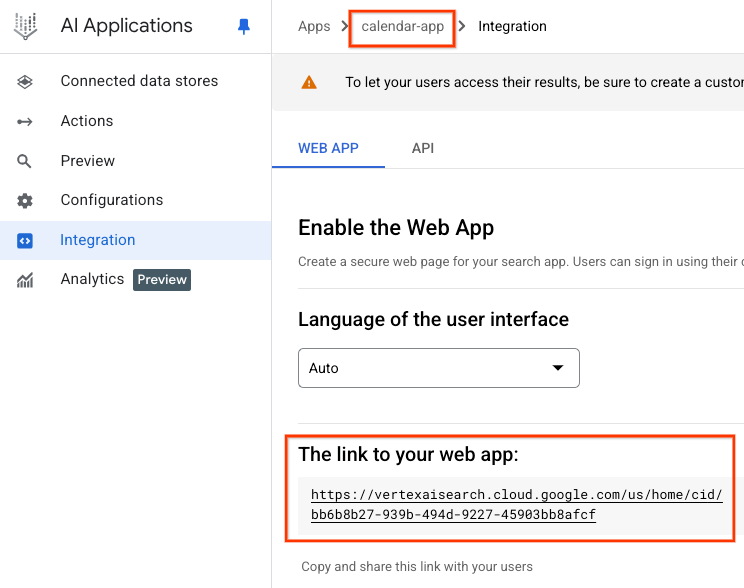
Ensure to store the link to your web app, per application.
Calendar Application
Agentspace Web URL: https://vertexaisearch.cloud.google.com/us/home/cid/bb6b8b27-939b-494d-9227-45903bb8afcf
Drive Application
Agentspace Web URL:
https://vertexaisearch.cloud.google.com/us/home/cid/5970a1b4-080a-4b44-8acd-fa89460cf0cd
12. Create Advanced host and path rule
In the following section, you'll update the load balancers routing rules to enable the option to define host and path rules using cloud console. The table below outlines the custom values (in top-down order), update based on your environment:
Custom Value | Example Based on Tutorial | |
Hosts | agentspace.YOUR-EXTERNAL-IP.nip.io | agentspace.34.54.158.206.nip.io |
defaultService | projects/<projectid>/global/backendServices/agentspace-ineg-bes | See Screenshot |
prefixMatch | /<name of Agentspace app#1> | /drive-app |
backendService | projects/<projectid>/global/backendServices/agentspace-ineg-bes | See Screenshot |
pathPrefixRewrite | /<Agentspace URL path of app#1> | /us/home/cid/5970a1b4-080a-4b44-8acd-fa89460cf0cd |
hostRewrite | vertexaisearch.cloud.google.com | vertexaisearch.cloud.google.com |
prefixMatch | /<name of Agentspace app#2> | /calendar-app |
backendService | projects/<projectid>/global/backendServices/agentspace-ineg-bes | See Screenshot |
pathPrefixRewrite | /<Agentspace URL path of app#2> | /us/home/cid/bb6b8b27-939b-494d-9227-45903bb8afcf |
hostRewrite | vertexaisearch.cloud.google.com | vertexaisearch.cloud.google.com |
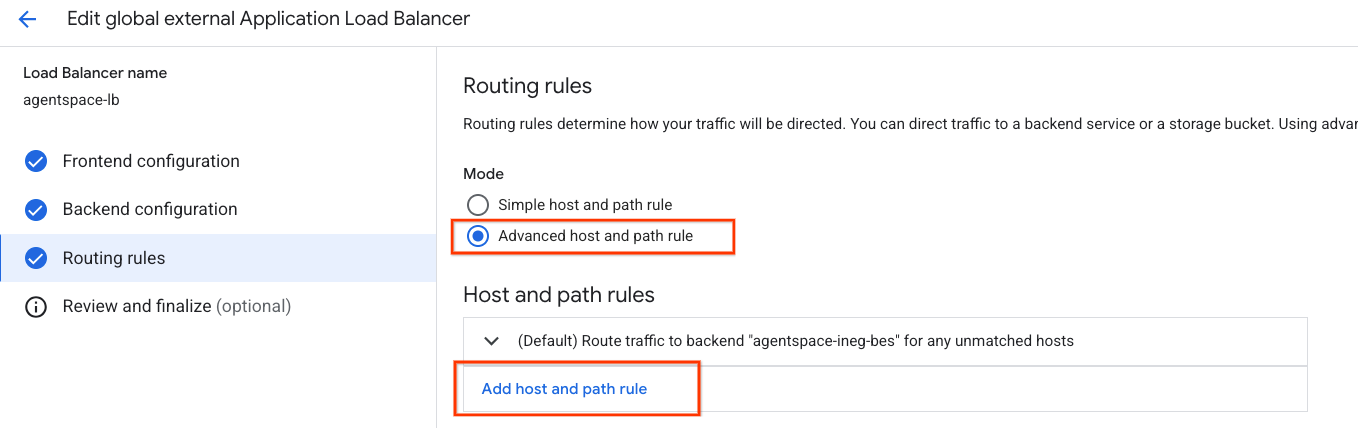
Navigate to the following to access host and path rules
Load balancing → agentspace-lb → Select edit
Select Routing rules → Advanced host and path rules
Select Add host and path rule
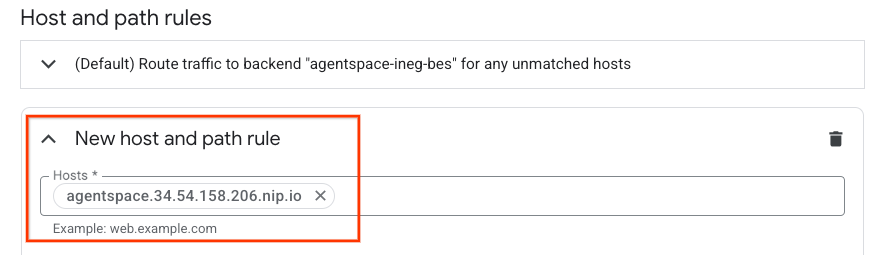
You are now presented with creating a new host and path rule, in the hosts section insert agentspace.YOUR-EXTERNAL-IP.nip.io or custom domain.
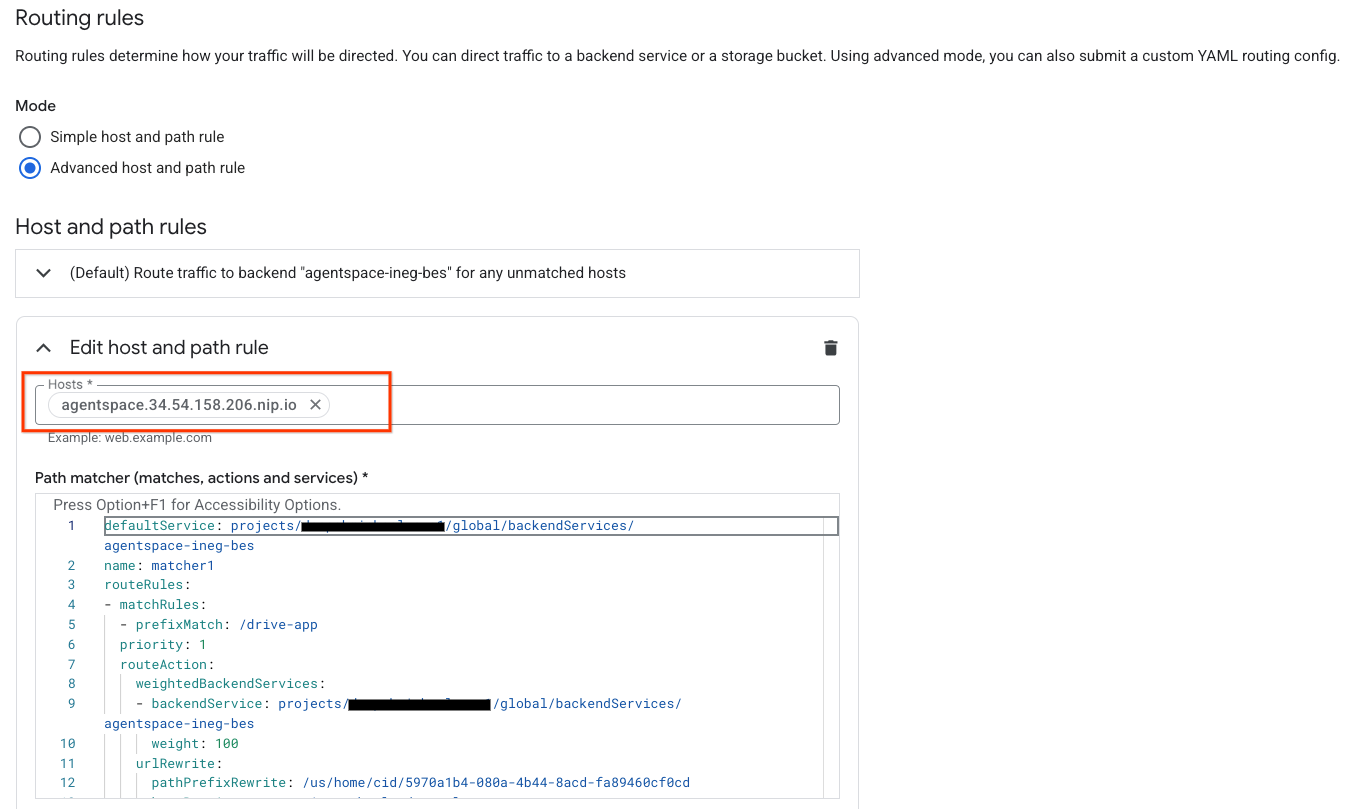
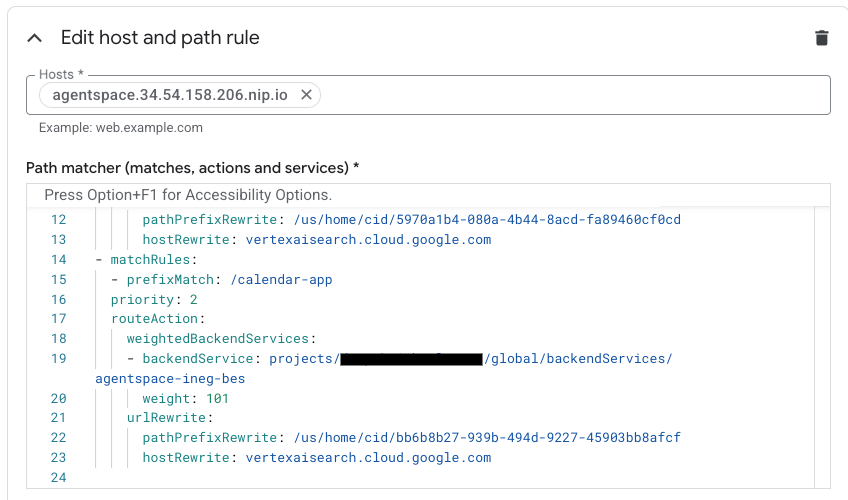
In the Path matcher field (matches, actions and services), update the content below with your environmental configuration then select update.
defaultService: projects/<projectid>/global/backendServices/agentspace-ineg-bes
name: matcher1
routeRules:
- matchRules:
 - prefixMatch: /<name of Agentspace app#1>
 priority: 1
 routeAction:
   weightedBackendServices:
   - backendService: projects/<projectid>/global/backendServices/agentspace-ineg-bes
     weight: 100
   urlRewrite:
     pathPrefixRewrite: /<Agentspace URL path of app#1>
     hostRewrite: vertexaisearch.cloud.google.com
- matchRules:
 - prefixMatch: /<name of Agentspace app#2>
 priority: 2
 routeAction:
   weightedBackendServices:
   - backendService: projects/<projectid>/global/backendServices/agentspace-ineg-bes
     weight: 101
   urlRewrite:
     pathPrefixRewrite: /<Agentspace URL path of app#2>
     hostRewrite: vertexaisearch.cloud.google.com
Example Screenshot:
13. Validation
The deployment is complete! You can access the Agentspace application using the custom domain through a web browser or terminal by specifying agentspace.YOUR-EXTERNAL-IP.nip.io/path e.g agentspace.34.54.158.206.nip.io, example(s) below:
Agentspace application: drive-app
Path: agentspace.34.54.158.206.nip.io/drive-app
Agentspace application: drive-app
Path: agentspace.34.54.158.206.nip.io/calendar-app
14. Clean up
Delete OAuth Credentials, perform the following:
Navigate to APIS & Services → Credentials
Under OAuth 2.0 Client IDs, select your credentials and then delete
From a single Cloud Shell terminal delete lab components:
gcloud compute forwarding-rules delete agentspace-fr --global -q

gcloud compute target-https-proxies delete https-proxy --global -q

gcloud compute url-maps delete agentspace-lb --global -q

cloud compute ssl-certificates delete agentspace-self-signed-cert --global -q

gcloud compute backend-services delete agentspace-ineg-bes --global -q

gcloud compute network-endpoint-groups delete agentspace-ineg --global -q

gcloud dns --project=$projectid record-sets delete agentspace.$externalip.nip.io --zone="agentspace-dns" --type="A"

gcloud dns --project=$projectid managed-zones delete agentspace-dns

gcloud compute addresses delete external-ip --global -q

gcloud compute networks delete agentspace-vpc -q
15. Congratulations
Congratulations, you've successfully configured and validated connectivity to a Agentspace using a custom domain using an External Application Load Balancer with advanced traffic management.
You created the load balancer infrastructure, learned how to create an Internet NEG, Cloud DNS and advanced traffic management that enabled host and path rewrite that allowed connectivity to Agentspace using a custom domain.
Cosmopup thinks codelabs are awesome!!
