
1. 概要

Document AI とは
Document AI は、ドキュメントから分析情報を抽出できるプラットフォームです。このサービスは、機能に応じてパーサーまたはスプリッタとも呼ばれるドキュメント プロセッサのリストを提供します。
Document AI プロセッサを管理する方法は 2 つあります。
- ウェブ コンソールから手動で
- Document AI API を使用してプログラムで実行する。
ウェブ コンソールと Python コードの両方からプロセッサのリストを表示するスクリーンショットの例を次に示します。
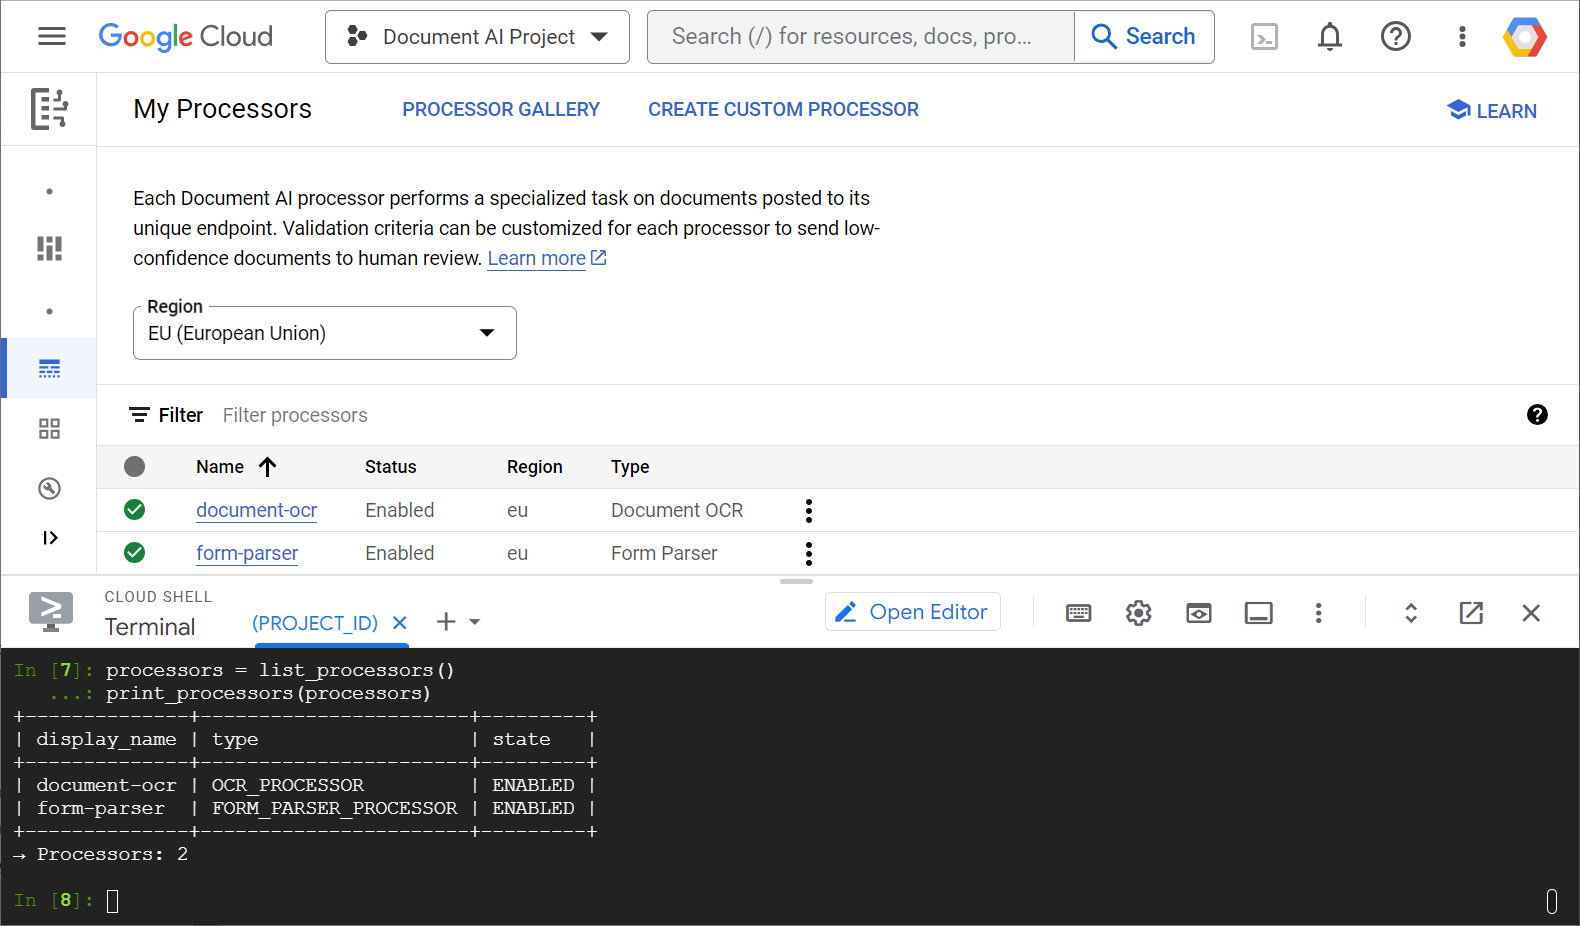
このラボでは、Python クライアント ライブラリを使用して Document AI プロセッサをプログラムで管理する方法について説明します。
表示される内容
- 環境の設定方法
- プロセッサのタイプを取得する方法
- プロセッサを作成する方法
- プロジェクト プロセッサを一覧表示する方法
- プロセッサの使用方法
- プロセッサを有効または無効にする方法
- プロセッサ バージョンを管理する方法
- プロセッサを削除する方法
必要なもの
アンケート
このチュートリアルをどのように使用されますか?
Python のご利用経験はどの程度ありますか?
Google Cloud サービスの使用経験はどの程度ありますか?
2. 設定と要件
セルフペース型の環境設定
- Google Cloud Console にログインして、プロジェクトを新規作成するか、既存のプロジェクトを再利用します。Gmail アカウントも Google Workspace アカウントもまだお持ちでない場合は、アカウントを作成してください。


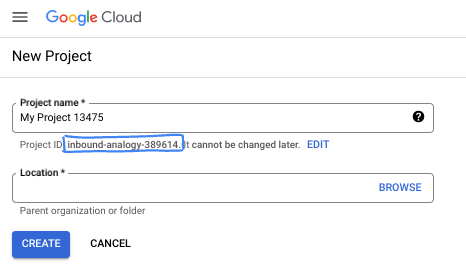
- プロジェクト名は、このプロジェクトの参加者に表示される名称です。Google API では使用されない文字列です。いつでも更新できます。
- プロジェクト ID は、すべての Google Cloud プロジェクトにおいて一意でなければならず、不変です(設定後は変更できません)。Cloud コンソールでは一意の文字列が自動生成されます。通常は、この内容を意識する必要はありません。ほとんどの Codelab では、プロジェクト ID(通常は
PROJECT_IDと識別されます)を参照する必要があります。生成された ID が好みではない場合は、ランダムに別の ID を生成できます。または、ご自身で試して、利用可能かどうかを確認することもできます。このステップ以降は変更できず、プロジェクトを通して同じ ID になります。 - なお、3 つ目の値として、一部の API が使用するプロジェクト番号があります。これら 3 つの値について詳しくは、こちらのドキュメントをご覧ください。
- 次に、Cloud のリソースや API を使用するために、Cloud コンソールで課金を有効にする必要があります。この Codelab の操作をすべて行って、費用が生じたとしても、少額です。このチュートリアルの終了後に請求が発生しないようにリソースをシャットダウンするには、作成したリソースを削除するか、プロジェクトを削除します。Google Cloud の新規ユーザーは、300 米ドル分の無料トライアル プログラムをご利用いただけます。
Cloud Shell の起動
Google Cloud はノートパソコンからリモートで操作できますが、このラボでは、Cloud Shell(Cloud 上で動作するコマンドライン環境)を使用します。
Cloud Shell をアクティブにする
- Cloud Console で、[Cloud Shell をアクティブにする]
 をクリックします。

Cloud Shell を初めて起動する場合は、その内容を説明する中間画面が表示されます。中間画面が表示された場合は、[続行] をクリックします。
すぐにプロビジョニングが実行され、Cloud Shell に接続されます。

この仮想マシンには、必要な開発ツールがすべて用意されています。仮想マシンは Google Cloud で稼働し、永続的なホーム ディレクトリが 5 GB 用意されているため、ネットワークのパフォーマンスと認証が大幅に向上しています。このコードラボで行う作業のほとんどはブラウザから実行できます。
Cloud Shell に接続すると、認証が完了しており、プロジェクトに各自のプロジェクト ID が設定されていることがわかります。
- Cloud Shell で次のコマンドを実行して、認証されたことを確認します。
gcloud auth list
コマンド出力
 Credentialed Accounts
ACTIVE  ACCOUNT
*       <my_account>@<my_domain.com>

To set the active account, run:
    $ gcloud config set account `ACCOUNT`
- Cloud Shell で次のコマンドを実行して、gcloud コマンドがプロジェクトを認識していることを確認します。
gcloud config list project
コマンド出力
[core]
project = <PROJECT_ID>
上記のようになっていない場合は、次のコマンドで設定できます。
gcloud config set project <PROJECT_ID>
コマンド出力
Updated property [core/project].
3. 環境のセットアップ
Document AI の使用を開始する前に、Cloud Shell で次のコマンドを実行して Document AI API を有効にします。
gcloud services enable documentai.googleapis.com
次のように表示されます。
Operation "operations/..." finished successfully.
これで Document AI を使用できるようになりました。
ホーム ディレクトリに移動します。
cd ~
依存関係を分離する Python 仮想環境を作成します。
virtualenv venv-docai
仮想環境をアクティブにします。
source venv-docai/bin/activate
IPython、Document AI クライアント ライブラリ、python-tabulate(リクエスト結果の整形に使用)をインストールします。
pip install ipython google-cloud-documentai tabulate
次のように表示されます。
...
Installing collected packages: ..., tabulate, ipython, google-cloud-documentai
Successfully installed ... google-cloud-documentai-2.15.0 ...
これで、Document AI クライアント ライブラリを使用する準備が整いました。
次の環境変数を設定します。
export PROJECT_ID=$(gcloud config get-value core/project)
# Choose "us" or "eu"
export API_LOCATION="us"
以降の手順はすべて同じセッション内で完了する必要があります。
環境変数が正しく定義されていることを確認します。
echo $PROJECT_ID
echo $API_LOCATION
次のステップでは、インストールしたばかりの IPython というインタラクティブな Python インタープリタを使用します。Cloud Shell で ipython を実行してセッションを開始します。
ipython
次のように表示されます。
Python 3.12.3 (main, Feb  4 2025, 14:48:35) [GCC 13.3.0]
Type 'copyright', 'credits' or 'license' for more information
IPython 9.1.0 -- An enhanced Interactive Python. Type '?' for help.

In [1]:
次のコードを IPython セッションにコピーします。
import os
from typing import Iterator, MutableSequence, Optional, Sequence, Tuple

import google.cloud.documentai_v1 as docai
from tabulate import tabulate

PROJECT_ID = os.getenv("PROJECT_ID", "")
API_LOCATION = os.getenv("API_LOCATION", "")

assert PROJECT_ID, "PROJECT_ID is undefined"
assert API_LOCATION in ("us", "eu"), "API_LOCATION is incorrect"

# Test processors
document_ocr_display_name = "document-ocr"
form_parser_display_name = "form-parser"

test_processor_display_names_and_types = (
    (document_ocr_display_name, "OCR_PROCESSOR"),
    (form_parser_display_name, "FORM_PARSER_PROCESSOR"),
)

def get_client() -> docai.DocumentProcessorServiceClient:
    client_options = {"api_endpoint": f"{API_LOCATION}-documentai.googleapis.com"}
    return docai.DocumentProcessorServiceClient(client_options=client_options)

def get_parent(client: docai.DocumentProcessorServiceClient) -> str:
    return client.common_location_path(PROJECT_ID, API_LOCATION)

def get_client_and_parent() -> Tuple[docai.DocumentProcessorServiceClient, str]:
    client = get_client()
    parent = get_parent(client)
    return client, parent
これで、最初のリクエストを作成してプロセッサ タイプを取得する準備が整いました。
4. プロセッサ タイプを取得する
次のステップでプロセッサを作成する前に、使用可能なプロセッサ タイプを取得します。このリストは fetch_processor_types で取得できます。
IPython セッションに次の関数を追加します。
def fetch_processor_types() -> MutableSequence[docai.ProcessorType]:
    client, parent = get_client_and_parent()
    response = client.fetch_processor_types(parent=parent)

    return response.processor_types

def print_processor_types(processor_types: Sequence[docai.ProcessorType]):
    def sort_key(pt):
        return (not pt.allow_creation, pt.category, pt.type_)

    sorted_processor_types = sorted(processor_types, key=sort_key)
    data = processor_type_tabular_data(sorted_processor_types)
    headers = next(data)
    colalign = next(data)

    print(tabulate(data, headers, tablefmt="pretty", colalign=colalign))
    print(f"→ Processor types: {len(sorted_processor_types)}")

def processor_type_tabular_data(
    processor_types: Sequence[docai.ProcessorType],
) -> Iterator[Tuple[str, str, str, str]]:
    def locations(pt):
        return ", ".join(sorted(loc.location_id for loc in pt.available_locations))

    yield ("type", "category", "allow_creation", "locations")
    yield ("left", "left", "left", "left")
    if not processor_types:
        yield ("-", "-", "-", "-")
        return
    for pt in processor_types:
        yield (pt.type_, pt.category, f"{pt.allow_creation}", locations(pt))
プロセッサ タイプを一覧表示します。
processor_types = fetch_processor_types()
print_processor_types(processor_types)
次のような出力が表示されます。
+--------------------------------------+-------------+----------------+-----------+
| type                                 | category    | allow_creation | locations |
+--------------------------------------+-------------+----------------+-----------+
| CUSTOM_CLASSIFICATION_PROCESSOR      | CUSTOM      | True           | eu, us    |
...
| FORM_PARSER_PROCESSOR                | GENERAL     | True           | eu, us    |
| LAYOUT_PARSER_PROCESSOR              | GENERAL     | True           | eu, us    |
| OCR_PROCESSOR                        | GENERAL     | True           | eu, us    |
| BANK_STATEMENT_PROCESSOR             | SPECIALIZED | True           | eu, us    |
| EXPENSE_PROCESSOR                    | SPECIALIZED | True           | eu, us    |
...
+--------------------------------------+-------------+----------------+-----------+
→ Processor types: 19
これで、次のステップでプロセッサを作成するために必要な情報がすべて揃いました。
5. プロセッサの作成
プロセッサを作成するには、表示名とプロセッサ タイプを指定して create_processor を呼び出します。
次の関数を追加します。
def create_processor(display_name: str, type: str) -> docai.Processor:
    client, parent = get_client_and_parent()
    processor = docai.Processor(display_name=display_name, type_=type)

    return client.create_processor(parent=parent, processor=processor)
テスト プロセッサを作成します。
separator = "=" * 80
for display_name, type in test_processor_display_names_and_types:
    print(separator)
    print(f"Creating {display_name} ({type})...")
    try:
        create_processor(display_name, type)
    except Exception as err:
        print(err)
print(separator)
print("Done")
次の結果が得られます。
================================================================================
Creating document-ocr (OCR_PROCESSOR)...
================================================================================
Creating form-parser (FORM_PARSER_PROCESSOR)...
================================================================================
Done
新しいプロセッサを作成しました。
次に、プロセッサを一覧表示する方法について説明します。
6. プロジェクト プロセッサの一覧表示
list_processors は、プロジェクトに属するすべてのプロセッサのリストを返します。
次の関数を追加します。
def list_processors() -> MutableSequence[docai.Processor]:
    client, parent = get_client_and_parent()
    response = client.list_processors(parent=parent)

    return list(response.processors)

def print_processors(processors: Optional[Sequence[docai.Processor]] = None):
    def sort_key(processor):
        return processor.display_name

    if processors is None:
        processors = list_processors()
    sorted_processors = sorted(processors, key=sort_key)
    data = processor_tabular_data(sorted_processors)
    headers = next(data)
    colalign = next(data)

    print(tabulate(data, headers, tablefmt="pretty", colalign=colalign))
    print(f"→ Processors: {len(sorted_processors)}")

def processor_tabular_data(
    processors: Sequence[docai.Processor],
) -> Iterator[Tuple[str, str, str]]:
    yield ("display_name", "type", "state")
    yield ("left", "left", "left")
    if not processors:
        yield ("-", "-", "-")
        return
    for processor in processors:
        yield (processor.display_name, processor.type_, processor.state.name)
関数を呼び出します。
processors = list_processors()
print_processors(processors)
次の結果が得られます。
+--------------+-----------------------+---------+
| display_name | type                  | state   |
+--------------+-----------------------+---------+
| document-ocr | OCR_PROCESSOR         | ENABLED |
| form-parser  | FORM_PARSER_PROCESSOR | ENABLED |
+--------------+-----------------------+---------+
→ Processors: 2
表示名でプロセッサを取得するには、次の関数を追加します。
def get_processor(
    display_name: str,
    processors: Optional[Sequence[docai.Processor]] = None,
) -> Optional[docai.Processor]:
    if processors is None:
        processors = list_processors()
    for processor in processors:
        if processor.display_name == display_name:
            return processor
    return None
関数をテストします。
processor = get_processor(document_ocr_display_name, processors)

assert processor is not None
print(processor)
次のように表示されます。
name: "projects/PROJECT_NUM/locations/LOCATION/processors/PROCESSOR_ID"
type_: "OCR_PROCESSOR"
display_name: "document-ocr"
state: ENABLED
...
これで、プロジェクト プロセッサを一覧表示し、表示名で取得する方法がわかりました。次に、プロセッサの使用方法について説明します。
7. プロセッサの使用
ドキュメントは次の 2 つの方法で処理できます。
- 同期:
process_documentを呼び出して、1 つのドキュメントを分析し、結果を直接使用します。 - 非同期:
batch_process_documentsを呼び出して、複数のドキュメントまたは大きなドキュメントに対してバッチ処理を開始します。
テスト ドキュメント(PDF)は、手書きの回答が記入されたアンケートをスキャンしたものです。IPython セッションから作業ディレクトリに直接ダウンロードします。
!gsutil cp gs://cloud-samples-data/documentai/form.pdf .
作業ディレクトリの内容を確認します。
!ls
次のリソースが必要です。
... form.pdf ... venv-docai ...
同期 process_document メソッドを使用して、ローカル ファイルを分析できます。次の関数を追加します。
def process_file(
    processor: docai.Processor,
    file_path: str,
    mime_type: str,
) -> docai.Document:
    client = get_client()
    with open(file_path, "rb") as document_file:
        document_content = document_file.read()
    document = docai.RawDocument(content=document_content, mime_type=mime_type)
    request = docai.ProcessRequest(raw_document=document, name=processor.name)

    response = client.process_document(request)

    return response.document
ドキュメントはアンケートであるため、フォーム パーサーを選択します。すべてのプロセッサが行うテキスト(印刷されたテキストと手書きテキスト)の抽出に加えて、この汎用プロセッサはフォーム フィールドを検出します。
ドキュメントを分析します。
processor = get_processor(form_parser_display_name)
assert processor is not None

file_path = "./form.pdf"
mime_type = "application/pdf"

document = process_file(processor, file_path, mime_type)
すべてのプロセッサは、ドキュメントに対して光学式文字認識(OCR)の最初のパスを実行します。OCR パスで検出されたテキストを確認します。
document.text.split("\n")
次のような画面が表示されます。
['FakeDoc M.D.',
 'HEALTH INTAKE FORM',
 'Please fill out the questionnaire carefully. The information you provide will be used to complete',
 'your health profile and will be kept confidential.',
 'Date:',
 '9/14/19',
 'Name:',
 'Sally Walker',
 'DOB: 09/04/1986',
 'Address: 24 Barney Lane',
 'City: Towaco',
 'State: NJ Zip: 07082',
 'Email: Sally, walker@cmail.com',
 '_Phone #: (906) 917-3486',
 'Gender: F',
 'Marital Status:',
  ...
]
検出されたフォーム フィールドを出力する次の関数を追加します。
def print_form_fields(document: docai.Document):
    sorted_form_fields = form_fields_sorted_by_ocr_order(document)
    data = form_field_tabular_data(sorted_form_fields, document)
    headers = next(data)
    colalign = next(data)

    print(tabulate(data, headers, tablefmt="pretty", colalign=colalign))
    print(f"→ Form fields: {len(sorted_form_fields)}")

def form_field_tabular_data(
    form_fields: Sequence[docai.Document.Page.FormField],
    document: docai.Document,
) -> Iterator[Tuple[str, str, str]]:
    yield ("name", "value", "confidence")
    yield ("right", "left", "right")
    if not form_fields:
        yield ("-", "-", "-")
        return
    for form_field in form_fields:
        name_layout = form_field.field_name
        value_layout = form_field.field_value
        name = text_from_layout(name_layout, document)
        value = text_from_layout(value_layout, document)
        confidence = value_layout.confidence
        yield (name, value, f"{confidence:.1%}")
また、次のユーティリティ関数も追加します。
def form_fields_sorted_by_ocr_order(
    document: docai.Document,
) -> MutableSequence[docai.Document.Page.FormField]:
    def sort_key(form_field):
        # Sort according to the field name detected position
        text_anchor = form_field.field_name.text_anchor
        return text_anchor.text_segments[0].start_index if text_anchor else 0

    fields = (field for page in document.pages for field in page.form_fields)

    return sorted(fields, key=sort_key)


def text_from_layout(
    layout: docai.Document.Page.Layout,
    document: docai.Document,
) -> str:
    full_text = document.text
    segs = layout.text_anchor.text_segments
    text = "".join(full_text[seg.start_index : seg.end_index] for seg in segs)
    if text.endswith("\n"):
        text = text[:-1]

    return text
検出されたフォーム フィールドを印刷します。
print_form_fields(document)
次のような出力が表示されます。
+-----------------+-------------------------+------------+
|            name | value                   | confidence |
+-----------------+-------------------------+------------+
|           Date: | 9/14/19                 |      83.0% |
|           Name: | Sally Walker            |      87.3% |
|            DOB: | 09/04/1986              |      88.5% |
|        Address: | 24 Barney Lane          |      82.4% |
|           City: | Towaco                  |      90.0% |
|          State: | NJ                      |      89.4% |
|            Zip: | 07082                   |      91.4% |
|          Email: | Sally, walker@cmail.com |      79.7% |
|       _Phone #: | walker@cmail.com        |      93.2% |
|                 | (906                    |            |
|         Gender: | F                       |      88.2% |
| Marital Status: | Single                  |      85.2% |
|     Occupation: | Software Engineer       |      81.5% |
|    Referred By: | None                    |      76.9% |
...
+-----------------+-------------------------+------------+
→ Form fields: 17
検出されたフィールド名と値を確認します(PDF)。アンケートの上半分は次のとおりです。
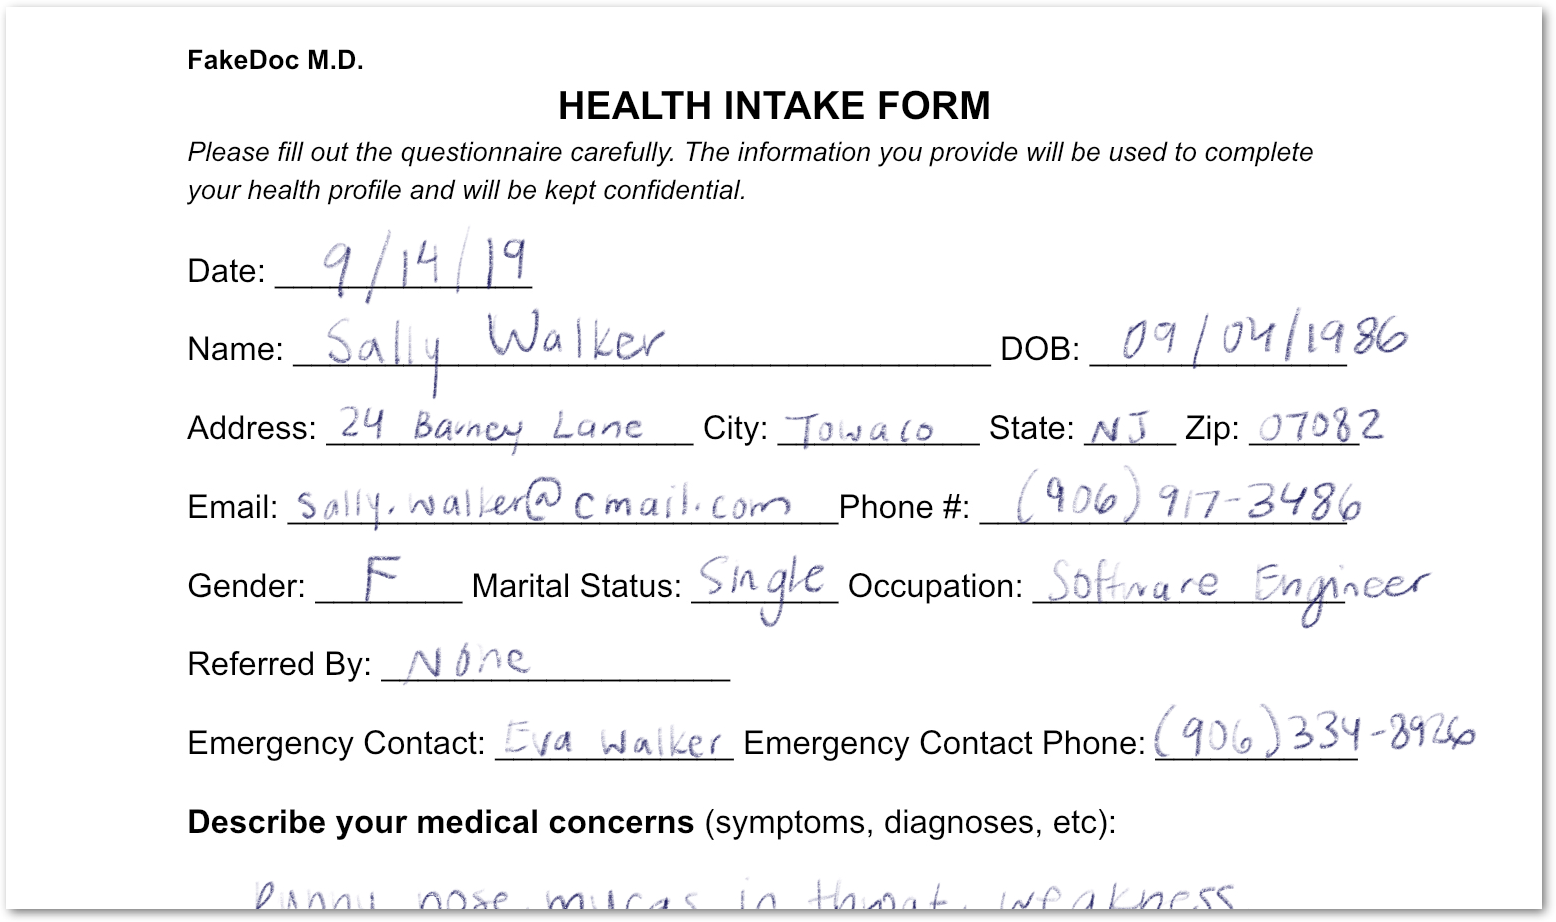
印刷テキストと手書き文字の両方を含むフォームを分析しました。また、信頼度の高いフィールドも検出されています。その結果、ピクセルが構造化データに変換されました。
8. プロセッサの有効化と無効化
disable_processor と enable_processor を使用すると、プロセッサを使用できるかどうかを制御できます。
次の関数を追加します。
def update_processor_state(processor: docai.Processor, enable_processor: bool):
    client = get_client()
    if enable_processor:
        request = docai.EnableProcessorRequest(name=processor.name)
        operation = client.enable_processor(request)
    else:
        request = docai.DisableProcessorRequest(name=processor.name)
        operation = client.disable_processor(request)
    operation.result()  # Wait for operation to complete

def enable_processor(processor: docai.Processor):
    update_processor_state(processor, True)

def disable_processor(processor: docai.Processor):
    update_processor_state(processor, False)
フォーム パーサー プロセッサを無効にして、プロセッサの状態を確認します。
processor = get_processor(form_parser_display_name)
assert processor is not None

disable_processor(processor)
print_processors()
次の結果が得られます。
+--------------+-----------------------+----------+
| display_name | type                  | state    |
+--------------+-----------------------+----------+
| document-ocr | OCR_PROCESSOR         | ENABLED  |
| form-parser  | FORM_PARSER_PROCESSOR | DISABLED |
+--------------+-----------------------+----------+
→ Processors: 2
フォーム パーサー プロセッサを再度有効にします。
enable_processor(processor)
print_processors()
次の結果が得られます。
+--------------+-----------------------+---------+
| display_name | type                  | state   |
+--------------+-----------------------+---------+
| document-ocr | OCR_PROCESSOR         | ENABLED |
| form-parser  | FORM_PARSER_PROCESSOR | ENABLED |
+--------------+-----------------------+---------+
→ Processors: 2
次に、プロセッサ バージョンを管理する方法について説明します。
9. プロセッサ バージョンの管理
プロセッサには複数のバージョンがあります。list_processor_versions メソッドと set_default_processor_version メソッドの使用方法を確認してください。
次の関数を追加します。
def list_processor_versions(
    processor: docai.Processor,
) -> MutableSequence[docai.ProcessorVersion]:
    client = get_client()
    response = client.list_processor_versions(parent=processor.name)

    return list(response)


def get_sorted_processor_versions(
    processor: docai.Processor,
) -> MutableSequence[docai.ProcessorVersion]:
    def sort_key(processor_version: docai.ProcessorVersion):
        return processor_version.name

    versions = list_processor_versions(processor)

    return sorted(versions, key=sort_key)


def print_processor_versions(processor: docai.Processor):
    versions = get_sorted_processor_versions(processor)
    default_version_name = processor.default_processor_version
    data = processor_versions_tabular_data(versions, default_version_name)
    headers = next(data)
    colalign = next(data)

    print(tabulate(data, headers, tablefmt="pretty", colalign=colalign))
    print(f"→ Processor versions: {len(versions)}")


def processor_versions_tabular_data(
    versions: Sequence[docai.ProcessorVersion],
    default_version_name: str,
) -> Iterator[Tuple[str, str, str]]:
    yield ("version", "display name", "default")
    yield ("left", "left", "left")
    if not versions:
        yield ("-", "-", "-")
        return
    for version in versions:
        mapping = docai.DocumentProcessorServiceClient.parse_processor_version_path(
            version.name
        )
        processor_version = mapping["processor_version"]
        is_default = "Y" if version.name == default_version_name else ""
        yield (processor_version, version.display_name, is_default)
OCR プロセッサで使用可能なバージョンを一覧表示します。
processor = get_processor(document_ocr_display_name)
assert processor is not None
print_processor_versions(processor)
プロセッサ バージョンを取得します。
+--------------------------------+--------------------------+---------+
| version                        | display name             | default |
+--------------------------------+--------------------------+---------+
| pretrained-ocr-v1.0-2020-09-23 | Google Stable            |         |
| pretrained-ocr-v1.1-2022-09-12 | Google Release Candidate |         |
| pretrained-ocr-v1.2-2022-11-10 | Google Release Candidate |         |
| pretrained-ocr-v2.0-2023-06-02 | Google Stable            | Y       |
| pretrained-ocr-v2.1-2024-08-07 | Google Release Candidate |         |
+--------------------------------+--------------------------+---------+
→ Processor versions: 5
次に、デフォルトのプロセッサ バージョンを変更する関数を追加します。
def set_default_processor_version(processor: docai.Processor, version_name: str):
    client = get_client()
    request = docai.SetDefaultProcessorVersionRequest(
        processor=processor.name,
        default_processor_version=version_name,
    )

    operation = client.set_default_processor_version(request)
    operation.result()  # Wait for operation to complete
最新のプロセッサ バージョンに切り替えます。
processor = get_processor(document_ocr_display_name)
assert processor is not None
versions = get_sorted_processor_versions(processor)

new_version = versions[-1]  # Latest version
set_default_processor_version(processor, new_version.name)

# Update the processor info
processor = get_processor(document_ocr_display_name)
assert processor is not None
print_processor_versions(processor)
新しいバージョンの構成を取得します。
+--------------------------------+--------------------------+---------+
| version                        | display name             | default |
+--------------------------------+--------------------------+---------+
| pretrained-ocr-v1.0-2020-09-23 | Google Stable            |         |
| pretrained-ocr-v1.1-2022-09-12 | Google Release Candidate |         |
| pretrained-ocr-v1.2-2022-11-10 | Google Release Candidate |         |
| pretrained-ocr-v2.0-2023-06-02 | Google Stable            |         |
| pretrained-ocr-v2.1-2024-08-07 | Google Release Candidate | Y       |
+--------------------------------+--------------------------+---------+
→ Processor versions: 5
次に、究極のプロセッサ管理方法(削除)について説明します。
10. プロセッサの削除
最後に、delete_processor メソッドの使用方法を確認します。
次の関数を追加します。
def delete_processor(processor: docai.Processor):
    client = get_client()
    operation = client.delete_processor(name=processor.name)
    operation.result()  # Wait for operation to complete
テスト プロセッサを削除します。
processors_to_delete = [dn for dn, _ in test_processor_display_names_and_types]
print("Deleting processors...")

for processor in list_processors():
    if processor.display_name not in processors_to_delete:
        continue
    print(f"  Deleting {processor.display_name}...")
    delete_processor(processor)

print("Done\n")
print_processors()
次の結果が得られます。
Deleting processors...
  Deleting form-parser...
  Deleting document-ocr...
Done

+--------------+------+-------+
| display_name | type | state |
+--------------+------+-------+
| -            | -    | -     |
+--------------+------+-------+
→ Processors: 0
これで、プロセッサの管理方法をすべて説明しました。これで手続きはほぼ完了です。
11. 完了
Python を使用して Document AI プロセッサを管理する方法を学びました。
クリーンアップ
開発環境をクリーンアップするには、Cloud Shell で次の操作を行います。
- IPython セッションがまだ開いている場合は、シェルに戻ります。
exit - Python 仮想環境の使用を停止します。
deactivate - 仮想環境フォルダ
cd ~ ; rm -rf ./venv-docaiを削除します。
Google Cloud プロジェクトを削除するには、Cloud Shell で次の操作を行います。
- 現在のプロジェクト ID を取得します。
PROJECT_ID=$(gcloud config get-value core/project) - 削除するプロジェクトが
echo $PROJECT_IDであることを確認します。 - プロジェクトを削除する:
gcloud projects delete $PROJECT_ID
詳細
- ブラウザで Document AI を試す: https://cloud.google.com/document-ai/docs/drag-and-drop
- Document AI プロセッサの詳細: https://cloud.google.com/document-ai/docs/processors-list
- Google Cloud 上の Python: https://cloud.google.com/python
- Python 用 Cloud クライアント ライブラリ: https://github.com/googleapis/google-cloud-python
ライセンス
この作業はクリエイティブ・コモンズの表示 2.0 汎用ライセンスにより使用許諾されています。