1. 개요

Document AI란?
Document AI는 문서에서 유용한 정보를 추출할 수 있는 플랫폼입니다. 핵심적으로 문서 처리기 (기능에 따라 파서 또는 스플리터라고도 함)의 목록을 계속 늘려가고 있습니다.
Document AI 프로세서를 관리하는 방법에는 두 가지가 있습니다.
- 웹 콘솔에서 수동으로
- Document AI API를 사용하여 프로그래매틱 방식으로
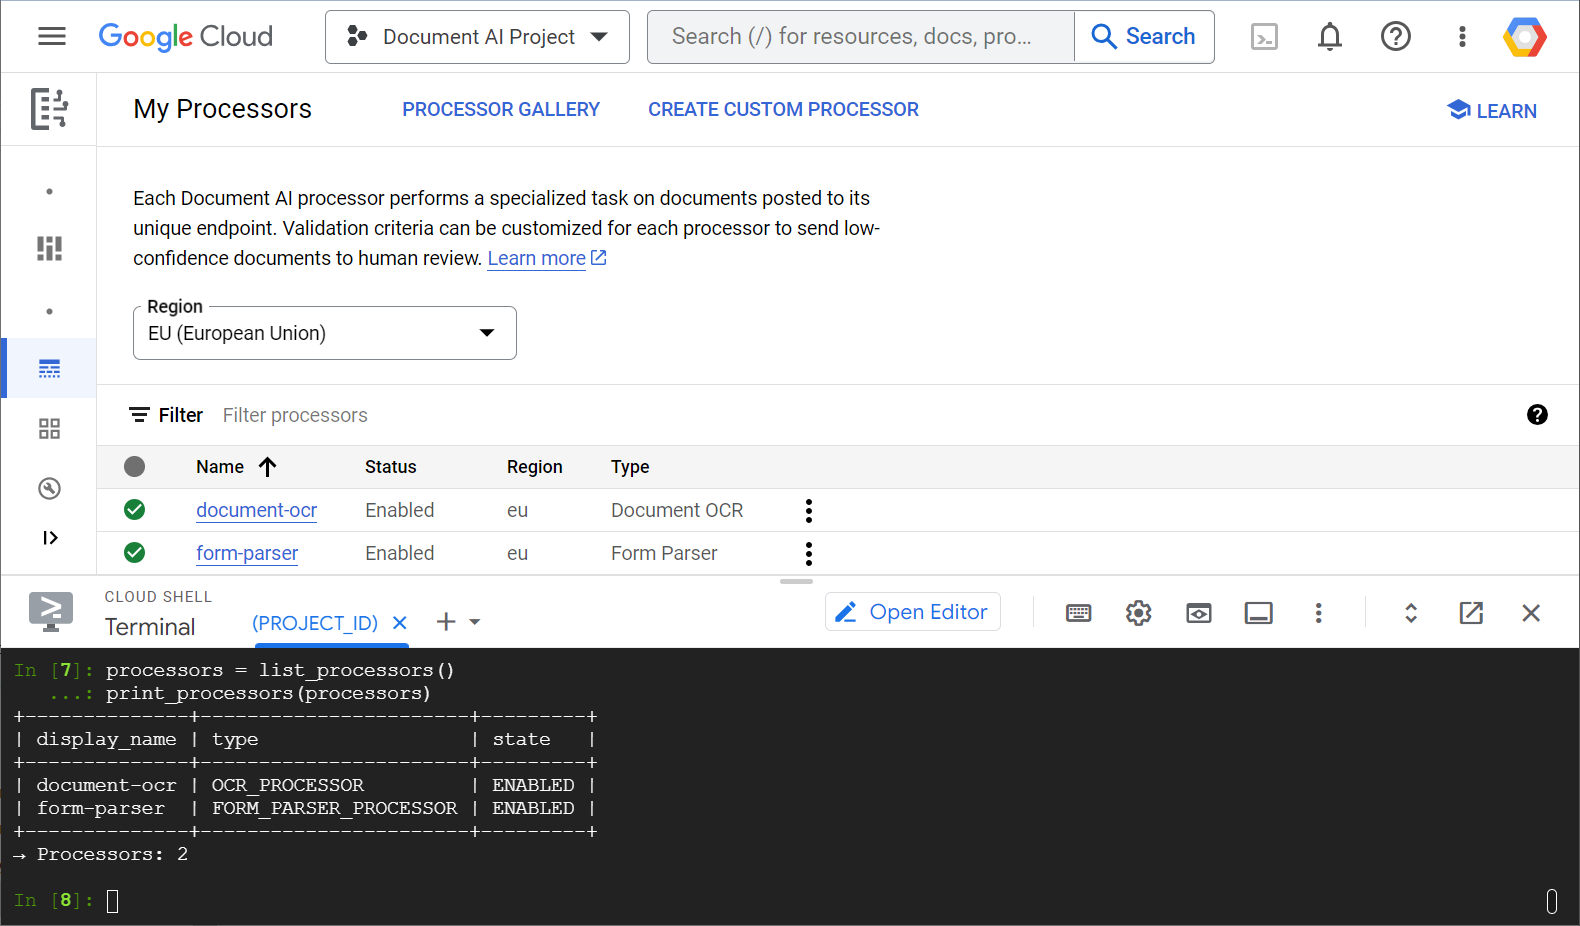
다음은 웹 콘솔과 Python 코드의 프로세서 목록을 보여주는 스크린샷 예입니다.

이 실습에서는 Python 클라이언트 라이브러리를 사용하여 Document AI 프로세서를 프로그래매틱 방식으로 관리하는 방법을 중점적으로 알아봅니다.
표시되는 내용
- 환경을 설정하는 방법
- 프로세서 유형을 가져오는 방법
- 프로세서를 만드는 방법
- 프로젝트 프로세서를 나열하는 방법
- 프로세서 사용 방법
- 프로세서를 사용 설정/사용 중지하는 방법
- 프로세서 버전 관리 방법
- 프로세서를 삭제하는 방법
필요한 항목
설문조사
이 튜토리얼을 어떻게 사용하실 계획인가요?
귀하의 Python 사용 경험이 어떤지 평가해 주세요.
귀하의 Google Cloud 서비스 사용 경험을 평가해 주세요.
2. 설정 및 요건
자습형 환경 설정
- Google Cloud Console에 로그인하여 새 프로젝트를 만들거나 기존 프로젝트를 재사용합니다. 아직 Gmail이나 Google Workspace 계정이 없는 경우 계정을 만들어야 합니다.


- 프로젝트 이름은 이 프로젝트 참가자의 표시 이름입니다. 이는 Google API에서 사용하지 않는 문자열이며 언제든지 업데이트할 수 있습니다.
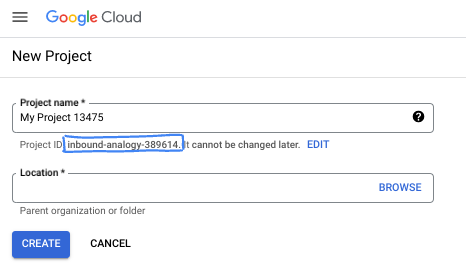
- 프로젝트 ID는 모든 Google Cloud 프로젝트에서 고유하며, 변경할 수 없습니다(설정된 후에는 변경할 수 없음). Cloud 콘솔은 고유한 문자열을 자동으로 생성합니다. 일반적으로는 신경 쓰지 않아도 됩니다. 대부분의 Codelab에서는 프로젝트 ID (일반적으로
PROJECT_ID로 식별됨)를 참조해야 합니다. 생성된 ID가 마음에 들지 않으면 다른 임의 ID를 생성할 수 있습니다. 또는 직접 시도해 보고 사용 가능한지 확인할 수도 있습니다. 이 단계 이후에는 변경할 수 없으며 프로젝트 기간 동안 유지됩니다. - 참고로 세 번째 값은 일부 API에서 사용하는 프로젝트 번호입니다. 이 세 가지 값에 대한 자세한 내용은 문서를 참고하세요.
- 다음으로 Cloud 리소스/API를 사용하려면 Cloud 콘솔에서 결제를 사용 설정해야 합니다. 이 Codelab 실행에는 많은 비용이 들지 않습니다. 이 튜토리얼이 끝난 후에 요금이 청구되지 않도록 리소스를 종료하려면 만든 리소스 또는 프로젝트를 삭제하면 됩니다. Google Cloud 신규 사용자는 300달러(USD) 상당의 무료 체험판 프로그램에 참여할 수 있습니다.
Cloud Shell 시작
Google Cloud를 노트북에서 원격으로 실행할 수 있지만, 이 실습에서는 Cloud에서 실행되는 명령줄 환경인 Cloud Shell을 사용합니다.
Cloud Shell 활성화
- Cloud Console에서 Cloud Shell 활성화
 를 클릭합니다.

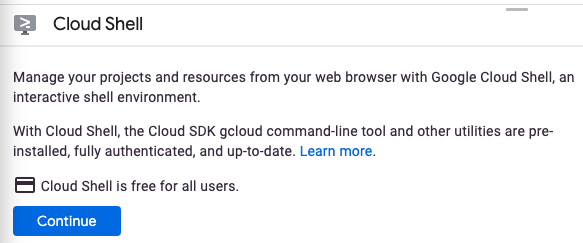
Cloud Shell을 처음 시작하는 경우 Cloud Shell에 대한 설명이 포함된 중간 화면이 표시됩니다. 중간 화면이 표시되면 계속을 클릭합니다.

Cloud Shell을 프로비저닝하고 연결하는 데 몇 분 정도만 걸립니다.

이 가상 머신에는 필요한 모든 개발 도구가 로드되어 있습니다. 영구적인 5GB 홈 디렉터리를 제공하고 Google Cloud에서 실행되므로 네트워크 성능과 인증이 크게 개선됩니다. 이 Codelab에서 대부분의 작업은 브라우저만으로도 수행할 수 있습니다.
Cloud Shell에 연결되면 인증이 완료되었고 프로젝트가 해당 프로젝트 ID로 설정된 것을 확인할 수 있습니다.
- Cloud Shell에서 다음 명령어를 실행하여 인증되었는지 확인합니다.
gcloud auth list
명령어 결과
 Credentialed Accounts
ACTIVE  ACCOUNT
*       <my_account>@<my_domain.com>

To set the active account, run:
    $ gcloud config set account `ACCOUNT`
- Cloud Shell에서 다음 명령어를 실행하여 gcloud 명령어가 프로젝트를 알고 있는지 확인합니다.
gcloud config list project
명령어 결과
[core]
project = <PROJECT_ID>
또는 다음 명령어로 설정할 수 있습니다.
gcloud config set project <PROJECT_ID>
명령어 결과
Updated property [core/project].
3. 환경 설정
Document AI를 사용하려면 먼저 Cloud Shell에서 다음 명령어를 실행하여 Document AI API를 사용 설정합니다.
gcloud services enable documentai.googleapis.com
다음과 같은 결과를 확인할 수 있습니다.
Operation "operations/..." finished successfully.
이제 Document AI를 사용할 수 있습니다.
홈 디렉터리로 이동합니다.
cd ~
종속 항목을 격리하기 위해 Python 가상 환경을 만듭니다.
virtualenv venv-docai
가상 환경을 활성화합니다.
source venv-docai/bin/activate
IPython, Document AI 클라이언트 라이브러리, python-tabulate (요청 결과를 멋지게 출력하는 데 사용)를 설치합니다.
pip install ipython google-cloud-documentai tabulate
다음과 같은 결과를 확인할 수 있습니다.
...
Installing collected packages: ..., tabulate, ipython, google-cloud-documentai
Successfully installed ... google-cloud-documentai-2.15.0 ...
이제 Document AI 클라이언트 라이브러리를 사용할 준비가 되었습니다.
다음 환경 변수를 설정합니다.
export PROJECT_ID=$(gcloud config get-value core/project)
# Choose "us" or "eu"
export API_LOCATION="us"
이제 모든 단계를 동일한 세션에서 완료해야 합니다.
환경 변수가 올바르게 정의되었는지 확인합니다.
echo $PROJECT_ID
echo $API_LOCATION
다음 단계에서는 방금 설치한 IPython이라는 대화형 Python 인터프리터를 사용합니다. Cloud Shell에서 ipython를 실행하여 세션을 시작합니다.
ipython
다음과 같은 결과를 확인할 수 있습니다.
Python 3.12.3 (main, Feb  4 2025, 14:48:35) [GCC 13.3.0]
Type 'copyright', 'credits' or 'license' for more information
IPython 9.1.0 -- An enhanced Interactive Python. Type '?' for help.

In [1]:
다음 코드를 IPython 세션에 복사합니다.
import os
from typing import Iterator, MutableSequence, Optional, Sequence, Tuple

import google.cloud.documentai_v1 as docai
from tabulate import tabulate

PROJECT_ID = os.getenv("PROJECT_ID", "")
API_LOCATION = os.getenv("API_LOCATION", "")

assert PROJECT_ID, "PROJECT_ID is undefined"
assert API_LOCATION in ("us", "eu"), "API_LOCATION is incorrect"

# Test processors
document_ocr_display_name = "document-ocr"
form_parser_display_name = "form-parser"

test_processor_display_names_and_types = (
    (document_ocr_display_name, "OCR_PROCESSOR"),
    (form_parser_display_name, "FORM_PARSER_PROCESSOR"),
)

def get_client() -> docai.DocumentProcessorServiceClient:
    client_options = {"api_endpoint": f"{API_LOCATION}-documentai.googleapis.com"}
    return docai.DocumentProcessorServiceClient(client_options=client_options)

def get_parent(client: docai.DocumentProcessorServiceClient) -> str:
    return client.common_location_path(PROJECT_ID, API_LOCATION)

def get_client_and_parent() -> Tuple[docai.DocumentProcessorServiceClient, str]:
    client = get_client()
    parent = get_parent(client)
    return client, parent
이제 첫 번째 요청을 보내고 프로세서 유형을 가져올 준비가 되었습니다.
4. 프로세서 유형 가져오기
다음 단계에서 프로세서를 만들기 전에 사용 가능한 프로세서 유형을 가져옵니다. fetch_processor_types를 사용하여 이 목록을 검색할 수 있습니다.
다음 함수를 IPython 세션에 추가합니다.
def fetch_processor_types() -> MutableSequence[docai.ProcessorType]:
    client, parent = get_client_and_parent()
    response = client.fetch_processor_types(parent=parent)

    return response.processor_types

def print_processor_types(processor_types: Sequence[docai.ProcessorType]):
    def sort_key(pt):
        return (not pt.allow_creation, pt.category, pt.type_)

    sorted_processor_types = sorted(processor_types, key=sort_key)
    data = processor_type_tabular_data(sorted_processor_types)
    headers = next(data)
    colalign = next(data)

    print(tabulate(data, headers, tablefmt="pretty", colalign=colalign))
    print(f"→ Processor types: {len(sorted_processor_types)}")

def processor_type_tabular_data(
    processor_types: Sequence[docai.ProcessorType],
) -> Iterator[Tuple[str, str, str, str]]:
    def locations(pt):
        return ", ".join(sorted(loc.location_id for loc in pt.available_locations))

    yield ("type", "category", "allow_creation", "locations")
    yield ("left", "left", "left", "left")
    if not processor_types:
        yield ("-", "-", "-", "-")
        return
    for pt in processor_types:
        yield (pt.type_, pt.category, f"{pt.allow_creation}", locations(pt))
프로세서 유형을 나열합니다.
processor_types = fetch_processor_types()
print_processor_types(processor_types)
다음과 같은 결과가 표시됩니다.
+--------------------------------------+-------------+----------------+-----------+
| type                                 | category    | allow_creation | locations |
+--------------------------------------+-------------+----------------+-----------+
| CUSTOM_CLASSIFICATION_PROCESSOR      | CUSTOM      | True           | eu, us    |
...
| FORM_PARSER_PROCESSOR                | GENERAL     | True           | eu, us    |
| LAYOUT_PARSER_PROCESSOR              | GENERAL     | True           | eu, us    |
| OCR_PROCESSOR                        | GENERAL     | True           | eu, us    |
| BANK_STATEMENT_PROCESSOR             | SPECIALIZED | True           | eu, us    |
| EXPENSE_PROCESSOR                    | SPECIALIZED | True           | eu, us    |
...
+--------------------------------------+-------------+----------------+-----------+
→ Processor types: 19
이제 다음 단계에서 프로세서를 만드는 데 필요한 모든 정보가 준비되었습니다.
5. 프로세서 만들기
프로세서를 만들려면 표시 이름과 프로세서 유형을 사용하여 create_processor를 호출합니다.
다음 함수를 추가합니다.
def create_processor(display_name: str, type: str) -> docai.Processor:
    client, parent = get_client_and_parent()
    processor = docai.Processor(display_name=display_name, type_=type)

    return client.create_processor(parent=parent, processor=processor)
테스트 프로세서를 만듭니다.
separator = "=" * 80
for display_name, type in test_processor_display_names_and_types:
    print(separator)
    print(f"Creating {display_name} ({type})...")
    try:
        create_processor(display_name, type)
    except Exception as err:
        print(err)
print(separator)
print("Done")
다음과 같은 결과가 표시됩니다.
================================================================================
Creating document-ocr (OCR_PROCESSOR)...
================================================================================
Creating form-parser (FORM_PARSER_PROCESSOR)...
================================================================================
Done
새 프로세서를 만들었습니다.
다음으로 프로세서를 나열하는 방법을 알아보세요.
6. 프로젝트 프로세서 나열
list_processors는 프로젝트에 속한 모든 프로세서의 목록을 반환합니다.
다음 함수를 추가합니다.
def list_processors() -> MutableSequence[docai.Processor]:
    client, parent = get_client_and_parent()
    response = client.list_processors(parent=parent)

    return list(response.processors)

def print_processors(processors: Optional[Sequence[docai.Processor]] = None):
    def sort_key(processor):
        return processor.display_name

    if processors is None:
        processors = list_processors()
    sorted_processors = sorted(processors, key=sort_key)
    data = processor_tabular_data(sorted_processors)
    headers = next(data)
    colalign = next(data)

    print(tabulate(data, headers, tablefmt="pretty", colalign=colalign))
    print(f"→ Processors: {len(sorted_processors)}")

def processor_tabular_data(
    processors: Sequence[docai.Processor],
) -> Iterator[Tuple[str, str, str]]:
    yield ("display_name", "type", "state")
    yield ("left", "left", "left")
    if not processors:
        yield ("-", "-", "-")
        return
    for processor in processors:
        yield (processor.display_name, processor.type_, processor.state.name)
함수를 호출합니다.
processors = list_processors()
print_processors(processors)
다음과 같은 결과가 표시됩니다.
+--------------+-----------------------+---------+
| display_name | type                  | state   |
+--------------+-----------------------+---------+
| document-ocr | OCR_PROCESSOR         | ENABLED |
| form-parser  | FORM_PARSER_PROCESSOR | ENABLED |
+--------------+-----------------------+---------+
→ Processors: 2
표시 이름으로 프로세서를 검색하려면 다음 함수를 추가합니다.
def get_processor(
    display_name: str,
    processors: Optional[Sequence[docai.Processor]] = None,
) -> Optional[docai.Processor]:
    if processors is None:
        processors = list_processors()
    for processor in processors:
        if processor.display_name == display_name:
            return processor
    return None
다음과 같이 함수를 테스트합니다.
processor = get_processor(document_ocr_display_name, processors)

assert processor is not None
print(processor)
다음과 같은 결과를 확인할 수 있습니다.
name: "projects/PROJECT_NUM/locations/LOCATION/processors/PROCESSOR_ID"
type_: "OCR_PROCESSOR"
display_name: "document-ocr"
state: ENABLED
...
이제 프로젝트 프로세서를 나열하고 표시 이름으로 검색하는 방법을 알게 되었습니다. 다음으로 프로세서를 사용하는 방법을 알아보세요.
7. 프로세서 사용
문서는 다음 두 가지 방법으로 처리할 수 있습니다.
- 동기식:
process_document를 호출하여 단일 문서를 분석하고 결과를 직접 사용합니다. - 비동기식:
batch_process_documents를 호출하여 여러 문서 또는 대용량 문서에 대한 일괄 처리를 시작합니다.
테스트 문서 ( PDF)는 필기 답변으로 작성된 스캔된 설문지입니다. IPython 세션에서 직접 작업 디렉터리에 다운로드합니다.
!gsutil cp gs://cloud-samples-data/documentai/form.pdf .
작업 디렉터리의 콘텐츠를 확인합니다.
!ls
다음 항목이 있어야 합니다.
... form.pdf ... venv-docai ...
동기 process_document 메서드를 사용하여 로컬 파일을 분석할 수 있습니다. 다음 함수를 추가합니다.
def process_file(
    processor: docai.Processor,
    file_path: str,
    mime_type: str,
) -> docai.Document:
    client = get_client()
    with open(file_path, "rb") as document_file:
        document_content = document_file.read()
    document = docai.RawDocument(content=document_content, mime_type=mime_type)
    request = docai.ProcessRequest(raw_document=document, name=processor.name)

    response = client.process_document(request)

    return response.document
문서가 설문지이므로 양식 파서를 선택합니다. 이 일반 프로세서는 모든 프로세서가 하는 인쇄된 텍스트와 필기 텍스트를 추출하는 것 외에도 양식 필드를 감지합니다.
문서를 분석합니다.
processor = get_processor(form_parser_display_name)
assert processor is not None

file_path = "./form.pdf"
mime_type = "application/pdf"

document = process_file(processor, file_path, mime_type)
모든 프로세서는 문서에 대해 광학 문자 인식 (OCR) 첫 번째 패스를 실행합니다. OCR 패스에서 감지한 텍스트를 검토합니다.
document.text.split("\n")
다음과 같이 표시되어야 합니다.
['FakeDoc M.D.',
 'HEALTH INTAKE FORM',
 'Please fill out the questionnaire carefully. The information you provide will be used to complete',
 'your health profile and will be kept confidential.',
 'Date:',
 '9/14/19',
 'Name:',
 'Sally Walker',
 'DOB: 09/04/1986',
 'Address: 24 Barney Lane',
 'City: Towaco',
 'State: NJ Zip: 07082',
 'Email: Sally, walker@cmail.com',
 '_Phone #: (906) 917-3486',
 'Gender: F',
 'Marital Status:',
  ...
]
감지된 양식 필드를 출력하는 다음 함수를 추가합니다.
def print_form_fields(document: docai.Document):
    sorted_form_fields = form_fields_sorted_by_ocr_order(document)
    data = form_field_tabular_data(sorted_form_fields, document)
    headers = next(data)
    colalign = next(data)

    print(tabulate(data, headers, tablefmt="pretty", colalign=colalign))
    print(f"→ Form fields: {len(sorted_form_fields)}")

def form_field_tabular_data(
    form_fields: Sequence[docai.Document.Page.FormField],
    document: docai.Document,
) -> Iterator[Tuple[str, str, str]]:
    yield ("name", "value", "confidence")
    yield ("right", "left", "right")
    if not form_fields:
        yield ("-", "-", "-")
        return
    for form_field in form_fields:
        name_layout = form_field.field_name
        value_layout = form_field.field_value
        name = text_from_layout(name_layout, document)
        value = text_from_layout(value_layout, document)
        confidence = value_layout.confidence
        yield (name, value, f"{confidence:.1%}")
다음 유틸리티 함수도 추가합니다.
def form_fields_sorted_by_ocr_order(
    document: docai.Document,
) -> MutableSequence[docai.Document.Page.FormField]:
    def sort_key(form_field):
        # Sort according to the field name detected position
        text_anchor = form_field.field_name.text_anchor
        return text_anchor.text_segments[0].start_index if text_anchor else 0

    fields = (field for page in document.pages for field in page.form_fields)

    return sorted(fields, key=sort_key)


def text_from_layout(
    layout: docai.Document.Page.Layout,
    document: docai.Document,
) -> str:
    full_text = document.text
    segs = layout.text_anchor.text_segments
    text = "".join(full_text[seg.start_index : seg.end_index] for seg in segs)
    if text.endswith("\n"):
        text = text[:-1]

    return text
감지된 양식 필드를 출력합니다.
print_form_fields(document)
다음과 같은 인쇄물이 나옵니다.
+-----------------+-------------------------+------------+
|            name | value                   | confidence |
+-----------------+-------------------------+------------+
|           Date: | 9/14/19                 |      83.0% |
|           Name: | Sally Walker            |      87.3% |
|            DOB: | 09/04/1986              |      88.5% |
|        Address: | 24 Barney Lane          |      82.4% |
|           City: | Towaco                  |      90.0% |
|          State: | NJ                      |      89.4% |
|            Zip: | 07082                   |      91.4% |
|          Email: | Sally, walker@cmail.com |      79.7% |
|       _Phone #: | walker@cmail.com        |      93.2% |
|                 | (906                    |            |
|         Gender: | F                       |      88.2% |
| Marital Status: | Single                  |      85.2% |
|     Occupation: | Software Engineer       |      81.5% |
|    Referred By: | None                    |      76.9% |
...
+-----------------+-------------------------+------------+
→ Form fields: 17
감지된 필드 이름과 값을 검토합니다 ( PDF). 다음은 설문조사의 상단 절반입니다.

인쇄된 텍스트와 필기 텍스트가 모두 포함된 양식을 분석했습니다. 또한 필드를 높은 신뢰도로 감지했습니다. 이렇게 하면 픽셀이 구조화된 데이터로 변환됩니다.
8. 프로세서 사용 설정 및 중지
disable_processor 및 enable_processor를 사용하여 프로세서를 사용할 수 있는지 여부를 제어할 수 있습니다.
다음 함수를 추가합니다.
def update_processor_state(processor: docai.Processor, enable_processor: bool):
    client = get_client()
    if enable_processor:
        request = docai.EnableProcessorRequest(name=processor.name)
        operation = client.enable_processor(request)
    else:
        request = docai.DisableProcessorRequest(name=processor.name)
        operation = client.disable_processor(request)
    operation.result()  # Wait for operation to complete

def enable_processor(processor: docai.Processor):
    update_processor_state(processor, True)

def disable_processor(processor: docai.Processor):
    update_processor_state(processor, False)
양식 파서 프로세서를 사용 중지하고 프로세서의 상태를 확인합니다.
processor = get_processor(form_parser_display_name)
assert processor is not None

disable_processor(processor)
print_processors()
다음과 같은 결과가 표시됩니다.
+--------------+-----------------------+----------+
| display_name | type                  | state    |
+--------------+-----------------------+----------+
| document-ocr | OCR_PROCESSOR         | ENABLED  |
| form-parser  | FORM_PARSER_PROCESSOR | DISABLED |
+--------------+-----------------------+----------+
→ Processors: 2
양식 파서 프로세서를 다시 사용 설정합니다.
enable_processor(processor)
print_processors()
다음과 같은 결과가 표시됩니다.
+--------------+-----------------------+---------+
| display_name | type                  | state   |
+--------------+-----------------------+---------+
| document-ocr | OCR_PROCESSOR         | ENABLED |
| form-parser  | FORM_PARSER_PROCESSOR | ENABLED |
+--------------+-----------------------+---------+
→ Processors: 2
다음으로 프로세서 버전을 관리하는 방법을 알아보세요.
9. 프로세서 버전 관리
프로세서는 여러 버전으로 제공될 수 있습니다. list_processor_versions 및 set_default_processor_version 메서드의 사용 방법을 확인하세요.
다음 함수를 추가합니다.
def list_processor_versions(
    processor: docai.Processor,
) -> MutableSequence[docai.ProcessorVersion]:
    client = get_client()
    response = client.list_processor_versions(parent=processor.name)

    return list(response)


def get_sorted_processor_versions(
    processor: docai.Processor,
) -> MutableSequence[docai.ProcessorVersion]:
    def sort_key(processor_version: docai.ProcessorVersion):
        return processor_version.name

    versions = list_processor_versions(processor)

    return sorted(versions, key=sort_key)


def print_processor_versions(processor: docai.Processor):
    versions = get_sorted_processor_versions(processor)
    default_version_name = processor.default_processor_version
    data = processor_versions_tabular_data(versions, default_version_name)
    headers = next(data)
    colalign = next(data)

    print(tabulate(data, headers, tablefmt="pretty", colalign=colalign))
    print(f"→ Processor versions: {len(versions)}")


def processor_versions_tabular_data(
    versions: Sequence[docai.ProcessorVersion],
    default_version_name: str,
) -> Iterator[Tuple[str, str, str]]:
    yield ("version", "display name", "default")
    yield ("left", "left", "left")
    if not versions:
        yield ("-", "-", "-")
        return
    for version in versions:
        mapping = docai.DocumentProcessorServiceClient.parse_processor_version_path(
            version.name
        )
        processor_version = mapping["processor_version"]
        is_default = "Y" if version.name == default_version_name else ""
        yield (processor_version, version.display_name, is_default)
OCR 프로세서에 사용할 수 있는 버전을 나열합니다.
processor = get_processor(document_ocr_display_name)
assert processor is not None
print_processor_versions(processor)
프로세서 버전이 표시됩니다.
+--------------------------------+--------------------------+---------+
| version                        | display name             | default |
+--------------------------------+--------------------------+---------+
| pretrained-ocr-v1.0-2020-09-23 | Google Stable            |         |
| pretrained-ocr-v1.1-2022-09-12 | Google Release Candidate |         |
| pretrained-ocr-v1.2-2022-11-10 | Google Release Candidate |         |
| pretrained-ocr-v2.0-2023-06-02 | Google Stable            | Y       |
| pretrained-ocr-v2.1-2024-08-07 | Google Release Candidate |         |
+--------------------------------+--------------------------+---------+
→ Processor versions: 5
이제 기본 프로세서 버전을 변경하는 함수를 추가합니다.
def set_default_processor_version(processor: docai.Processor, version_name: str):
    client = get_client()
    request = docai.SetDefaultProcessorVersionRequest(
        processor=processor.name,
        default_processor_version=version_name,
    )

    operation = client.set_default_processor_version(request)
    operation.result()  # Wait for operation to complete
최신 프로세서 버전으로 전환합니다.
processor = get_processor(document_ocr_display_name)
assert processor is not None
versions = get_sorted_processor_versions(processor)

new_version = versions[-1]  # Latest version
set_default_processor_version(processor, new_version.name)

# Update the processor info
processor = get_processor(document_ocr_display_name)
assert processor is not None
print_processor_versions(processor)
새 버전 구성이 표시됩니다.
+--------------------------------+--------------------------+---------+
| version                        | display name             | default |
+--------------------------------+--------------------------+---------+
| pretrained-ocr-v1.0-2020-09-23 | Google Stable            |         |
| pretrained-ocr-v1.1-2022-09-12 | Google Release Candidate |         |
| pretrained-ocr-v1.2-2022-11-10 | Google Release Candidate |         |
| pretrained-ocr-v2.0-2023-06-02 | Google Stable            |         |
| pretrained-ocr-v2.1-2024-08-07 | Google Release Candidate | Y       |
+--------------------------------+--------------------------+---------+
→ Processor versions: 5
다음은 궁극적인 프로세서 관리 방법 (삭제)입니다.
10. 프로세서 삭제
마지막으로 delete_processor 메서드의 사용 방법을 확인합니다.
다음 함수를 추가합니다.
def delete_processor(processor: docai.Processor):
    client = get_client()
    operation = client.delete_processor(name=processor.name)
    operation.result()  # Wait for operation to complete
테스트 프로세서를 삭제합니다.
processors_to_delete = [dn for dn, _ in test_processor_display_names_and_types]
print("Deleting processors...")

for processor in list_processors():
    if processor.display_name not in processors_to_delete:
        continue
    print(f"  Deleting {processor.display_name}...")
    delete_processor(processor)

print("Done\n")
print_processors()
다음과 같은 결과가 표시됩니다.
Deleting processors...
  Deleting form-parser...
  Deleting document-ocr...
Done

+--------------+------+-------+
| display_name | type | state |
+--------------+------+-------+
| -            | -    | -     |
+--------------+------+-------+
→ Processors: 0
모든 프로세서 관리 메서드를 다뤘습니다. 거의 완료되었습니다.
11. 축하합니다.

Python을 사용하여 Document AI 프로세서를 관리하는 방법을 알아봤습니다.
삭제
Cloud Shell에서 개발 환경을 정리하려면 다음 단계를 따르세요.
- 아직 IPython 세션에 있는 경우 셸로 돌아갑니다.
exit - Python 가상 환경 사용 중지:
deactivate - 가상 환경 폴더
cd ~ ; rm -rf ./venv-docai를 삭제합니다.
Cloud Shell에서 Google Cloud 프로젝트를 삭제하려면 다음 단계를 따르세요.
- 현재 프로젝트 ID를 가져옵니다.
PROJECT_ID=$(gcloud config get-value core/project) - 삭제하려는 프로젝트가 맞는지 확인합니다.
echo $PROJECT_ID - 프로젝트를 삭제합니다.
gcloud projects delete $PROJECT_ID
자세히 알아보기
- 브라우저에서 Document AI를 사용해 보세요. https://cloud.google.com/document-ai/docs/drag-and-drop
- Document AI 프로세서 세부정보: https://cloud.google.com/document-ai/docs/processors-list
- Google Cloud에서 Python 사용: https://cloud.google.com/python
- Python용 Cloud 클라이언트 라이브러리: https://github.com/googleapis/google-cloud-python
라이선스
이 작업물은 Creative Commons Attribution 2.0 일반 라이선스에 따라 사용이 허가되었습니다.
