
1. Introduction
Overview
The Google Wallet API allows you to engage with users through various types of passes: loyalty cards, offers, gift cards, event tickets, transit tickets, boarding passes, and more. Each pass type, or pass class, comes with use-case specific fields and features to enhance the user experience.
However, these might not fit every use case. To create a more customized experience, you can use the generic pass type. Here are some example use cases for the generic pass type:
- Parking passes
- Library membership cards
- Stored value vouchers
- Gym membership cards
- Reservations
You can use generic passes for any use case that can be presented with:
- Up to three rows of information
- (Optional) Barcode graphic
- (Optional) Details section

For more information on the Google Wallet API, or adding an Add to Google Wallet button to a web page, please see the Google Wallet developer documentation.
Pass classes and objects
The Google Wallet API exposes methods to create the following:
Type | Description |
Pass class | A template for an individual pass object. It contains information common to all pass objects that belong to this class. |
Pass object | An instance of a pass class that is unique to a user ID. |
About this codelab
In this codelab, you will complete the following tasks.
- Create a new issuer account in demo mode
- Create a service account for issuing passes
- Create a new Generic pass class
- Create a new pass object
- Create an Add to Google Wallet button to save a pass
- Display the button in your web page
- Handle the pass save result
Prerequisites
- Git
- A Google Account with access to the Google Cloud console
- Node.js version 10 or greater
Objectives
After completing this codelab, you will be able to do the following:
- Create pass objects using the Google Wallet
- Create an Add to Google Wallet button
Support
If you are stuck at any point in the codelab, the google-pay/wallet-web-codelab GitHub repository contains a complete solution for reference.
2. Setup
In this step, you will create an Issuer account in demo mode. This will allow you to create pass classes and objects that can be added to user wallets. Next, you will create a Google Cloud project and service account. These will be used to programmatically create pass classes and objects in the same manner as a backend server. Last, you will authorize the Google Cloud service account to manage passes in your Google Wallet issuer account.
Sign up for a Google Wallet Issuer account
An Issuer account is necessary to create and distribute passes for Google Wallet. You can sign up using the Google Pay & Wallet Console. Initially, you will have access to create passes in demo mode. This means that only specific test users will be able to add passes you create. Test users can be managed in the Google Pay & Wallet Console.
For more information on demo mode, see the Generic pass prerequisites.
- Open the Google Pay & Wallet Console
- Follow the on-screen instructions to create an Issuer account
- Select Google Wallet API
- Confirm you understand the terms of service and privacy policy
- Copy the Issuer ID value to a text editor or other location
- Under the Manage tab, select Set up test accounts
- Add any email addresses you will use in this codelab
Enable the Google Wallet API
- Sign into the Google Cloud console
- If you don't already have a Google Cloud project, create one now (see Creating and managing projects for more information)
- Enable the Google Wallet API (also referred to as Google Pay for Passes API) for your project
Create a service account and key
A service account and a service account key are necessary to call the Google Wallet API. The service account is the identity that calls the Google Wallet API. The service account key contains a private key that identifies your application as the service account. This key is sensitive, so keep it confidential.
Create a service account
- In the Google Cloud console, open Service Accounts
- Enter a name, ID, and description for your service account
- Select CREATE AND CONTINUE
- Select DONE
Create a service account key
- Select your service account
- Select the KEYS menu
- Select ADD KEY, then Create new key
- Select the JSON key type
- Select CREATE
You will be prompted to save the key file to your local workstation. Make sure to remember its location.
Set the GOOGLE_APPLICATION_CREDENTIALS environment variable
The GOOGLE_APPLICATION_CREDENTIALS environment variable is used by Google SDKs to authenticate as a service account and access different APIs for a Google Cloud project.
- Follow the instructions in the Google Cloud Service account keys documentation to set the
GOOGLE_APPLICATION_CREDENTIALSenvironment variable - Verify the environment variable is set in a new terminal (MacOS/Linux) or command-line (Windows) session (you may need to start a new session if you have one open already)
echo $GOOGLE_APPLICATION_CREDENTIALS
Authorize the service account
Lastly, you will need to authorize the service account to manage Google Wallet passes.
- Open the Google Pay & Wallet Console
- Select Users
- Select Invite a user
- Enter the email address of the service account (e.g.
test-svc@myproject.iam.gserviceaccount.com) - Select either Developer or Admin from the Access level drop-down menu
- Select Invite
3. Start the sample Node.js app
Duration 10:00
In this step, you will run a sample Node.js application that acts as a shopping website and backend server.
Clone the sample repository
The google-pay/wallet-web-codelab repository contains a Node.js-based sample project and different script files that imitate a backend server used for provisioning pass classes and objects. You will edit these to include an Add to Google Wallet button on a product detail screen.
- Clone the repository to your local workstation
git clone https://github.com/google-pay/wallet-web-codelab.git
Install project dependencies
- Open the cloned repository in your terminal or command-line prompt
- Navigate to the
webdirectory (this is the app you will modify in the rest of this codelab)cd web - Install the Node.js dependencies
npm install . - Start the app
node app.js - Open the app running on http://localhost:3000

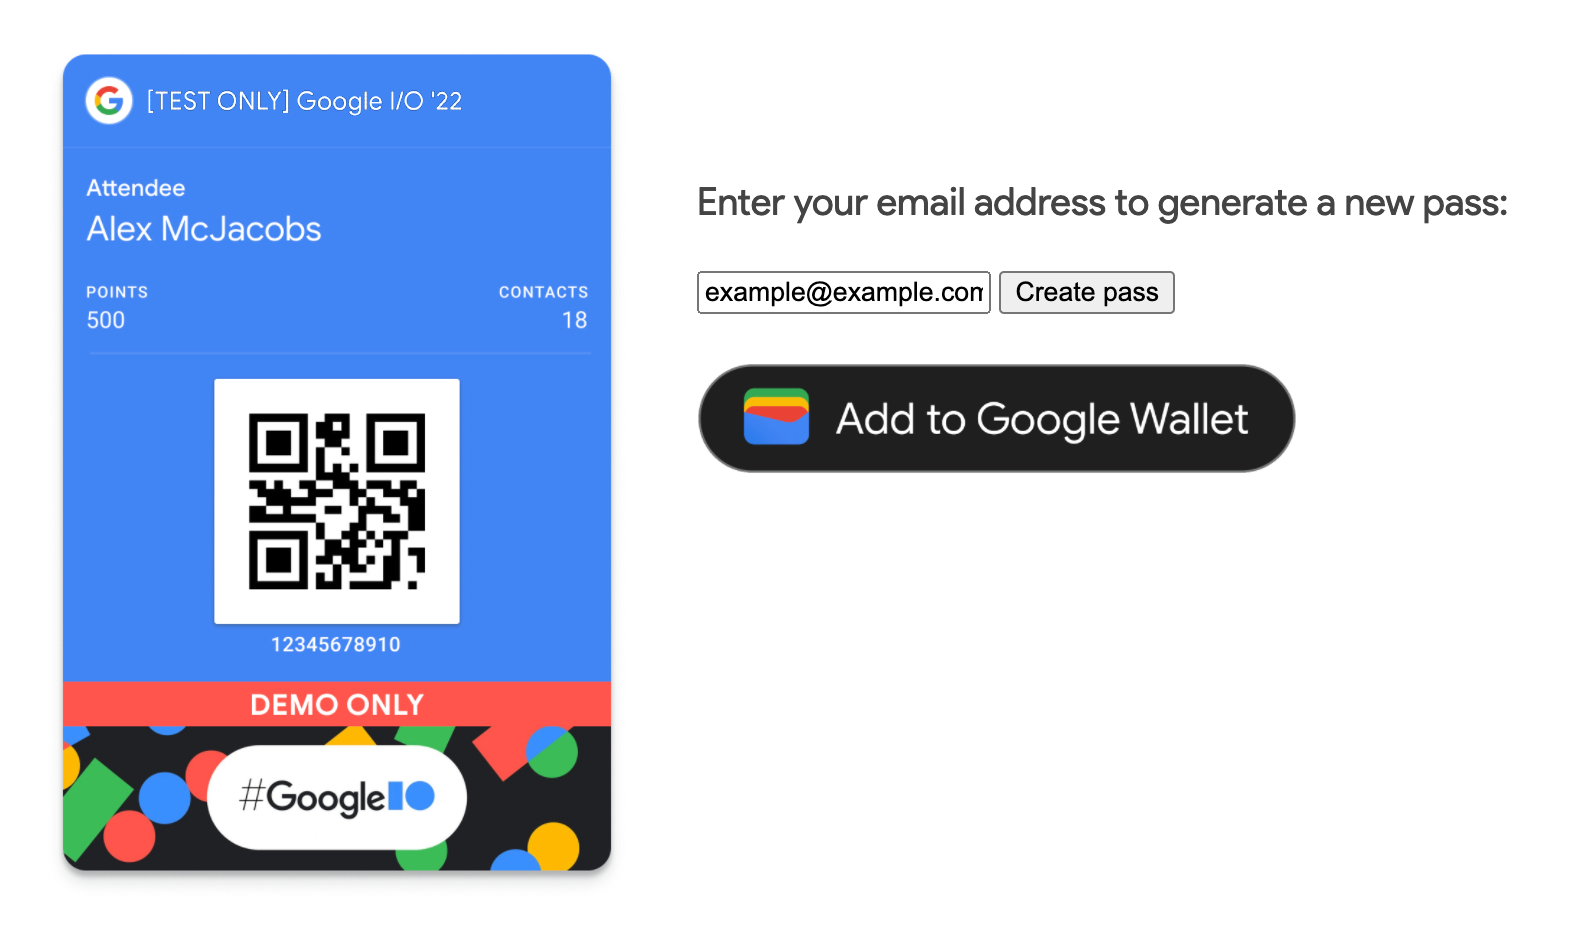
If you enter your email address and select Create pass, nothing will happen. In the next steps, you will configure the app to create a new pass class and object.
4. Create a Generic pass class
In this step, you will create the base class for your pass. Any time a new pass is created for a user, it will inherit the properties defined in the pass class.
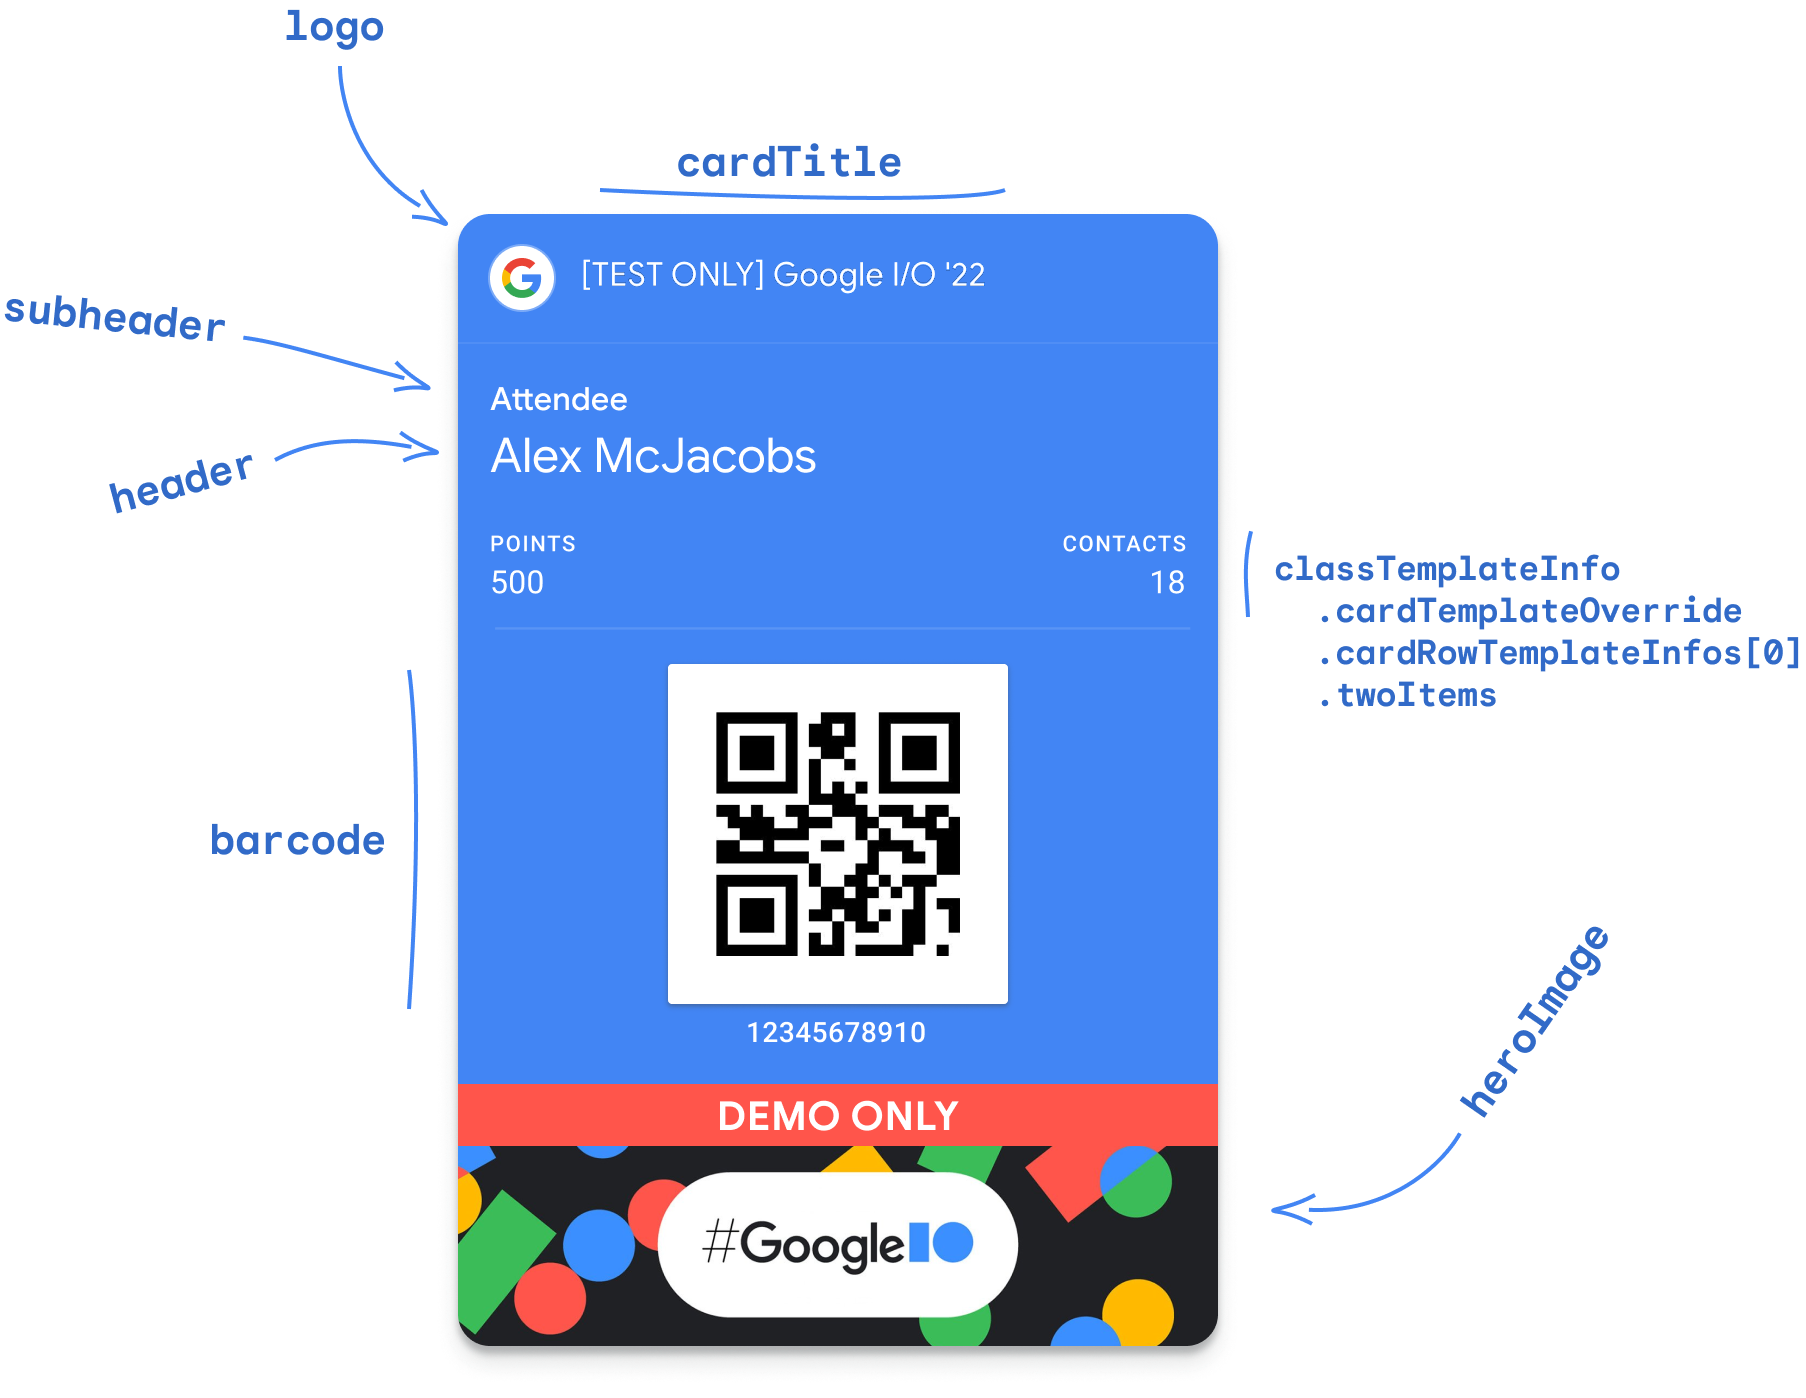
The pass class you will create during this codelab uses the flexibility of Generic passes to create an object that works as both an identity badge and challenge points tracker. When a pass object is created from this class, it will look like the following graphic.
Pass classes can be created directly in the Google Pay & Wallet Console or by using the Google Wallet API. In this codelab, you will create the Generic pass class using the API. This follows the process a private, backend server would use to create pass classes.
- Open the
web/app.jsfile - Replace the value of
issuerIdwith your Issuer ID from the Google Pay & Wallet Console// TODO: Define Issuer ID const issuerId = 'ISSUER_ID'; - Locate the
createPassClassfunction - In the function, create an authenticated HTTP client and use the Google Wallet API to create a new pass class
// TODO: Create a Generic pass class
let genericClass = {
  'id': `${classId}`,
  'classTemplateInfo': {
    'cardTemplateOverride': {
      'cardRowTemplateInfos': [
        {
          'twoItems': {
            'startItem': {
              'firstValue': {
                'fields': [
                  {
                    'fieldPath': "object.textModulesData['points']"
                  }
                ]
              }
            },
            'endItem': {
              'firstValue': {
                'fields': [
                  {
                    'fieldPath': "object.textModulesData['contacts']"
                  }
                ]
              }
            }
          }
        }
      ]
    },
    'detailsTemplateOverride': {
      'detailsItemInfos': [
        {
          'item': {
            'firstValue': {
              'fields': [
                {
                  'fieldPath': "class.imageModulesData['event_banner']"
                }
              ]
            }
          }
        },
        {
          'item': {
            'firstValue': {
              'fields': [
                {
                  'fieldPath': "class.textModulesData['game_overview']"
                }
              ]
            }
          }
        },
        {
          'item': {
            'firstValue': {
              'fields': [
                {
                  'fieldPath': "class.linksModuleData.uris['official_site']"
                }
              ]
            }
          }
        }
      ]
    }
  },
  'imageModulesData': [
    {
      'mainImage': {
        'sourceUri': {
          'uri': 'https://codelabs.developers.google.com/static/add-to-wallet-web/images/google-io-2021-card.png'
        },
        'contentDescription': {
          'defaultValue': {
            'language': 'en-US',
            'value': 'Google I/O 2022 Banner'
          }
        }
      },
      'id': 'event_banner'
    }
  ],
  'textModulesData': [
    {
      'header': 'Gather points meeting new people at Google I/O',
      'body': 'Join the game and accumulate points in this badge by meeting other attendees in the event.',
      'id': 'game_overview'
    }
  ],
  'linksModuleData': {
    'uris': [
      {
        'uri': 'https://io.google/2022/',
        'description': 'Official I/O \'22 Site',
        'id': 'official_site'
      }
    ]
  }
};

let response;
try {
  // Check if the class exists already
  response = await httpClient.request({
    url: `${baseUrl}/genericClass/${classId}`,
    method: 'GET'
  });

  console.log('Class already exists');
  console.log(response);
} catch (err) {
  if (err.response && err.response.status === 404) {
    // Class does not exist
    // Create it now
    response = await httpClient.request({
      url: `${baseUrl}/genericClass`,
      method: 'POST',
      data: genericClass
    });

    console.log('Class insert response');
    console.log(response);
  } else {
    // Something else went wrong
    console.log(err);
    res.send('Something went wrong...check the console logs!');
  }
}
When your code runs, it will create a new pass class and output the class ID. The class ID is made up of the issuer ID followed by a developer-defined suffix. In this case, the suffix is set to codelab_class (the class ID would look similar to 1234123412341234123.codelab_class). The output logs will also include the response from the Google Wallet API.
5. Create a Generic pass object
In this step, you will configure your Node.js app to create a Generic pass object using the class you created previously. There are two flows for creating pass objects for users.
Create the pass object on the backend server
In this approach, the pass object is created on a backend server and returned to the client app as a signed JWT. This is best suited for cases where user adoption is high, as it ensures the object exists before the user tries to add it to their wallet.
Create the pass object when the user adds it to their wallet
In this approach, the pass object is defined and encoded into a signed JWT on the backend server. An Add to Google Wallet button is then rendered in the client app that references the JWT. When the user selects the button, the JWT is used to create the pass object. This is best suited for cases where user adoption is variable or unknown, as it prevents pass objects from being created and not used. This approach will be used in the codelab.
- Open the
web/app.jsfile - Locate the
createPassObjectfunction - In the function, define a new pass object for your user
// TODO: Create a new Generic pass for the user
let objectSuffix = `${req.body.email.replace(/[^\w.-]/g, '_')}`;
let objectId = `${issuerId}.${objectSuffix}`;

let genericObject = {
  'id': `${objectId}`,
  'classId': classId,
  'genericType': 'GENERIC_TYPE_UNSPECIFIED',
  'hexBackgroundColor': '#4285f4',
  'logo': {
    'sourceUri': {
      'uri': 'https://developers.google.com/static/wallet/site-assets/images/pass-builder/pass_google_logo.jpg'
    }
  },
  'cardTitle': {
    'defaultValue': {
      'language': 'en',
      'value': 'Google I/O \'22'
    }
  },
  'subheader': {
    'defaultValue': {
      'language': 'en',
      'value': 'Attendee'
    }
  },
  'header': {
    'defaultValue': {
      'language': 'en',
      'value': 'Alex McJacobs'
    }
  },
  'barcode': {
    'type': 'QR_CODE',
    'value': `${objectId}`
  },
  'heroImage': {
    'sourceUri': {
      'uri': 'https://developers.google.com/static/wallet/site-assets/images/pass-builder/google-io-hero-demo-only.jpg'
    }
  },
  'textModulesData': [
    {
      'header': 'POINTS',
      'body': '1234',
      'id': 'points'
    },
    {
      'header': 'CONTACTS',
      'body': '20',
      'id': 'contacts'
    }
  ]
};

// TODO: Create the signed JWT and link
res.send("Form submitted!");
If you reload the app, enter your email address, and submit the form, you will not see any output. The pass object is being defined by the backend application, but no output is being returned. Next, you will turn the pass into an Add to Google Wallet link.
6. Create an Add to Google Wallet button
For the final step, you will create a signed JWT and return a link that can be used in the Add to Google Wallet button. When the user selects the button, they will be prompted to save the pass to their wallet.
- Create the JWT claims, encode them using the service account private key, and return an Add to Google Wallet button with the embedded link
// TODO: Create the signed JWT and link const claims = { iss: credentials.client_email, aud: 'google', origins: [], typ: 'savetowallet', payload: { genericObjects: [ genericObject ] } }; const token = jwt.sign(claims, credentials.private_key, { algorithm: 'RS256' }); const saveUrl = `https://pay.google.com/gp/v/save/${token}`; res.send(`<a href='${saveUrl}'><img src='wallet-button.png'></a>`); - Reload the app running in your browser
- Enter your email address into the form and select Create pass
- When it appears, select the Add to Google Wallet button
7. Congratulations
Congratulations, you have successfully integrated the Google Wallet API on Web!
Learn more
Take a look at a complete integration in the google-pay/wallet-web-codelab GitHub repository.
Create passes and request production access
When you are ready to issue your own passes in production, go to the Google Pay & Wallet Console to request production access.
See the Web API Prerequisites to learn more.