
1. Overview
In this codelab, you'll build an intelligent movie recommendation chatbot by combining the power of Neo4j, Google Vertex AI, and Gemini. At the heart of this system is a Neo4j Knowledge Graph that models movies, actors, directors, genres, and more through a rich network of interconnected nodes and relationships.
To enhance the user experience with semantic understanding, you'll generate vector embeddings from movie plot overviews using Vertex AI's text-embedding-004 model (or newer). These embeddings are indexed in Neo4j for fast, similarity-based retrieval.
Finally, you'll integrate Gemini to power a conversational interface where users can ask natural language questions like "What should I watch if I liked Interstellar?" and receive personalized movie suggestions based on semantic similarity and graph-based context.
Through the codelab, you will employ a step by step approach as follows:
- Build a Neo4j Knowledge Graph with movie-related entities and relationships
- Generate/Load text embeddings for movie overviews using Vertex AI
- Implement a Gradio chatbot interface powered by Gemini that combines vector search with graph-based Cypher execution
- (Optional) Deploy the app to Cloud Run as a standalone web application
What you'll learn
- How to create and populate a movie knowledge graph using Cypher and Neo4j
- How to use Vertex AI to generate and work with semantic text embeddings
- How to combine LLMs and Knowledge Graphs for intelligent retrieval using GraphRAG
- How to build a user-friendly chat interface using Gradio
- How to optionally deploy on Google Cloud Run
What you'll need
- Chrome web browser
- A Gmail account
- A Google Cloud Project with billing enabled
- A free Neo4j Aura DB account
- Basic familiarity with terminal commands and Python (helpful but not required)
This codelab, designed for developers of all levels (including beginners), uses Python and Neo4j in its sample application. While basic familiarity with Python and graph databases can be helpful, no prior experience is required to understand the concepts or follow along.

2. Setup Neo4j AuraDB
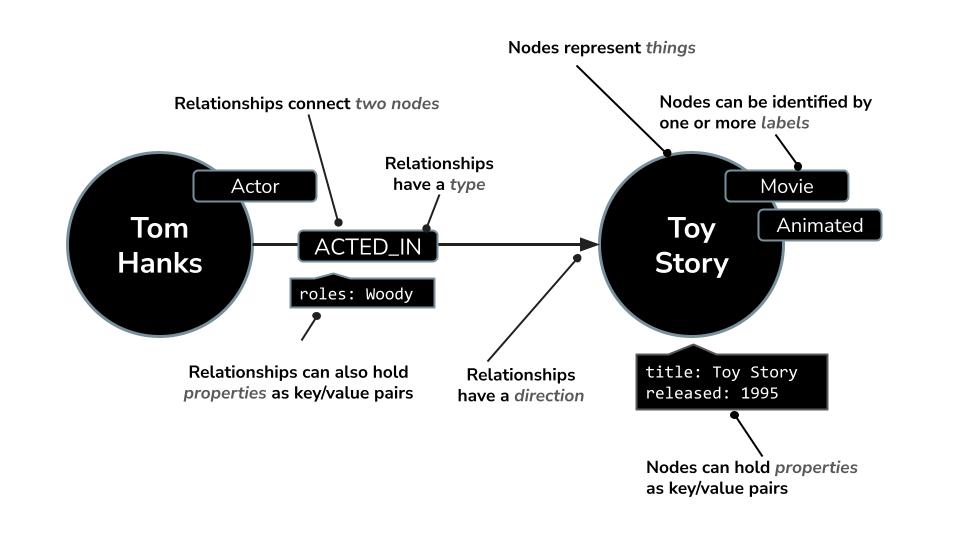
Neo4j is a leading native graph database that stores data as a network of nodes (entities) and relationships (connections between entities), making it ideal for use cases where understanding connections is key — such as recommendations, fraud detection, knowledge graphs, and more. Unlike relational or document-based databases that rely on rigid tables or hierarchical structures, Neo4j's flexible graph model allows for intuitive and efficient representation of complex, interconnected data.
Instead of organizing data in rows and tables like relational databases, Neo4j uses a graph model, where information is represented as nodes (entities) and relationships (connections between those entities). This model makes it exceptionally intuitive for working with data that's inherently linked — such as people, places, products, or, in our case, movies, actors, and genres.
For example, in a movie dataset:
- A node can represent a
Movie,Actor, orDirector - A relationship could be
ACTED_INorDIRECTED
This structure enables you to easily ask questions like:
- Which movies has this actor appeared in?
- Who has worked with Christopher Nolan?
- What are similar movies based on shared actors or genres?
Neo4j comes with a powerful query language called Cypher, designed specifically for querying graphs. Cypher allows you to express complex patterns and connections in a concise and readable way. For instance: this Cypher query uses MERGE to ensure unique creation of the actor, movie, and their relationship with role details, avoiding duplicates.
MERGE (a:Actor {name: "Tom Hanks"})
MERGE (m:Movie {title: "Toy Story", released: 1995})
MERGE (a)-[:ACTED_IN {roles: ["Woody"]}]->(m);
Neo4j offers multiple deployment options depending on your needs:
- Self-managed: Run Neo4j on your own infrastructure using Neo4j Desktop or as a Docker image (on-prem or in your own cloud).
- Cloud-managed: Deploy Neo4j on popular cloud providers using marketplace offerings.
- Fully managed: Use Neo4j AuraDB, Neo4j's fully managed cloud database-as-a-service, which handles provisioning, scaling, backups, and security for you.
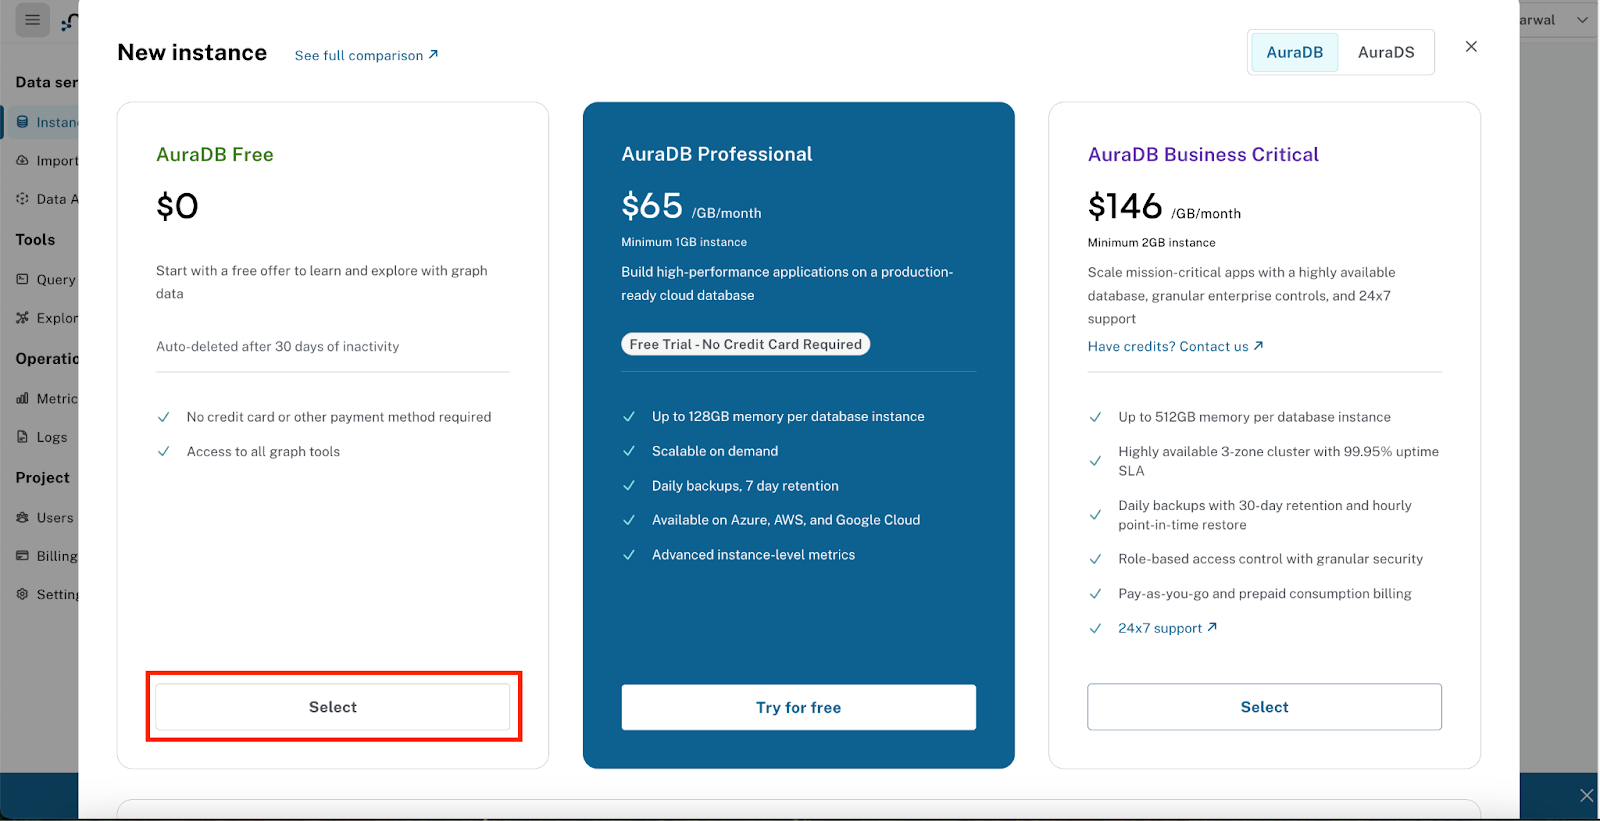
In this codelab, we'll be using Neo4j AuraDB Free, the zero-cost tier of AuraDB. It provides a fully managed graph database instance with enough storage and features for prototyping, learning, and building small applications — perfect for our goal of building a GenAI-powered movie recommendation chatbot.
You'll create a free AuraDB instance, connect it to your application using connection credentials, and use it to store and query your movie knowledge graph throughout this lab.
Why Graphs?
In traditional relational databases, answering questions like "Which movies are similar to Inception based on shared cast or genre?" would involve complex JOIN operations across multiple tables. As the depth of relationships grows, performance and readability degrade.
Graph databases like Neo4j, however, are built to efficiently traverse relationships, making them a natural fit for recommendation systems, semantic search, and intelligent assistants. They help capture real-world context — like collaboration networks, storylines, or viewer preferences — that can be difficult to represent using traditional data models.
By combining this connected data with LLMs like Gemini and vector embeddings from Vertex AI, we can supercharge the chatbot experience — allowing it to reason, retrieve, and respond in a more personalized, relevant way.
Neo4j AuraDB Free Creation
- Visit https://console.neo4j.io
- Log in with your Google account or email.
- Click "Create Free Instance."
- While the instance is being provisioned, a popup window will appear showing the connection credentials for your database.
Make sure to download and securely save the following details from the popup — these are essential for connecting your application to Neo4j:
NEO4J_URI=neo4j+s://<your-instance-id>.databases.neo4j.io
NEO4J_USERNAME=neo4j
NEO4J_PASSWORD=<your-generated-password>
AURA_INSTANCEID=<your-instance-id>
AURA_INSTANCENAME=<your-instance-name>
You'll use these values to configure the .env file in your project for authenticating with Neo4j in the next step.
Neo4j AuraDB Free is well-suited for development, experimentation, and small-scale applications like this codelab. It offers generous usage limits, supporting up to 200,000 nodes and 400,000 relationships. While it provides all the essential features needed to build and query a knowledge graph, it does not support advanced configurations such as custom plugins or increased storage. For production workloads or larger datasets, you can upgrade to a higher-tier AuraDB plan that offers greater capacity, performance, and enterprise-grade features.
This completes the section for setting up your Neo4j AuraDB backend. In the next step, we'll create a Google Cloud project, clone the repository, and configure the necessary environment variables to get your development environment ready before we begin with our codelab.
3. Before you begin
Create a project
- In the Google Cloud Console, on the project selector page, select or create a Google Cloud project.
- Make sure that billing is enabled for your Cloud project. Learn how to check if billing is enabled on a project .
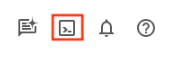
- You'll use Cloud Shell, a command-line environment running in Google Cloud that comes preloaded with bq. Click Activate Cloud Shell at the top of the Google Cloud console.
- Once connected to Cloud Shell, you check that you're already authenticated and that the project is set to your project ID using the following command:
gcloud auth list
- Run the following command in Cloud Shell to confirm that the gcloud command knows about your project.
gcloud config list project
- If your project is not set, use the following command to set it:
gcloud config set project <YOUR_PROJECT_ID>
- Enable the required APIs via the command shown below. This could take a few minutes, so please be patient.
gcloud services enable cloudresourcemanager.googleapis.com \
                       servicenetworking.googleapis.com \
                       run.googleapis.com \
                       cloudbuild.googleapis.com \
                       cloudfunctions.googleapis.com \
                       aiplatform.googleapis.com
On successful execution of the command, you should see a message: "Operation .... finished successfully".
The alternative to the gcloud command is through the console by searching for each product or using this link.
If any API is missed, you can always enable it during the course of the implementation.
Refer documentation for gcloud commands and usage.
Clone repository and setup environment settings
The next step is to clone the sample repository that we will be referencing in the rest of the codelab. Assuming that you are in Cloud Shell, give the following command from your home directory:
git clone https://github.com/sidagarwal04/neo4j-vertexai-codelab.git
To launch the editor, click Open Editor on the toolbar of the Cloud Shell window. Click on the menu bar in the top left corner and select File → Open Folder as shown below:

Select the neo4j-vertexai-codelab folder and you should see the folder open with somewhat similar structure as shown below:
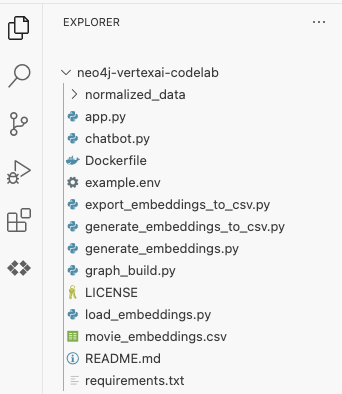
Next, we need to set up the environment variables that will be used throughout the codelab. Click on the example.env file and you should see the contents as shown below:
NEO4J_URI=
NEO4J_USER=
NEO4J_PASSWORD=
NEO4J_DATABASE=
PROJECT_ID=
LOCATION=
Now create a new file named .env in the same folder as the example.env file and copy the contents of the existing example.env file. Now, update the following variables:
NEO4J_URI,NEO4J_USER,NEO4J_PASSWORD, andNEO4J_DATABASE:- Fill in these values using the credentials provided during the Neo4j AuraDB Free instance creation in the previous step.
NEO4J_DATABASEis typically set to neo4j for AuraDB Free.PROJECT_IDandLOCATION:- If you're running the codelab from Google Cloud Shell, you can leave these fields blank, as they will be automatically inferred from your active project configuration.
- If you're running locally or outside of Cloud Shell, update
PROJECT_IDwith the ID of the Google Cloud project you created earlier, and setLOCATIONto the region you selected for that project (e.g., us-central1).
Once you've filled in these values, save the .env file. This configuration will allow your application to connect to both Neo4j and Vertex AI services.
The final step in setting up your development environment is to create a Python virtual environment and install all required dependencies listed in the requirements.txt file. These dependencies include libraries needed to work with Neo4j, Vertex AI, Gradio, and more.
First, create a virtual environment named .venv by running the following command:
python -m venv .venv
Once the environment is created, we will need to activate the created environment with the following command
source .venv/bin/activate
You should now see (.venv) at the beginning of your terminal prompt, indicating that the environment is active. For example: (.venv) yourusername@cloudshell:
Now, install the required dependencies by running:
pip install -r requirements.txt
Here's a snapshot of the key dependencies listed in the file:
gradio>=4.0.0
neo4j>=5.0.0
numpy>=1.20.0
python-dotenv>=1.0.0
google-cloud-aiplatform>=1.30.0
vertexai>=0.0.1
Once all dependencies are installed successfully, your local Python environment will be fully configured to run the scripts and chatbot in this codelab.
Great ! We're now ready to move on to the next step — understanding the dataset and preparing it for graph creation and semantic enrichment.
4. Prepare the Movies dataset
Our first task is to prepare the Movies dataset that we'll be using to build the knowledge graph and power our recommendation chatbot. Instead of starting from scratch, we'll use an existing open dataset and build upon it.
We're using The Movies Dataset by Rounak Banik, a well-known public dataset available on Kaggle. It includes metadata for over 45,000 movies from TMDB, including cast, crew, keywords, ratings, and more.
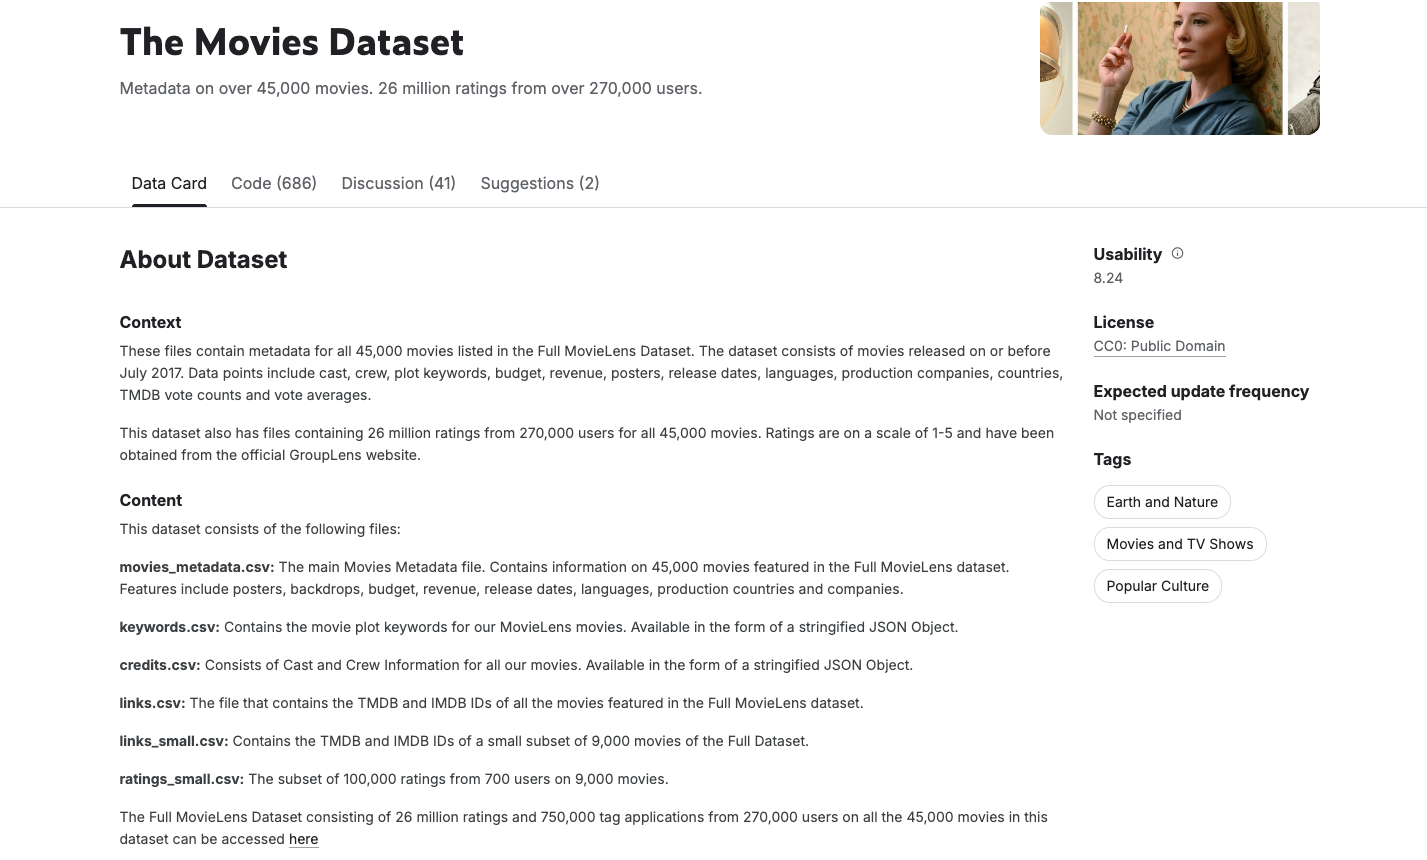
To build a reliable and effective Movie Recommendation Chatbot, it's essential to start with clean, consistent, and structured data. While The Movies Dataset from Kaggle is a rich resource with over 45,000 movie records and detailed metadata—including genres, cast, crew, and more—it also contains noise, inconsistencies, and nested data structures that aren't ideal for graph modeling or semantic embedding.
To address this, we have preprocessed and normalized the dataset to ensure it's well-suited for building a Neo4j knowledge graph and generating high-quality embeddings. This process involved:
- Removing duplicates and incomplete records
- Standardizing key fields (e.g., genre names, person names)
- Flattening complex nested structures (e.g., cast and crew) into structured CSVs
- Selecting a representative subset of ~12,000 movies to stay within Neo4j AuraDB Free limits
High-quality, normalized data helps ensure:
- Data quality: Minimizes errors and inconsistencies for more accurate recommendations
- Query performance: Streamlined structure improves retrieval speed and reduces redundancy
- Embedding accuracy: Clean inputs lead to more meaningful and contextual vector embeddings
You can access the cleaned and normalized dataset in the normalized_data/ folder of this GitHub repo. This dataset is also mirrored in a Google Cloud Storage bucket for easy access in upcoming Python scripts.
With the data cleaned and ready, we're now prepared to load it into Neo4j and begin constructing our movie knowledge graph.
5. Build Movies Knowledge Graph
To power our GenAI-enabled movie recommendation chatbot, we need to structure our movie dataset in a way that captures the rich network of connections between movies, actors, directors, genres, and other metadata. In this section, we'll build a Movies Knowledge Graph in Neo4j using the cleaned and normalized dataset you prepared earlier.
We'll use Neo4j's LOAD CSV capability to ingest CSV files hosted in a public Google Cloud Storage (GCS) bucket. These files represent different components of the movie dataset, such as movies, genres, cast, crew, production companies, and user ratings.
Step 1: Create Constraints and Indexes
Before importing data, it's good practice to create constraints and indexes to enforce data integrity and optimize query performance.
CREATE CONSTRAINT unique_tmdb_id IF NOT EXISTS FOR (m:Movie) REQUIRE m.tmdbId IS UNIQUE;
CREATE CONSTRAINT unique_movie_id IF NOT EXISTS FOR (m:Movie) REQUIRE m.movieId IS UNIQUE;
CREATE CONSTRAINT unique_prod_id IF NOT EXISTS FOR (p:ProductionCompany) REQUIRE p.company_id IS UNIQUE;
CREATE CONSTRAINT unique_genre_id IF NOT EXISTS FOR (g:Genre) REQUIRE g.genre_id IS UNIQUE;
CREATE CONSTRAINT unique_lang_id IF NOT EXISTS FOR (l:SpokenLanguage) REQUIRE l.language_code IS UNIQUE;
CREATE CONSTRAINT unique_country_id IF NOT EXISTS FOR (c:Country) REQUIRE c.country_code IS UNIQUE;

CREATE INDEX actor_id IF NOT EXISTS FOR (p:Person) ON (p.actor_id);
CREATE INDEX crew_id IF NOT EXISTS FOR (p:Person) ON (p.crew_id);
CREATE INDEX movieId IF NOT EXISTS FOR (m:Movie) ON (m.movieId);
CREATE INDEX user_id IF NOT EXISTS FOR (p:Person) ON (p.user_id);
Step 2: Import Movie Metadata and Relationships
Let's take a look at how we import movie metadata using the LOAD CSV command. This example creates Movie nodes with key attributes like title, overview, language, and runtime:
LOAD CSV WITH HEADERS FROM "https://storage.googleapis.com/neo4j-vertexai-codelab/normalized_data/normalized_movies.csv" AS row
WITH row, toInteger(row.tmdbId) AS tmdbId
WHERE tmdbId IS NOT NULL
WITH row, tmdbId
LIMIT 12000
MERGE (m:Movie {tmdbId: tmdbId})
ON CREATE SET m.title = coalesce(row.title, "None"),
              m.original_title = coalesce(row.original_title, "None"),
              m.adult = CASE
                            WHEN toInteger(row.adult) = 1 THEN 'Yes'
                            ELSE 'No'
                        END,
              m.budget = toInteger(coalesce(row.budget, 0)),
              m.original_language = coalesce(row.original_language, "None"),
              m.revenue = toInteger(coalesce(row.revenue, 0)),
              m.tagline = coalesce(row.tagline, "None"),
              m.overview = coalesce(row.overview, "None"),
              m.release_date = coalesce(row.release_date, "None"),
              m.runtime = toFloat(coalesce(row.runtime, 0)),
              m.belongs_to_collection = coalesce(row.belongs_to_collection, "None");
Similarly, you can import and link other entities such as Genres, Production Companies, Spoken Languages, Countries, Cast, Crew, and User Ratings using their respective CSVs and Cypher queries.
Load the Full Graph via Python
Rather than manually running multiple Cypher queries, we recommend using the automated Python script provided in this codelab.
The script graph_build.py loads the entire dataset from GCS into your Neo4j AuraDB instance using the credentials in your .env file.
python graph_build.py
The script will sequentially load all necessary CSVs, create nodes and relationships, and structure your complete movie knowledge graph.
|
|

.png")
Validate Your Graph
After loading, you can validate your graph by running the following script:
python validate_graph.py
This will give you a quick summary of what's in your graph: how many movies, actors, genres, and relationships like ACTED_IN, DIRECTED, etc., are present—ensuring your import was successful.
📦 Node Counts:
Movie: 11997 nodes
ProductionCompany: 7961 nodes
Genre: 20 nodes
SpokenLanguage: 100 nodes
Country: 113 nodes
Person: 92663 nodes
Actor: 81165 nodes
Director: 4846 nodes
Producer: 5981 nodes
User: 671 nodes

🔗 Relationship Counts:
HAS_GENRE: 28479 relationships
PRODUCED_BY: 22758 relationships
PRODUCED_IN: 14702 relationships
HAS_LANGUAGE: 16184 relationships
ACTED_IN: 191307 relationships
DIRECTED: 5047 relationships
PRODUCED: 6939 relationships
RATED: 90344 relationships
You should now see your graph populated with movies, people, genres, and more — ready to be semantically enriched in the next step!
6. Generate and Load Embeddings to perform Vector Similarity Search
To enable semantic search in our chatbot, we need to generate vector embeddings for movie overviews. These embeddings transform textual data into numerical vectors that can be compared for similarity — making it possible for the chatbot to retrieve relevant movies even if the query doesn't match the title or description exactly.

Option 1: Load Pre-computed Embeddings via Cypher
To quickly attach the embeddings to the corresponding Movie nodes in Neo4j, run the following Cypher command in the Neo4j Browser:
LOAD CSV WITH HEADERS FROM 'https://storage.googleapis.com/neo4j-vertexai-codelab/movie_embeddings.csv' AS row
WITH row
MATCH (m:Movie {tmdbId: toInteger(row.tmdbId)})
SET m.embedding = apoc.convert.fromJsonList(row.embedding)
This command reads the embedding vectors from the CSV and attaches them as a property (m.embedding) on each Movie node.
Option 2: Load Embeddings Using Python
You can also load the embeddings programmatically using the provided Python script. This approach is useful if you're working in your own environment or want to automate the process:
python load_embeddings.py
This script reads the same CSV from GCS and writes the embeddings to Neo4j using the Python Neo4j driver.
[Optional] Generate Embeddings Yourself (for Exploration)
If you're curious to understand how the embeddings are generated, you can explore the logic in the generate_embeddings.py script itself. It uses Vertex AI to embed each movie overview text using the text-embedding-004 model.
To try it yourself, open and run the embedding generation section of the code. If you're running in Cloud Shell, you can comment the following line, since Cloud Shell is already authenticated via your active account:
# os.environ["GOOGLE_APPLICATION_CREDENTIALS"] = "./service-account.json"
Once the embeddings are loaded into Neo4j, your movie knowledge graph becomes semantic-aware — ready to support powerful natural language search using vector similarity!
7. The Movie Recommendation Chatbot
With your knowledge graph and vector embeddings in place, it's time to bring everything together into a fully functional conversational interface — your GenAI-powered Movie Recommendation Chatbot.
This chatbot is implemented in Python using Gradio, a lightweight web framework for building intuitive user interfaces. The core logic lives in app.py, which connects to your Neo4j AuraDB instance and uses Google Vertex AI and Gemini to process and respond to natural language queries.
How It Works
- User types a natural language querye.g., "Recommend me sci-fi thrillers like Interstellar"
- Generate a vector embedding for the query using Vertex AI's
text-embedding-004model - Perform a vector search in Neo4j to retrieve semantically similar movies
- Use Gemini to:
- Interpret the query in context
- Generate a custom Cypher query based on the vector search results and Neo4j schema
- Execute the query to extract related graph data (e.g., actors, directors, genres)
- Summarize the results conversationally for the user
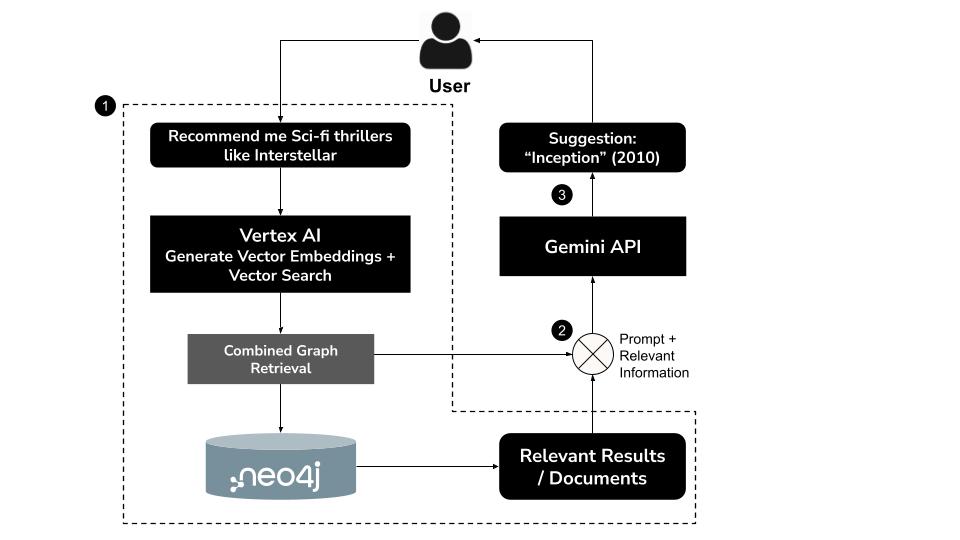
This hybrid approach, known as GraphRAG (Graph Retrieval-Augmented Generation), combines semantic retrieval and structured reasoning to produce more accurate, contextual, and explainable recommendations.
Run the Chatbot locally
Activate your virtual environment (if not already active), then launch the chatbot with:
python app.py
You should see an output similar to the following:
Vector index 'overview_embeddings' already exists. No need to create a new one.
* Running on local URL:  http://0.0.0.0:8080
To create a public link, set `share=True` in `launch()`.
💡 To share the chatbot externally, set share=True in the launch() function in app.py.
Interact with the Chatbot
Open the local URL displayed in your terminal (usually 👉 http://0.0.0.0:8080) to access the chatbot interface.
Try asking questions like:
- "What should I watch if I liked Interstellar?"
- "Suggest a romantic movie directed by Nora Ephron"
- "I want to watch a family movie with Tom Hanks"
- "Find thriller movies involving artificial intelligence"
The chatbot will:
✅ Understand the query
✅ Find semantically similar movie plots using embeddings
✅ Generate and run a Cypher query to fetch related graph context
✅ Return a friendly, personalized recommendation — all within seconds
What You Have Now
You've just built a GraphRAG-powered movie chatbot that combines:
- Vector search for semantic relevance
- Knowledge graph reasoning with Neo4j
- LLM capabilities through Gemini
- A smooth chat interface with Gradio
This architecture forms a foundation you can extend into more advanced search, recommendation, or reasoning systems powered by GenAI.
8. (Optional) Deploying to Google Cloud Run
If you'd like to make your Movie Recommendation Chatbot publicly accessible, you can deploy it to Google Cloud Run — a fully managed, serverless platform that auto-scales your app and abstracts away all infrastructure concerns.
This deployment uses:
requirements.txt— to define Python dependencies (Neo4j, Vertex AI, Gradio, etc.)Dockerfile— to package the application.env.yaml— to pass environment variables securely at runtime
Step 1: Prepare .env.yaml
Create a file named .env.yaml in your root directory with contents like:
NEO4J_URI: "neo4j+s://<your-aura-db-uri>"
NEO4J_USER: "neo4j"
NEO4J_PASSWORD: "<your-password>"
PROJECT_ID: "<your-gcp-project-id>"
LOCATION: "<your-gcp-region>"  # e.g. us-central1
💡 This format is preferred over --set-env-vars as it's more scalable, version-controllable, and readable.
Step 2: Set Up Environment Variables
In your terminal, set the following environment variables (replace the placeholder values with your actual project settings):
# Set your Google Cloud project ID
export GCP_PROJECT='your-project-id'  # Change this

# Set your preferred deployment region
export GCP_REGION='us-central1'
Step 2: Create Artifact Registry and Build the Container
# Artifact Registry repo and service name
export AR_REPO='your-repo-name'       # Change this
export SERVICE_NAME='movies-chatbot'  # Or any name you prefer

# Create the Artifact Registry repository
gcloud artifacts repositories create "$AR_REPO" \
  --location="$GCP_REGION" \
  --repository-format=Docker

# Authenticate Docker with Artifact Registry
gcloud auth configure-docker "$GCP_REGION-docker.pkg.dev"

# Build and submit the container image
gcloud builds submit \
  --tag "$GCP_REGION-docker.pkg.dev/$GCP_PROJECT/$AR_REPO/$SERVICE_NAME"
This command packages your app using the Dockerfile and uploads the container image to Google Cloud Artifact Registry.
Step 3: Deploy to Cloud Run
Now deploy your app using the .env.yaml file for runtime configuration:
gcloud run deploy "$SERVICE_NAME" \
  --port=8080 \
  --image="$GCP_REGION-docker.pkg.dev/$GCP_PROJECT/$AR_REPO/$SERVICE_NAME" \
  --allow-unauthenticated \
  --region=$GCP_REGION \
  --platform=managed \
  --project=$GCP_PROJECT \
  --env-vars-file=.env.yaml
Access the Chatbot
Once deployed, Cloud Run will provide a public URL like:
https://movies-reco-[UNIQUE_ID].${GCP_REGION}.run.app
Open this URL in your browser to access your deployed Gradio chatbot interface — ready to handle movie recommendations using GraphRAG, Gemini, and Neo4j!
Notes & Tips
- Ensure your
Dockerfilerunspip install -r requirements.txtduring build. - If you're not using Cloud Shell, you'll need to authenticate your environment using a Service Account with Vertex AI and Artifact Registry permissions.
- You can monitor deployment logs and metrics from the Google Cloud Console > Cloud Run.
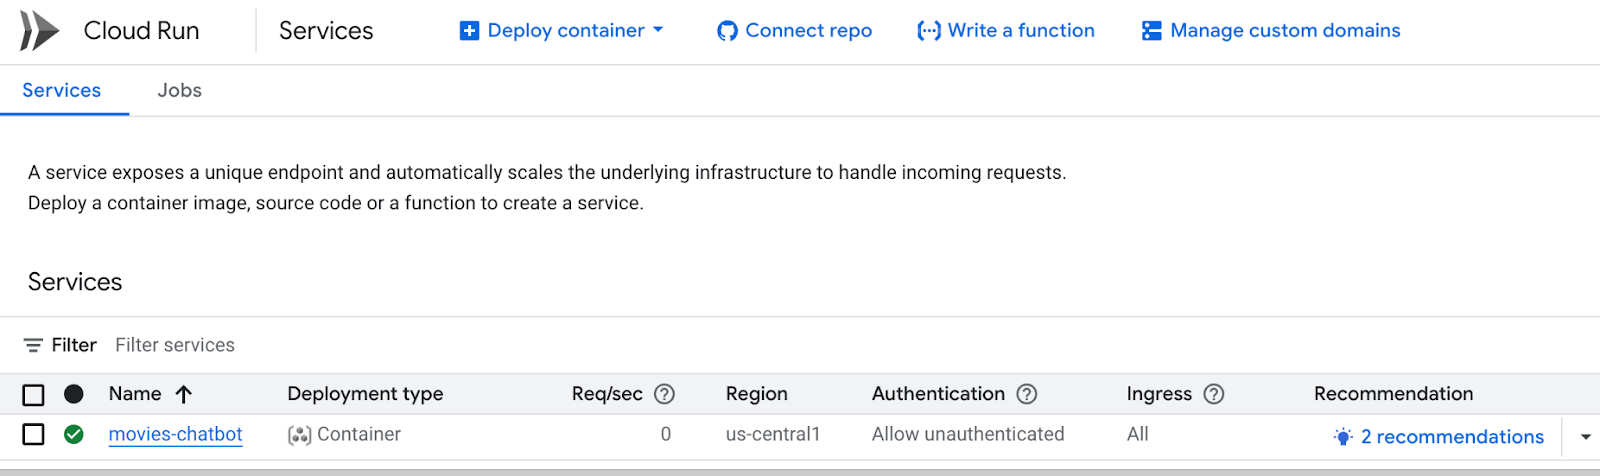
You can also visit Cloud Run from the Google Cloud console and you will see the list of services in Cloud Run. The movies-chatbot service should be one of the services (if not the only one) listed there.
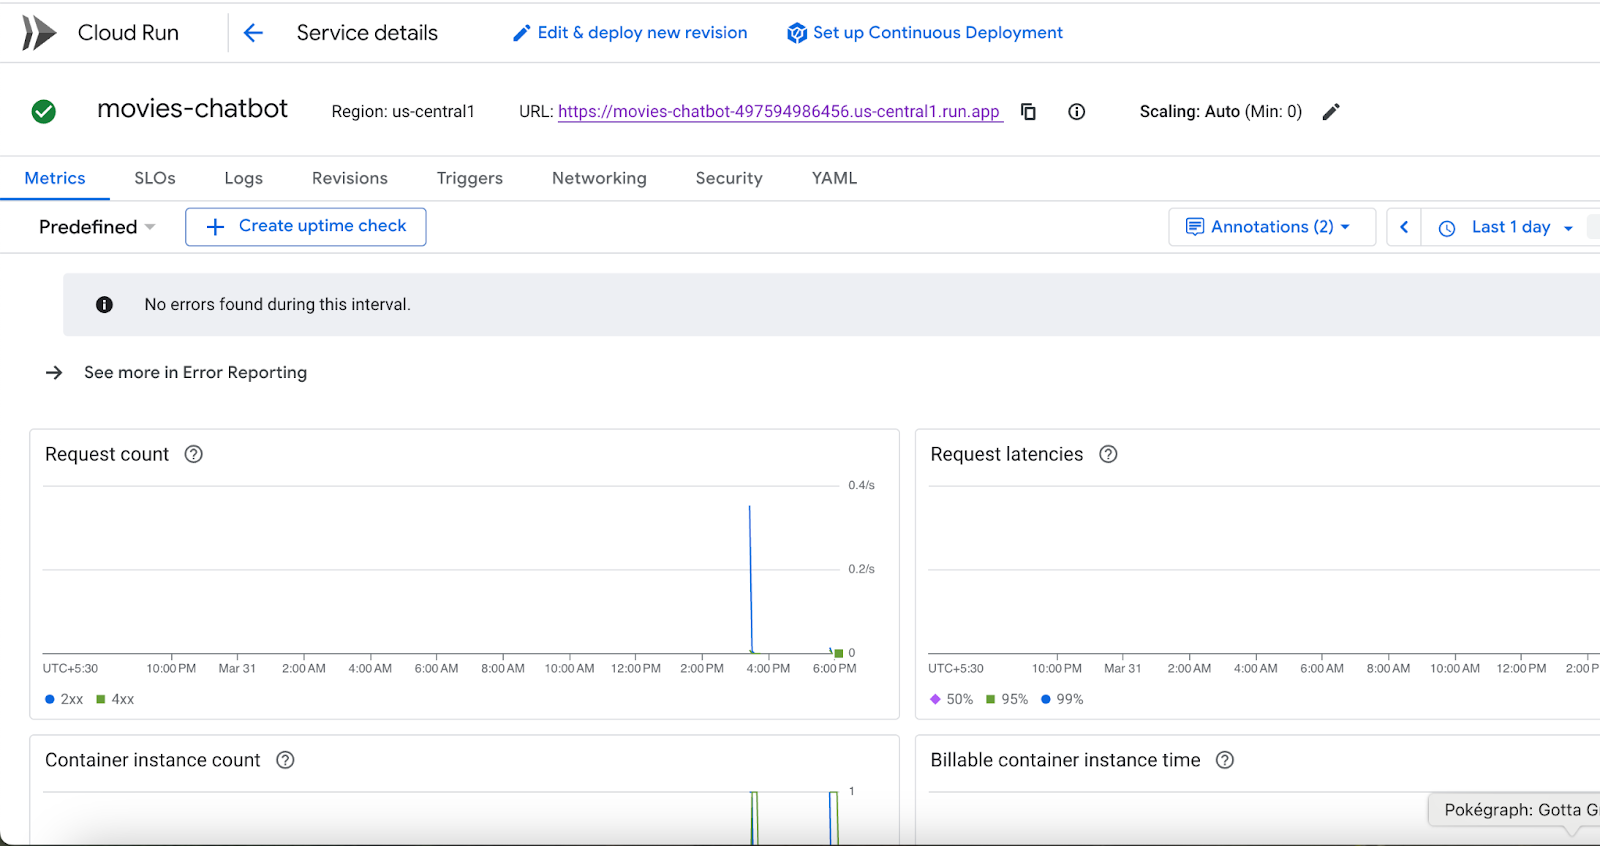
You can view the details of the service like URL, configurations, logs and more by clicking on the specific service name (movies-chatbot in our case).
With this, your Movie Recommendation Chatbot is now deployed, scalable, and shareable. 🎉
9. Clean up
To avoid incurring charges to your Google Cloud account for the resources used in this post, follow these steps:
- In the Google Cloud console, go to the Manage resources page.
- In the project list, select the project that you want to delete, and then click Delete.
- In the dialog, type the project ID, and then click Shut down to delete the project.
10. Congratulations
You've successfully built and deployed a GraphRAG-powered, GenAI-enhanced movie recommendation chatbot using Neo4j, Vertex AI, and Gemini. By combining the graph-native modeling capabilities of Neo4j with semantic search via Vertex AI and natural language reasoning through Gemini, you've created an intelligent system that goes beyond basic search — it understands user intent, reasons over connected data, and responds conversationally.
In this codelab, you accomplished the following:
✅ Built a real-world movie Knowledge Graph in Neo4j to model movies, actors, genres, and relationships
✅ Generated vector embeddings for movie plot overviews using Vertex AI's text-embedding models
✅ Implemented GraphRAG, combining vector search and LLM-generated Cypher queries for deeper, multi-hop reasoning
✅ Integrated Gemini to interpret user questions, generate Cypher queries, and summarize graph results in natural language
✅ Created an intuitive chat interface using Gradio
✅ Optionally deployed your chatbot to Google Cloud Run for scalable, serverless hosting
What's Next?
This architecture is not limited to movie recommendations — it can be extended to:
- Book and music discovery platforms
- Academic research assistants
- Product recommendation engines
- Healthcare, finance, and legal knowledge assistants
Anywhere you have complex relationships + rich textual data, this combination of Knowledge Graphs + LLMs + semantic embeddings can power the next generation of intelligent applications.
As multimodal GenAI models like Gemini evolve, you'll be able to incorporate even richer context, images, speech, and personalization to build truly human-centric systems.
Keep exploring, keep building — and don't forget to stay updated with the latest from Neo4j, Vertex AI, and Google Cloud to take your intelligent applications to the next level! Explore more hands-on knowledge graph tutorials at Neo4j GraphAcademy.