
1. Overview
Across different industries, contextual search is a critical functionality that forms the heart and center of their applications. Retrieval Augmented Generation has been a key driver of this crucial tech evolution for quite some time now with its Generative AI powered retrieval mechanisms. Generative models, with their large context windows and impressive output quality, are transforming AI. RAG provides a systematic way to inject context into AI applications and agents, grounding them in structured databases or information from various media. This contextual data is crucial for clarity of truth and accuracy of output, but how accurate are those results? Does your business depend largely on the accuracy of these contextual matches and relevance? Then this project is going to tickle you!
The dirty secret of vector search isn't just building it, it's knowing if your vector matches are actually good. We've all been there, staring blankly at a list of results, wondering, ‘Is this thing even working?!' Let's dive into how to actually evaluate the quality of your vector matches. "So what changed in RAG?", you ask? Everything! For years, Retrieval Augmented Generation (RAG) felt like a promising but elusive goal. Now, finally, we have the tools to build RAG applications with the performance and the reliability needed for mission-critical tasks.
Now we already have the foundational understanding of 3 things:
- What contextual search means for your agent and how to accomplish that using Vector Search.
- We also deep-dove into attaining Vector Search within the scope of your data, that is within your database itself (all of Google Cloud Databases support that, if you didn't already know!).
- We went one step further than the rest of the world in telling you how to accomplish such a light-weight Vector Search RAG capability with high performance and quality with AlloyDB Vector Search capability powered by ScaNN index.
If you haven't gone through those basic, intermediate and slightly advanced RAG experiments, I would encourage you to read those 3 here, here and here in the listed order.
Patent Search assists the user in finding contextually relevant patents to their search text and we have already built a version of this in the past. Now we'll build it with new and advanced RAG features that enable a quality controlled contextual search for that application. Let's dive in!
The picture below shows the overall flow of what's happening in this application.~ 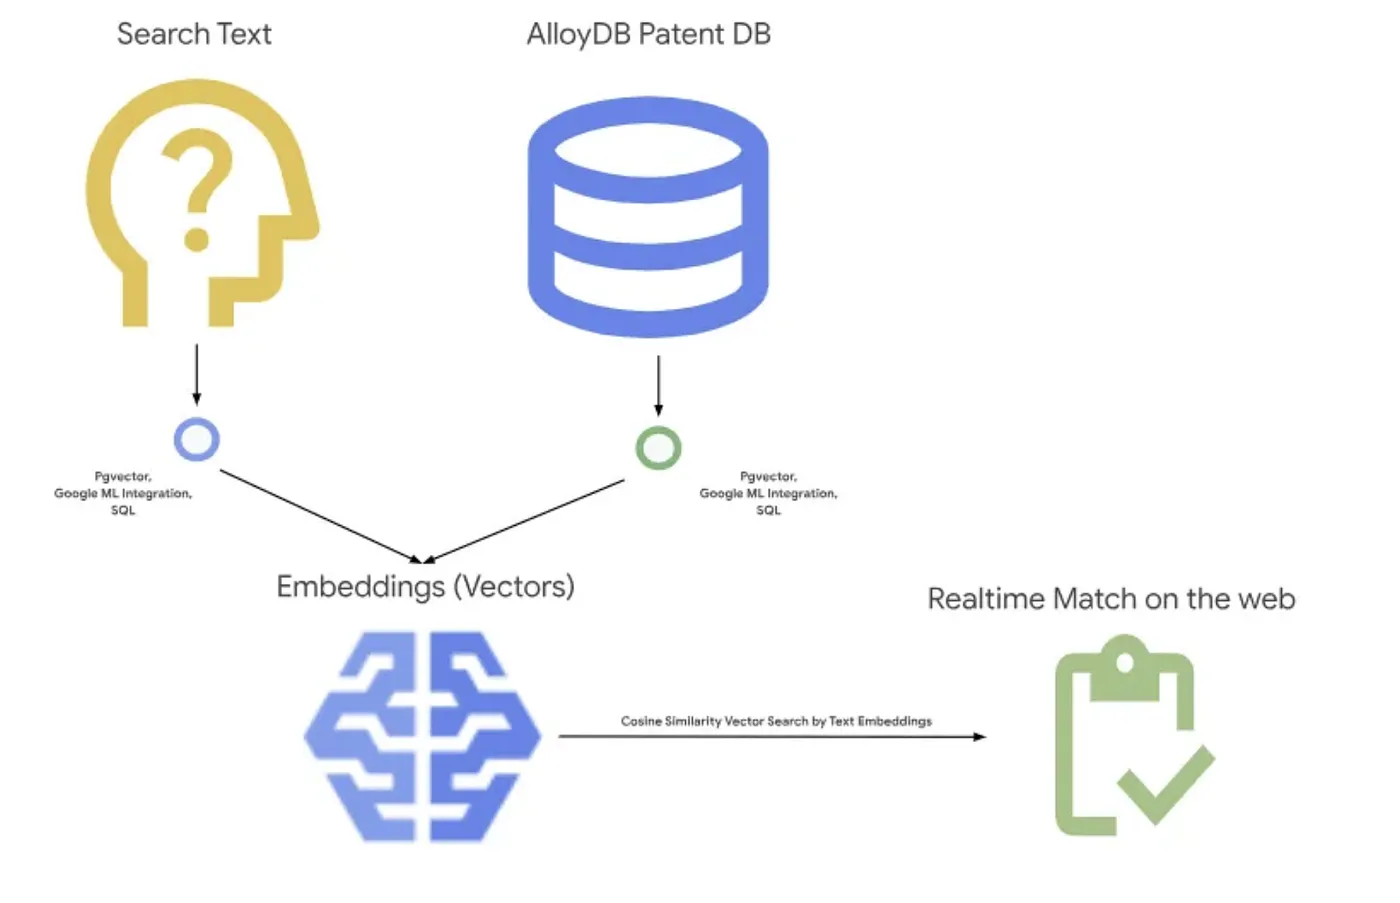
Objective
Allow a user to search for patents based on a textual description with improved performance and better quality while being able to assess the quality of the generated matches using AlloyDB's latest RAG features.
What you'll build
As part of this lab, you will:
- Create an AlloyDB instance & load Patents Public Dataset
- Create metadata index and ScaNN index
- Implement advanced Vector Search in AlloyDB using ScaNN's inline filtering method
- Implement Recall eval feature
- Evaluate query response
Requirements
2. Before you begin
Create a project
- In the Google Cloud Console, on the project selector page, select or create a Google Cloud project.
- Make sure that billing is enabled for your Cloud project. Learn how to check if billing is enabled on a project .
- You'll use Cloud Shell, a command-line environment running in Google Cloud. Click Activate Cloud Shell at the top of the Google Cloud console.

- Once connected to Cloud Shell, you check that you're already authenticated and that the project is set to your project ID using the following command:
gcloud auth list
- Run the following command in Cloud Shell to confirm that the gcloud command knows about your project.
gcloud config list project
- If your project is not set, use the following command to set it:
gcloud config set project <YOUR_PROJECT_ID>
- Enable the required APIs. You can use a gcloud command in the Cloud Shell terminal:
gcloud services enable alloydb.googleapis.com compute.googleapis.com cloudresourcemanager.googleapis.com servicenetworking.googleapis.com run.googleapis.com cloudbuild.googleapis.com cloudfunctions.googleapis.com aiplatform.googleapis.com
The alternative to the gcloud command is through the console by searching for each product or using this link.
Refer documentation for gcloud commands and usage.
3. Database setup
In this lab we'll use AlloyDB as the database for the patent data. It uses clusters to hold all of the resources, such as databases and logs. Each cluster has a primary instance that provides an access point to the data. Tables will hold the actual data.
Let's create an AlloyDB cluster, instance and table where the patent dataset will be loaded.
Create a cluster and instance
- Navigate the AlloyDB page in the Cloud Console. An easy way to find most pages in Cloud Console is to search for them using the search bar of the console.
- Select CREATE CLUSTER from that page:
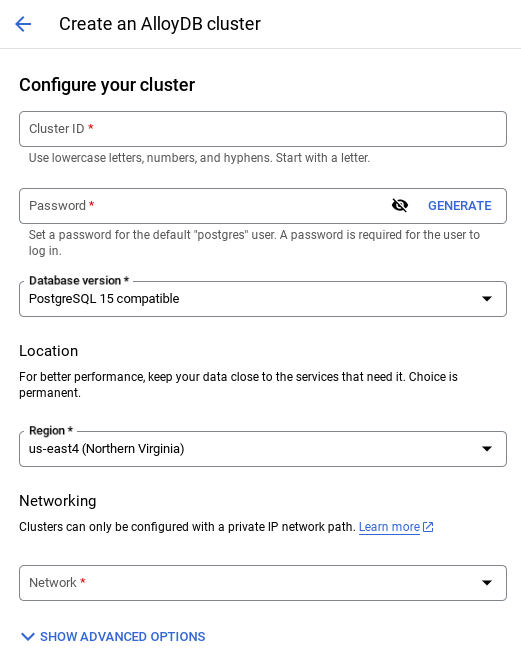
- You'll see a screen like the one below. Create a cluster and instance with the following values (Make sure the values match in case you are cloning the application code from the repo):
- cluster id: "
vector-cluster" - password: "
alloydb" - PostgreSQL 15 / latest recommended
- Region: "
us-central1" - Networking: "
default"
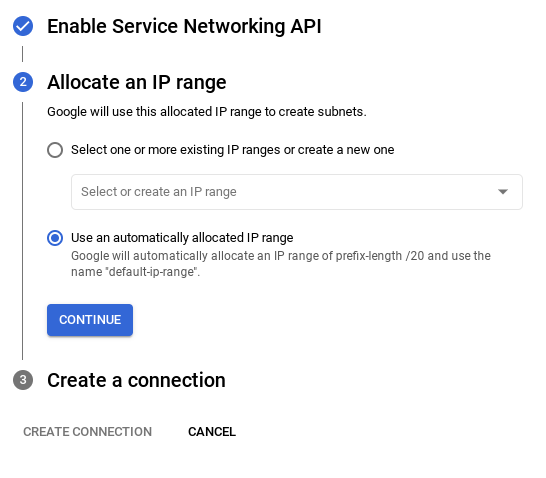
- When you select the default network, you'll see a screen like the one below.
Select SET UP CONNECTION.
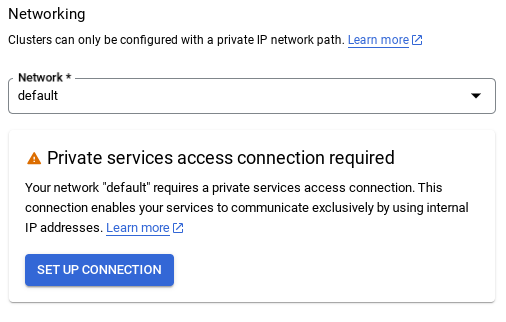
- From there, select "Use an automatically allocated IP range" and Continue. After reviewing the information, select CREATE CONNECTION.
- Once your network is set up, you can continue to create your cluster. Click CREATE CLUSTER to complete setting up of the cluster as shown below:
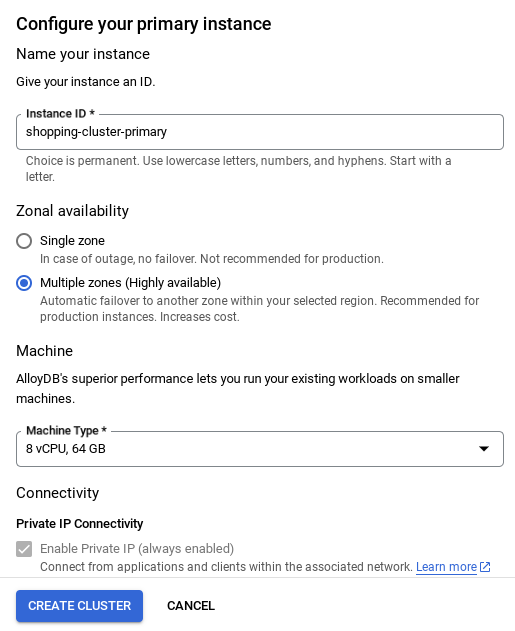
Make sure to change the instance id (which you can find at the time of configuration of the cluster / instance) to
vector-instance. If you cannot change it, remember to use your instance id in all the upcoming references.
Note that the Cluster creation will take around 10 minutes. Once it is successful, you should see a screen that shows the overview of your cluster you just created.
4. Data ingestion
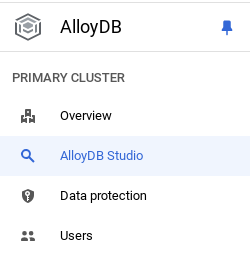
Now it's time to add a table with the data about the store. Navigate to AlloyDB, select the primary cluster and then AlloyDB Studio:
You may need to wait for your instance to finish being created. Once it is, sign into AlloyDB using the credentials you created when you created the cluster. Use the following data for authenticating to PostgreSQL:
- Username : "
postgres" - Database : "
postgres" - Password : "
alloydb"
Once you have authenticated successfully into AlloyDB Studio, SQL commands are entered in the Editor. You can add multiple Editor windows using the plus to the right of the last window.
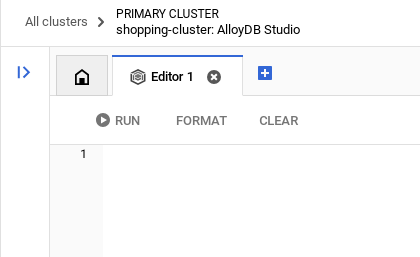
You'll enter commands for AlloyDB in editor windows, using the Run, Format, and Clear options as necessary.
Enable Extensions
For building this app, we will use the extensions pgvector and google_ml_integration. The pgvector extension allows you to store and search vector embeddings. The google_ml_integration extension provides functions you use to access Vertex AI prediction endpoints to get predictions in SQL. Enable these extensions by running the following DDLs:
CREATE EXTENSION IF NOT EXISTS google_ml_integration CASCADE;
CREATE EXTENSION IF NOT EXISTS vector;
If you would like to check the extensions that have been enabled on your database, run this SQL command:
select extname, extversion from pg_extension;
Create a table
You can create a table using the DDL statement below in the AlloyDB Studio:
CREATE TABLE patents_data ( id VARCHAR(25), type VARCHAR(25), number VARCHAR(20), country VARCHAR(2), date VARCHAR(20), abstract VARCHAR(300000), title VARCHAR(100000), kind VARCHAR(5), num_claims BIGINT, filename VARCHAR(100), withdrawn BIGINT, abstract_embeddings vector(768)) ;
The abstract_embeddings column will allow storage for the vector values of the text.
Grant Permission
Run the below statement to grant execute on the "embedding" function:
GRANT EXECUTE ON FUNCTION embedding TO postgres;
Grant Vertex AI User ROLE to the AlloyDB service account
From Google Cloud IAM console, grant the AlloyDB service account (that looks like this: service-<<PROJECT_NUMBER>>@gcp-sa-alloydb.iam.gserviceaccount.com) access to the role "Vertex AI User". PROJECT_NUMBER will have your project number.
Alternatively you can run the below command from the Cloud Shell Terminal:
PROJECT_ID=$(gcloud config get-value project)


gcloud projects add-iam-policy-binding $PROJECT_ID \
  --member="serviceAccount:service-$(gcloud projects describe $PROJECT_ID --format="value(projectNumber)")@gcp-sa-alloydb.iam.gserviceaccount.com" \
--role="roles/aiplatform.user"
Load patent data into the database
The Google Patents Public Datasets on BigQuery will be used as our dataset. We will use the AlloyDB Studio to run our queries. The data is sourced into this insert_scripts.sql file and we will run this to load the patent data.
- In the Google Cloud console, open the AlloyDB page.
- Select your newly created cluster and click the instance.
- In the AlloyDB Navigation menu, click AlloyDB Studio. Sign in with your credentials.
- Open a new tab by clicking the New tab icon on the right.
- Copy the
insertquery statement from theinsert_scripts.sqlscript mentioned above to the editor. You can copy 10-50 insert statements for a quick demo of this use case. - Click Run. The results of your query appear in the Results table.
Note: You may notice that the insert script has a lot of data in it. This is because we have included embeddings in the insert scripts. Click "View Raw" in case you have trouble loading the file in github. This is done in order to save you the trouble (in the upcoming steps) of generating more than a few embeddings (say 20-25 max) in case you are using a trial credit billing account for Google Cloud.
5. Create Embeddings for patents data
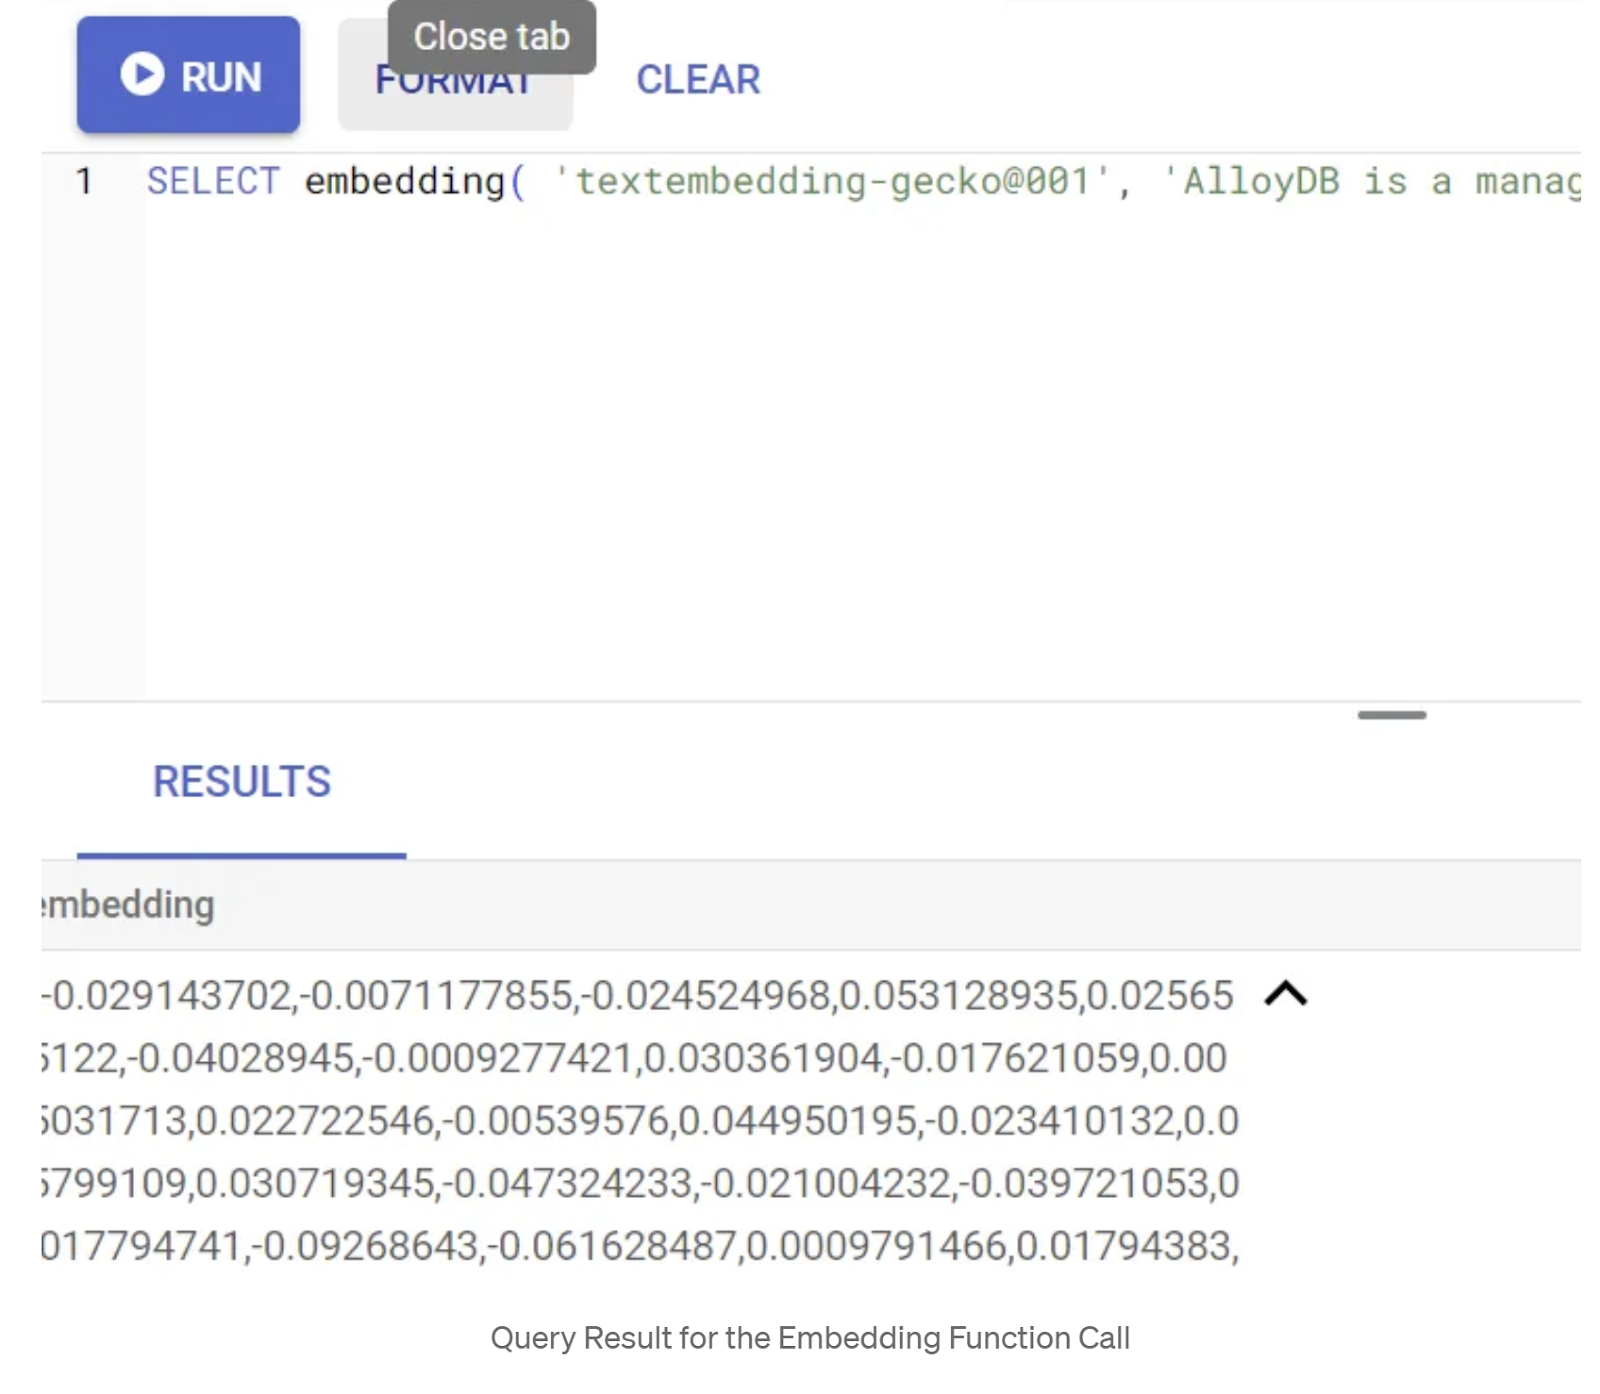
First let's test the embedding function, by running the following sample query:
SELECT embedding('text-embedding-005', 'AlloyDB is a managed, cloud-hosted SQL database service.');
This should return the embeddings vector, that looks like an array of floats, for the sample text in the query. Looks like this:
Update the abstract_embeddings Vector field
Run the below DML to update the patent abstracts in the table with the corresponding embeddings only if you have not inserted the abstract_embeddings data as part of the insert script:
UPDATE patents_data set abstract_embeddings = embedding( 'text-embedding-005', abstract);
You may have trouble generating more than a few embeddings (say 20-25 max) if you are using a trial credit billing account for Google Cloud. So for that reason, I have included the embeddings in the insert scripts already and you should have it in your table loaded if you had completed the "load patent data into the database" step.
6. Perform Advanced RAG with AlloyDB's new Features
Now that the table, data, embeddings are all ready, let's perform the real time Vector Search for the user search text. You can test this by running the query below:
SELECT id || ' - ' || title as title FROM patents_data ORDER BY abstract_embeddings <=> embedding('text-embedding-005', 'Sentiment Analysis')::vector LIMIT 10;
In this query,
- The user searched text is: "Sentiment Analysis".
- We are converting it to embeddings in the embedding() method using the model: text-embedding-005.
- "<=>" represents the use of the COSINE SIMILARITY distance method.
- We are converting the embedding method's result to vector type to make it compatible with the vectors stored in the database.
- LIMIT 10 represents that we are selecting the 10 closest matches of the search text.
AlloyDB takes Vector Search RAG to the next level:
There are a good number of things introduced. Two of the developer-focused ones are:
- Inline Filtering
- Recall Evaluator
Inline Filtering
Previously as a developer, you would have to perform the Vector Search query and have to go deal with the filtering and recall. AlloyDB Query Optimizer makes choices on how to execute a query with filters. Inline filtering, is a new query optimization technique that allows the AlloyDB query optimizer to evaluate both the metadata filtering conditions and the vector search alongside, leveraging both vector indexes and indexes on the metadata columns. This has made recall performance increase, allowing developers to take advantage of what AlloyDB has to offer out of the box.
Inline filtering is best for cases with medium selectivity. As AlloyDB searches through the vector index, it only computes distances for vectors that match the metadata filtering conditions (your functional filters in a query usually handled in the WHERE clause). This massively improves performance for these queries complementing the advantages of post-filter or pre-filter.
- Install or update the pgvector extension
CREATE EXTENSION IF NOT EXISTS vector WITH VERSION '0.8.0.google-3';
If the pgvector extension is already installed, upgrade the vector extension to version 0.8.0.google-3 or later to get recall evaluator capabilities.
ALTER EXTENSION vector UPDATE TO '0.8.0.google-3';
This step needs to be executed only if your vector extension is <0.8.0.google-3>.
Important note: If your row count is less than 100, you won't need to create the ScaNN index in the first place as it won't apply for less rows. Please skip the following steps in that case.
- To create ScaNN indexes, install the alloydb_scann extension.
CREATE EXTENSION IF NOT EXISTS alloydb_scann;
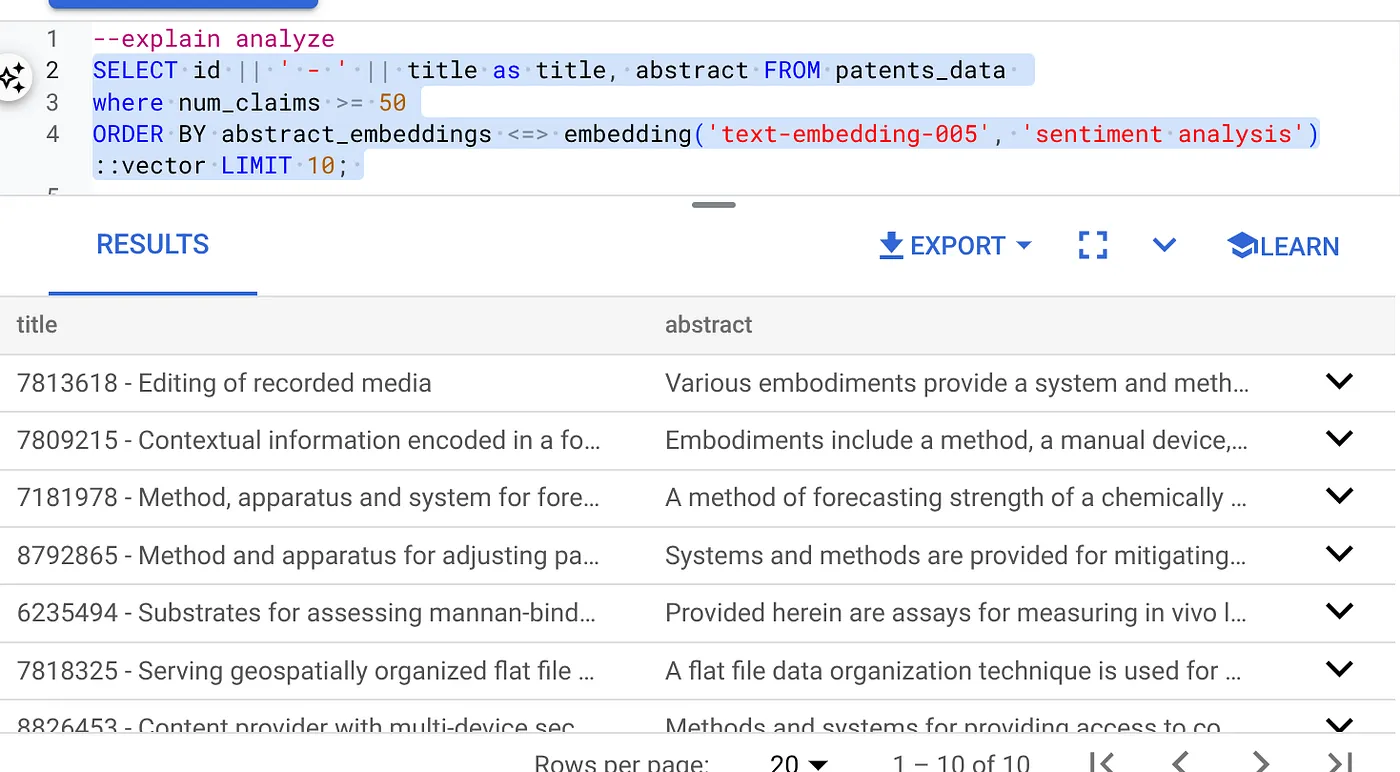
- First run the Vector Search Query without the index and without the Inline Filter enabled:
SELECT id || ' - ' || title as title FROM patents_data
WHERE num_claims >= 15
ORDER BY abstract_embeddings <=> embedding('text-embedding-005', 'Sentiment Analysis')::vector LIMIT 10;
Result should be similar to:
- Run Explain Analyze on it: (with no index nor Inline Filtering)
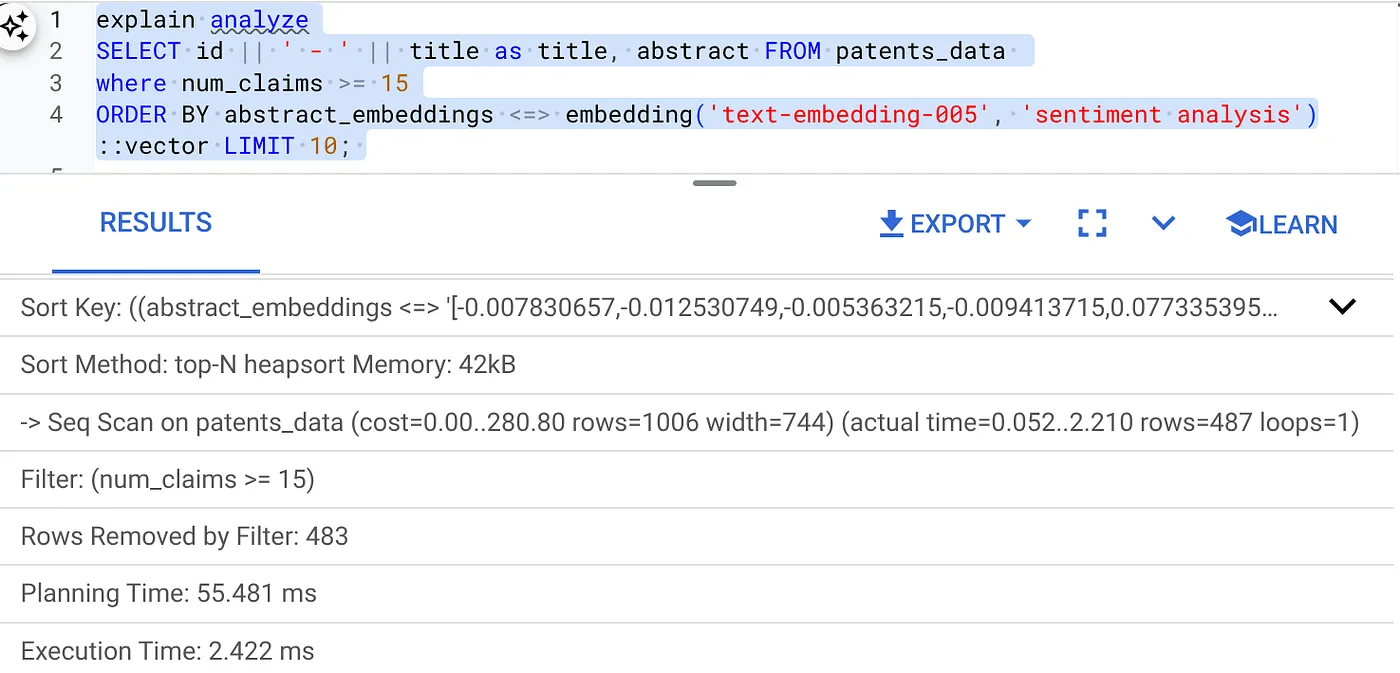
The execution time is 2.4 ms
- Let's create a regular index on the num_claims field so we can filter by it:
CREATE INDEX idx_patents_data_num_claims ON patents_data (num_claims);
- Let's create the ScaNN index for our Patent Search application. Run the following from your AlloyDB Studio:
CREATE INDEX patent_index ON patents_data
USING scann (abstract_embeddings cosine)
WITH (num_leaves=32);
Important note: (num_leaves=32) applies for our total dataset with 1000+ rows. If your row count is less than 100, you won't need to create an index in the first place as it won't apply for less rows.
- Set the Inline Filtering enabled on the ScaNN Index:
SET scann.enable_inline_filtering = on
- Now, let's run the same query with filter and Vector Search in it:
SELECT id || ' - ' || title as title FROM patents_data
WHERE num_claims >= 15
ORDER BY abstract_embeddings <=> embedding('text-embedding-005', 'Sentiment Analysis')::vector LIMIT 10;
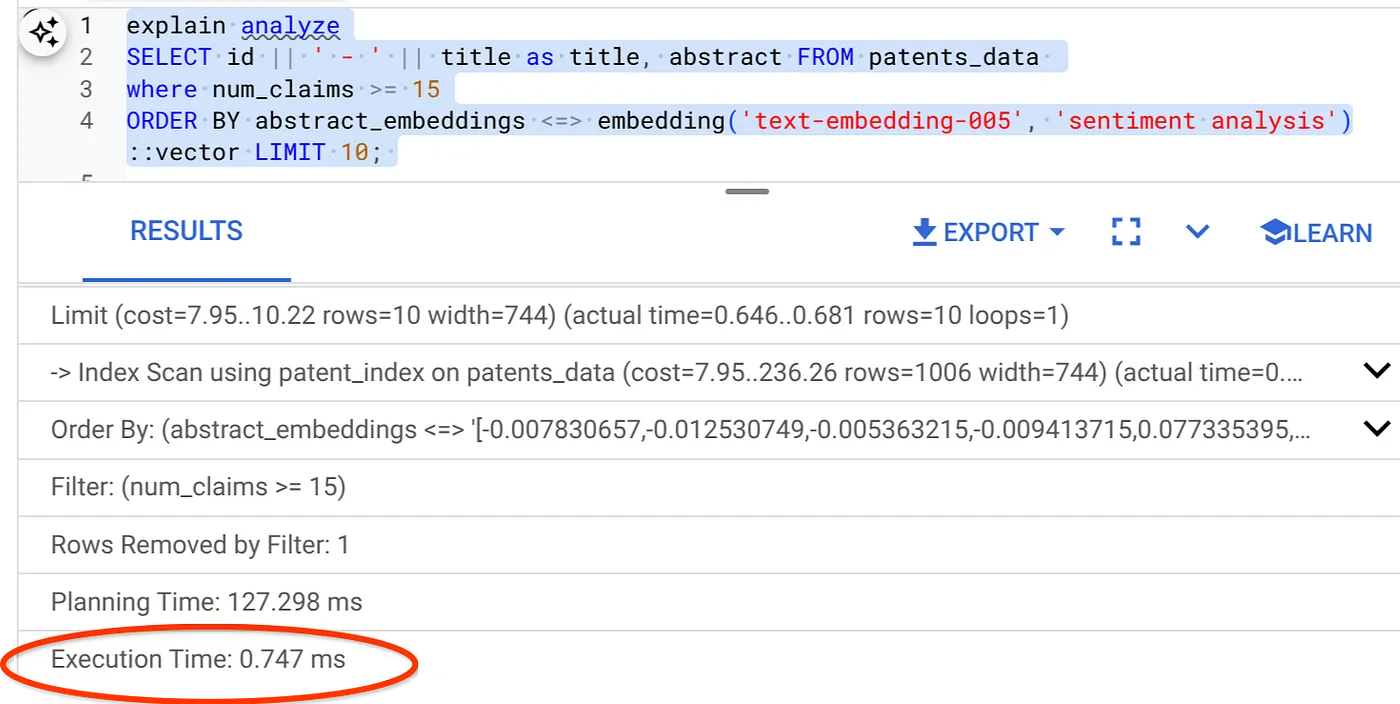
As you can see the execution time is reduced significantly for the same Vector Search. The Inline Filtering infused ScaNN index on the Vector Search has made this possible!!!
Next, let's evaluate the recall for this ScaNN enabled Vector Search.
Recall Evaluator
Recall in similarity search is the percentage of relevant instances that were retrieved from a search, i.e. the number of true positives. This is the most common metric used for measuring search quality. One source of recall loss comes from the difference between approximate nearest neighbor search, or aNN, and k (exact) nearest neighbor search, or kNN. Vector indexes like AlloyDB's ScaNN implement aNN algorithms, allowing you to speed up vector search on large datasets in exchange for a small tradeoff in recall. Now, AlloyDB provides you with the ability to measure this tradeoff directly in the database for individual queries and ensure that it is stable over time. You can update query and index parameters in response to this information to achieve better results and performance.
What is the logic behind recall of search results?
In the context of vector search, recall refers to the percentage of vectors that the index returns which are true nearest neighbors. For example, if a nearest neighbor query for the 20 nearest neighbors returns 19 of the ground truth nearest neighbors, then the recall is 19/20x100 = 95%. Recall is the metric used for search quality, and is defined as the percentage of the returned results that are objectively closest to the query vectors.
You can find the recall for a vector query on a vector index for a given configuration using the evaluate_query_recall function. This function lets you tune your parameters to achieve the vector query recall results that you want.
Important Note:
If you are facing permission denied error on HNSW index in the following steps, skip this entire recall evaluation section for now. It might have to do with access restrictions at this point as it is just released at the time this codelab is documented.
- Set the Enable Index Scan flag on the ScaNN Index & HNSW index:
SET scann.enable_indexscan = on
SET hnsw.enable_index_scan = on
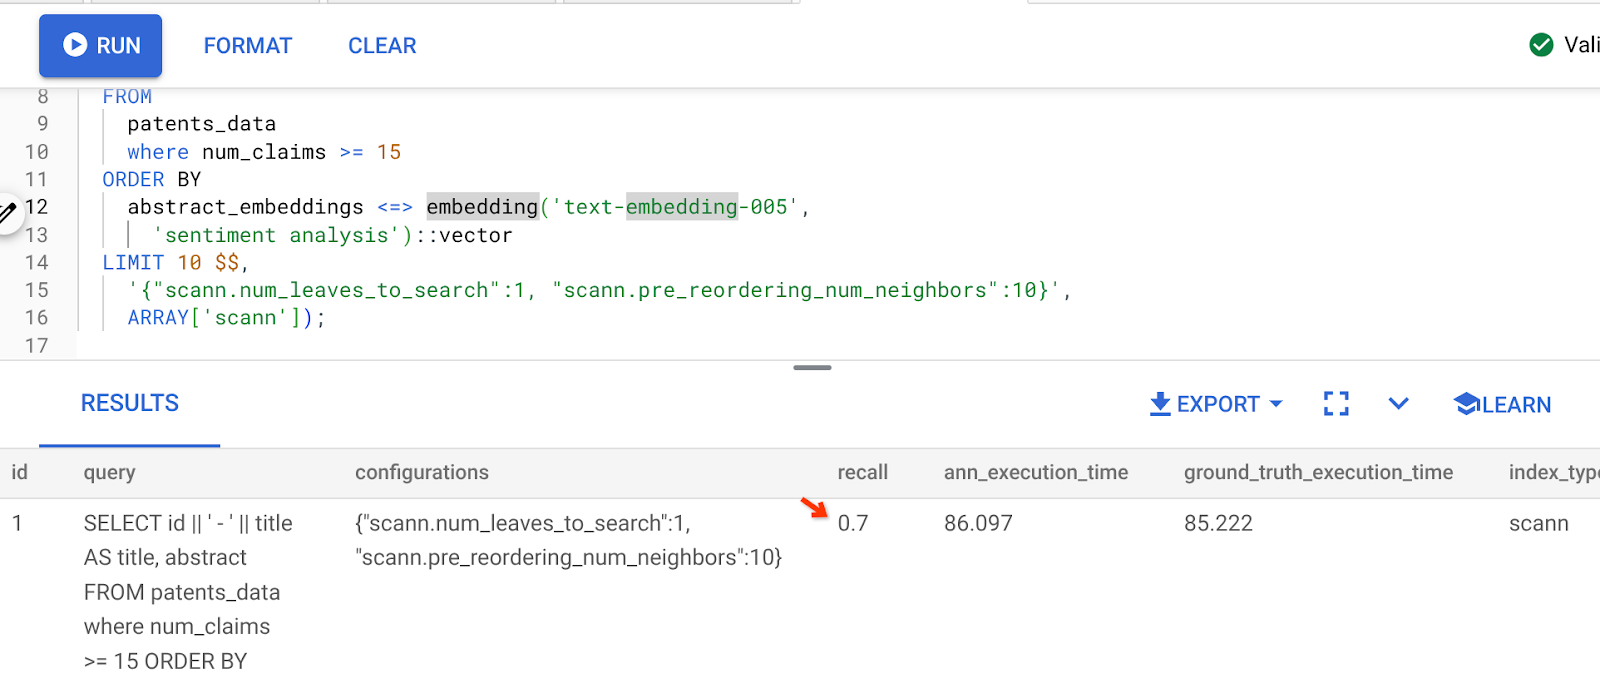
- Run the following query in AlloyDB Studio:
SELECT
  *
FROM
  evaluate_query_recall($$
  SELECT
    id || ' - ' || title AS title,
    abstract
  FROM
    patents_data
    where num_claims >= 15
  ORDER BY
    abstract_embeddings <=> embedding('text-embedding-005',
      'sentiment analysis')::vector
  LIMIT 25 $$,
    '{"scann.num_leaves_to_search":1, "scann.pre_reordering_num_neighbors":10}',
    ARRAY['scann']);
The evaluate_query_recall function takes in the query as a parameter and returns its recall. I'm using the same query that I used to check performance as the function input query. I have added SCaNN as the index method. For more parameter options refer to the documentation.
The recall for this Vector Search query we have been using:

I see that the RECALL is 70%. Now I can use this information to change the index parameters, methods and query parameters and improve my recall for this Vector Search!
7. Test it with modified query & index parameters
Now let's test the query by modifying the query parameters based on the recall received.
- I have modified the number of rows in the result set to 7 (from 25 previously) and I see an improved RECALL, i.e. 86%.

This means in real-time I can vary the number of matches that my users get to see to improve the relevance of the matches in accordance with the users' search context.
- Let's try it again by modifying the index parameters:
For this test, I'm going to use "L2 Distance" instead of "Cosine" similarity distance function. I'll also change the limit of the query to 10 to showcase if there is improvement in quality of search results even with an increased search result set count.
[BEFORE] Query that uses Cosine Similarity distance function:
SELECT
  *
FROM
  evaluate_query_recall($$
  SELECT
    id || ' - ' || title AS title,
    abstract
  FROM
    patents_data
    where num_claims >= 15
  ORDER BY
    abstract_embeddings <=> embedding('text-embedding-005',
      'sentiment analysis')::vector
  LIMIT 10 $$,
    '{"scann.num_leaves_to_search":1, "scann.pre_reordering_num_neighbors":10}',
    ARRAY['scann']);
Very Important Note: "How do we know this query uses COSINE similarity?" you ask. You can identify the distance function by the use of "<=>" to represent Cosine distance.
Docs link for Vector Search distance functions.
The result of the above query is:
As you can see, the RECALL is 70% without any change to our index logic. Remember the ScaNN index we created in step 6 of the Inline Filtering section, "patent_index "? The same index is still effective while we ran the above query.
Now let's create an index with a different distance function query: L2 distance: <->
drop index patent_index;

CREATE INDEX patent_index_L2 ON patents_data
USING scann (abstract_embeddings L2)
WITH (num_leaves=32);
The drop index statement is just to ensure there is no unnecessary index on the table.
Now, I can execute the following query to evaluate the RECALL after changing the distance function of my Vector Search functionality.
[AFTER] Query that uses Cosine Similarity distance function:
SELECT
  *
FROM
  evaluate_query_recall($$
  SELECT
    id || ' - ' || title AS title,
    abstract
  FROM
    patents_data
    where num_claims >= 15
  ORDER BY
    abstract_embeddings <-> embedding('text-embedding-005',
      'sentiment analysis')::vector
  LIMIT 10 $$,
    '{"scann.num_leaves_to_search":1, "scann.pre_reordering_num_neighbors":10}',
    ARRAY['scann']);
The result of the above query is:
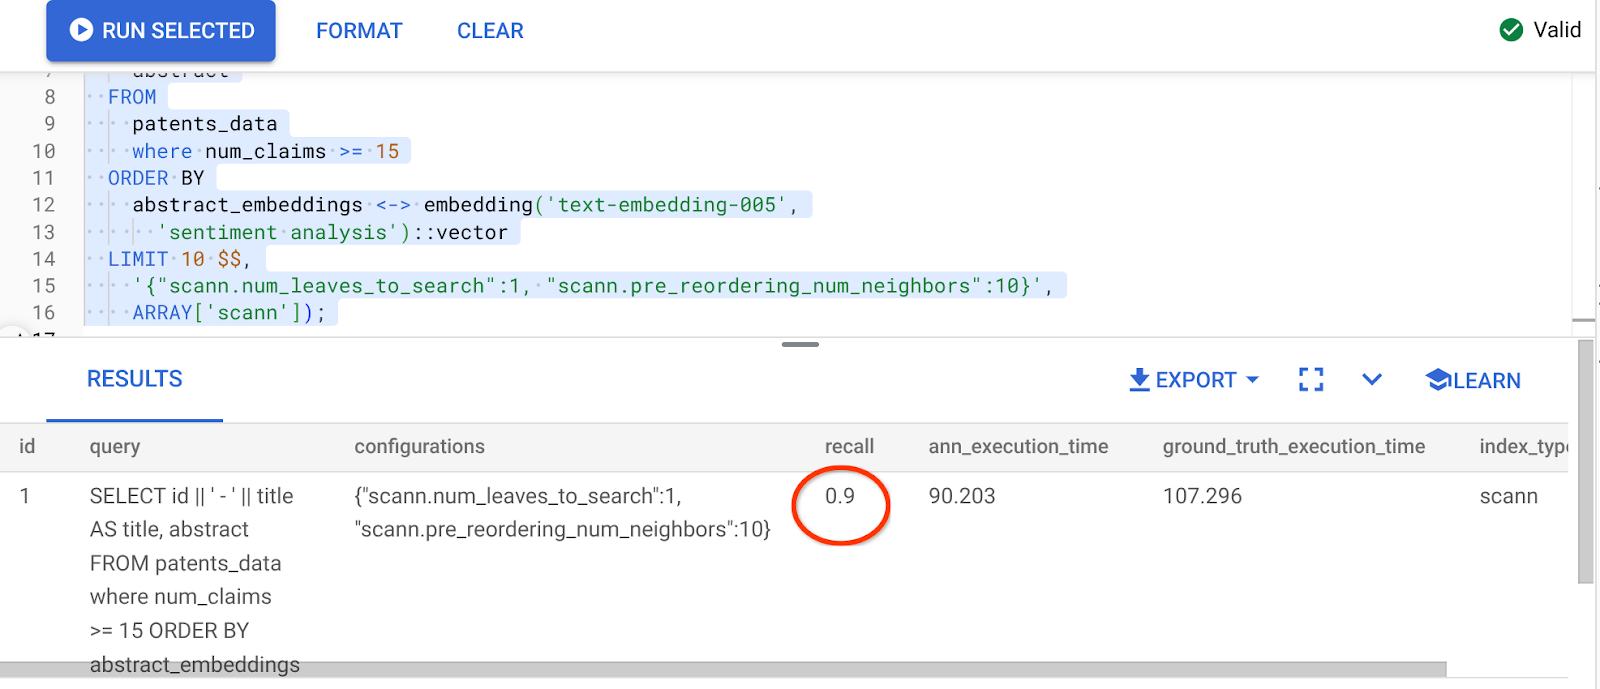
What a transformation in recall value, 90%!!!
There are other parameters you can change in the index, like num_leaves etc. based on the desired recall value and the dataset your application uses.
8. Clean up
To avoid incurring charges to your Google Cloud account for the resources used in this post, follow these steps:
- In the Google Cloud console, go to the resource manager page.
- In the project list, select the project that you want to delete, and then click Delete.
- In the dialog, type the project ID, and then click Shut down to delete the project.
- Alternatively, you can just delete the AlloyDB cluster (change the location in this hyperlink if you didn't choose us-central1 for the cluster at the time of configuration) that we just created for this project by clicking the DELETE CLUSTER button.
9. Congratulations
Congratulations! You have successfully built your contextual Patent Search query with AlloyDB's advanced Vector search for high performance and to make it truly meaning-driven. I have put together a quality-controlled multi-tool agentic application that uses ADK and all of the AlloyDB stuff that we discussed here to create a high performing and quality Patent Vector Search & Analyzer Agent that you can view here: https://youtu.be/Y9fvVY0yZTY
If you want to learn to build that agent, please refer to this codelab.