
1. Introduction
The potential of using Generative AI for test plan creation stems from its ability to solve two of the biggest challenges in modern quality assurance: speed and comprehensiveness. In today's rapid Agile and DevOps cycles, manually authoring detailed test plans is a significant bottleneck, delaying the entire testing process. A Gen AI-powered agent can ingest user stories and technical requirements to produce a thorough test plan in minutes, not days, ensuring the QA process keeps pace with development. Furthermore, AI excels at identifying complex scenarios, edge cases, and negative paths that a human might overlook, leading to vastly improved test coverage and a significant reduction in bugs that escape to production.
In this codelab, we will explore how to build such an agent which can retrieve the product requirements documents from Confluence and capable of giving constructive feedback and also generate a comprehensive test plan which can be exported into a CSV file.
Through the codelab, you will employ a step by step approach as follows:
- Prepare your Google Cloud project and Enable all the required API on it
- Setup workspace for your coding environment
- Preparing local mcp-server for Confluence
- Structuring ADK agent source code, prompt, and tools to connect to MCP server
- Understanding utilization of Artifact Service and Tool Contexts
- Testing the agent using ADK local Web Development UI
- Manage environment variables and setup required files needed to deploy the application to the Cloud Run
- Deploy the application to the Cloud Run
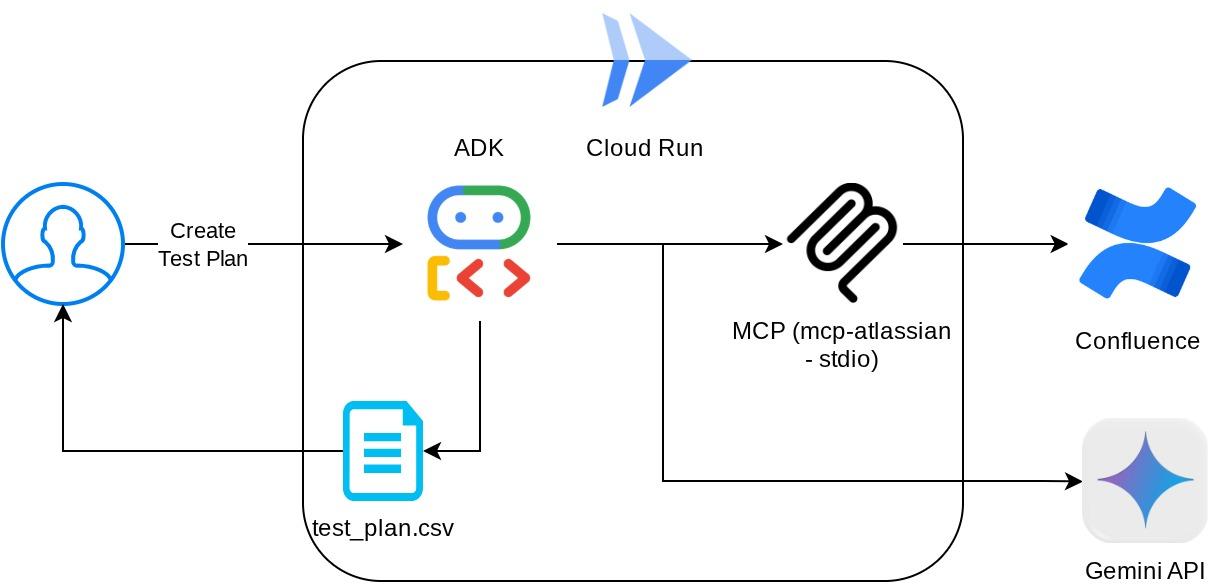
Architecture Overview
Prerequisites
- Comfortable working with Python
- An understanding of basic full-stack architecture using HTTP service
What you'll learn
- Architecting ADK Agent while utilizing it's several capabilities
- Tool usage with Custom tool and MCP
- Setting up file output by agent using Artifact Service management
- Utilizing BuiltInPlanner to improve task execution by doing planning with Gemini 2.5 Flash thinking capabilities
- Interaction and debugging via ADK web interface
- Deploy application to Cloud Run using Dockerfile and provide environment variables
What you'll need
- Chrome web browser
- A Gmail account
- A Cloud Project with billing enabled
- (Optional) Confluence Space with Product Requirement Documents page(s)
This codelab, designed for developers of all levels (including beginners), uses Python in its sample application. However, Python knowledge isn't required for understanding the concepts presented. Not to worry on the Confluence space if you don't have one, we will provide credentials for trying this codelab
2. Before you begin
Select Active Project in the Cloud Console
This codelab assumes that you already have a Google Cloud project with billing enabled. If you do not have it yet, you can follow the instructions below to get started.
- In the Google Cloud Console, on the project selector page, select or create a Google Cloud project.
- Make sure that billing is enabled for your Cloud project. Learn how to check if billing is enabled on a project.
Setup Cloud Project in Cloud Shell Terminal
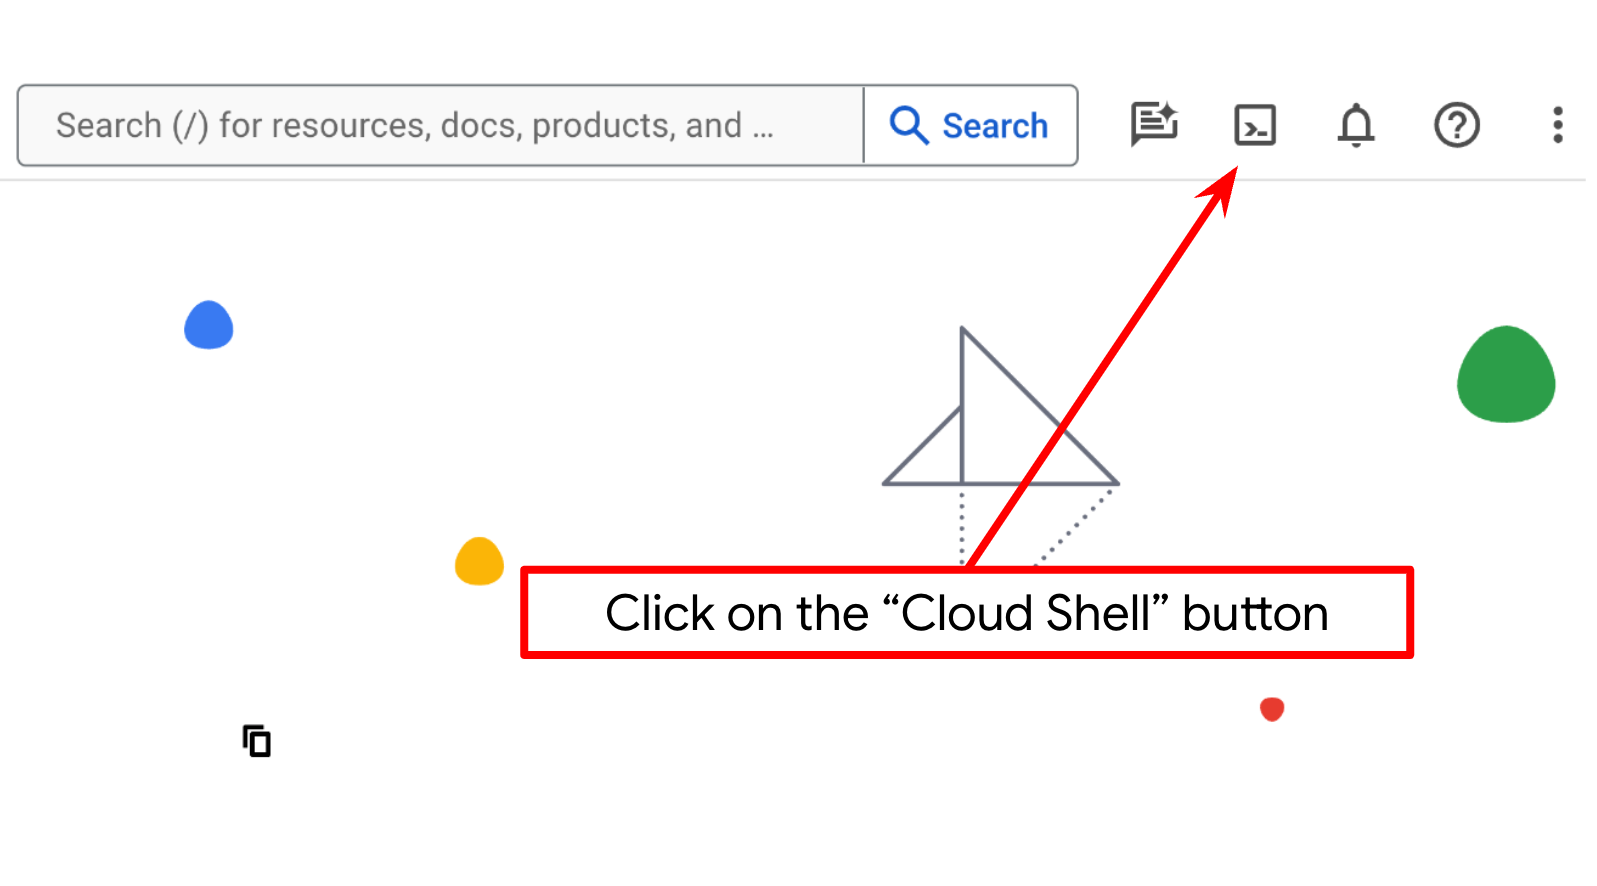
- You'll use Cloud Shell, a command-line environment running in Google Cloud. Click Activate Cloud Shell at the top of the Google Cloud console.
- Once connected to Cloud Shell, you check that you're already authenticated and that the project is set to your project ID using the following command:
gcloud auth list
- Run the following command in Cloud Shell to confirm that the gcloud command knows about your project.
gcloud config list project
- If your project is not set, use the following command to set it:
gcloud config set project <YOUR_PROJECT_ID>
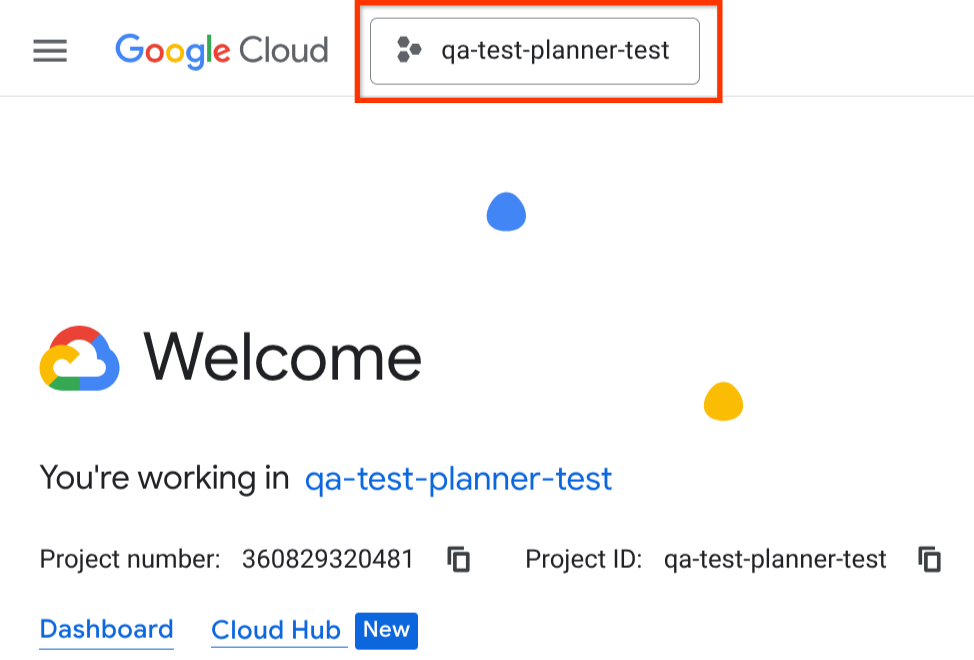
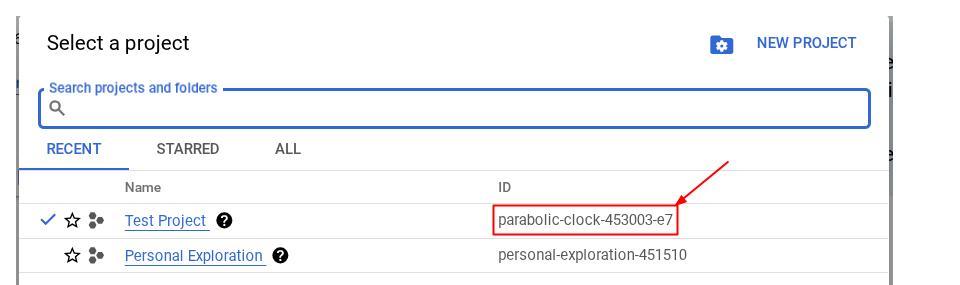
Alternatively, you also can see the PROJECT_ID id in the console

Click it and you will all of your project and the project ID on the right side
- Enable the required APIs via the command shown below. This could take a few minutes, so please be patient.
gcloud services enable aiplatform.googleapis.com \
                       run.googleapis.com \
                       cloudbuild.googleapis.com \
                       cloudresourcemanager.googleapis.com
On successful execution of the command, you should see a message similar to the one shown below:
Operation "operations/..." finished successfully.
The alternative to the gcloud command is through the console by searching for each product or using this link.
If any API is missed, you can always enable it during the course of the implementation.
Refer documentation for gcloud commands and usage.
Go to Cloud Shell Editor and Setup Application Working Directory
Now, we can set up our code editor to do some coding stuff. We will use the Cloud Shell Editor for this
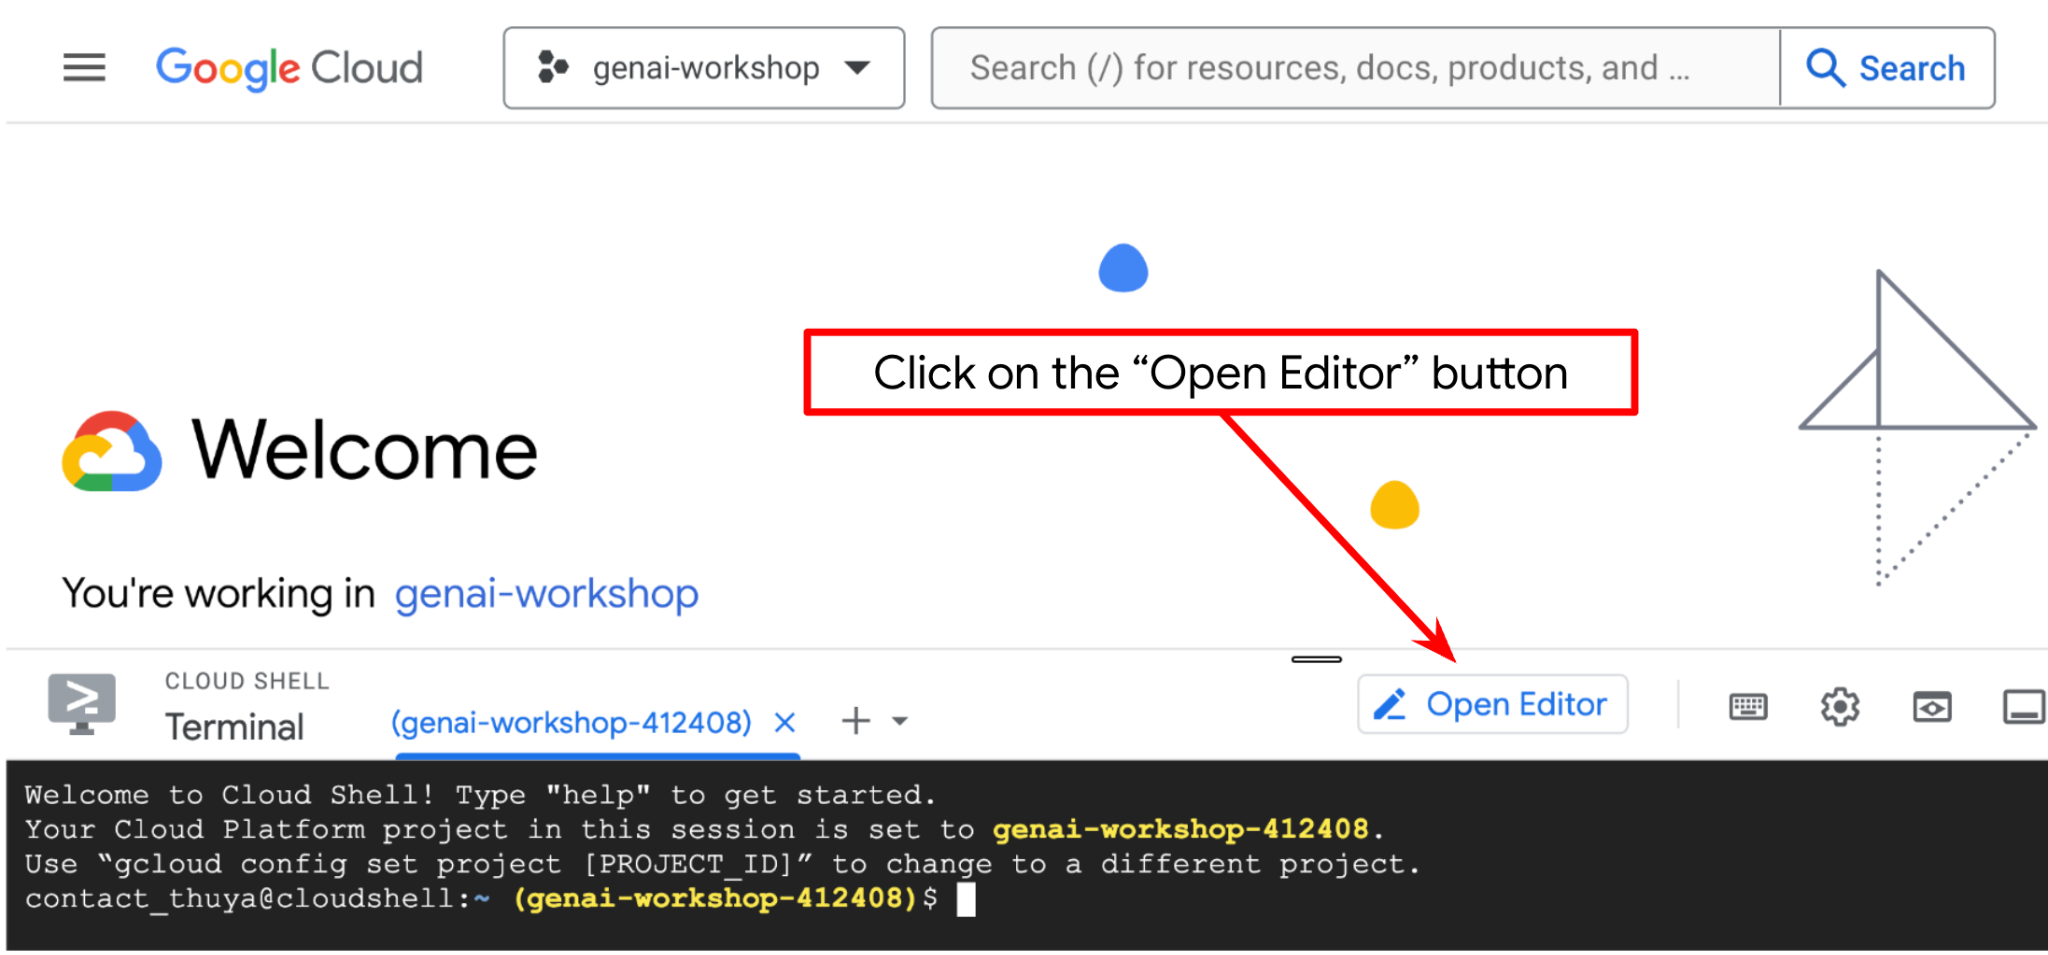
- Click on the Open Editor button, this will open a Cloud Shell Editor, we can write our code here
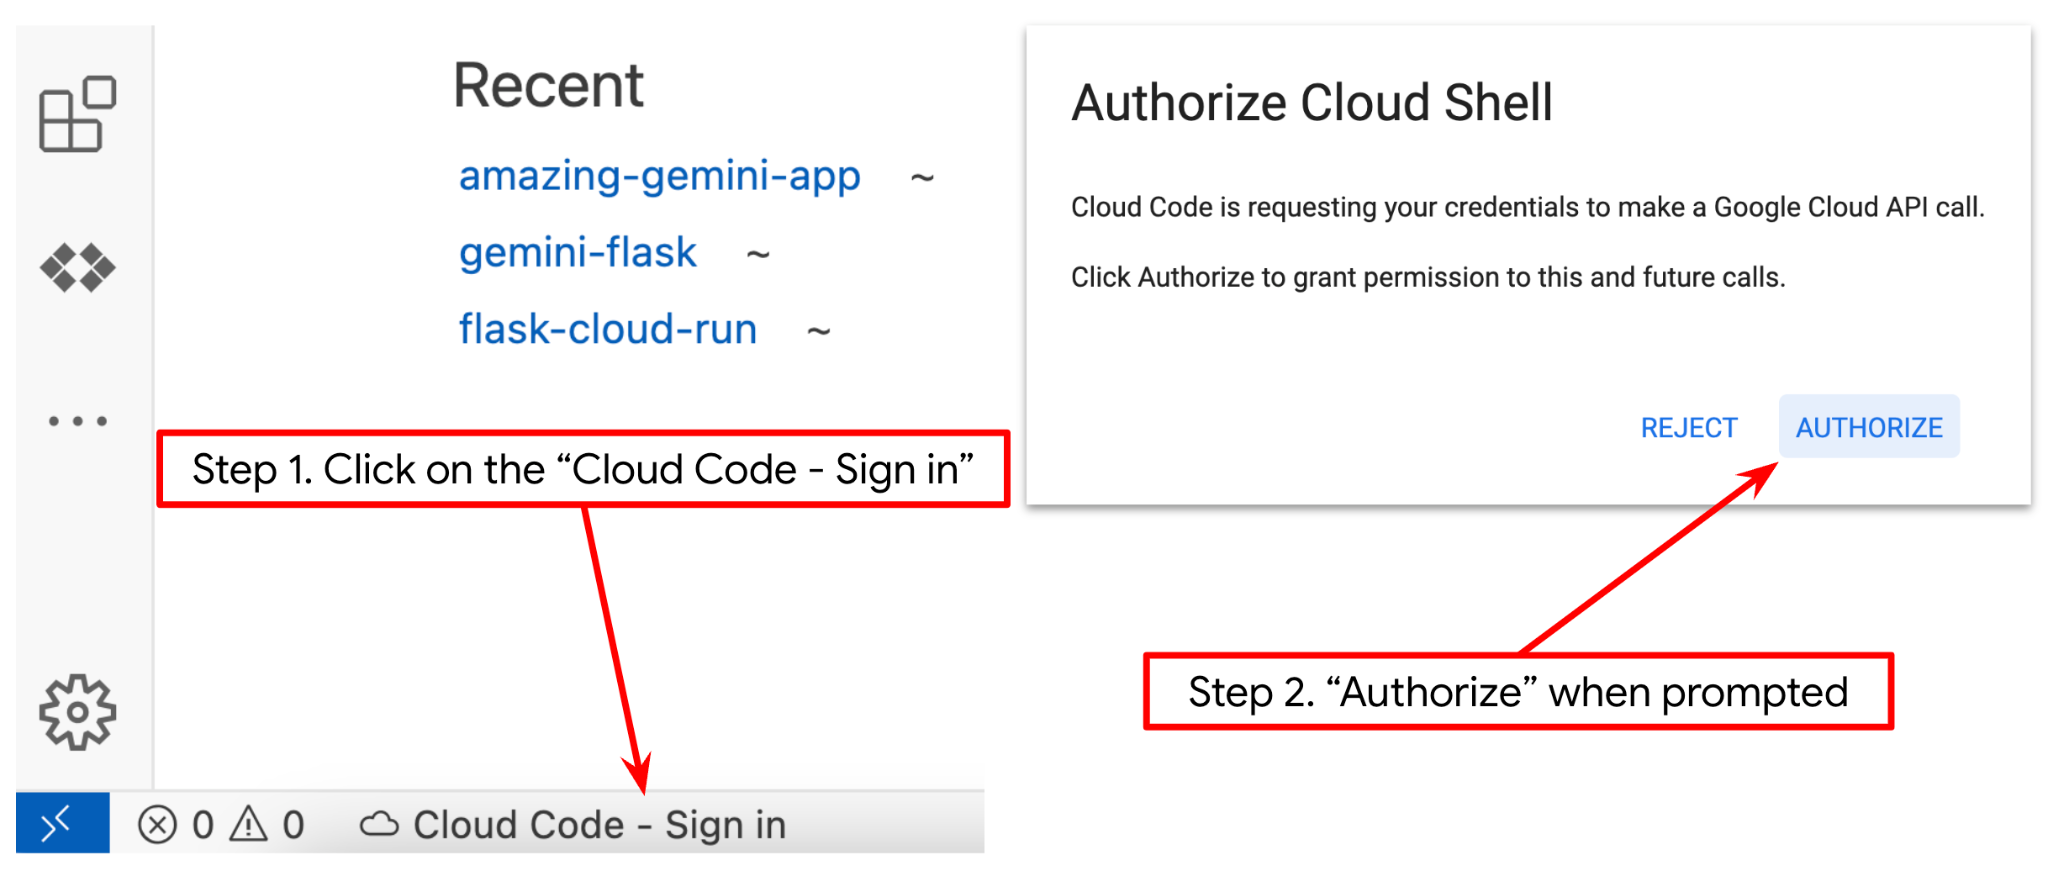
- Make sure the Cloud Code project is set in the bottom left corner (status bar) of the Cloud Shell editor, as highlighted in the image below and is set to the active Google Cloud project where you have billing enabled. Authorize if prompted. If you already follow previous command, the button may also point directly to your activated project instead of sign in button
- Next, let's clone the template working directory for this codelab from Github, run the following command. It will create the working directory in the qa-test-planner-agent directory
git clone https://github.com/alphinside/qa-test-planner-agent.git qa-test-planner-agent
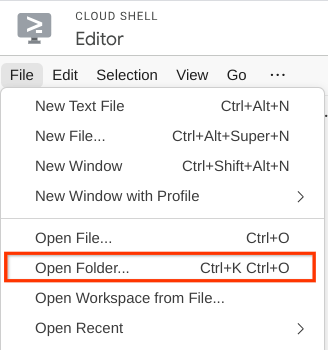
- After that, go to the top section of the Cloud Shell Editor and click File->Open Folder, find your username directory and find the qa-test-planner-agent directory then click the OK button. This will make the chosen directory as the main working directory. In this example, the username is alvinprayuda, hence the directory path is shown below
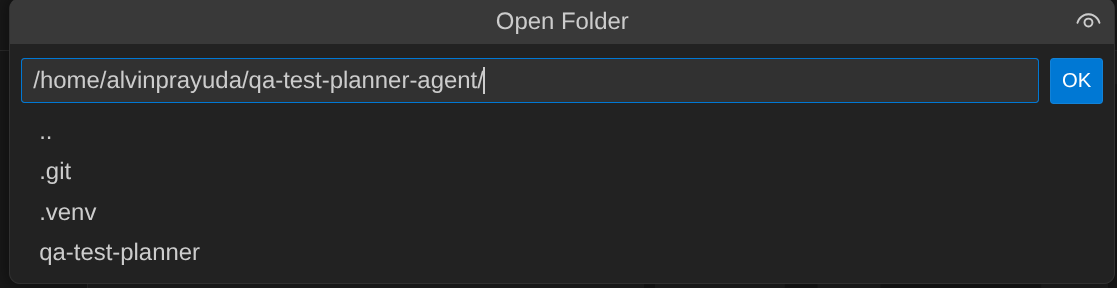
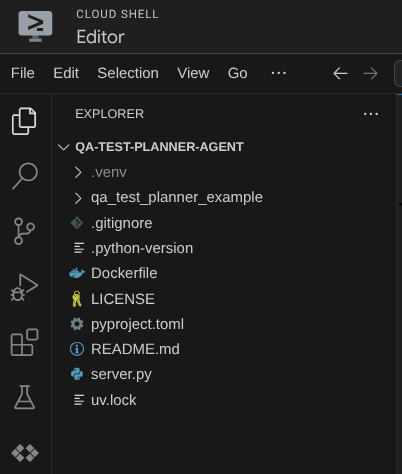
Now, your Cloud Shell Editor should look like this
Environment Setup
Prepare Python Virtual Environment
The next step is to prepare the development environment. Your current active terminal should be inside the qa-test-planner-agent working directory. We will utilize Python 3.12 in this codelab and we will use uv python project manager to simplify the need of creating and managing python version and virtual environment
- If you haven't opened the terminal yet, open it by clicking on Terminal -> New Terminal , or use Ctrl + Shift + C , it will open a terminal window on the bottom part of the browser

- Download
uvand install python 3.12 with the following command
curl -LsSf https://astral.sh/uv/0.7.19/install.sh | sh && \
source $HOME/.local/bin/env && \
uv python install 3.12
- Now let's initialize the virtual environment using
uv, Run this command
uv sync --frozen
This will create the .venv directory and install the dependencies. Quick sneak peek on the pyproject.toml will give you information about the dependencies shown like this
dependencies = [
    "google-adk>=1.5.0",
    "mcp-atlassian>=0.11.9",
    "pandas>=2.3.0",
    "python-dotenv>=1.1.1",
]
- To test the virtual env, create new file main.py and copy the following code
def main():
   print("Hello from qa-test-planner-agent")

if __name__ == "__main__":
   main()
- Then, run the following command
uv run main.py
You will get output like shown below
Using CPython 3.12
Creating virtual environment at: .venv
Hello from qa-test-planner-agent!
This shows that the python project is being set up properly.
Now we can move to the next step, building the agent and then the services
3. Build the Agent using Google ADK and Gemini 2.5
Introduction to ADK Directory Structure
Let's start by exploring what ADK has to offer and how to build the agent. ADK complete documentation can be accessed in this URL . ADK offers us many utilities within its CLI command execution. Some of them are the following :
- Setup the agent directory structure
- Quickly try interaction via CLI input output
- Quickly setup local development UI web interface
Now, let's create the agent directory structure using the CLI command. Run the following command
uv run adk create qa_test_planner \
   --model gemini-2.5-flash \
   --project {your-project-id} \
   --region global
It will create the following agent directory structure in your current working directory
qa_test_planner/
├── __init__.py
├── .env
├── agent.py
And if you inspect the init.py and agent.py you will see this code
# __init__.py

from . import agent
# agent.py

from google.adk.agents import Agent

root_agent = Agent(
    model='gemini-2.5-flash',
    name='root_agent',
    description='A helpful assistant for user questions.',
    instruction='Answer user questions to the best of your knowledge',
)
Building Our QA Test Planner Agent
Let's build our QA test planner agent! Open qa_test_planner/agent.py file and copy the code below which will contain the root_agent.
# qa_test_planner/agent.py

from google.adk.agents import Agent
from google.adk.tools.mcp_tool.mcp_toolset import (
    MCPToolset,
    StdioConnectionParams,
    StdioServerParameters,
)
from google.adk.planners import BuiltInPlanner
from google.genai import types
from dotenv import load_dotenv
import os
from pathlib import Path
from pydantic import BaseModel
from typing import Literal
import tempfile
import pandas as pd
from google.adk.tools import ToolContext


load_dotenv(dotenv_path=Path(__file__).parent / ".env")

confluence_tool = MCPToolset(
    connection_params=StdioConnectionParams(
        server_params=StdioServerParameters(
            command="uvx",
            args=[
                "mcp-atlassian",
                f"--confluence-url={os.getenv('CONFLUENCE_URL')}",
                f"--confluence-username={os.getenv('CONFLUENCE_USERNAME')}",
                f"--confluence-token={os.getenv('CONFLUENCE_TOKEN')}",
                "--enabled-tools=confluence_search,confluence_get_page,confluence_get_page_children",
            ],
            env={},
        ),
        timeout=60,
    ),
)


class TestPlan(BaseModel):
    test_case_key: str
    test_type: Literal["manual", "automatic"]
    summary: str
    preconditions: str
    test_steps: str
    expected_result: str
    associated_requirements: str


async def write_test_tool(
    prd_id: str, test_cases: list[dict], tool_context: ToolContext
):
    """A tool to write the test plan into file

    Args:
        prd_id: Product requirement document ID
        test_cases: List of test case dictionaries that should conform to these fields:
            - test_case_key: str
            - test_type: Literal["manual","automatic"]
            - summary: str
            - preconditions: str
            - test_steps: str
            - expected_result: str
            - associated_requirements: str

    Returns:
        A message indicating success or failure of the validation and writing process
    """
    validated_test_cases = []
    validation_errors = []

    # Validate each test case
    for i, test_case in enumerate(test_cases):
        try:
            validated_test_case = TestPlan(**test_case)
            validated_test_cases.append(validated_test_case)
        except Exception as e:
            validation_errors.append(f"Error in test case {i + 1}: {str(e)}")

    # If validation errors exist, return error message
    if validation_errors:
        return {
            "status": "error",
            "message": "Validation failed",
            "errors": validation_errors,
        }

    # Write validated test cases to CSV
    try:
        # Convert validated test cases to a pandas DataFrame
        data = []
        for tc in validated_test_cases:
            data.append(
                {
                    "Test Case ID": tc.test_case_key,
                    "Type": tc.test_type,
                    "Summary": tc.summary,
                    "Preconditions": tc.preconditions,
                    "Test Steps": tc.test_steps,
                    "Expected Result": tc.expected_result,
                    "Associated Requirements": tc.associated_requirements,
                }
            )

        # Create DataFrame from the test case data
        df = pd.DataFrame(data)

        if not df.empty:
            # Create a temporary file with .csv extension
            with tempfile.NamedTemporaryFile(suffix=".csv", delete=False) as temp_file:
                # Write DataFrame to the temporary CSV file
                df.to_csv(temp_file.name, index=False)
                temp_file_path = temp_file.name

            # Read the file bytes from the temporary file
            with open(temp_file_path, "rb") as f:
                file_bytes = f.read()

            # Create an artifact with the file bytes
            await tool_context.save_artifact(
                filename=f"{prd_id}_test_plan.csv",
                artifact=types.Part.from_bytes(data=file_bytes, mime_type="text/csv"),
            )

            # Clean up the temporary file
            os.unlink(temp_file_path)

            return {
                "status": "success",
                "message": (
                    f"Successfully wrote {len(validated_test_cases)} test cases to "
                    f"CSV file: {prd_id}_test_plan.csv"
                ),
            }
        else:
            return {"status": "warning", "message": "No test cases to write"}
    except Exception as e:
        return {
            "status": "error",
            "message": f"An error occurred while writing to CSV: {str(e)}",
        }


root_agent = Agent(
    model="gemini-2.5-flash",
    name="qa_test_planner_agent",
    description="You are an expert QA Test Planner and Product Manager assistant",
    instruction=f"""
Help user search any product requirement documents on Confluence. Furthermore you also can provide the following capabilities when asked:
- evaluate product requirement documents and assess it, then give expert input on what can be improved
- create a comprehensive test plan following Jira Xray mandatory field formatting, result showed as markdown table. Each test plan must also have explicit mapping on
    which user stories or requirements identifier it's associated to

Here is the Confluence space ID with it's respective document grouping:

- "{os.getenv("CONFLUENCE_PRD_SPACE_ID")}" : space to store Product Requirements Documents

Do not making things up, Always stick to the fact based on data you retrieve via tools.
""",
    tools=[confluence_tool, write_test_tool],
    planner=BuiltInPlanner(
        thinking_config=types.ThinkingConfig(
            include_thoughts=True,
            thinking_budget=2048,
        )
    ),
)
Setup Configuration Files
Now we will need to add additional configuration setup for this project, as this agent will need access to Confluence
Open the qa_test_planner/.env and the following environment variables values to it, ensure that the resulting .env file looks like this
GOOGLE_GENAI_USE_VERTEXAI=1
GOOGLE_CLOUD_PROJECT={YOUR-CLOUD-PROJECT-ID}
GOOGLE_CLOUD_LOCATION=global
CONFLUENCE_URL={YOUR-CONFLUENCE-DOMAIN}
CONFLUENCE_USERNAME={YOUR-CONFLUENCE-USERNAME}
CONFLUENCE_TOKEN={YOUR-CONFLUENCE-API-TOKEN}
CONFLUENCE_PRD_SPACE_ID={YOUR-CONFLUENCE-SPACE-ID}
Unfortunately, this Confluence space cannot be made public, hence you can inspect these files to read the available Product Requirements Documents which will be available using above credentials.
Code Explanation
This script contains our agent initiation where we initialize the following things:
- Set the model to be used to
gemini-2.5-flash - Setup Confluence MCP Tools which will communicate via Stdio
- Setup
write_test_toolcustom tool to write test plan and dump csv to artifact - Setup the agent description and instruction
- Enable planning before generating the final response or execution using Gemini 2.5 Flash thinking capabilities
The agent itself, when powered by Gemini model with built in Thinking capabilities and configured with the planner arguments can show it's thinking capabilities and displayed on the web interface as well. The code to configure this is shown below
# qa-test-planner/agent.py

from google.adk.planners import BuiltInPlanner
from google.genai import types

...

# Provide the confluence tool to agent

root_agent = Agent(
    model="gemini-2.5-flash",
    name="qa_test_planner_agent",
    ...,
    tools=[confluence_tool, write_test_tool],
    planner=BuiltInPlanner(
        thinking_config=types.ThinkingConfig(
            include_thoughts=True,
            thinking_budget=2048,
        )
    ),

...
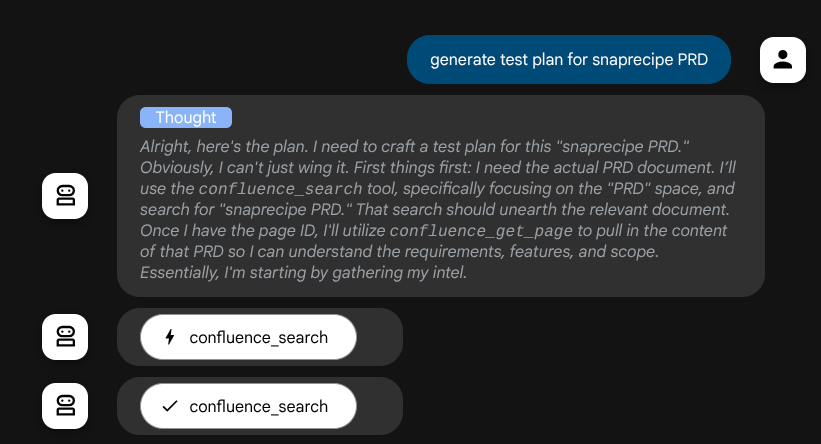
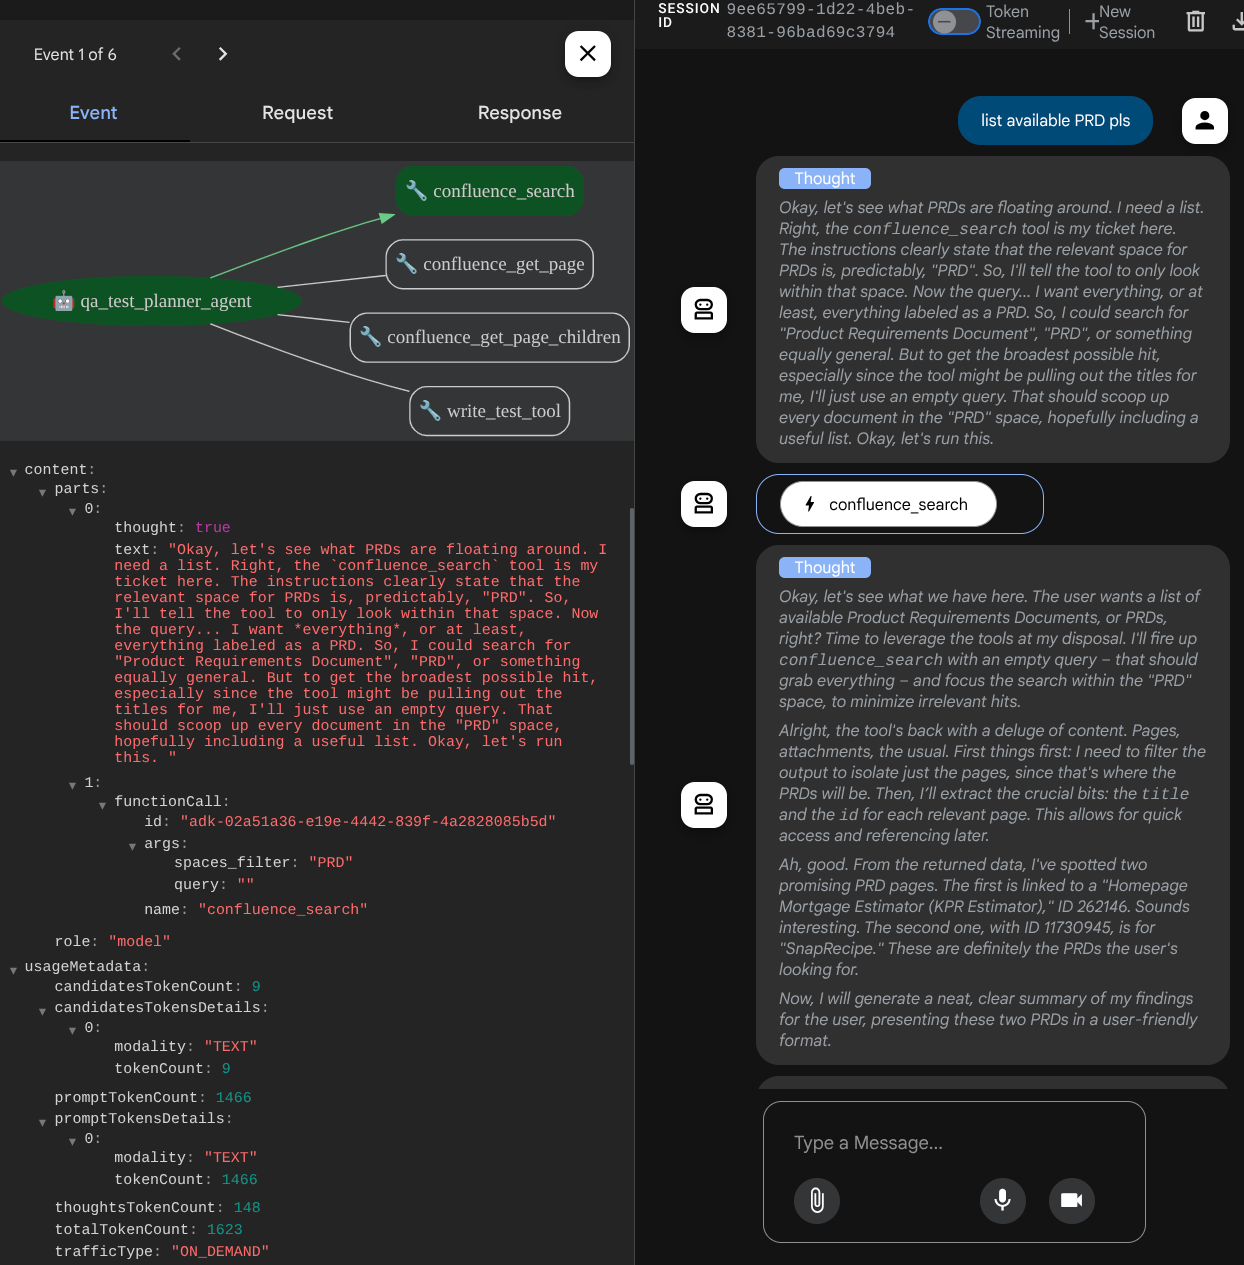
And before taking actions, we can see it's thinking process
The Confluence MCP Tool
To connect to MCP Server from ADK, we need to utilize the MCPToolSet which can be imported from google.adk.tools.mcp_tool.mcp_toolset module. The code to initialized here shown below ( truncated for efficiency )
# qa-test-planner/agent.py

from google.adk.tools.mcp_tool.mcp_toolset import (
    MCPToolset,
    StdioConnectionParams,
    StdioServerParameters,
)

...

# Initialize the Confluence MCP Tool via Stdio Output

confluence_tool = MCPToolset(
    connection_params=StdioConnectionParams(
        server_params=StdioServerParameters(
            command="uvx",
            args=[
                "mcp-atlassian",
                f"--confluence-url={os.getenv('CONFLUENCE_URL')}",
                f"--confluence-username={os.getenv('CONFLUENCE_USERNAME')}",
                f"--confluence-token={os.getenv('CONFLUENCE_TOKEN')}",
                "--enabled-tools=confluence_search,confluence_get_page,confluence_get_page_children",
            ],
            env={},
        ),
        timeout=60,
    ),
)


...

# Provide the confluence tool to agent

root_agent = Agent(
    model="gemini-2.5-flash",
    name="qa_test_planner_agent",
    ...,
    tools=[confluence_tool, write_test_tool],

...
With this configuration, the agent will initialize the Confluence MCP Server as a separate process and it will handle communication with those processes via Studio I/O. This flow is illustrated at the following MCP architecture image marked inside the red box below.
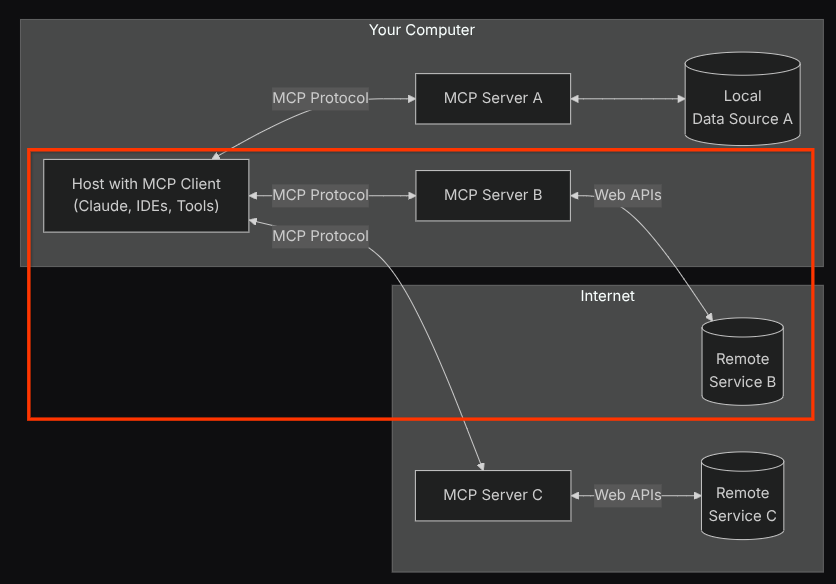
Additionally within the command arguments of MCP initialization, we also limit the tools that can be utilized to only these tools: confluence_search, confluence_get_page, and confluence_get_page_children which support our QA test agent use cases. We utilize the community-contributed Atlassian MCP Server ( see full documentations for more details ) for this codelab tutorial.
Write Test Tool
After the agent receives context from the Confluence MCP Tool, it can construct the necessary test plan for the user. However we want to produce a file which contains this test plan so that it can be persisted and shared to the other person. In order to support this, we provide the custom tool write_test_tool below
# qa-test-planner/agent.py

...

async def write_test_tool(
    prd_id: str, test_cases: list[dict], tool_context: ToolContext
):
    """A tool to write the test plan into file

    Args:
        prd_id: Product requirement document ID
        test_cases: List of test case dictionaries that should conform to these fields:
            - test_case_key: str
            - test_type: Literal["manual","automatic"]
            - summary: str
            - preconditions: str
            - test_steps: str
            - expected_result: str
            - associated_requirements: str

    Returns:
        A message indicating success or failure of the validation and writing process
    """
    validated_test_cases = []
    validation_errors = []

    # Validate each test case
    for i, test_case in enumerate(test_cases):
        try:
            validated_test_case = TestPlan(**test_case)
            validated_test_cases.append(validated_test_case)
        except Exception as e:
            validation_errors.append(f"Error in test case {i + 1}: {str(e)}")

    # If validation errors exist, return error message
    if validation_errors:
        return {
            "status": "error",
            "message": "Validation failed",
            "errors": validation_errors,
        }

    # Write validated test cases to CSV
    try:
        # Convert validated test cases to a pandas DataFrame
        data = []
        for tc in validated_test_cases:
            data.append(
                {
                    "Test Case ID": tc.test_case_key,
                    "Type": tc.test_type,
                    "Summary": tc.summary,
                    "Preconditions": tc.preconditions,
                    "Test Steps": tc.test_steps,
                    "Expected Result": tc.expected_result,
                    "Associated Requirements": tc.associated_requirements,
                }
            )

        # Create DataFrame from the test case data
        df = pd.DataFrame(data)

        if not df.empty:
            # Create a temporary file with .csv extension
            with tempfile.NamedTemporaryFile(suffix=".csv", delete=False) as temp_file:
                # Write DataFrame to the temporary CSV file
                df.to_csv(temp_file.name, index=False)
                temp_file_path = temp_file.name

            # Read the file bytes from the temporary file
            with open(temp_file_path, "rb") as f:
                file_bytes = f.read()

            # Create an artifact with the file bytes
            await tool_context.save_artifact(
                filename=f"{prd_id}_test_plan.csv",
                artifact=types.Part.from_bytes(data=file_bytes, mime_type="text/csv"),
            )

            # Clean up the temporary file
            os.unlink(temp_file_path)

            return {
                "status": "success",
                "message": (
                    f"Successfully wrote {len(validated_test_cases)} test cases to "
                    f"CSV file: {prd_id}_test_plan.csv"
                ),
            }
        else:
            return {"status": "warning", "message": "No test cases to write"}
    except Exception as e:
        return {
            "status": "error",
            "message": f"An error occurred while writing to CSV: {str(e)}",
        }


...
The function declared above is to support the following functionalities:
- Check the produced test plan so that it conforms to the mandatory field specifications, we check using Pydantic model, and if error occurs we provide the error message back to agent
- Dump the result to CSV using pandas functionality
- The generated file then saved as artifact using Artifact Service capabilities which can be accessed using ToolContext object that can be accessed on every tool calls
If we save the generated files as artifact, it will been marked as event in ADK runtime and can it will be displayed in the agent interaction later on the Web interface
With this, we can dynamically setup the file response from the agent, to be given to user.
4. Testing The Agent
Now let's try to communicate with the agent via CLI, run the following command
uv run adk run qa_test_planner
It will show output like this, where you can chat in turn with the agent, however you can only send text via this interface
Log setup complete: /tmp/agents_log/agent.xxxx_xxx.log
To access latest log: tail -F /tmp/agents_log/agent.latest.log
Running agent qa_test_planner_agent, type exit to exit.
user: hello
[qa_test_planner_agent]: Hello there! How can I help you today?
user:
It's nice to be able to chat with the agent via CLI. But, even better if we have a nice web chat with it and we can do that too! ADK also allows us to have a development UI to interact and inspect what's going on during the interaction. Run the following command to start the local development UI server
uv run adk web --port 8080
It will spawn output like the following example, means that we can already access the web interface
INFO:     Started server process [xxxx]
INFO:     Waiting for application startup.

+-----------------------------------------------------------------------------+
| ADK Web Server started                                                      |
|                                                                             |
| For local testing, access at http://localhost:8080.                         |
+-----------------------------------------------------------------------------+

INFO:     Application startup complete.
INFO:     Uvicorn running on http://0.0.0.0:8080 (Press CTRL+C to quit)
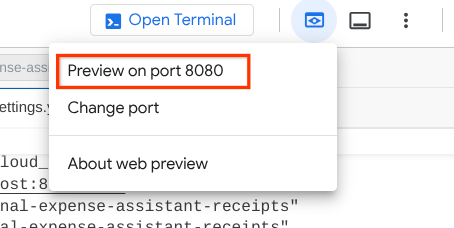
Now, to check it, click the Web Preview button on the top area of your Cloud Shell Editor and select Preview on port 8080
You will see the following web page where you can select available agents on the top left drop down button ( in our case it should be qa_test_planner ) and interact with the bot. You will see many informations about the log details during agent runtime in the left window
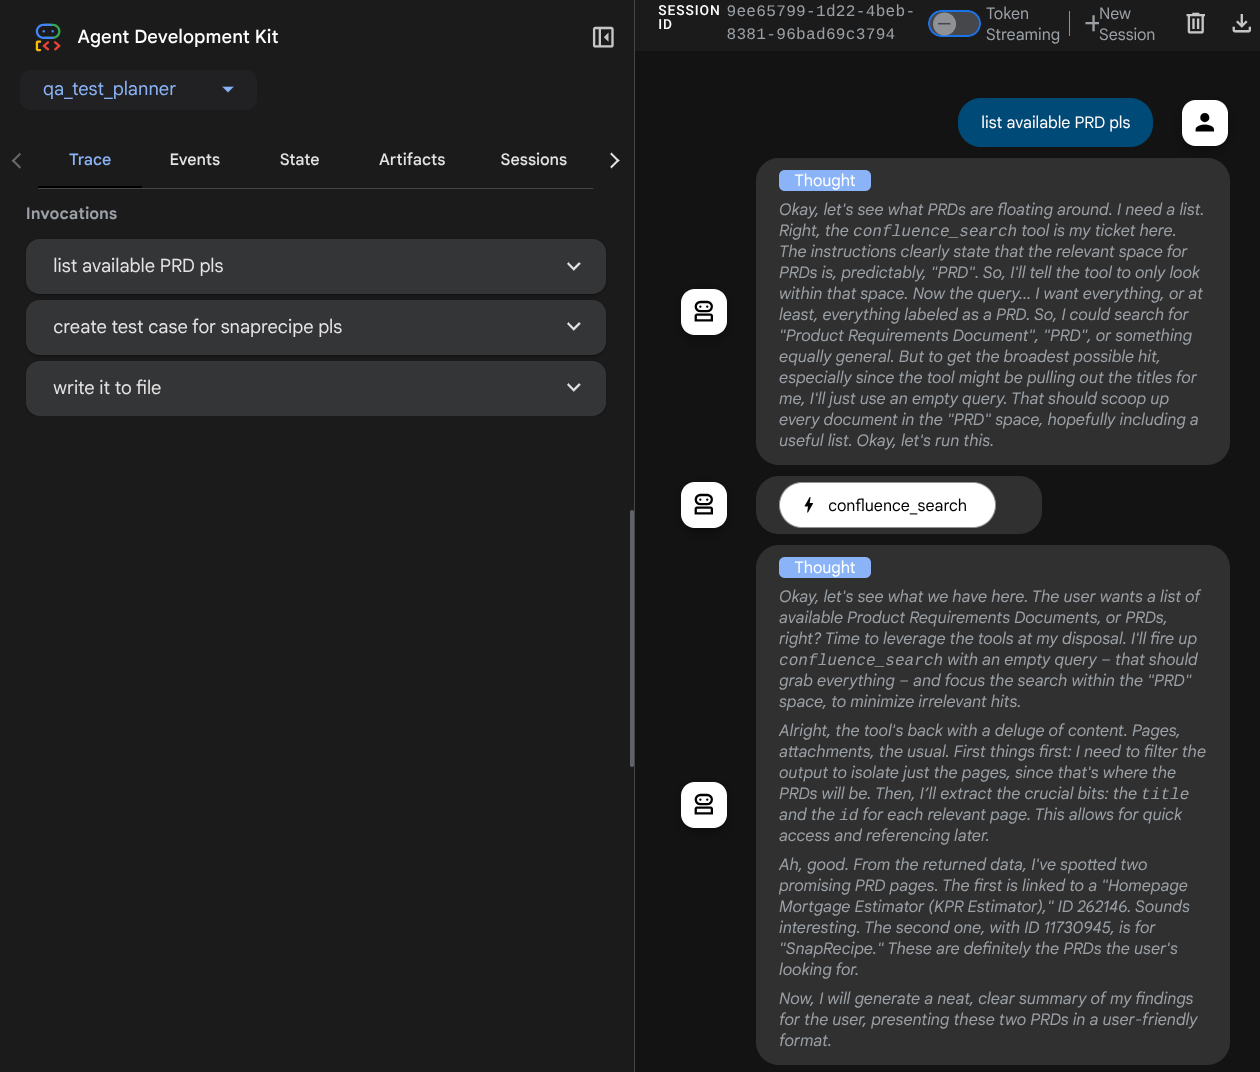
Let's try some actions! Chat with the agents with these prompts:
- " Please list all available PRDs "
- " Write test plan for Snaprecipe PRD "
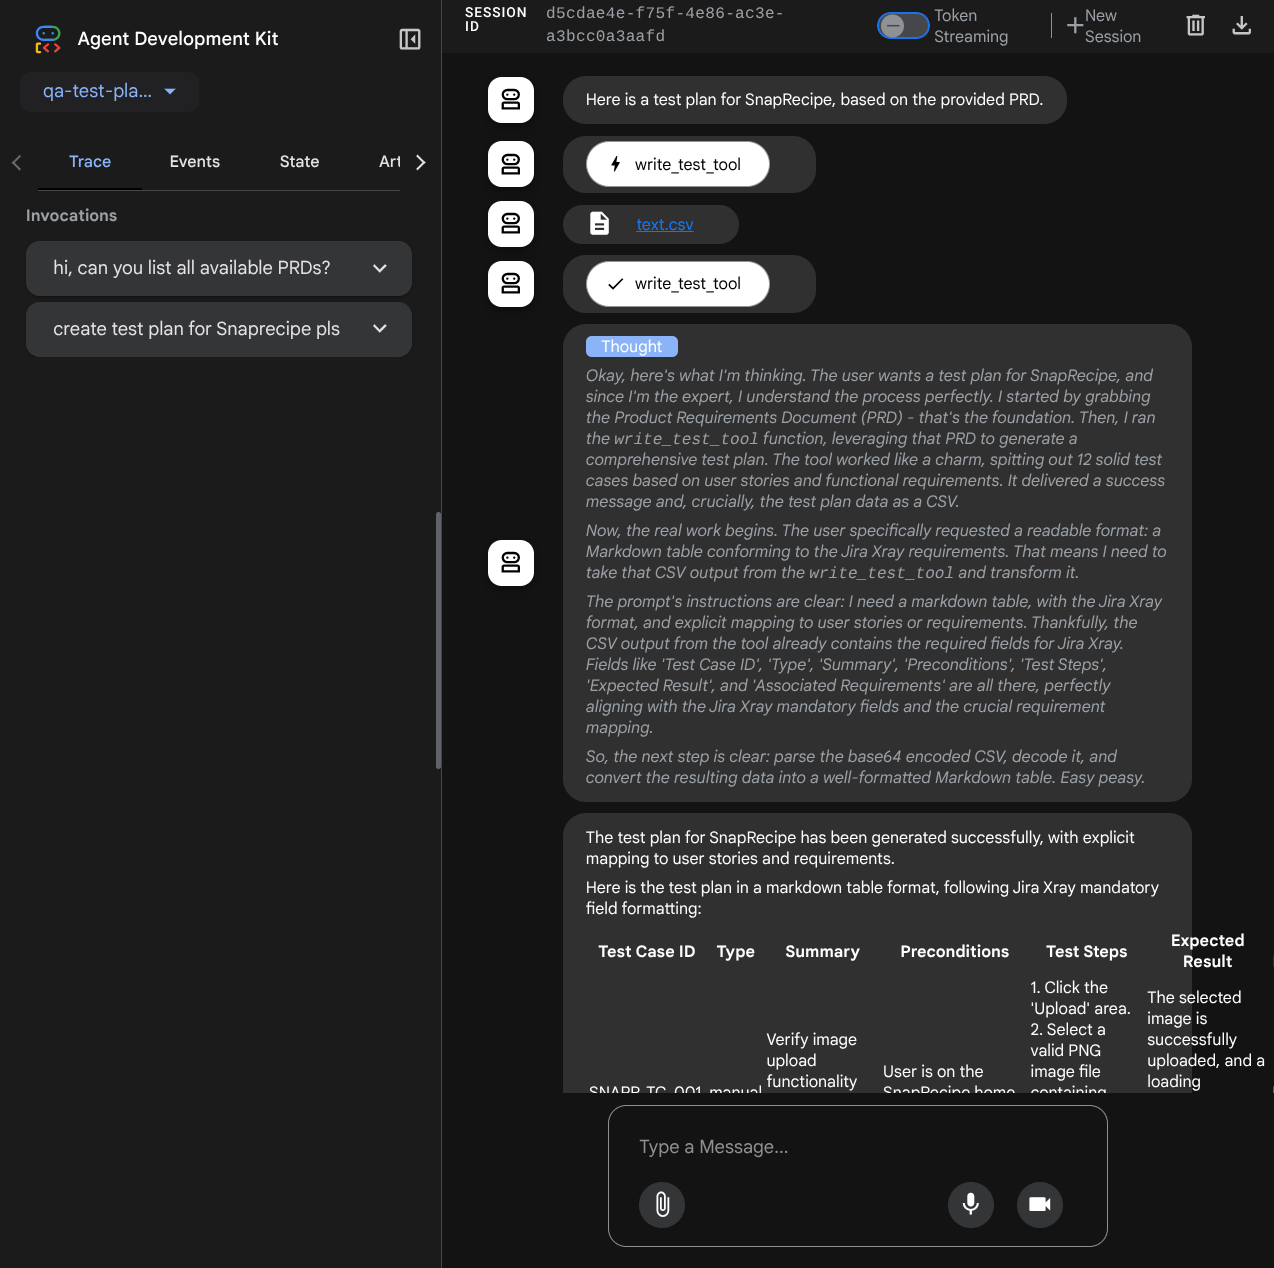
When it use some tools, you can inspect what's going on in the development UI
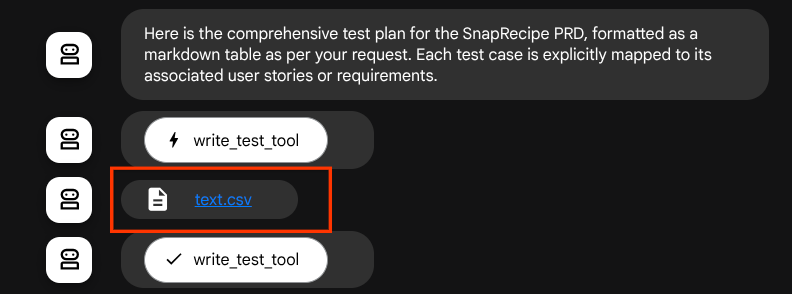
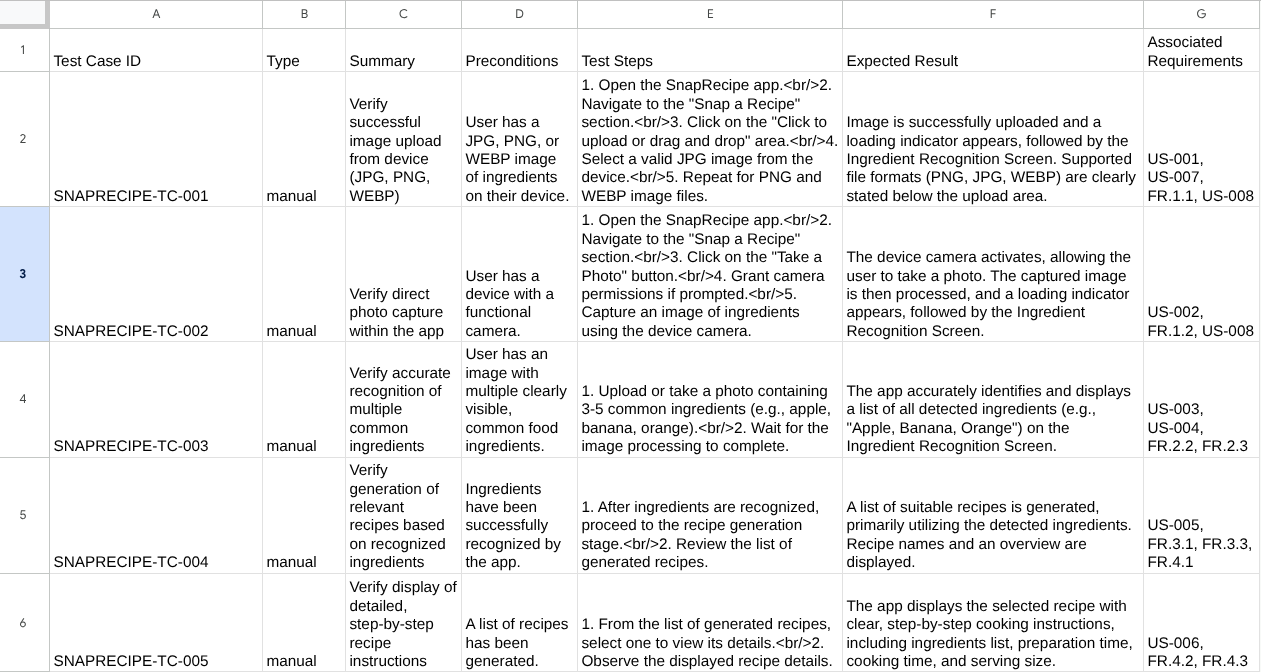
See how the agent responds to you and also inspect when we prompt for test file it will generate the test plan in CSV file as artifact

Now, you can check the content of the CSV by importing it to Google Sheet for example
Congratulations! Now you have a working QA Test Planner agent running locally! Now let's see how we can deploy it to Cloud Run so other people also can use it!
5. Deploying to Cloud Run
Now, of course we want to access this amazing app from anywhere. In order to do so, we can package this application and deploy it to Cloud Run. For the sake of this demo, this service will be exposed as a public service that can be accessed by others. However, keep in mind that this is not the best practice!
At your current working directory, we already have all files needed to deploy our applications to Cloud Run - the agent directory, Dockerfile, and server.py (the main service script), let's deploy it. Navigate to the Cloud Shell Terminal and make sure the current project is configured to your active project, if not you have use the gcloud configure command to set the project id:
gcloud config set project [PROJECT_ID]
Then, run the following command to deploy it to Cloud Run.
gcloud run deploy qa-test-planner-agent \
                  --source . \
                  --port 8080 \
                  --project {YOUR_PROJECT_ID} \
                  --allow-unauthenticated \
                  --region us-central1 \
                  --update-env-vars GOOGLE_GENAI_USE_VERTEXAI=1 \
                  --update-env-vars GOOGLE_CLOUD_PROJECT={YOUR_PROJECT_ID} \
                  --update-env-vars GOOGLE_CLOUD_LOCATION=global \
                  --update-env-vars CONFLUENCE_URL={YOUR_CONFLUENCE_URL} \
                  --update-env-vars CONFLUENCE_USERNAME={YOUR_CONFLUENCE_USERNAME} \
                  --update-env-vars CONFLUENCE_TOKEN={YOUR_CONFLUENCE_TOKEN} \
                  --update-env-vars CONFLUENCE_PRD_SPACE_ID={YOUR_PRD_SPACE_ID} \
                  --memory 1G
If you're prompted to acknowledge creation of an artifact registry for docker repository, just answer Y. Note that we are allowing unauthenticated access here because this is a demo application. Recommendation is to use appropriate authentication for your enterprise and production applications.
Once the deployment is complete, you should get a link similar to the below:
https://qa-test-planner-agent-*******.us-central1.run.app
When you access the URL, you will enter the web dev UI similar to when you try it locally. Go ahead and use your application from the Incognito window or your mobile device. It should be live already.
Now let's try these different prompt again - sequentially, see what happen there:
- " Can you find PRD related to Mortgage Estimator? "
- " Give me feedback about what can we improve on that"
- " Write the test plan for it"
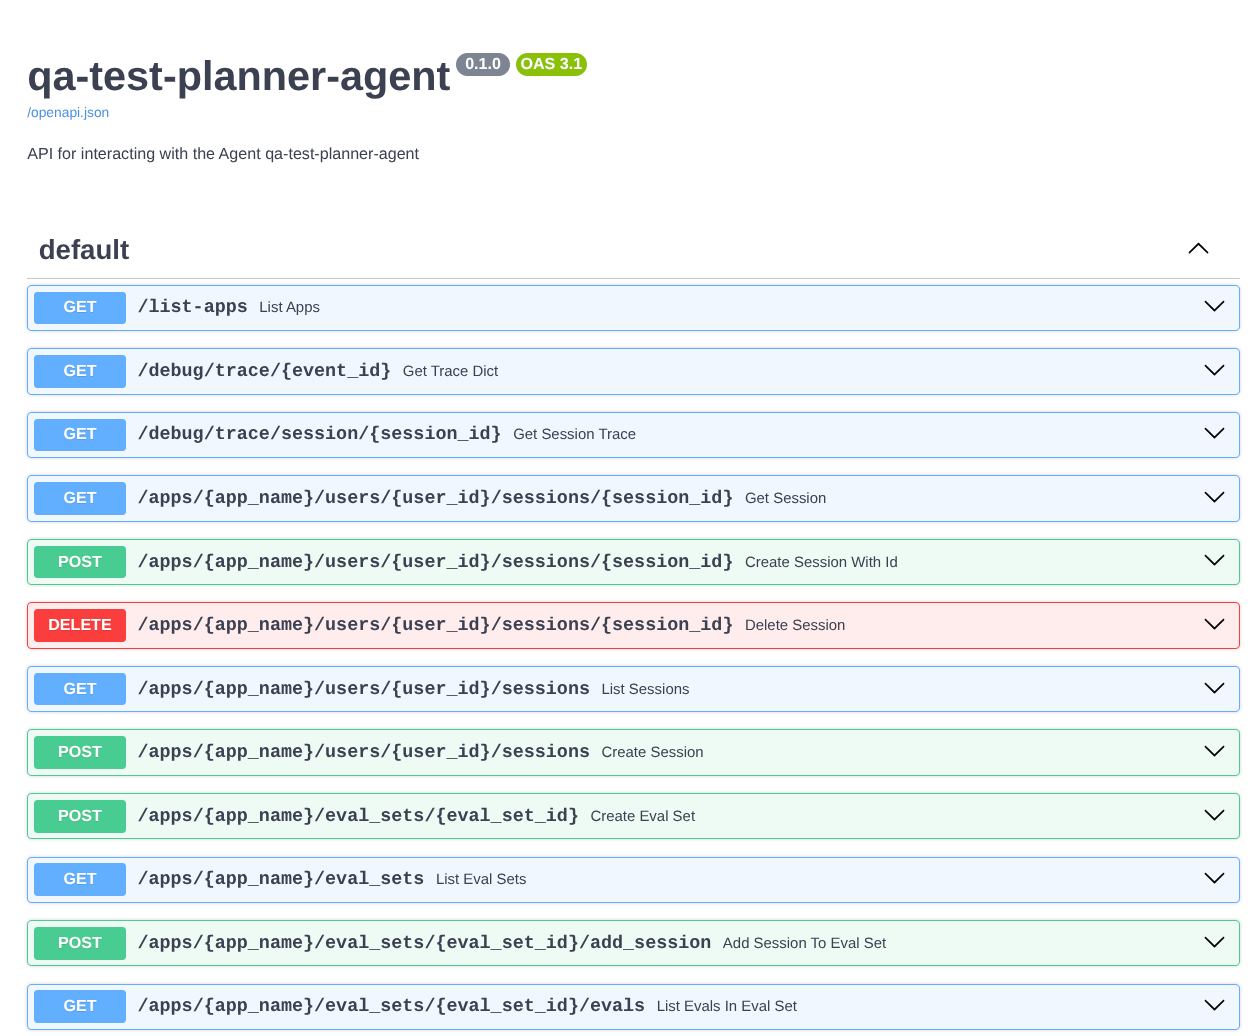
Additionally, as we run the agent as a FastAPI app, we also can inspect all the API routes in the /docs route. E.g. if you access the URL like this https://qa-test-planner-agent-*******.us-central1.run.app/docs you will see Swagger documentation page like shown below
Code Explanation
Now, let's inspect what file we need here for deployment, starting with server.py
# server.py

import os

from fastapi import FastAPI
from google.adk.cli.fast_api import get_fast_api_app

AGENT_DIR = os.path.dirname(os.path.abspath(__file__))

app_args = {"agents_dir": AGENT_DIR, "web": True}

app: FastAPI = get_fast_api_app(**app_args)

app.title = "qa-test-planner-agent"
app.description = "API for interacting with the Agent qa-test-planner-agent"


if __name__ == "__main__":
    import uvicorn

    uvicorn.run(app, host="0.0.0.0", port=8080)
We can easily convert our agent into a fastapi app using the get_fast_api_app function. In this function, we can set up various functionality, for example configuring session service, artifact service, or even tracing data to the cloud.
If you want to, you can also set the application lifecycle here. After that we can use uvicorn to run the Fast API application
After that, the Dockerfile will provide us the necessary steps to run the application
# Dockerfile

FROM python:3.12-slim

RUN pip install --no-cache-dir uv==0.7.13

WORKDIR /app

COPY . .

RUN uv sync --frozen

EXPOSE 8080

CMD ["uv", "run", "uvicorn", "server:app", "--host", "0.0.0.0", "--port", "8080"]
6. Challenge
Now it is your time to shine and polish your exploration skills. Can you also create a tool so that PRD review feedback is also written to a file?
7. Clean up
To avoid incurring charges to your Google Cloud account for the resources used in this codelab, follow these steps:
- In the Google Cloud console, go to the Manage resources page.
- In the project list, select the project that you want to delete, and then click Delete.
- In the dialog, type the project ID, and then click Shut down to delete the project.
- Alternatively you can go to Cloud Run on the console, select the service you just deployed and delete.