
1. Introduction
Last Updated: 2022-04-25
What you will build
In this codelab, you will deploy an auto-scaling High Performance Computing (HPC) cluster on Google Cloud.A Terraform deployment creates this cluster with Gromacs installed via Spack. The cluster will be managed with the Slurm job scheduler. When the cluster is created, you will run the benchMEM, benchPEP, or benchRIB benchmarks.
What you will learn
- How to deploy an HPC cluster supporting the Slurm job scheduler
- How to run a GPU accelerated molecular dynamics simulations with Gromacs on Google Cloud using a Slurm batch job
What you will need
2. Setup
To complete this codelab , you need to enable the Compute Engine and Cloud Build APIs. To enable the Compute Engine and Cloud Build APIs, open your Cloud Shell and run the following commands. Remember to substitute your project-id for the
gcloud config set project <PROJECT_ID>
gcloud services enable compute.googleapis.com
gcloud services enable cloudbuild.googleapis.com
Caution: If you plan to use third-party SSH (e.g. OpenSSH) to connect to your cluster, be sure you attach an ssh key to your cloud identity profile using OS Login. Learn more about adding SSH keys to your cloud identity profile.
3. [OPTIONAL] Create a GCP VM Image with Gromacs
For this codelab, we've provided a pre-built image for you, since the build process can take up to 2 hours to install Gromacs and all of its dependencies. If you'd like to use this pre-built image to save some time, you can skip ahead to the next section.
When running research applications on Google Cloud, there are many options for installing and deploying your application. In this section of the codelab, you will create a virtual machine image that builds on top of the slurm-gcp (CentOS7) VM image. During the creation process, the compiler, all of Gromacs' dependencies, and Gromacs will be installed.
The Gromacs Cloud Build pipeline on the RCC Apps repository encapsulates the necessary instructions for installing Gromacs. The installation process uses Packer to deploy a VM that installs Spack, which in turn installs the GCC@9.2.0 compiler and Gromacs@2021.2 with GPU acceleration enabled.
- Open your Cloud Shell on GCP.
- Clone the FluidNumerics/rcc-apps repository
cd ~
git clone https://github.com/FluidNumerics/rcc-apps.git
- Build the image using Google Cloud Build.
cd rcc-apps
gcloud builds submit . --config=gromacs/cloudbuild.yaml --project=<PROJECT_ID> --async
You can check the status of your build process at the Google Cloud Build dashboard
The build process may take to two hours. To accelerate this,you may consider modifying your build configuration file schema to change the machine type in order to improve build performance. This can be done using the _MACHINE_TYPE build variable. For example:
gcloud builds submit . --config=gromacs/cloudbuild.yaml --project=<PROJECT_ID> --async --substitutions=_MACHINE_TYPE=n2-standard-64
Once your build finishes, you will have a VM image available in your Google Cloud project that you can use to deploy your cluster.
4. Deploy an auto-scaling HPC cluster with Terraform
In this section, you will use Terraform to deploy an auto-scaling HPC cluster, with the Slurm job scheduler installed. This cluster will be deployed with compute nodes that each have 8 vCPUs and 1 Nvidia® Tesla V100 GPU.
- Open your Cloud Shell on GCP.
- Clone the FluidNumerics/rcc-apps repository
cd ~
git clone https://github.com/FluidNumerics/rcc-apps.git
- Change to the gromacs terraform directory:
cd ~/rcc-apps/gromacs/tf/slurm
- Create and review a terraform plan. Set the environment variables
GMX_NAME,GMX_PROJECT, andGMX_ZONEto specify the name of your cluster, your GCP project, and the zone you want to deploy to. Please review the note below if you are not sure
export GMX_PROJECT=<PROJECT_ID>
export GMX_ZONE=<ZONE>
export GMX_NAME="gromacs"
- If you created your own VM image in the previous section of this codelab, you will also need to set the GMX_IMAGE environment variable
export GMX_IMAGE="projects/${GMX_PROJECT}/global/images/gromacs-gcp-foss-latest"
- Create the plan with the make command, which will run
terraform init && terraform plan.
make plan
- Deploy the cluster. The setup process only takes a few minutes since Gromacs and its dependencies come pre-installed on your cluster.
make apply
- SSH to the login node created in the previous step. You can see this node in the previous step (probably called gromacs-login0). You can do this by clicking on the SSH button next to the list of VM Instances in the console menu item Compute Engine -> VM instance.
Option: This pair of gcloud commands will figure out the login node name and SSH into it:
export CLUSTER_LOGIN_NODE=$(gcloud compute instances list --zones ${GMX_ZONE} --filter="name ~ .*login" --format="value(name)" | head -n1)
gcloud compute ssh ${CLUSTER_LOGIN_NODE} --zone ${GMX_ZONE}
- Once you are connected to the login node, to verify your cluster setup, check that Gromacs is installed
$ spack find gromacs
==> In environment /apps/spack-pkg-env
==> Root specs
gromacs@2021.2 +cuda~mpi

==> 1 installed package
-- linux-centos7-x86_64 / gcc@9.2.0 -----------------------------
gromacs@2021.2
- Verify that
/opt/share/gromacshas the contents listed below.
$ ls /opt/share/gromacs/
benchMEM.tpr benchPEP-h.tpr benchPEP.tpr benchRIB.tpr
5. Run the benchRIB Benchmark
Gromacs is research software that is used to simulate molecular dynamics and calculate molecular structures under energy minimization constraints. The benchmarks provided in the VM image for this codelab focus on molecular dynamics, the evolution of systems of atoms.
In molecular dynamics, the positions, velocities, and accelerations of atoms are simulated using Newton's laws of motion :
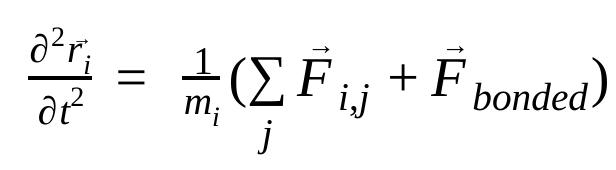
where,  is the position of atom i, t is time,
  is the mass of atom i and
  is the non-bonded force on atom i due to atom j and
 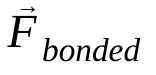 are the forces due to bonded interactions. Given the temperature, pressure, atom positions, and atom velocities, the forces are calculated and the system is numerically integrated to obtain new atom velocities and positions. This process is repeated to simulate the molecular dynamics for a given period of time.
The Gromacs image (either the one you created or the one provided) comes with three benchmarks
- benchMEM
- benchRIB
- benchPEP
These benchmarks are from Dr. Kutzner's set of Free Gromacs Benchmarks and are a standard set of transient molecular dynamics simulations. Each benchmark varies in the number of atoms and duration of the simulation. The relevant configurations for each simulation are given in the table below.
Metric / Benchmark | benchMEM | benchRIB | benchPEP |
Number of Atoms | 81,743 | 2,136,412 | 12,495,503 |
System Size / nm | 10.8 x 10.2 x 9.6 | 31.2 x 31.2 x 31.2 | 50.0 x 50.0 x 50.0 |
Time Step / fs | 2 | 4 | 2 |
Cutoff Radii / nm | 1 | 1 | 1.2 |
PME grid spacing / nm | 0.12 | 0.135 | 0.16 |
To run the benchmark, you will submit a Slurm batch job. By default, the provided batch script runs the benchRIB benchmark. The input decks that define the configurations for the provided benchmarks are included in the Gromacs VM image under /opt/share/gromacs. Additionally, an example bash script for running Gromacs is available under /opt/share.
For this section, you must SSH to the login node of the cluster
- Submit a batch job using the sbatch command
$ sbatch --ntasks=1 --cpus-per-task=8 --gres=gpu:1 --out=gromacs.out /opt/share/gromacs_bench.sh
This will queue the job for execution and Slurm will provision a compute node for you. When you run sinfo, you will see that a compute node is in the alloc# state, meaning that the compute node is allocated for your job, but is in the process of being provisioned. Once your job is running, the node will be set to the alloc state.
$ sinfo
PARTITION AVAIL  TIMELIMIT  NODES  STATE NODELIST
gromacs*     up   infinite      1 alloc# gromacs-compute-0-0
$ squeue
             JOBID PARTITION     NAME     USER ST       TIME  NODES NODELIST(REASON)
                 2   gromacs gromacs_      joe  R       0:02      1 gromacs-compute-0-0
$ sinfo
PARTITION AVAIL  TIMELIMIT  NODES  STATE NODELIST
gromacs*     up   infinite      1  alloc gromacs-compute-0-0
Wait for the job to complete. The default benchmark (benchRIB) simulates about 8 million atoms and is configured to run 5000 timesteps (with 4 timesteps/fs) step and take about 6 minutes to complete. You can monitor the status of your job with this command:
watch squeue
When your job is gone from the queue, you can exit with ctrl-C.
- When the job completes, you should see a directory called
run/that contains the simulation output (underrun/MEM) and a log file in your current directory calledgromacs.out. Therun/MEMdirectory contains two filesener.edrandmd.log. Theener.edrfile stores the system's energies, temperature, pressure, box size, density and virials in a portable binary format. As the extension suggests, themd.logfile contains logs for the Gromacs simulation and includes information about the simulation performance in addition to logging information from the particle-particle and PME solvers. The contents of gromacs.out contains standard output fromgmx mdrunshould look similar to what is shown below.
$ tail -n9 gromacs.out
step 5000, remaining wall clock time:     0 s
               Core t (s)   Wall t (s)        (%)
       Time:     3085.342      385.683      800.0
                 (ns/day)    (hour/ns)
Performance:        4.481        5.356

GROMACS reminds you: "I never thought of stopping, and I just hated sleeping. I can't imagine having a better life." (Barbara McClintock)

OK
6. Congratulations
In this codelab, you created an auto-scaling, cloud-native HPC cluster and ran a GPU accelerated molecular dynamics simulation with Gromacs on Google Cloud!
Cleaning up
To avoid incurring charges to your Google Cloud account for the resources used in this codelab:
RECOMMENDED: Delete the HPC cluster with Terraform
- Open your cloud shell and navigate to the
gromacs/tf/slurmexample directory
cd ~/rcc-apps/gromacs/tf/slurm
- Run make destroy to delete all of the resources.
make destroy
OR, Delete the project (most effective and destructive)
The easiest way to eliminate billing is to delete the project you created for the codelab.
Caution: Deleting a project has the following effects:
- Everything in the project is deleted. If you used an existing project for this codelab, when you delete it, you also delete any other work you've done in the project.
- Custom project IDs are lost. When you created this project, you might have created a custom project ID that you want to use in the future. To preserve the URLs that use the project ID, such as an appspot.com URL, delete selected resources inside the project instead of deleting the whole project.
If you plan to explore multiple codelabs and quickstarts, reusing projects can help you avoid exceeding project quota limits.
- In the Cloud Console, go to the Manage resources page. Go to the Manage resources page
- In the project list, select the project that you want to delete and then click Delete
 .
. - In the dialog, type the project ID and then click Shut down to delete the project.