
1. 📖 Introduction
Have you ever been frustrated and too lazy to manage all of your personal expenses? Me too! Thus why in this codelab, we will build a personal expense manager assistant - powered by Gemini 2.5 to do all the chores for us! From managing the uploaded receipts to analyze whether you already spent too much to buy a coffee!
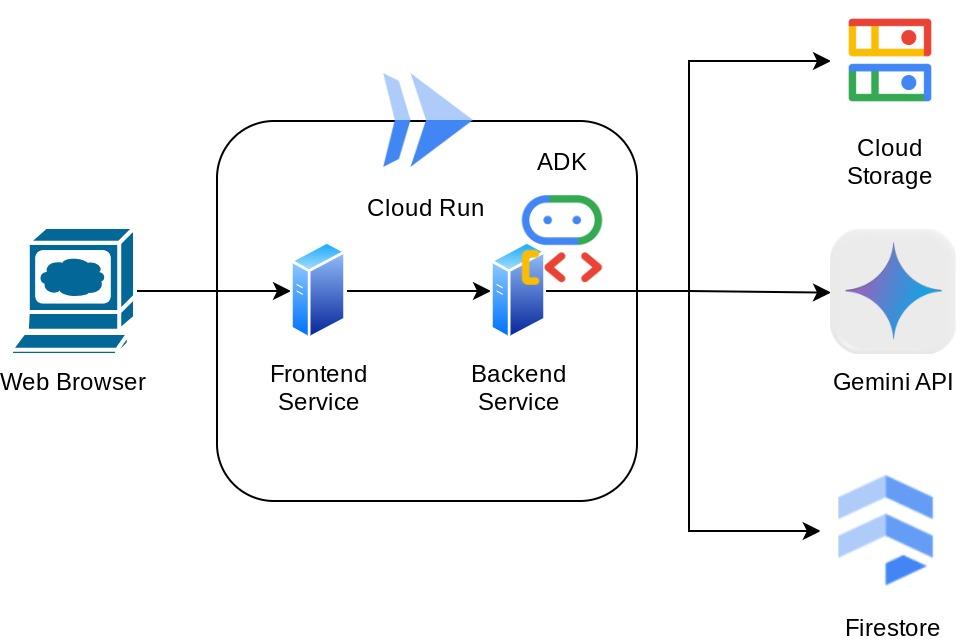
This assistant will be accessible via web browser in the form of a chat web interface, in which you can communicate with it, upload some receipt images and ask the assistant to store them, or maybe want to search some receipts to get the file and do some expense analysis. And all of this built on top of Google Agent Development Kit framework
The application itself is separated into 2 services: frontend and backend; enabling you to build a quick prototype and try what it feels like, and also understand how the API contract looks to integrate both of them.
Through the codelab, you will employ a step by step approach as follows:
- Prepare your Google Cloud project and Enable all the required API on it
- Setup bucket on Google Cloud Storage and database on Firestore
- Create Firestore Indexing
- Setup workspace for your coding environment
- Structuring ADK agent source code, tools, prompt, etc.
- Testing the agent using ADK local Web Development UI
- Build the frontend service - chat interface using Gradio library, to send some query and upload receipt images
- Build the backend service - HTTP server using FastAPI which where our ADK agent code, SessionService, and Artifact Service reside
- Manage environment variables and setup required files needed to deploy the application to the Cloud Run
- Deploy the application to the Cloud Run
Architecture Overview
Prerequisites
- Comfortable working with Python
- An understanding of basic full-stack architecture using HTTP service
What you'll learn
- Frontend web prototyping with Gradio
- Backend service development with FastAPI and Pydantic
- Architecting ADK Agent while utilizing it's several capabilities
- Tool usage
- Session and Artifact Management
- Callback utilization for input modification before sent to Gemini
- Utilizing BuiltInPlanner to improve task execution by doing planning
- Quick debugging via ADK local web interface
- Strategy to optimize multimodal interaction via information parsing and retrieval via prompt engineering and Gemini request modification using ADK callback
- Agentic Retrieval Augmented Generation using Firestore as Vector Database
- Manage environment variables in YAML file with Pydantic-settings
- Deploy application to Cloud Run using Dockerfile and provide environment variables with YAML file
What you'll need
- Chrome web browser
- A Gmail account
- A Cloud Project with billing enabled
This codelab, designed for developers of all levels (including beginners), uses Python in its sample application. However, Python knowledge isn't required for understanding the concepts presented.
2. 🚀 Before you begin
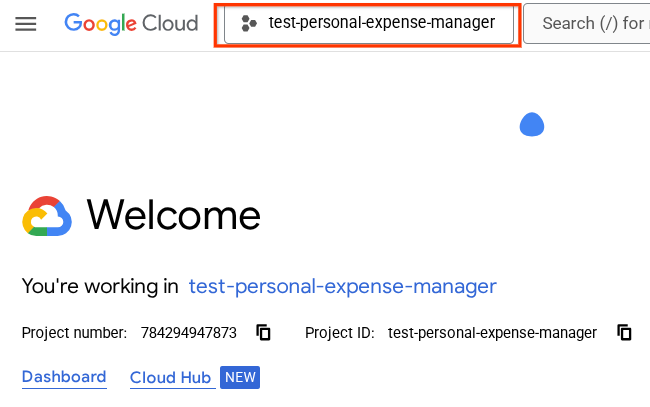
Select Active Project in the Cloud Console
This codelab assumes that you already have a Google Cloud project with billing enabled. If you do not have it yet, you can follow the instructions below to get started.
- In the Google Cloud Console, on the project selector page, select or create a Google Cloud project.
- Make sure that billing is enabled for your Cloud project. Learn how to check if billing is enabled on a project.
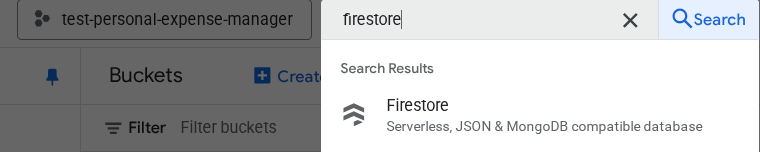
Prepare Firestore Database
Next, we will also need to create a Firestore Database. Firestore in Native mode is a NoSQL document database built for automatic scaling, high performance, and ease of application development. It can also act as a vector database which can support Retrieval Augmented Generation technique for our lab.
- Search "firestore" on the search bar, and click the Firestore product
- Then, click the Create A Firestore Database button
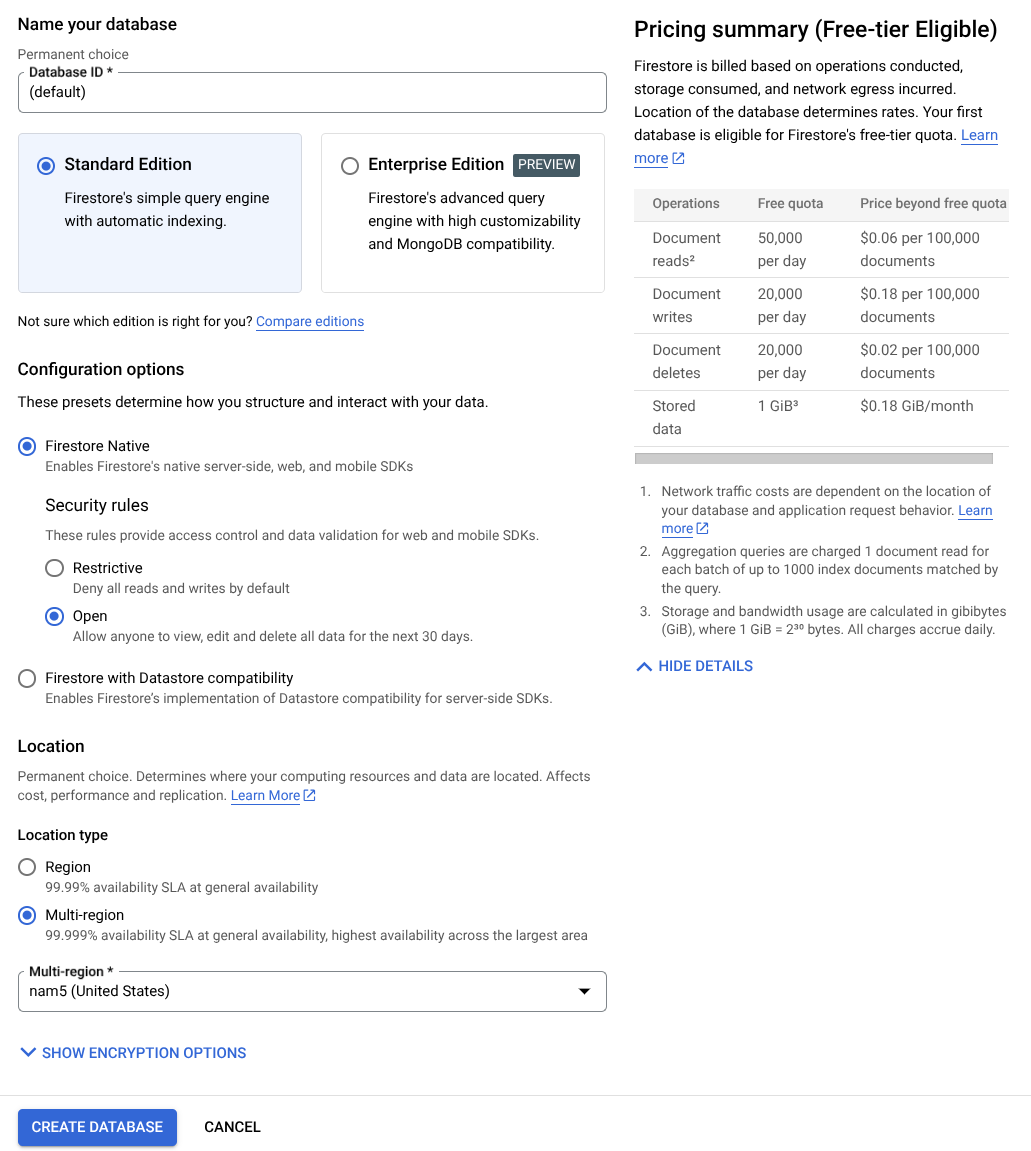
- Use the (default) as the database ID name and keep the Standard Edition selected. For the sake of this lab demo, use the Firestore Native with Open security rules.
- You'll also notice that this database actually has the Free-tier Usage YEAY! After that, click the Create Database Button
After these steps, you should already be redirected to the Firestore Database that you just created
Setup Cloud Project in Cloud Shell Terminal
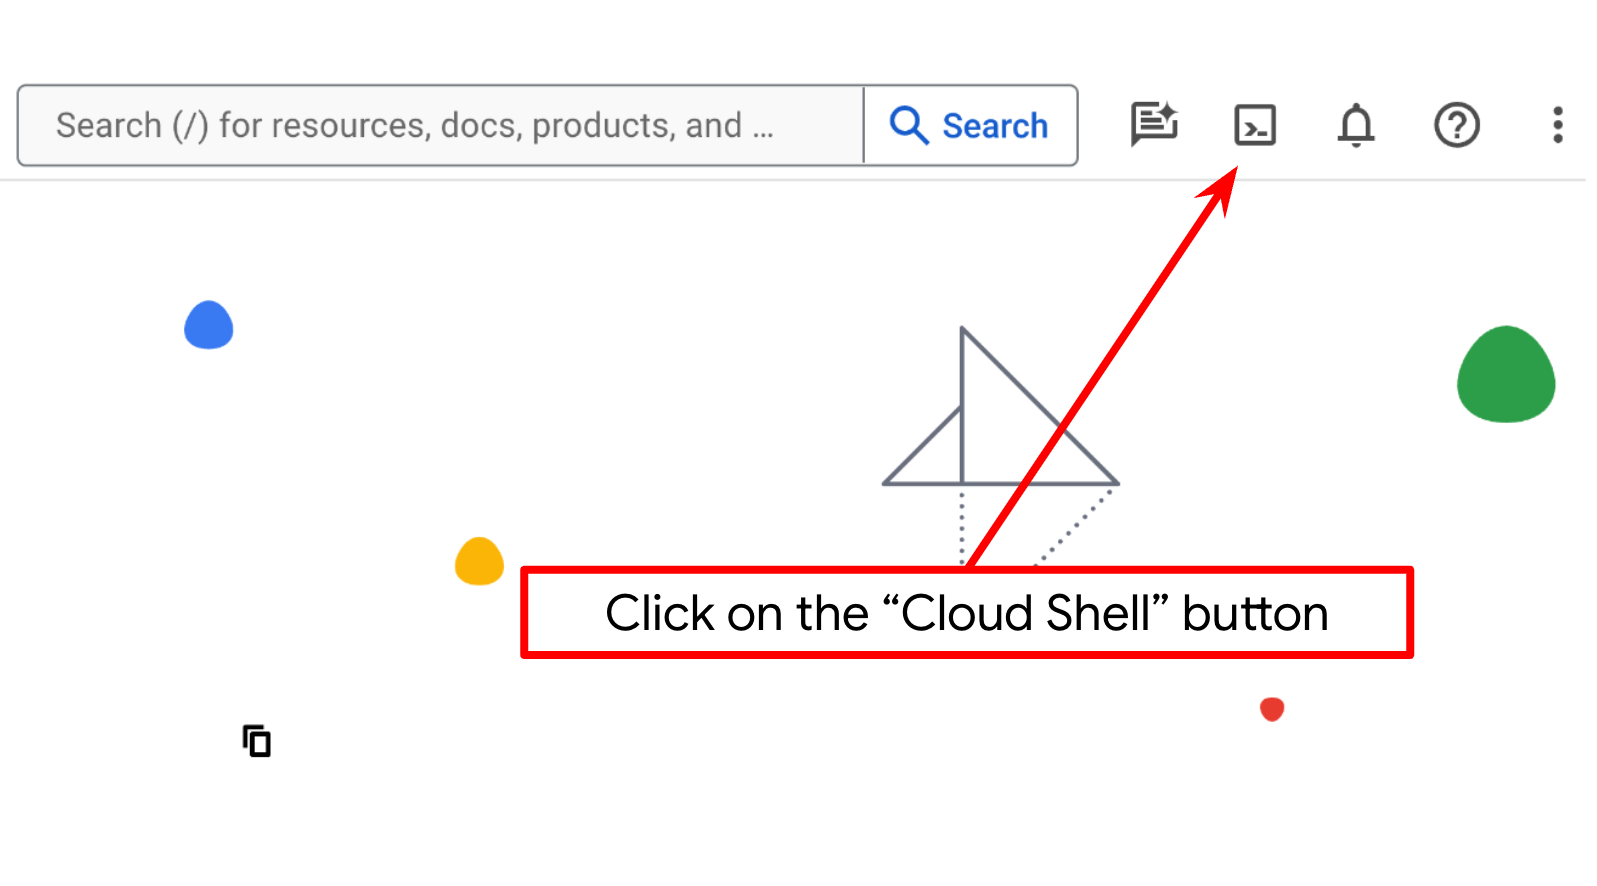
- You'll use Cloud Shell, a command-line environment running in Google Cloud that comes preloaded with bq. Click Activate Cloud Shell at the top of the Google Cloud console.
- Once connected to Cloud Shell, you check that you're already authenticated and that the project is set to your project ID using the following command:
gcloud auth list
- Run the following command in Cloud Shell to confirm that the gcloud command knows about your project.
gcloud config list project
- If your project is not set, use the following command to set it:
gcloud config set project <YOUR_PROJECT_ID>
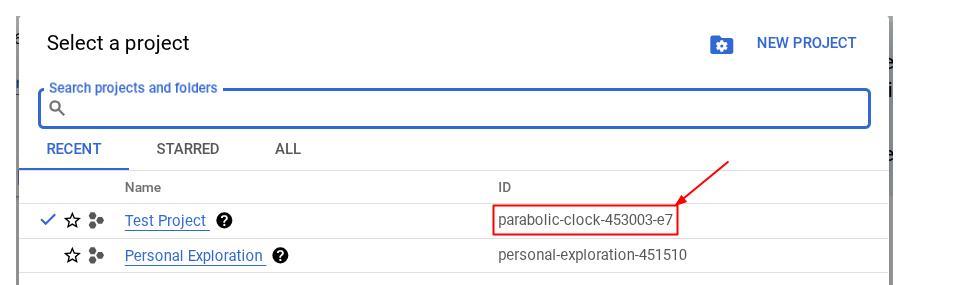
Alternatively, you also can see the PROJECT_ID id in the console

Click it and you will all of your project and the project ID on the right side
- Enable the required APIs via the command shown below. This could take a few minutes, so please be patient.
gcloud services enable aiplatform.googleapis.com \
                       firestore.googleapis.com \
                       run.googleapis.com \
                       cloudbuild.googleapis.com \
                       cloudresourcemanager.googleapis.com
On successful execution of the command, you should see a message similar to the one shown below:
Operation "operations/..." finished successfully.
The alternative to the gcloud command is through the console by searching for each product or using this link.
If any API is missed, you can always enable it during the course of the implementation.
Refer documentation for gcloud commands and usage.
Prepare Google Cloud Storage Bucket
Next, from the same terminal, we will need to prepare the GCS bucket to store the uploaded file. Run the following command to create the bucket, a unique yet relevant bucket name relevant to personal expense assistant receipts will be needed, hence we will utilize the following bucket name combined with your project id
gsutil mb -l us-central1 gs://personal-expense-{your-project-id}
It will show this output
Creating gs://personal-expense-{your-project-id}
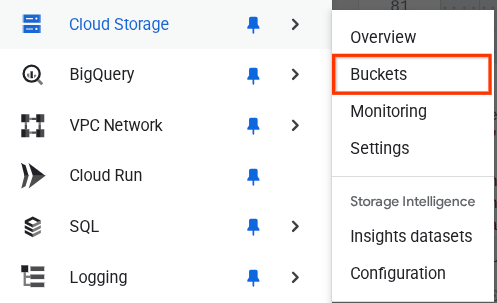
You can verify this by going to the Navigation Menu on top left of the browser and select Cloud Storage -> Bucket
Creating Firestore Index for Search
Firestore is a NoSQL database natively, which offers superior performance and flexibility in data model, but has limitations when it comes to complex queries. As we plan to utilize some compound multi field queries and vector search we will need to create some index first. You can read more about the details in this documentation
- Run the following command to create index to support compound queries
gcloud firestore indexes composite create \
        --collection-group=personal-expense-assistant-receipts \
        --field-config field-path=total_amount,order=ASCENDING \
        --field-config field-path=transaction_time,order=ASCENDING \
        --field-config field-path=__name__,order=ASCENDING \
        --database="(default)"
- And run this one to support vector search
gcloud firestore indexes composite create \
        --collection-group="personal-expense-assistant-receipts" \
        --query-scope=COLLECTION \
        --field-config field-path="embedding",vector-config='{"dimension":"768", "flat": "{}"}' \
        --database="(default)"
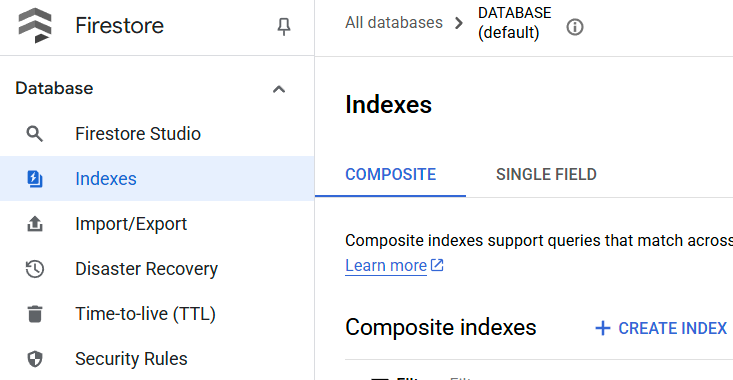
You can check the created index by visiting Firestore in the cloud console and click the (default) database instance and select Indexes on the navigation bar
Go to Cloud Shell Editor and Setup Application Working Directory
Now, we can set up our code editor to do some coding stuff. We will use the Cloud Shell Editor for this
- Click on the Open Editor button, this will open a Cloud Shell Editor, we can write our code here
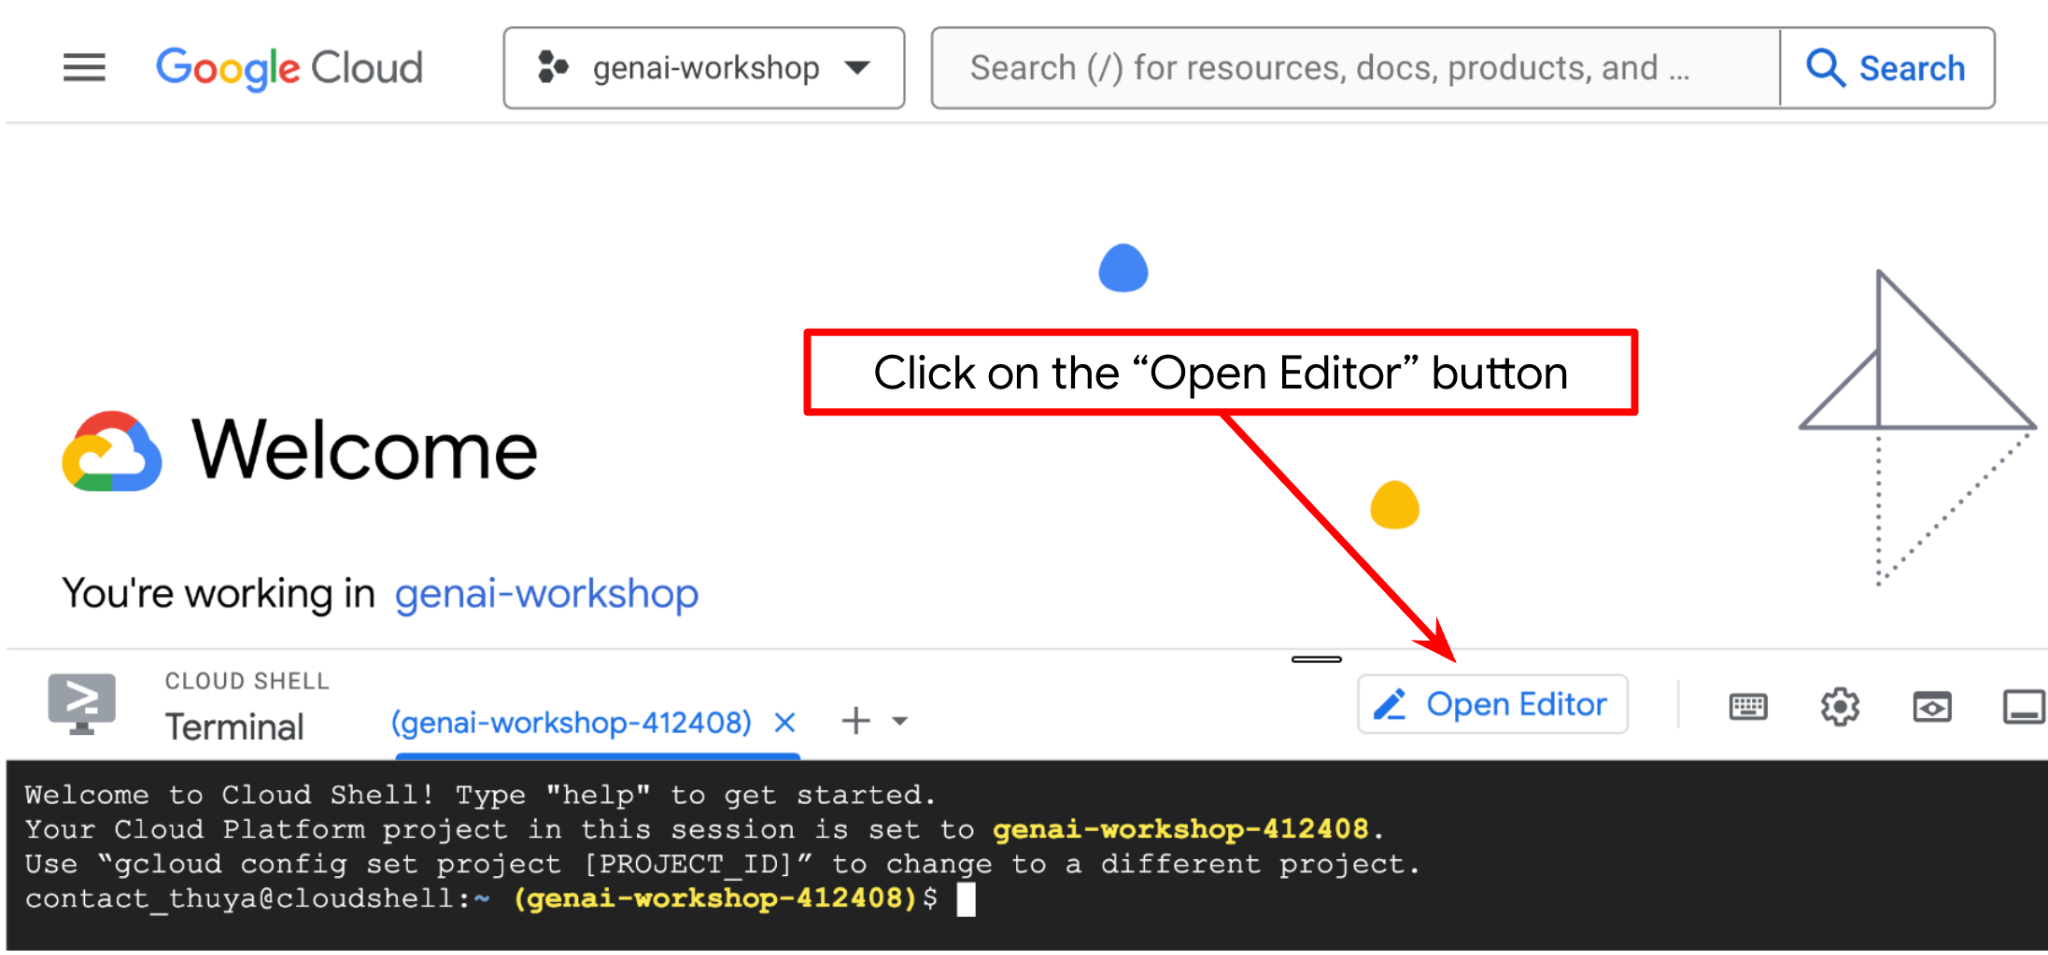
- Next, we also need to check whether the shell is already configured to the correct PROJECT ID that you have, if you see there is value inside ( ) before the $ icon in the terminal ( in below screenshot, the value is "adk-multimodal-tool" ) this value shows the configured project for your active shell session.

If the shown value is already correct, you can skip the next command. However if it's not correct or missing, run the following command
gcloud config set project <YOUR_PROJECT_ID>
- Next, let's clone the template working directory for this codelab from Github, run the following command. It will create the working directory in the personal-expense-assistant directory
git clone https://github.com/alphinside/personal-expense-assistant-adk-codelab-starter.git personal-expense-assistant
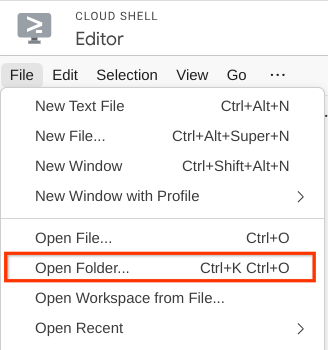
- After that, go to the top section of the Cloud Shell Editor and click File->Open Folder, find your username directory and find the personal-expense-assistant directory then click OK button. This will make the chosen directory as the main working directory. In this example, the username is alvinprayuda, hence the directory path is shown below

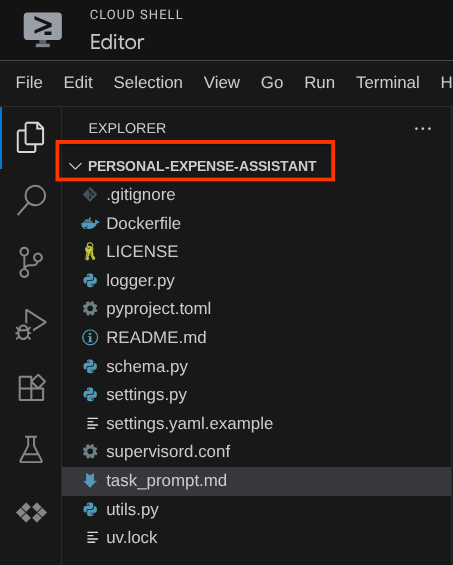
Now, your Cloud Shell Editor should look like this
Environment Setup
Prepare Python Virtual Environment
The next step is to prepare the development environment. Your current active terminal should be inside the personal-expense-assistant working directory. We will utilize Python 3.12 in this codelab and we will use uv python project manager to simplify the need of creating and managing python version and virtual environment
- If you haven't opened the terminal yet, open it by clicking on Terminal -> New Terminal , or use Ctrl + Shift + C , it will open a terminal window on the bottom part of the browser

- Now let's initialize the virtual environment using
uv, Run these commands
cd ~/personal-expense-assistant
uv sync --frozen
This will create the .venv directory and install the dependencies. Quick sneak peek on the pyproject.toml will give you information about the dependencies shown like this
dependencies = [
    "datasets>=3.5.0",
    "google-adk==1.18",
    "google-cloud-firestore>=2.20.1",
    "gradio>=5.23.1",
    "pydantic>=2.10.6",
    "pydantic-settings[yaml]>=2.8.1",
]
Setup Configuration Files
Now we will need to set up configuration files for this project. We use pydantic-settings to read config from the YAML file.
We already provided the file template inside settings.yaml.example , we will need to copy the file and rename it to settings.yaml. Run this command to create the file
cp settings.yaml.example settings.yaml
Then, copy the following value into the file
GCLOUD_LOCATION: "us-central1"
GCLOUD_PROJECT_ID: "your-project-id"
BACKEND_URL: "http://localhost:8081/chat"
STORAGE_BUCKET_NAME: "personal-expense-{your-project-id}"
DB_COLLECTION_NAME: "personal-expense-assistant-receipts"
For this codelab, we are going with the pre-configured values for GCLOUD_LOCATION, BACKEND_URL, and DB_COLLECTION_NAME .
Now we can move to the next step, building the agent and then the services
3. 🚀 Build the Agent using Google ADK and Gemini 2.5
Introduction to ADK Directory Structure
Let's start by exploring what ADK has to offer and how to build the agent. ADK complete documentation can be accessed in this URL . ADK offers us many utilities within its CLI command execution. Some of them are the following :
- Setup the agent directory structure
- Quickly try interaction via CLI input output
- Quickly setup local development UI web interface
Now, let's create the agent directory structure using the CLI command. Run the following command.
uv run adk create expense_manager_agent
When asked, choose the model gemini-2.5-flash and the Vertex AI backend. The wizard will then ask for the project ID and location. You can accept the default options by pressing enter, or change them as necessary. Just double check that you are using the correct project ID created earlier in this lab. The output will look like this:
Choose a model for the root agent:
1. gemini-2.5-flash
2. Other models (fill later)
Choose model (1, 2): 1
1. Google AI
2. Vertex AI
Choose a backend (1, 2): 2

You need an existing Google Cloud account and project, check out this link for details:
https://google.github.io/adk-docs/get-started/quickstart/#gemini---google-cloud-vertex-ai

Enter Google Cloud project ID [going-multimodal-lab]:
Enter Google Cloud region [us-central1]:

Agent created in /home/username/personal-expense-assistant/expense_manager_agent:
- .env
- __init__.py
- agent.py
It will create the following agent directory structure
expense_manager_agent/
├── __init__.py
├── .env
├── agent.py
And if you inspect the init.py and agent.py you will see this code
# __init__.py

from . import agent
# agent.py

from google.adk.agents import Agent

root_agent = Agent(
    model='gemini-2.5-flash',
    name='root_agent',
    description='A helpful assistant for user questions.',
    instruction='Answer user questions to the best of your knowledge',
)
Now you can test it by running
uv run adk run expense_manager_agent
Whenever you are done testing you can exit the agent by typing exit or pressing Ctrl+D.
Building Our Expense Manager Agent
Let's build our expense manager agent! Open expense_manager_agent/agent.py file and copy the code below which will contain the root_agent.
# expense_manager_agent/agent.py

from google.adk.agents import Agent
from expense_manager_agent.tools import (
    store_receipt_data,
    search_receipts_by_metadata_filter,
    search_relevant_receipts_by_natural_language_query,
    get_receipt_data_by_image_id,
)
from expense_manager_agent.callbacks import modify_image_data_in_history
import os
from settings import get_settings
from google.adk.planners import BuiltInPlanner
from google.genai import types

SETTINGS = get_settings()
os.environ["GOOGLE_CLOUD_PROJECT"] = SETTINGS.GCLOUD_PROJECT_ID
os.environ["GOOGLE_CLOUD_LOCATION"] = SETTINGS.GCLOUD_LOCATION
os.environ["GOOGLE_GENAI_USE_VERTEXAI"] = "TRUE"

# Get the code file directory path and read the task prompt file
current_dir = os.path.dirname(os.path.abspath(__file__))
prompt_path = os.path.join(current_dir, "task_prompt.md")
with open(prompt_path, "r") as file:
    task_prompt = file.read()

root_agent = Agent(
    name="expense_manager_agent",
    model="gemini-2.5-flash",
    description=(
        "Personal expense agent to help user track expenses, analyze receipts, and manage their financial records"
    ),
    instruction=task_prompt,
    tools=[
        store_receipt_data,
        get_receipt_data_by_image_id,
        search_receipts_by_metadata_filter,
        search_relevant_receipts_by_natural_language_query,
    ],
    planner=BuiltInPlanner(
        thinking_config=types.ThinkingConfig(
            thinking_budget=2048,
        )
    ),
    before_model_callback=modify_image_data_in_history,
)
Code Explanation
This script contains our agent initiation where we initialize the following things:
- Set the model to be used to
gemini-2.5-flash - Set up the agent description and instruction as the system prompt which is being read from
task_prompt.md - Provide necessary tools to support the agent functionality
- Enable planning before generating the final response or execution using Gemini 2.5 Flash thinking capabilities
- Set up callback intercept before sending request to Gemini to limit number of image data sent before making prediction
4. 🚀 Configuring the Agent Tools
Our expense manager agent will have capabilities of the following:
- Extract data from the receipt image and store the data and the file
- Exact search on the expense data
- Contextual search on the expense data
Hence we need the appropriate tools to support this functionality. Create a new file under expense_manager_agent directory and name it tools.py
touch expense_manager_agent/tools.py
Open the expense_manage_agent/tools.py, then copy the code below
# expense_manager_agent/tools.py

import datetime
from typing import Dict, List, Any
from google.cloud import firestore
from google.cloud.firestore_v1.vector import Vector
from google.cloud.firestore_v1 import FieldFilter
from google.cloud.firestore_v1.base_query import And
from google.cloud.firestore_v1.base_vector_query import DistanceMeasure
from settings import get_settings
from google import genai

SETTINGS = get_settings()
DB_CLIENT = firestore.Client(
    project=SETTINGS.GCLOUD_PROJECT_ID
)  # Will use "(default)" database
COLLECTION = DB_CLIENT.collection(SETTINGS.DB_COLLECTION_NAME)
GENAI_CLIENT = genai.Client(
    vertexai=True, location=SETTINGS.GCLOUD_LOCATION, project=SETTINGS.GCLOUD_PROJECT_ID
)
EMBEDDING_DIMENSION = 768
EMBEDDING_FIELD_NAME = "embedding"
INVALID_ITEMS_FORMAT_ERR = """
Invalid items format. Must be a list of dictionaries with 'name', 'price', and 'quantity' keys."""
RECEIPT_DESC_FORMAT = """
Store Name: {store_name}
Transaction Time: {transaction_time}
Total Amount: {total_amount}
Currency: {currency}
Purchased Items:
{purchased_items}
Receipt Image ID: {receipt_id}
"""


def sanitize_image_id(image_id: str) -> str:
    """Sanitize image ID by removing any leading/trailing whitespace."""
    if image_id.startswith("[IMAGE-"):
        image_id = image_id.split("ID ")[1].split("]")[0]

    return image_id.strip()


def store_receipt_data(
    image_id: str,
    store_name: str,
    transaction_time: str,
    total_amount: float,
    purchased_items: List[Dict[str, Any]],
    currency: str = "IDR",
) -> str:
    """
    Store receipt data in the database.

    Args:
        image_id (str): The unique identifier of the image. For example IMAGE-POSITION 0-ID 12345,
            the ID of the image is 12345.
        store_name (str): The name of the store.
        transaction_time (str): The time of purchase, in ISO format ("YYYY-MM-DDTHH:MM:SS.ssssssZ").
        total_amount (float): The total amount spent.
        purchased_items (List[Dict[str, Any]]): A list of items purchased with their prices. Each item must have:
            - name (str): The name of the item.
            - price (float): The price of the item.
            - quantity (int, optional): The quantity of the item. Defaults to 1 if not provided.
        currency (str, optional): The currency of the transaction, can be derived from the store location.
            If unsure, default is "IDR".

    Returns:
        str: A success message with the receipt ID.

    Raises:
        Exception: If the operation failed or input is invalid.
    """
    try:
        # In case of it provide full image placeholder, extract the id string
        image_id = sanitize_image_id(image_id)

        # Check if the receipt already exists
        doc = get_receipt_data_by_image_id(image_id)

        if doc:
            return f"Receipt with ID {image_id} already exists"

        # Validate transaction time
        if not isinstance(transaction_time, str):
            raise ValueError(
                "Invalid transaction time: must be a string in ISO format 'YYYY-MM-DDTHH:MM:SS.ssssssZ'"
            )
        try:
            datetime.datetime.fromisoformat(transaction_time.replace("Z", "+00:00"))
        except ValueError:
            raise ValueError(
                "Invalid transaction time format. Must be in ISO format 'YYYY-MM-DDTHH:MM:SS.ssssssZ'"
            )

        # Validate items format
        if not isinstance(purchased_items, list):
            raise ValueError(INVALID_ITEMS_FORMAT_ERR)

        for _item in purchased_items:
            if (
                not isinstance(_item, dict)
                or "name" not in _item
                or "price" not in _item
            ):
                raise ValueError(INVALID_ITEMS_FORMAT_ERR)

            if "quantity" not in _item:
                _item["quantity"] = 1

        # Create a combined text from all receipt information for better embedding
        result = GENAI_CLIENT.models.embed_content(
            model="text-embedding-004",
            contents=RECEIPT_DESC_FORMAT.format(
                store_name=store_name,
                transaction_time=transaction_time,
                total_amount=total_amount,
                currency=currency,
                purchased_items=purchased_items,
                receipt_id=image_id,
            ),
        )

        embedding = result.embeddings[0].values

        doc = {
            "receipt_id": image_id,
            "store_name": store_name,
            "transaction_time": transaction_time,
            "total_amount": total_amount,
            "currency": currency,
            "purchased_items": purchased_items,
            EMBEDDING_FIELD_NAME: Vector(embedding),
        }

        COLLECTION.add(doc)

        return f"Receipt stored successfully with ID: {image_id}"
    except Exception as e:
        raise Exception(f"Failed to store receipt: {str(e)}")


def search_receipts_by_metadata_filter(
    start_time: str,
    end_time: str,
    min_total_amount: float = -1.0,
    max_total_amount: float = -1.0,
) -> str:
    """
    Filter receipts by metadata within a specific time range and optionally by amount.

    Args:
        start_time (str): The start datetime for the filter (in ISO format, e.g. 'YYYY-MM-DDTHH:MM:SS.ssssssZ').
        end_time (str): The end datetime for the filter (in ISO format, e.g. 'YYYY-MM-DDTHH:MM:SS.ssssssZ').
        min_total_amount (float): The minimum total amount for the filter (inclusive). Defaults to -1.
        max_total_amount (float): The maximum total amount for the filter (inclusive). Defaults to -1.

    Returns:
        str: A string containing the list of receipt data matching all applied filters.

    Raises:
        Exception: If the search failed or input is invalid.
    """
    try:
        # Validate start and end times
        if not isinstance(start_time, str) or not isinstance(end_time, str):
            raise ValueError("start_time and end_time must be strings in ISO format")
        try:
            datetime.datetime.fromisoformat(start_time.replace("Z", "+00:00"))
            datetime.datetime.fromisoformat(end_time.replace("Z", "+00:00"))
        except ValueError:
            raise ValueError("start_time and end_time must be strings in ISO format")

        # Start with the base collection reference
        query = COLLECTION

        # Build the composite query by properly chaining conditions
        # Notes that this demo assume 1 user only,
        # need to refactor the query for multiple user
        filters = [
            FieldFilter("transaction_time", ">=", start_time),
            FieldFilter("transaction_time", "<=", end_time),
        ]

        # Add optional filters
        if min_total_amount != -1:
            filters.append(FieldFilter("total_amount", ">=", min_total_amount))

        if max_total_amount != -1:
            filters.append(FieldFilter("total_amount", "<=", max_total_amount))

        # Apply the filters
        composite_filter = And(filters=filters)
        query = query.where(filter=composite_filter)

        # Execute the query and collect results
        search_result_description = "Search by Metadata Results:\n"
        for doc in query.stream():
            data = doc.to_dict()
            data.pop(
                EMBEDDING_FIELD_NAME, None
            )  # Remove embedding as it's not needed for display

            search_result_description += f"\n{RECEIPT_DESC_FORMAT.format(**data)}"

        return search_result_description
    except Exception as e:
        raise Exception(f"Error filtering receipts: {str(e)}")


def search_relevant_receipts_by_natural_language_query(
    query_text: str, limit: int = 5
) -> str:
    """
    Search for receipts with content most similar to the query using vector search.
    This tool can be use for user query that is difficult to translate into metadata filters.
    Such as store name or item name which sensitive to string matching.
    Use this tool if you cannot utilize the search by metadata filter tool.

    Args:
        query_text (str): The search text (e.g., "coffee", "dinner", "groceries").
        limit (int, optional): Maximum number of results to return (default: 5).

    Returns:
        str: A string containing the list of contextually relevant receipt data.

    Raises:
        Exception: If the search failed or input is invalid.
    """
    try:
        # Generate embedding for the query text
        result = GENAI_CLIENT.models.embed_content(
            model="text-embedding-004", contents=query_text
        )
        query_embedding = result.embeddings[0].values

        # Notes that this demo assume 1 user only,
        # need to refactor the query for multiple user
        vector_query = COLLECTION.find_nearest(
            vector_field=EMBEDDING_FIELD_NAME,
            query_vector=Vector(query_embedding),
            distance_measure=DistanceMeasure.EUCLIDEAN,
            limit=limit,
        )

        # Execute the query and collect results
        search_result_description = "Search by Contextual Relevance Results:\n"
        for doc in vector_query.stream():
            data = doc.to_dict()
            data.pop(
                EMBEDDING_FIELD_NAME, None
            )  # Remove embedding as it's not needed for display
            search_result_description += f"\n{RECEIPT_DESC_FORMAT.format(**data)}"

        return search_result_description
    except Exception as e:
        raise Exception(f"Error searching receipts: {str(e)}")


def get_receipt_data_by_image_id(image_id: str) -> Dict[str, Any]:
    """
    Retrieve receipt data from the database using the image_id.

    Args:
        image_id (str): The unique identifier of the receipt image. For example, if the placeholder is
            [IMAGE-ID 12345], the ID to use is 12345.

    Returns:
        Dict[str, Any]: A dictionary containing the receipt data with the following keys:
            - receipt_id (str): The unique identifier of the receipt image.
            - store_name (str): The name of the store.
            - transaction_time (str): The time of purchase in UTC.
            - total_amount (float): The total amount spent.
            - currency (str): The currency of the transaction.
            - purchased_items (List[Dict[str, Any]]): List of items purchased with their details.
        Returns an empty dictionary if no receipt is found.
    """
    # In case of it provide full image placeholder, extract the id string
    image_id = sanitize_image_id(image_id)

    # Query the receipts collection for documents with matching receipt_id (image_id)
    # Notes that this demo assume 1 user only,
    # need to refactor the query for multiple user
    query = COLLECTION.where(filter=FieldFilter("receipt_id", "==", image_id)).limit(1)
    docs = list(query.stream())

    if not docs:
        return {}

    # Get the first matching document
    doc_data = docs[0].to_dict()
    doc_data.pop(EMBEDDING_FIELD_NAME, None)

    return doc_data
Code Explanation
In this tools function implementation we design the tools around these 2 main ideas:
- Parse receipt data and mapping to the original file using Image ID string placeholder
[IMAGE-ID <hash-of-image-1>] - Storing and retrieval data using Firestore database
Tool "store_receipt_data"
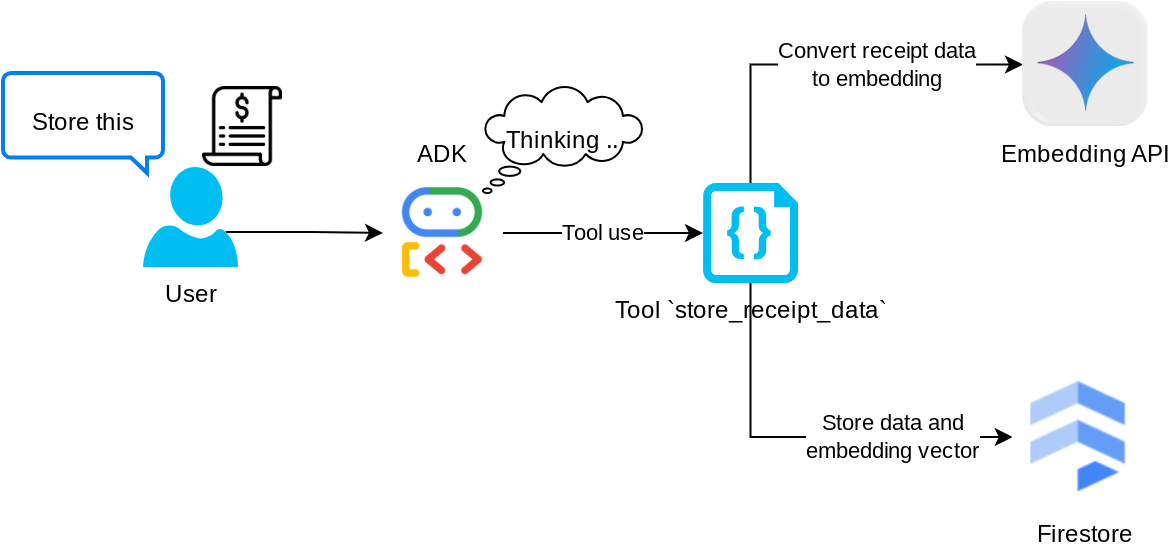
This tool is the Optical Character Recognition tool, it will parse the required information from the image data, together with recognizing the Image ID string and map them together to be stored in the Firestore database.
In addition, this tool also converts the content of the receipt into embedding using text-embedding-004 so that all the metadata and the embedding is stored and indexed together. Enabling flexibility to be retrieved either by query or contextual search.
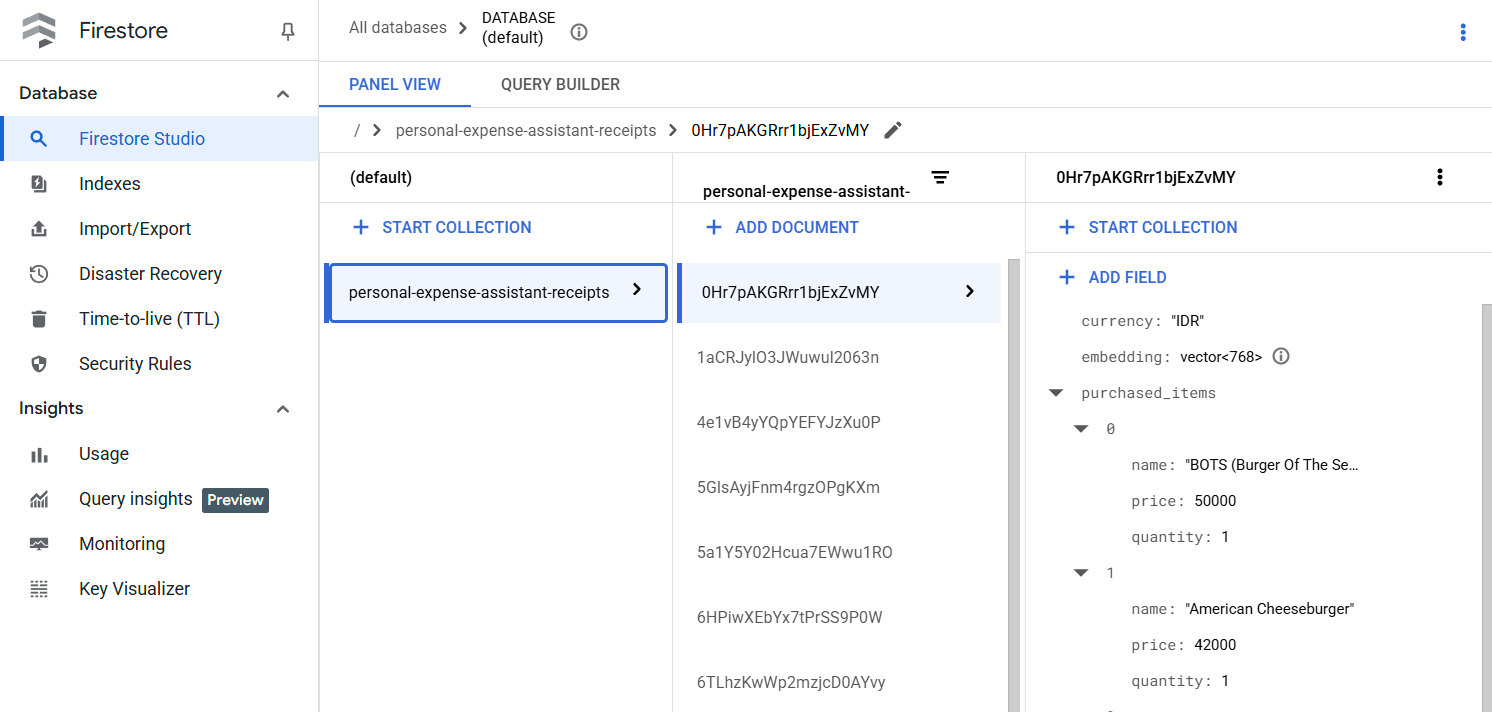
After successfully executing this tool, you can see that the receipt data already indexed in Firestore database like shown below
Tool "search_receipts_by_metadata_filter"
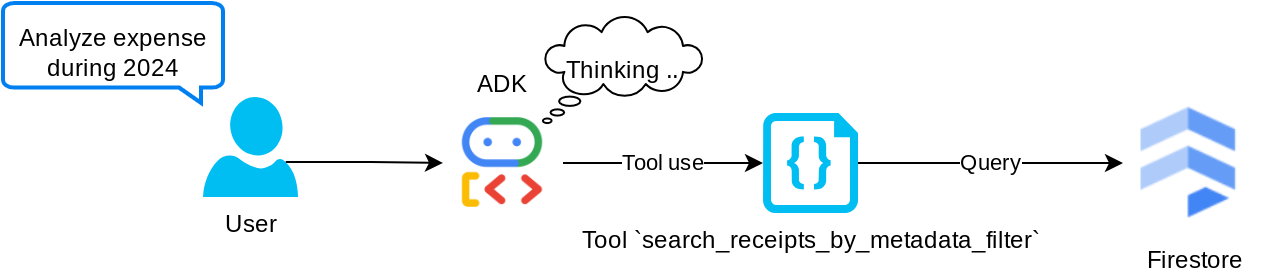
This tool converts the user query into a metadata query filter which supports searching by date range and/or total transaction. It will return all matched receipt data, where in the process we will drop the embedding field as it is not needed by the agent for contextual understanding
Tool "search_relevant_receipts_by_natural_language_query"
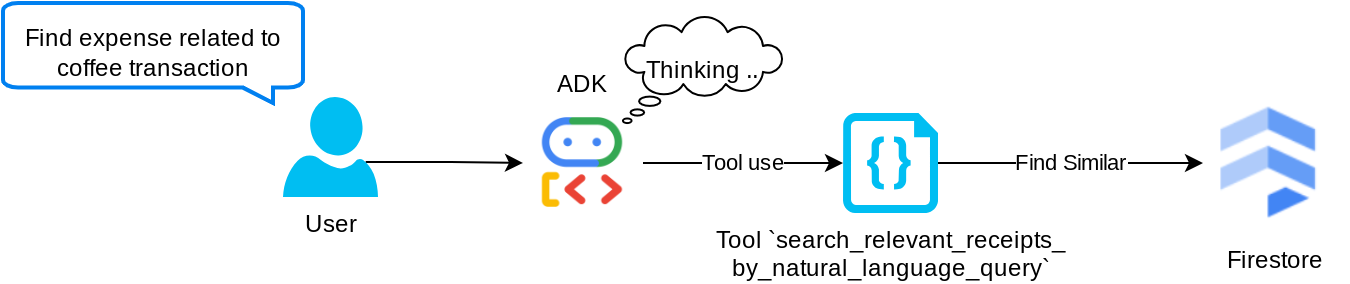
This is our Retrieval Augmented Generation (RAG) tool. Our agent has the capability to design its own query to retrieve relevant receipts from the vector database and it also can choose when to use this tool. The notion of allowing independent decision from the agent whether it will use this RAG tool or not and design its own query is one of the definitions of the Agentic RAG approach.
We not only allow it to build its own query, but also allow it to select how many relevant documents it wants to retrieve. Combined with a proper prompt engineering, E.g.
# Example prompt

Always filter the result from tool
search_relevant_receipts_by_natural_language_query as the returned
result may contain irrelevant information
This will make this tool a powerful tool that is able to search almost anything, though it might not return all the expected results due to the non-exact nature of nearest neighbor search.
5. 🚀 Conversation Context Modification via Callbacks
Google ADK enables us to "intercept" agent runtime at various levels. You can read more about this detailed capability in this documentation . In this lab, we utilize the before_model_callback to modify the request before sent to the LLM to remove image data in the old conversation history context ( only include image data in the last 3 user interaction ) for efficiency
However, we still want the agent to have the image data context when needed. Hence we add a mechanism to add a string image ID placeholder after each image byte data in the conversation. This will help the agent to link the image ID to its actual file data which can be utilized both at image storing or retrieval time. The structure will look like this
<image-byte-data-1>
[IMAGE-ID <hash-of-image-1>]
<image-byte-data-2>
[IMAGE-ID <hash-of-image-2>]
And so on..
And when the byte data is becoming obsolete in the conversation history, the string identifier is still there to still enable data access with the help of tool usage. Example history structure after image data removed
[IMAGE-ID <hash-of-image-1>]
[IMAGE-ID <hash-of-image-2>]
And so on..
Let's start! Create a new file under expense_manager_agent directory and name it callbacks.py
touch expense_manager_agent/callbacks.py
Open the expense_manager_agent/callbacks.py file, then copy code below
# expense_manager_agent/callbacks.py

import hashlib
from google.genai import types
from google.adk.agents.callback_context import CallbackContext
from google.adk.models.llm_request import LlmRequest


def modify_image_data_in_history(
    callback_context: CallbackContext, llm_request: LlmRequest
) -> None:
    # The following code will modify the request sent to LLM
    # We will only keep image data in the last 3 user messages using a reverse and counter approach

    # Count how many user messages we've processed
    user_message_count = 0

    # Process the reversed list
    for content in reversed(llm_request.contents):
        # Only count for user manual query, not function call
        if (content.role == "user") and (content.parts[0].function_response is None):
            user_message_count += 1
            modified_content_parts = []

            # Check any missing image ID placeholder for any image data
            # Then remove image data from conversation history if more than 3 user messages
            for idx, part in enumerate(content.parts):
                if part.inline_data is None:
                    modified_content_parts.append(part)
                    continue

                if (
                    (idx + 1 >= len(content.parts))
                    or (content.parts[idx + 1].text is None)
                    or (not content.parts[idx + 1].text.startswith("[IMAGE-ID "))
                ):
                    # Generate hash ID for the image and add a placeholder
                    image_data = part.inline_data.data
                    hasher = hashlib.sha256(image_data)
                    image_hash_id = hasher.hexdigest()[:12]
                    placeholder = f"[IMAGE-ID {image_hash_id}]"

                    # Only keep image data in the last 3 user messages
                    if user_message_count <= 3:
                        modified_content_parts.append(part)

                    modified_content_parts.append(types.Part(text=placeholder))

                else:
                    # Only keep image data in the last 3 user messages
                    if user_message_count <= 3:
                        modified_content_parts.append(part)

            # This will modify the contents inside the llm_request
            content.parts = modified_content_parts
6. 🚀 The Prompt
Designing an agent with complex interaction and capabilities, requires us to find a good enough prompt to guide the agent so that it can behave the way we want it to be.
Previously we had a mechanism on how to handle image data in conversation history, and also had tools that might not be straightforward to be used, such as search_relevant_receipts_by_natural_language_query. We also want the agent to be able to search and retrieve the correct receipt image to us. This means we need to be properly convey all of this information in a proper prompt structure
We will ask the agent to structure the output into the following markdown format to parse the thinking process, final response, and attachment ( if any )
# THINKING PROCESS

Thinking process here

# FINAL RESPONSE

Response to the user here

Attachments put inside json block

{
    "attachments": [
      "[IMAGE-ID <hash-id-1>]",
      "[IMAGE-ID <hash-id-2>]",
      ...
    ]
}
Let's start with the following prompt to achieve our initial expectation of the expense manager agent behavior. The task_prompt.md file should already exist in our existing working directory, but we need to move it under expense_manager_agent directory. Run the following command to move it
mv task_prompt.md expense_manager_agent/task_prompt.md
7. 🚀 Testing The Agent
Now let's try to communicate with the agent via CLI, run the following command
uv run adk run expense_manager_agent
It will show output like this, where you can chat in turn with the agent, however you can only send text via this interface
Log setup complete: /tmp/agents_log/agent.xxxx_xxx.log
To access latest log: tail -F /tmp/agents_log/agent.latest.log
Running agent root_agent, type exit to exit.
user: hello
[root_agent]: Hello there! How can I help you today?
user:
Now, besides CLI interaction, ADK also allows us to have a development UI to interact and inspect what's going on during the interaction. Run the following command to start the local development UI server
uv run adk web --port 8080
It will spawn output like the following example, means that we can already access the web interface
INFO:     Started server process [xxxx]
INFO:     Waiting for application startup.

+-----------------------------------------------------------------------------+
| ADK Web Server started                                                      |
|                                                                             |
| For local testing, access at http://localhost:8080.                         |
+-----------------------------------------------------------------------------+

INFO:     Application startup complete.
INFO:     Uvicorn running on http://0.0.0.0:8080 (Press CTRL+C to quit)
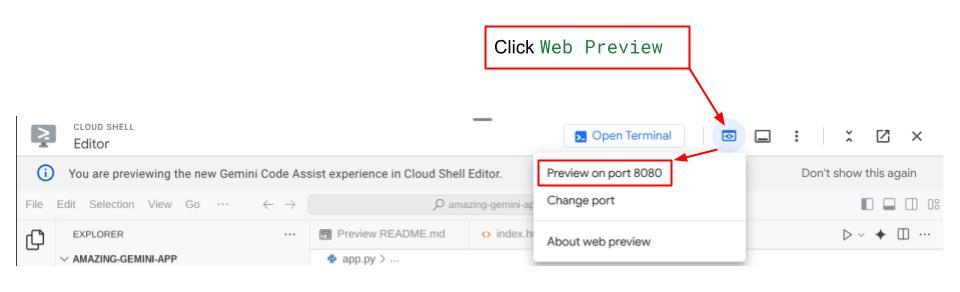
Now, to check it, click the Web Preview button on the top area of your Cloud Shell Editor and select Preview on port 8080
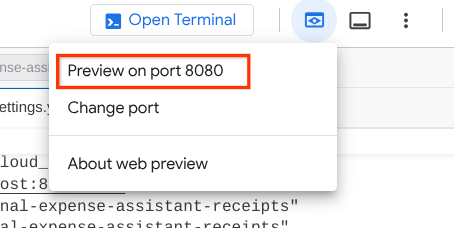
You will see the following web page where you can select available agents on the top left drop down button ( in our case it should be expense_manager_agent ) and interact with the bot. You will see many informations about the log details during agent runtime in the left window
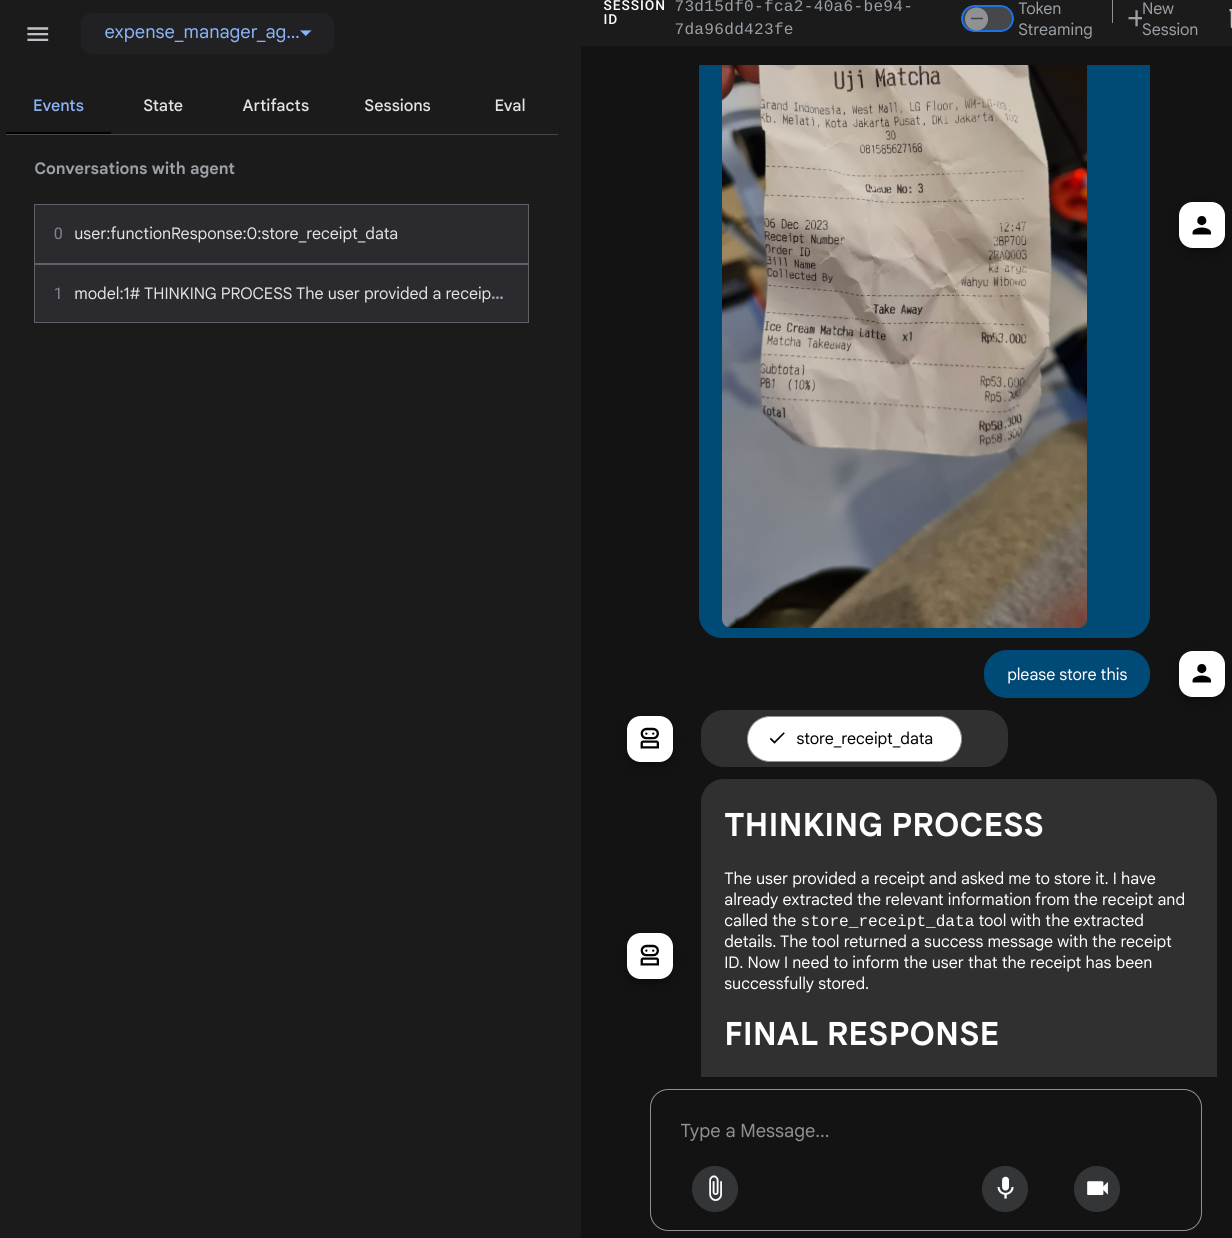
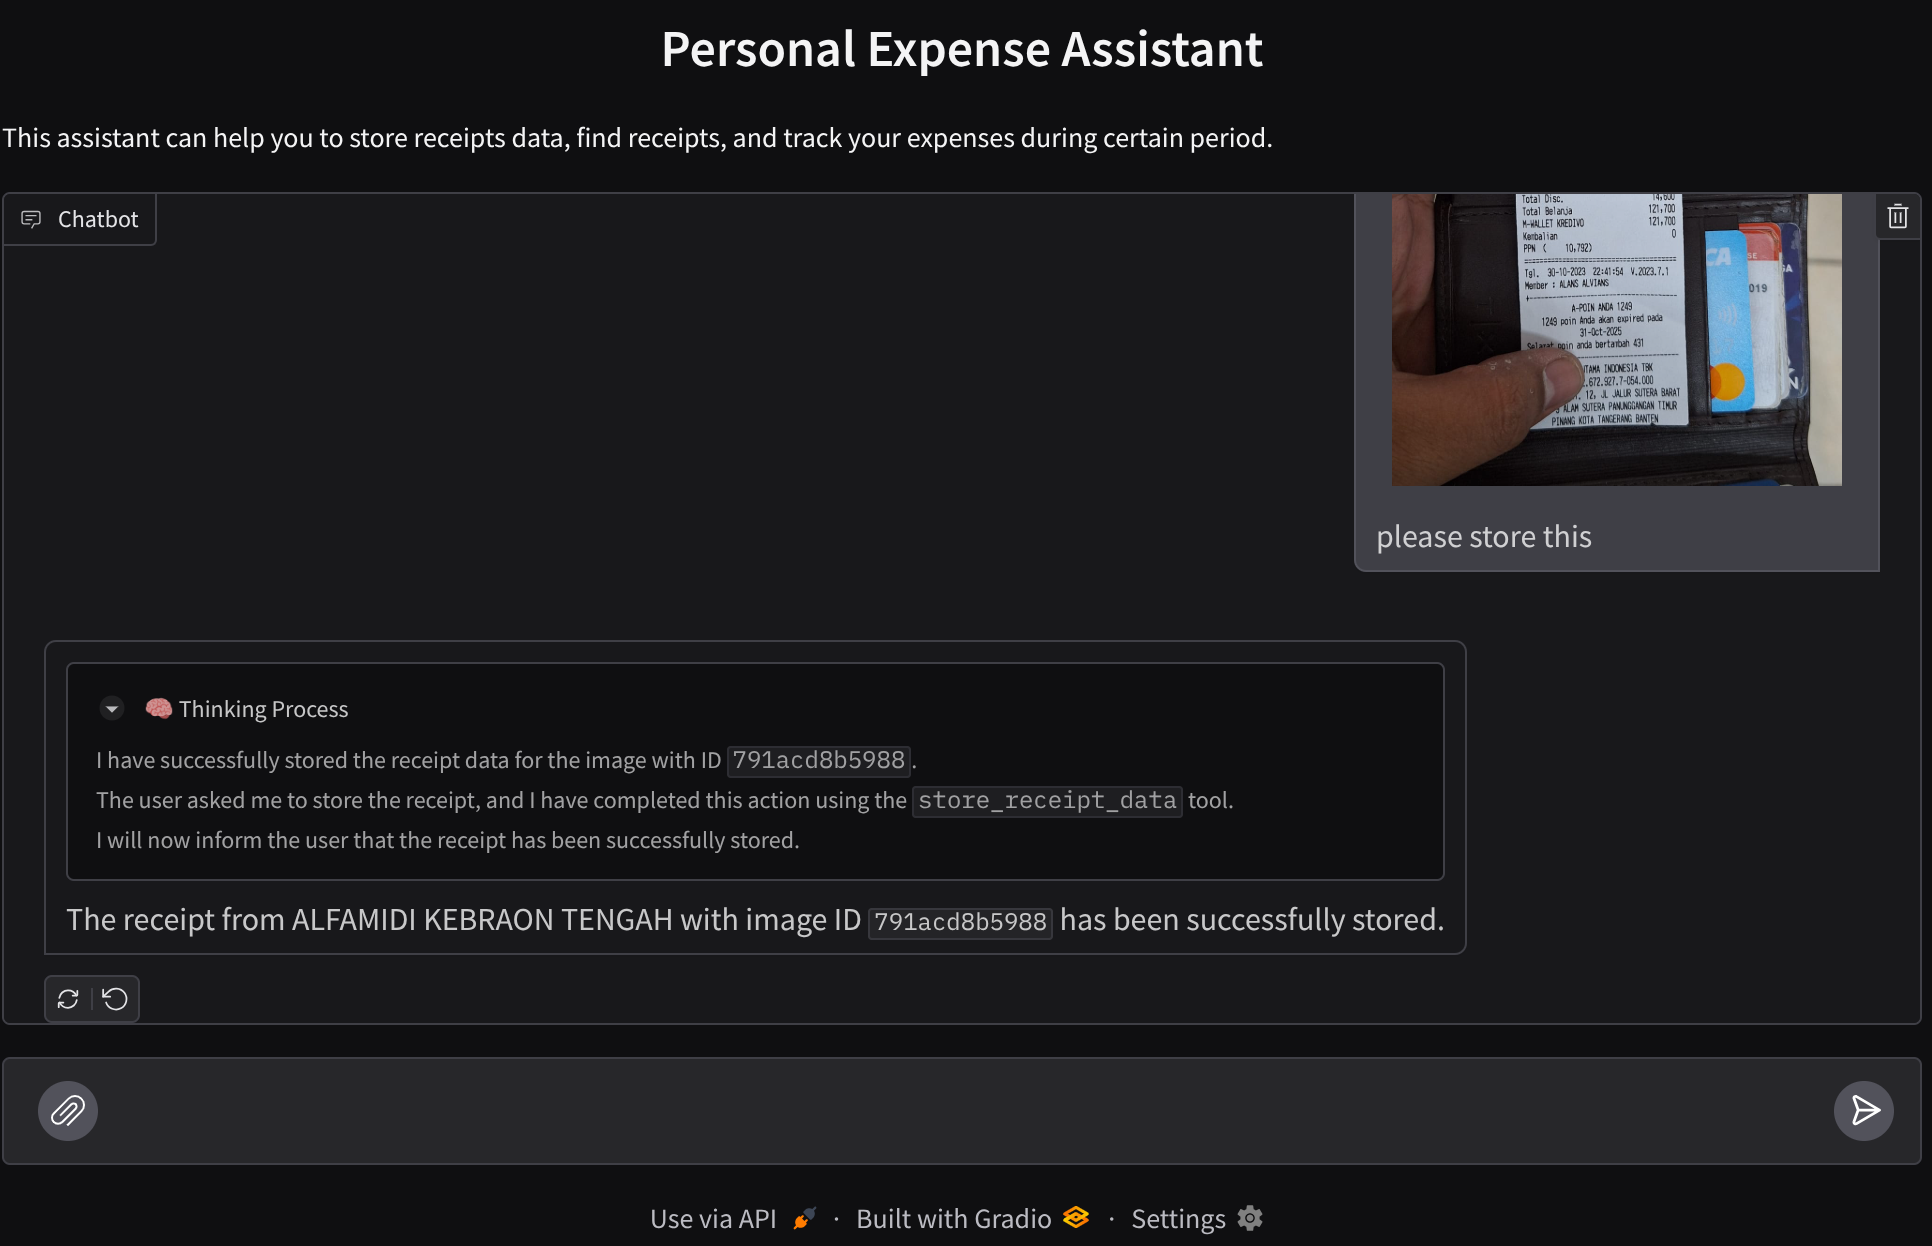
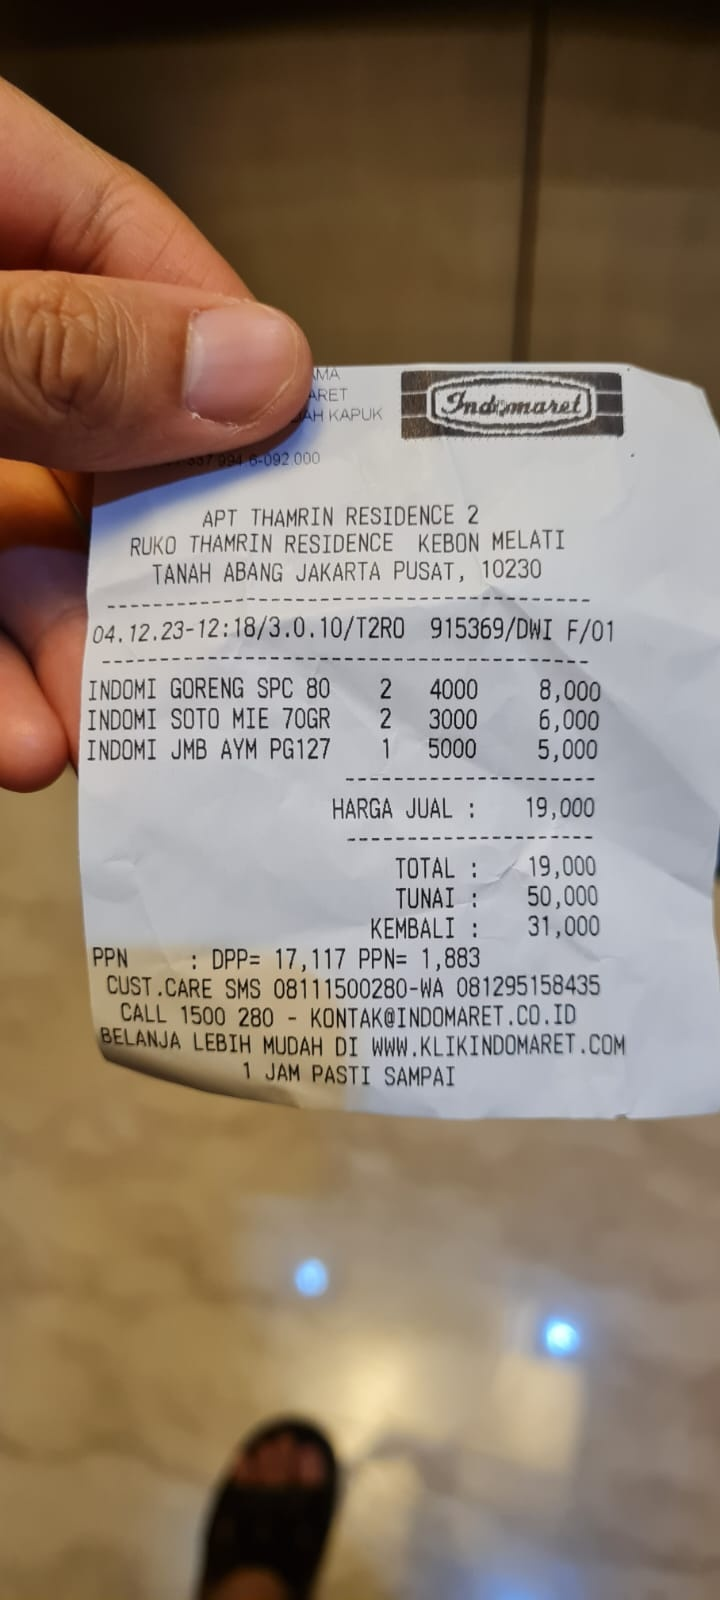
Let's try some actions! Upload these 2 example receipts ( source : Hugging face datasets mousserlane/id_receipt_dataset ) . Right click on each image and choose Save Image as.. ( this will download the receipt image), then upload the file to the bot by clicking on the "clip" icon and say that you want to store these receipts

After that try the following queries to do some search or file retrieval
- "Give breakdown of expenses and its total during 2023"
- "Give me receipt file from Indomaret"
When it use some tools, you can inspect what's going on in the development UI
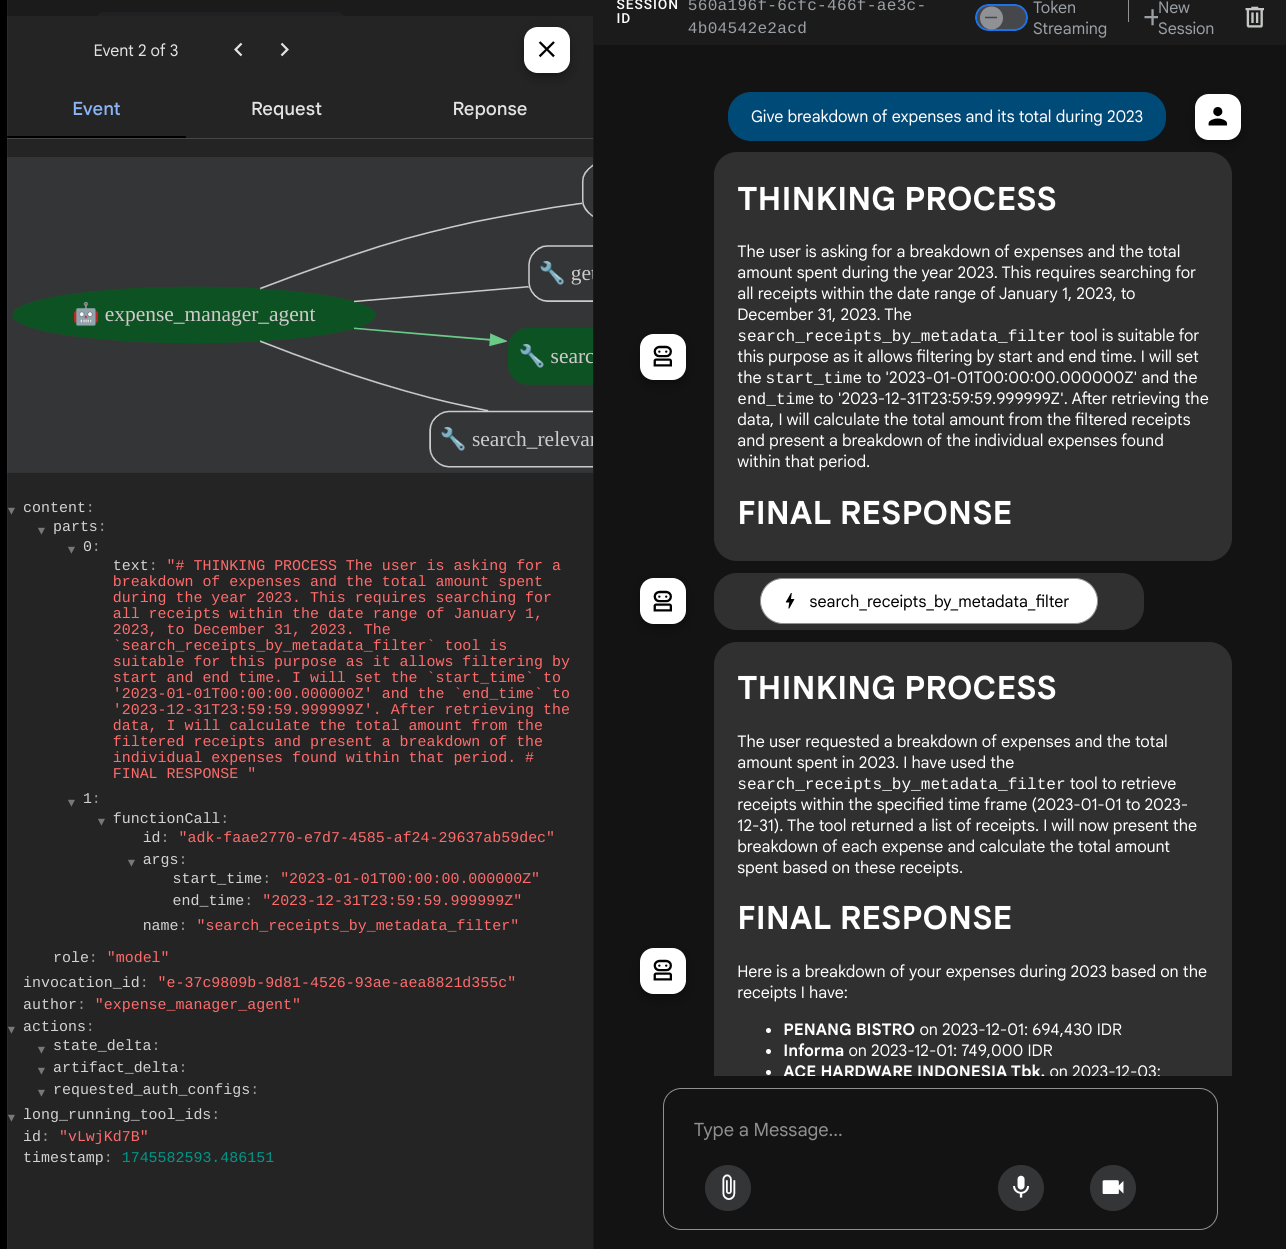
See how the agent responds to you and check whether it complies with all the rules provided in the prompt inside task_prompt.py. Congratulations! Now you have a complete working development agent.
Now it's time to complete it with proper and nice UI and capabilities to upload and download the image file.
8. 🚀 Build Frontend Service using Gradio
We will build a chat web interface which looks like this
It contains a chat interface with an input field for users to send text and upload the receipt image file(s).
We will build the frontend service using Gradio.
Create new file and name it frontend.py
touch frontend.py
then copy the following code and save it
import mimetypes
import gradio as gr
import requests
import base64
from typing import List, Dict, Any
from settings import get_settings
from PIL import Image
import io
from schema import ImageData, ChatRequest, ChatResponse


SETTINGS = get_settings()


def encode_image_to_base64_and_get_mime_type(image_path: str) -> ImageData:
    """Encode a file to base64 string and get MIME type.

    Reads an image file and returns the base64-encoded image data and its MIME type.

    Args:
        image_path: Path to the image file to encode.

    Returns:
        ImageData object containing the base64 encoded image data and its MIME type.
    """
    # Read the image file
    with open(image_path, "rb") as file:
        image_content = file.read()

    # Get the mime type
    mime_type = mimetypes.guess_type(image_path)[0]

    # Base64 encode the image
    base64_data = base64.b64encode(image_content).decode("utf-8")

    # Return as ImageData object
    return ImageData(serialized_image=base64_data, mime_type=mime_type)


def decode_base64_to_image(base64_data: str) -> Image.Image:
    """Decode a base64 string to PIL Image.

    Converts a base64-encoded image string back to a PIL Image object
    that can be displayed or processed further.

    Args:
        base64_data: Base64 encoded string of the image.

    Returns:
        PIL Image object of the decoded image.
    """
    # Decode the base64 string and convert to PIL Image
    image_data = base64.b64decode(base64_data)
    image_buffer = io.BytesIO(image_data)
    image = Image.open(image_buffer)

    return image


def get_response_from_llm_backend(
    message: Dict[str, Any],
    history: List[Dict[str, Any]],
) -> List[str | gr.Image]:
    """Send the message and history to the backend and get a response.

    Args:
        message: Dictionary containing the current message with 'text' and optional 'files' keys.
        history: List of previous message dictionaries in the conversation.

    Returns:
        List containing text response and any image attachments from the backend service.
    """
    # Extract files and convert to base64
    image_data = []
    if uploaded_files := message.get("files", []):
        for file_path in uploaded_files:
            image_data.append(encode_image_to_base64_and_get_mime_type(file_path))

    # Prepare the request payload
    payload = ChatRequest(
        text=message["text"],
        files=image_data,
        session_id="default_session",
        user_id="default_user",
    )

    # Send request to backend
    try:
        response = requests.post(SETTINGS.BACKEND_URL, json=payload.model_dump())
        response.raise_for_status()  # Raise exception for HTTP errors

        result = ChatResponse(**response.json())
        if result.error:
            return [f"Error: {result.error}"]

        chat_responses = []

        if result.thinking_process:
            chat_responses.append(
                gr.ChatMessage(
                    role="assistant",
                    content=result.thinking_process,
                    metadata={"title": "🧠 Thinking Process"},
                )
            )

        chat_responses.append(gr.ChatMessage(role="assistant", content=result.response))

        if result.attachments:
            for attachment in result.attachments:
                image_data = attachment.serialized_image
                chat_responses.append(gr.Image(decode_base64_to_image(image_data)))

        return chat_responses
    except requests.exceptions.RequestException as e:
        return [f"Error connecting to backend service: {str(e)}"]


if __name__ == "__main__":
    demo = gr.ChatInterface(
        get_response_from_llm_backend,
        title="Personal Expense Assistant",
        description="This assistant can help you to store receipts data, find receipts, and track your expenses during certain period.",
        type="messages",
        multimodal=True,
        textbox=gr.MultimodalTextbox(file_count="multiple", file_types=["image"]),
    )

    demo.launch(
        server_name="0.0.0.0",
        server_port=8080,
    )
After that, we can try running the frontend service with the following command. Don't forget to rename the main.py file into frontend.py
uv run frontend.py
You will see output similar to this one in your cloud console
* Running on local URL:  http://0.0.0.0:8080

To create a public link, set `share=True` in `launch()`.
After that you can check the web interface when you ctrl+click the local URL link. Alternatively, you also can access the frontend application by clicking on the Web Preview button on the top right side of the Cloud Editor, and select Preview on port 8080
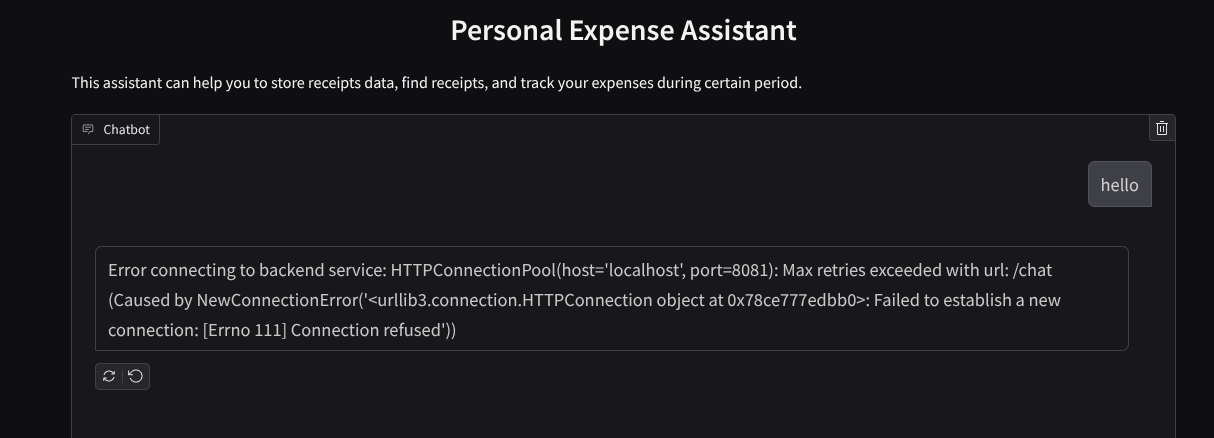
You will see the web interface, however you will get expected error when trying to submit chat due to backend service that is not being set up yet
Now, let the service run and don't kill it just yet. We will run the backend service in another terminal tab
Code Explanation
In this frontend code, first we enable the user to send text and upload multiple files. Gradio allow us to create this kind of functionality with gr.ChatInterface method combined with gr.MultimodalTextbox
Now before sending the file and the text to the backend, we need to figure out the mimetype of the file as it is needed by the backend. We also need to encode the image file byte into base64 and send it together with the mimetype.
class ImageData(BaseModel):
    """Model for image data with hash identifier.

    Attributes:
        serialized_image: Optional Base64 encoded string of the image content.
        mime_type: MIME type of the image.
    """

    serialized_image: str
    mime_type: str
The schema used for frontend - backend interaction is defined in schema.py. We utilize Pydantic BaseModel to enforce data validation in the schema
When receiving the response, we already separate which part is the thinking process, final response, and attachment. Thus we can utilize the Gradio component to display each component with the UI component.
class ChatResponse(BaseModel):
    """Model for a chat response.

    Attributes:
        response: The text response from the model.
        thinking_process: Optional thinking process of the model.
        attachments: List of image data to be displayed to the user.
        error: Optional error message if something went wrong.
    """

    response: str
    thinking_process: str = ""
    attachments: List[ImageData] = []
    error: Optional[str] = None
9. 🚀 Build Backend Service using FastAPI
Next, we will need to build the backend which can initialize our Agent together with the other components to be able to execute the agent runtime.
Create new file, and name it backend.py
touch backend.py
And copy the following code
from expense_manager_agent.agent import root_agent as expense_manager_agent
from google.adk.sessions import InMemorySessionService
from google.adk.runners import Runner
from google.adk.events import Event
from fastapi import FastAPI, Body, Depends
from typing import AsyncIterator
from types import SimpleNamespace
import uvicorn
from contextlib import asynccontextmanager
from utils import (
    extract_attachment_ids_and_sanitize_response,
    download_image_from_gcs,
    extract_thinking_process,
    format_user_request_to_adk_content_and_store_artifacts,
)
from schema import ImageData, ChatRequest, ChatResponse
import logger
from google.adk.artifacts import GcsArtifactService
from settings import get_settings

SETTINGS = get_settings()
APP_NAME = "expense_manager_app"


# Application state to hold service contexts
class AppContexts(SimpleNamespace):
    """A class to hold application contexts with attribute access"""

    session_service: InMemorySessionService = None
    artifact_service: GcsArtifactService = None
    expense_manager_agent_runner: Runner = None


# Initialize application state
app_contexts = AppContexts()


@asynccontextmanager
async def lifespan(app: FastAPI):
    # Initialize service contexts during application startup
    app_contexts.session_service = InMemorySessionService()
    app_contexts.artifact_service = GcsArtifactService(
        bucket_name=SETTINGS.STORAGE_BUCKET_NAME
    )
    app_contexts.expense_manager_agent_runner = Runner(
        agent=expense_manager_agent,  # The agent we want to run
        app_name=APP_NAME,  # Associates runs with our app
        session_service=app_contexts.session_service,  # Uses our session manager
        artifact_service=app_contexts.artifact_service,  # Uses our artifact manager
    )

    logger.info("Application started successfully")
    yield
    logger.info("Application shutting down")
    # Perform cleanup during application shutdown if necessary


# Helper function to get application state as a dependency
async def get_app_contexts() -> AppContexts:
    return app_contexts


# Create FastAPI app
app = FastAPI(title="Personal Expense Assistant API", lifespan=lifespan)


@app.post("/chat", response_model=ChatResponse)
async def chat(
    request: ChatRequest = Body(...),
    app_context: AppContexts = Depends(get_app_contexts),
) -> ChatResponse:
    """Process chat request and get response from the agent"""

    # Prepare the user's message in ADK format and store image artifacts
    content = await format_user_request_to_adk_content_and_store_artifacts(
        request=request,
        app_name=APP_NAME,
        artifact_service=app_context.artifact_service,
    )

    final_response_text = "Agent did not produce a final response."  # Default

    # Use the session ID from the request or default if not provided
    session_id = request.session_id
    user_id = request.user_id

    # Create session if it doesn't exist
    if not await app_context.session_service.get_session(
        app_name=APP_NAME, user_id=user_id, session_id=session_id
    ):
        await app_context.session_service.create_session(
            app_name=APP_NAME, user_id=user_id, session_id=session_id
        )

    try:
        # Process the message with the agent
        # Type annotation: runner.run_async returns an AsyncIterator[Event]
        events_iterator: AsyncIterator[Event] = (
            app_context.expense_manager_agent_runner.run_async(
                user_id=user_id, session_id=session_id, new_message=content
            )
        )
        async for event in events_iterator:  # event has type Event
            # Key Concept: is_final_response() marks the concluding message for the turn
            if event.is_final_response():
                if event.content and event.content.parts:
                    # Extract text from the first part
                    final_response_text = event.content.parts[0].text
                elif event.actions and event.actions.escalate:
                    # Handle potential errors/escalations
                    final_response_text = f"Agent escalated: {event.error_message or 'No specific message.'}"
                break  # Stop processing events once the final response is found

        logger.info(
            "Received final response from agent", raw_final_response=final_response_text
        )

        # Extract and process any attachments and thinking process in the response
        base64_attachments = []
        sanitized_text, attachment_ids = extract_attachment_ids_and_sanitize_response(
            final_response_text
        )
        sanitized_text, thinking_process = extract_thinking_process(sanitized_text)

        # Download images from GCS and replace hash IDs with base64 data
        for image_hash_id in attachment_ids:
            # Download image data and get MIME type
            result = await download_image_from_gcs(
                artifact_service=app_context.artifact_service,
                image_hash=image_hash_id,
                app_name=APP_NAME,
                user_id=user_id,
                session_id=session_id,
            )
            if result:
                base64_data, mime_type = result
                base64_attachments.append(
                    ImageData(serialized_image=base64_data, mime_type=mime_type)
                )

        logger.info(
            "Processed response with attachments",
            sanitized_response=sanitized_text,
            thinking_process=thinking_process,
            attachment_ids=attachment_ids,
        )

        return ChatResponse(
            response=sanitized_text,
            thinking_process=thinking_process,
            attachments=base64_attachments,
        )

    except Exception as e:
        logger.error("Error processing chat request", error_message=str(e))
        return ChatResponse(
            response="", error=f"Error in generating response: {str(e)}"
        )


# Only run the server if this file is executed directly
if __name__ == "__main__":
    uvicorn.run(app, host="0.0.0.0", port=8081)
After that we can try running the backend service. Remember that in the previous step we run the frontend service right, now we will need to open new terminal and try to run this backend service
- Create a new terminal. Navigate to your terminal in the bottom area and find the "+" button to create a new terminal. Alternatively you can do Ctrl + Shift + C to open new terminal

- After that, ensure that you are in the working directory personal-expense-assistant then run the following command
uv run backend.py
- If succeed, it will show output like this
INFO:     Started server process [xxxxx]
INFO:     Waiting for application startup.
INFO:     Application startup complete.
INFO:     Uvicorn running on http://0.0.0.0:8081 (Press CTRL+C to quit)
Code Explanation
Initializing ADK Agent, SessionService and ArtifactService
In order to run the agent in the backend service we will need to create a Runner which takes both SessionService and our agent. SessionService will manage conversation history and state, hence when integrated with Runner, it will give our agent capability to receive the ongoing conversations context.
We also utilize ArtifactService to handle the uploaded file. You can read more details about in here about ADK Session and Artifacts
...

@asynccontextmanager
async def lifespan(app: FastAPI):
    # Initialize service contexts during application startup
    app_contexts.session_service = InMemorySessionService()
    app_contexts.artifact_service = GcsArtifactService(
        bucket_name=SETTINGS.STORAGE_BUCKET_NAME
    )
    app_contexts.expense_manager_agent_runner = Runner(
        agent=expense_manager_agent,  # The agent we want to run
        app_name=APP_NAME,  # Associates runs with our app
        session_service=app_contexts.session_service,  # Uses our session manager
        artifact_service=app_contexts.artifact_service,  # Uses our artifact manager
    )

    logger.info("Application started successfully")
    yield
    logger.info("Application shutting down")
    # Perform cleanup during application shutdown if necessary

...
In this demo, we use InMemorySessionService and GcsArtifactService to be integrated with our agent Runner. As the conversation history is stored in memory, it will be lost once the backend service is killed or restarted. We initialize these inside the FastAPI application lifecycle to be injected as dependency in the /chat route.
Uploading and Downloading Image with GcsArtifactService
All the uploaded image will be stored as artifact by the GcsArtifactService, you can check this inside the format_user_request_to_adk_content_and_store_artifacts function inside utils.py
...

# Prepare the user's message in ADK format and store image artifacts
content = await asyncio.to_thread(
    format_user_request_to_adk_content_and_store_artifacts,
    request=request,
    app_name=APP_NAME,
    artifact_service=app_context.artifact_service,
)

...
All requests which will be processed by agent runner, need to be formatted into types.Content type. Inside the function, we also process each image data and extract its ID to be substituted with an Image ID placeholder.
Similar mechanism is employed to download the attachments after extracting the image IDs using regex:
...
sanitized_text, attachment_ids = extract_attachment_ids_and_sanitize_response(
    final_response_text
)
sanitized_text, thinking_process = extract_thinking_process(sanitized_text)

# Download images from GCS and replace hash IDs with base64 data
for image_hash_id in attachment_ids:
    # Download image data and get MIME type
    result = await asyncio.to_thread(
        download_image_from_gcs,
        artifact_service=app_context.artifact_service,
        image_hash=image_hash_id,
        app_name=APP_NAME,
        user_id=user_id,
        session_id=session_id,
    )
...
10. 🚀 Integration Test
Now, you should have multiple services run in different cloud console tabs:
- Frontend service run at port 8080
* Running on local URL:  http://0.0.0.0:8080

To create a public link, set `share=True` in `launch()`.
- Backend service run at port 8081
INFO:     Started server process [xxxxx]
INFO:     Waiting for application startup.
INFO:     Application startup complete.
INFO:     Uvicorn running on http://0.0.0.0:8081 (Press CTRL+C to quit)
At current state, you should be able to upload your receipt images and chat seamlessly with the assistant from the web application on the port 8080.
Click the Web Preview button on the top area of your Cloud Shell Editor and select Preview on port 8080
Now let's do some interaction with the assistant!
Download the following receipts. These receipt data date range is between year 2023-2024 and ask the assistant to store/upload it
- Receipt Drive ( source Hugging face datasets
mousserlane/id_receipt_dataset)
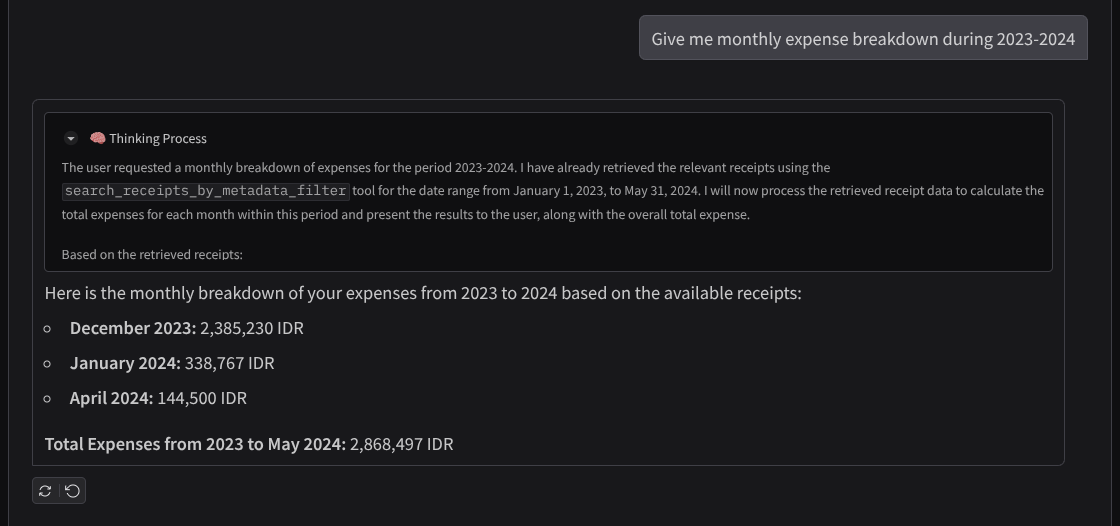
Ask various things
- "Give me monthly expense breakdown during 2023-2024"
- "Show me receipt for coffee transaction"
- "Give me receipt file from Yakiniku Like"
- Etc
Here is some snippet of successful interaction
11. 🚀 Deploying to Cloud Run
Now, of course we want to access this amazing app from anywhere. In order to do so, we can package this application and deploy it to Cloud Run. For the sake of this demo, this service will be exposed as a public service that can be accessed by others. However, keep in mind that this is not the best practice for this kind of application as this is more suitable for personal applications
In this codelab, we will put both frontend and backend service in 1 container. We will need the help of supervisord to manage both services. You can inspect the supervisord.conf file and check the Dockerfile that we set the supervisord as the entrypoint.
At this point, we already have all files needed to deploy our applications to Cloud Run, let's deploy it. Navigate to the Cloud Shell Terminal and make sure the current project is configured to your active project, if not you have use the gcloud configure command to set the project id:
gcloud config set project [PROJECT_ID]
Then, run the following command to deploy it to Cloud Run.
gcloud run deploy personal-expense-assistant \
                  --source . \
                  --port=8080 \
                  --allow-unauthenticated \
                  --env-vars-file=settings.yaml \
                  --memory 1024Mi \
                  --region us-central1
If you're prompted to acknowledge creation of an artifact registry for docker repository, just answer Y. Note that we are allowing unauthenticated access here because this is a demo application. Recommendation is to use appropriate authentication for your enterprise and production applications.
Once the deployment is complete, you should get a link similar to the below:
https://personal-expense-assistant-*******.us-central1.run.app
Go ahead and use your application from the Incognito window or your mobile device. It should be live already.
12. 🎯 Challenge
Now it is your time to shine and polish your exploration skills. Do you have what it takes to change the code so that the backend can accommodate multiple users? What components need to be updated?
13. 🧹 Clean up
To avoid incurring charges to your Google Cloud account for the resources used in this codelab, follow these steps:
- In the Google Cloud console, go to the Manage resources page.
- In the project list, select the project that you want to delete, and then click Delete.
- In the dialog, type the project ID, and then click Shut down to delete the project.
- Alternatively you can go to Cloud Run on the console, select the service you just deployed and delete.