
1. 📖 はじめに
個人的な費用をすべて管理するのが面倒で、イライラしたことはありませんか?私も!この Codelab では、Gemini 2.5 を活用して、すべての雑用をこなす個人用費用管理アシスタントを構築します。アップロードされた領収書の管理から、コーヒーを買うのに使いすぎたかどうかを分析することまで、
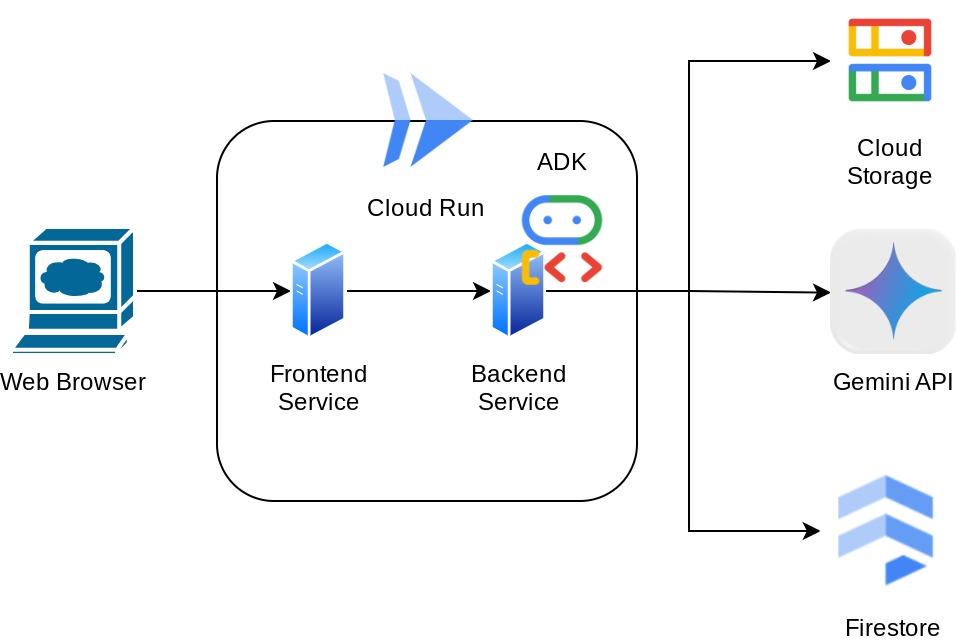
このアシスタントには、チャット ウェブ インターフェースの形式でウェブブラウザからアクセスできます。このインターフェースで、アシスタントと通信したり、領収書の画像をアップロードして保存を依頼したり、領収書を検索してファイルを取得し、経費分析を行ったりできます。これらはすべて、Google Agent Development Kit フレームワーク上に構築されています。
アプリケーション自体はフロントエンドとバックエンドの 2 つのサービスに分離されています。これにより、迅速なプロトタイプを作成してその感触を試すとともに、両方を統合するための API コントラクトの様子を把握できます。
この Codelab では、次の手順でアプローチします。
- Google Cloud プロジェクトを準備し、必要な API をすべて有効にする
- Google Cloud Storage にバケットをセットアップし、Firestore にデータベースをセットアップする
- Firestore インデックスを作成する
- コーディング環境のワークスペースを設定する
- ADK エージェントのソースコード、ツール、プロンプトなどの構造化
- ADK ローカル ウェブ開発 UI を使用してエージェントをテストする
- Gradio ライブラリを使用して、フロントエンド サービス(チャット インターフェース)をビルドし、クエリを送信して領収書の画像をアップロードします。
- FastAPI を使用してバックエンド サービス(HTTP サーバー)を構築します。このサーバーには、ADK エージェント コード、SessionService、Artifact Service が存在します。
- 環境変数を管理し、アプリケーションを Cloud Run にデプロイするために必要なファイルを設定する
- アプリケーションを Cloud Run にデプロイする
アーキテクチャの概要
前提条件
- Python の操作に慣れている
- HTTP サービスを使用した基本的なフルスタック アーキテクチャの理解
学習内容
- Gradio を使用したフロントエンド ウェブのプロトタイピング
- FastAPI と Pydantic を使用したバックエンド サービスの開発
- ADK エージェントの複数の機能を活用したアーキテクチャ
- ツールの使用
- セッションとアーティファクトの管理
- Gemini に送信する前の入力変更のコールバックの使用率
- BuiltInPlanner を活用してプランニングを行い、タスクの実行を改善する
- ADK ローカル ウェブ インターフェースによる迅速なデバッグ
- ADK コールバックを使用したプロンプト エンジニアリングと Gemini リクエストの変更による情報解析と取得を介したマルチモーダル インタラクションを最適化する戦略
- ベクトル データベースとして Firestore を使用したエージェント検索拡張生成
- Pydantic-settings を使用して YAML ファイルの環境変数を管理する
- Dockerfile を使用して Cloud Run にアプリケーションをデプロイし、YAML ファイルで環境変数を指定する
必要なもの
- Chrome ウェブブラウザ
- Gmail アカウント
- 課金が有効になっている Cloud プロジェクト
この Codelab は、初心者を含むあらゆるレベルのデベロッパーを対象としており、サンプル アプリケーションで Python を使用します。ただし、ここで説明するコンセプトを理解するために Python の知識は必要ありません。
2. 🚀 始める前に
Cloud コンソールでアクティブなプロジェクトを選択する
この Codelab では、課金が有効になっている Google Cloud プロジェクトがすでにあることを前提としています。まだお持ちでない場合は、以下の手順に沿って開始してください。
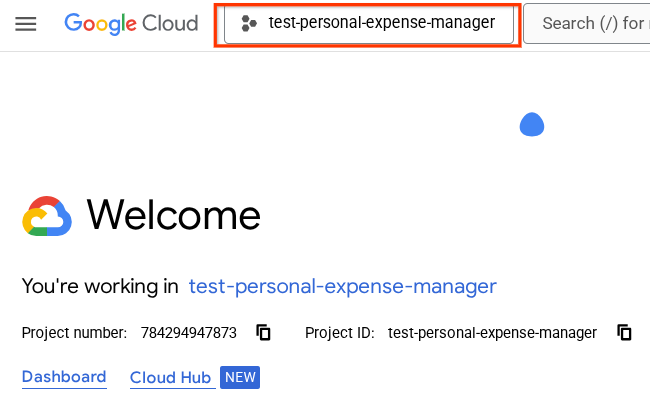
- Google Cloud コンソールのプロジェクト選択ページで、Google Cloud プロジェクトを選択または作成します。
- Cloud プロジェクトに対して課金が有効になっていることを確認します。詳しくは、プロジェクトで課金が有効になっているかどうかを確認する方法をご覧ください。
Firestore データベースを準備する
次に、Firestore データベースも作成する必要があります。ネイティブ モードの Firestore は、自動スケーリングと高パフォーマンスを実現し、アプリケーション開発を簡素化するように構築された NoSQL ドキュメント データベースです。また、ラボの検索拡張生成手法をサポートするベクトル データベースとしても機能します。
- 検索バーで「firestore」を検索し、Firestore プロダクトをクリックします。
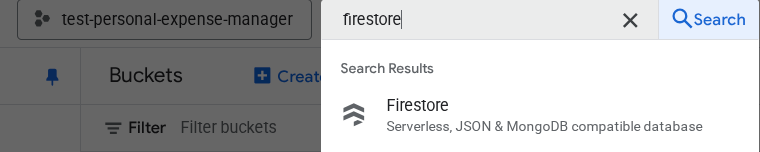
- [Firestore データベースを作成] ボタンをクリックします。
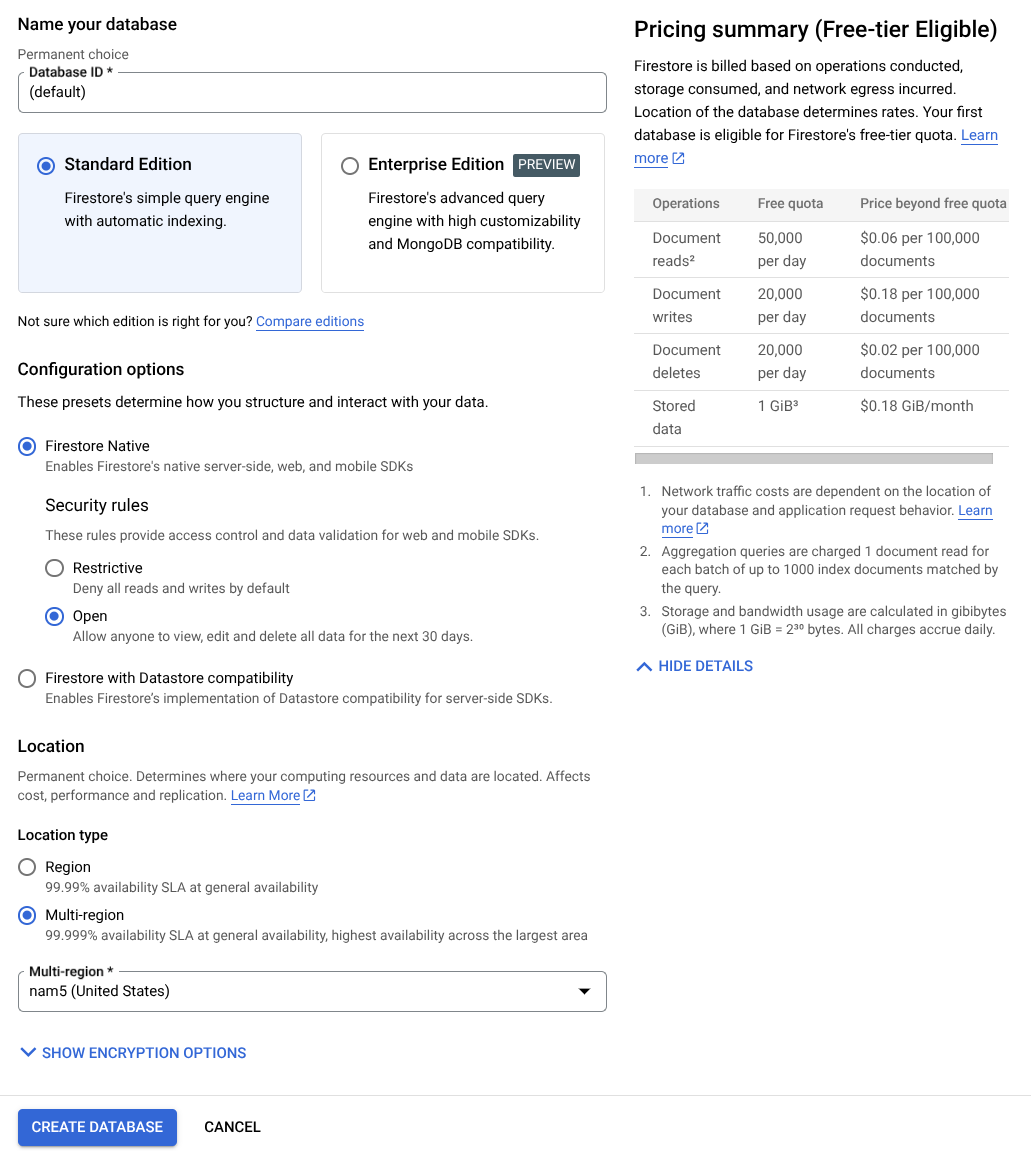
- データベース ID 名として [(default)] を使用し、[Standard Edition] を選択したままにします。このラボのデモでは、Firestore Native と Open セキュリティ ルールを使用します。
- このデータベースには、無料枠の使用量 YEAY! があることもわかります。[データベースを作成] ボタンをクリックします。
これらの手順を完了すると、作成した Firestore データベースにリダイレクトされます。
Cloud Shell ターミナルで Cloud プロジェクトを設定する
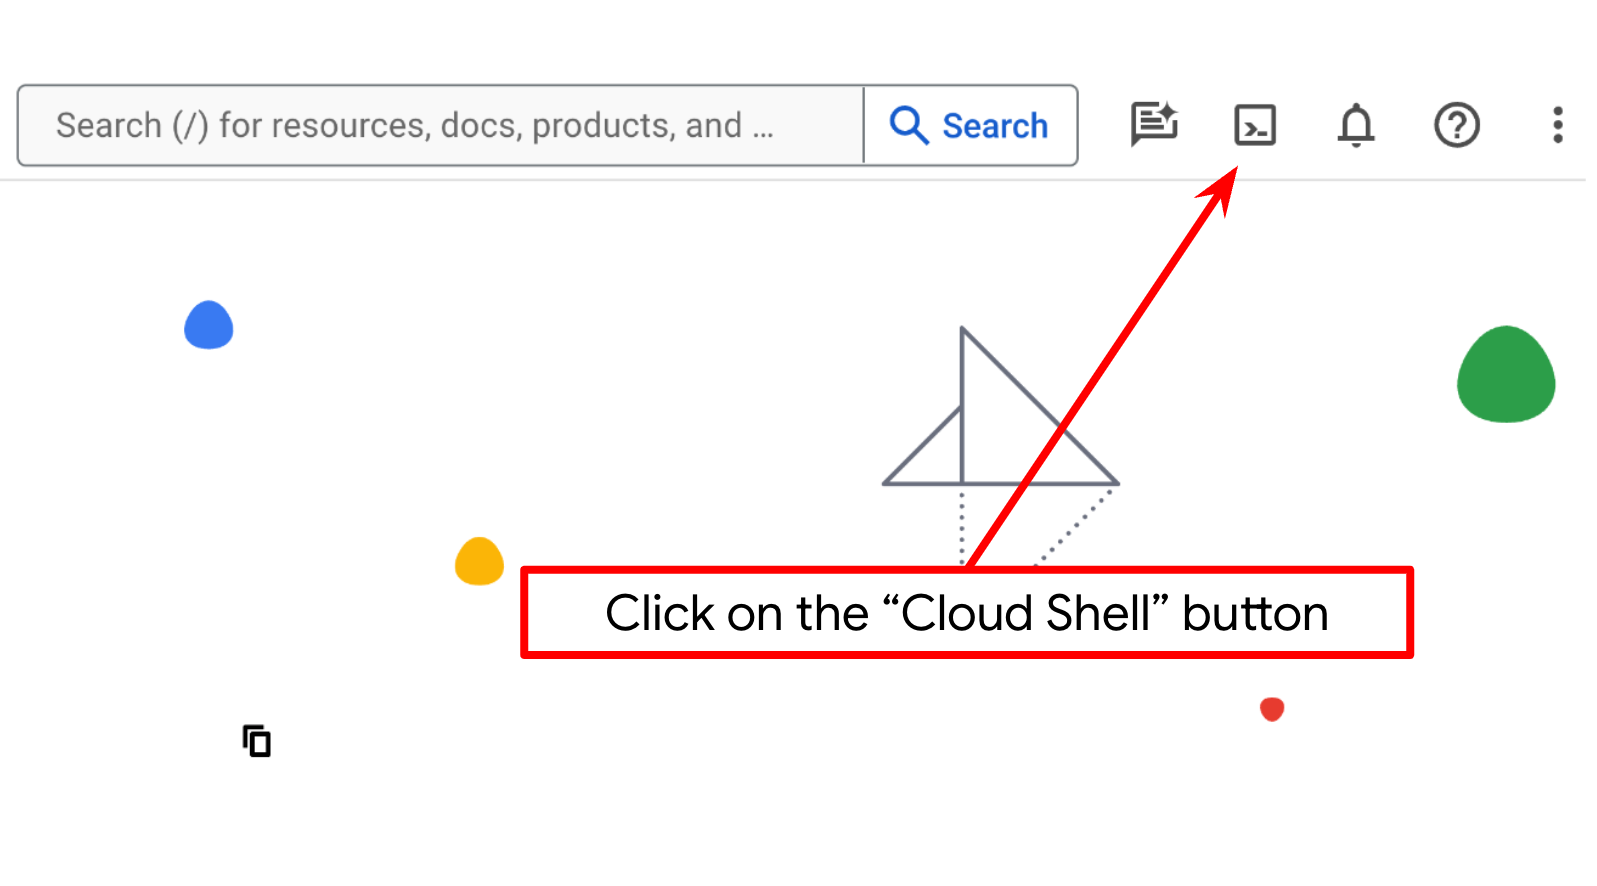
- Cloud Shell(Google Cloud で動作するコマンドライン環境)を使用します。この環境には bq がプリロードされています。Google Cloud コンソールの上部にある [Cloud Shell をアクティブにする] をクリックします。
- Cloud Shell に接続したら、次のコマンドを使用して、すでに認証済みであることと、プロジェクトがプロジェクト ID に設定されていることを確認します。
gcloud auth list
- Cloud Shell で次のコマンドを実行して、gcloud コマンドがプロジェクトを認識していることを確認します。
gcloud config list project
- プロジェクトが設定されていない場合は、次のコマンドを使用して設定します。
gcloud config set project <YOUR_PROJECT_ID>
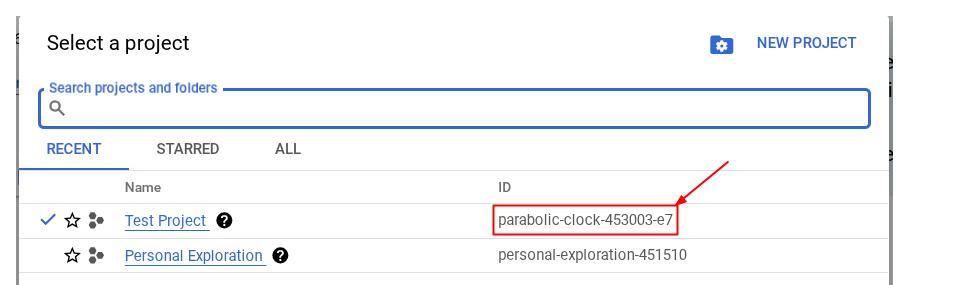
また、コンソールで PROJECT_ID ID を確認することもできます。

クリックすると、右側にすべてのプロジェクトとプロジェクト ID が表示されます。
- 次のコマンドを使用して、必要な API を有効にします。この処理には数分かかることがあります。
gcloud services enable aiplatform.googleapis.com \
                       firestore.googleapis.com \
                       run.googleapis.com \
                       cloudbuild.googleapis.com \
                       cloudresourcemanager.googleapis.com
コマンドが正常に実行されると、次のようなメッセージが表示されます。
Operation "operations/..." finished successfully.
gcloud コマンドの代わりに、コンソールで各プロダクトを検索するか、こちらのリンクを使用することもできます。
API が見つからない場合は、実装中にいつでも有効にできます。
gcloud コマンドとその使用方法については、ドキュメントをご覧ください。
Google Cloud Storage バケットを準備する
次に、同じターミナルから、アップロードされたファイルを保存する GCS バケットを準備する必要があります。次のコマンドを実行してバケットを作成します。個人費用アシスタントの領収書に関連する一意のバケット名が必要になるため、次のバケット名をプロジェクト ID と組み合わせて使用します。
gsutil mb -l us-central1 gs://personal-expense-{your-project-id}
次のような出力が表示されます。
Creating gs://personal-expense-{your-project-id}
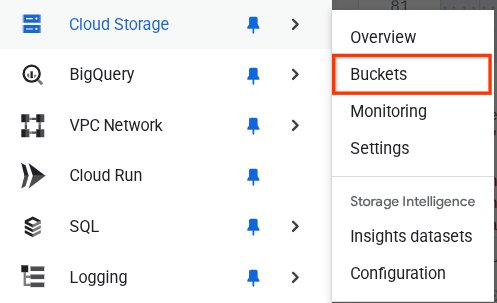
これを確認するには、ブラウザの左上にあるナビゲーション メニューに移動し、[Cloud Storage -> バケット] を選択します。
検索用の Firestore インデックスを作成する
Firestore はネイティブの NoSQL データベースであり、データモデルのパフォーマンスと柔軟性に優れていますが、複雑なクエリに関しては制限があります。複合マルチフィールド クエリとベクトル検索を利用する予定なので、まずインデックスを作成する必要があります。詳細については、こちらのドキュメントをご覧ください。
- 次のコマンドを実行して、複合クエリをサポートするインデックスを作成します。
gcloud firestore indexes composite create \
        --collection-group=personal-expense-assistant-receipts \
        --field-config field-path=total_amount,order=ASCENDING \
        --field-config field-path=transaction_time,order=ASCENDING \
        --field-config field-path=__name__,order=ASCENDING \
        --database="(default)"
- ベクトル検索をサポートするために、次のコマンドを実行します
gcloud firestore indexes composite create \
        --collection-group="personal-expense-assistant-receipts" \
        --query-scope=COLLECTION \
        --field-config field-path="embedding",vector-config='{"dimension":"768", "flat": "{}"}' \
        --database="(default)"
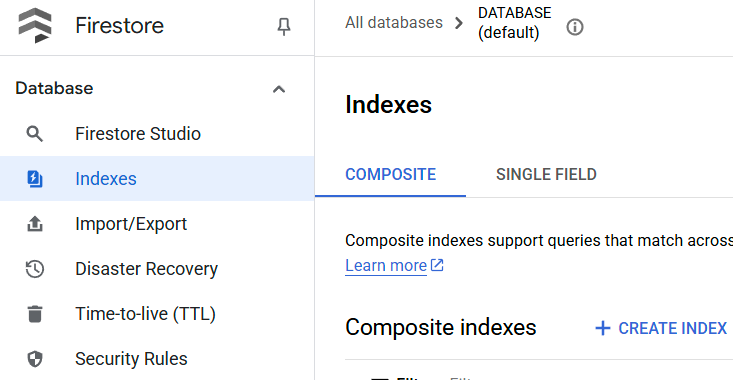
作成したインデックスを確認するには、Cloud コンソールで Firestore にアクセスし、[(デフォルト)] データベース インスタンスをクリックして、ナビゲーション バーで [インデックス] を選択します。
Cloud Shell エディタに移動してアプリケーションの作業ディレクトリを設定する
これで、コーディング作業を行うようにコードエディタを設定できます。これには Cloud Shell エディタを使用します。
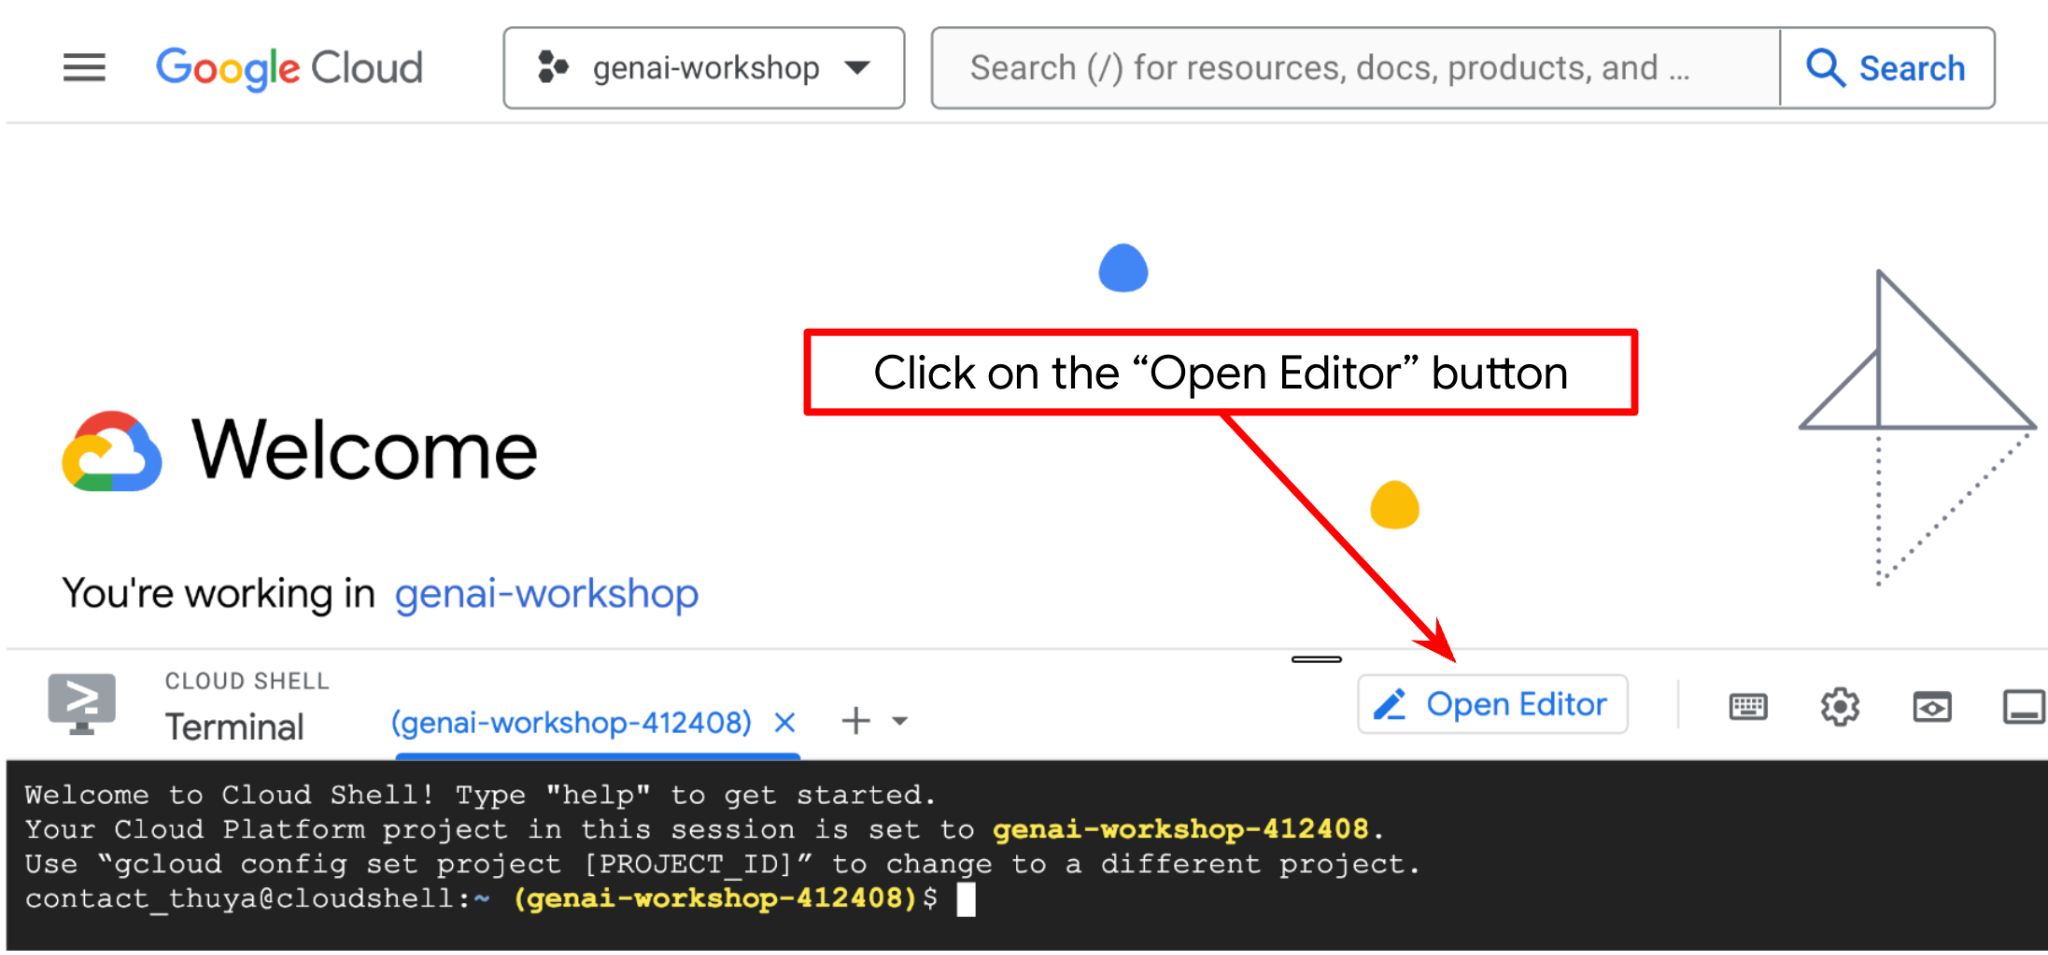
- [エディタを開く] ボタンをクリックすると、Cloud Shell エディタが開きます。ここにコードを記述できます。
- 次に、シェルが正しい プロジェクト ID にすでに構成されているかどうかを確認する必要があります。ターミナルの $アイコンの前に()内の値が表示されている場合(下のスクリーンショットでは値は "adk-multimodal-tool")、この値はアクティブなシェル セッション用に構成されたプロジェクトを示しています。

表示された値がすでに正しい場合は、次のコマンドをスキップできます。正しくない場合や欠落している場合は、次のコマンドを実行します。
gcloud config set project <YOUR_PROJECT_ID>
- 次に、GitHub からこの Codelab のテンプレート作業ディレクトリのクローンを作成します。次のコマンドを実行します。作業ディレクトリが personal-expense-assistant ディレクトリに作成されます。
git clone https://github.com/alphinside/personal-expense-assistant-adk-codelab-starter.git personal-expense-assistant
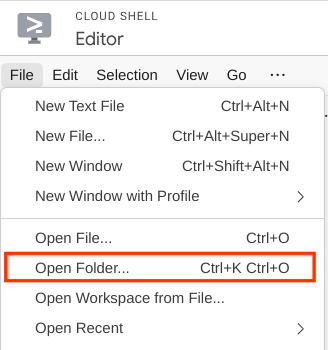
- 次に、Cloud Shell エディタの上部にある [File->Open Folder] をクリックし、username ディレクトリを見つけて、personal-expense-assistant ディレクトリを見つけてから、[OK] ボタンをクリックします。これにより、選択したディレクトリがメインの作業ディレクトリになります。この例では、ユーザー名は alvinprayuda であるため、ディレクトリ パスは次のようになります。

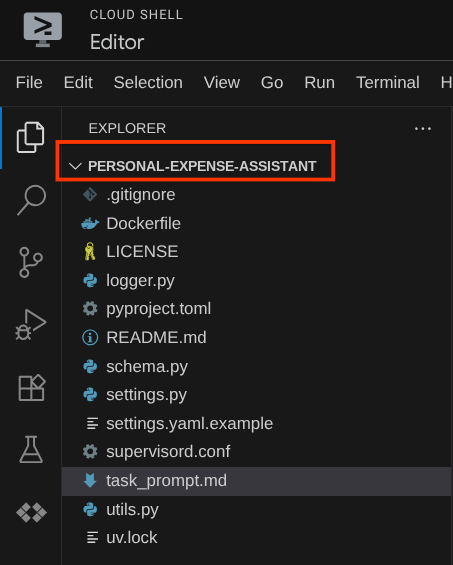
Cloud Shell エディタは次のようになります。
環境の設定
Python 仮想環境を準備する
次のステップは、開発環境を準備することです。現在アクティブなターミナルは、personal-expense-assistant 作業ディレクトリ内にある必要があります。この Codelab では Python 3.12 を使用し、uv Python プロジェクト マネージャーを使用して、Python のバージョンと仮想環境の作成と管理の必要性を簡素化します。
- ターミナルをまだ開いていない場合は、[ターミナル] -> [新しいターミナル] をクリックして開くか、Ctrl+Shift+C を使用します。ブラウザの下部にターミナル ウィンドウが開きます。

uvを使用して仮想環境を初期化します。次のコマンドを実行します。
cd ~/personal-expense-assistant
uv sync --frozen
これにより、.venv ディレクトリが作成され、依存関係がインストールされます。pyproject.toml の簡単なプレビューで、次のように表示される依存関係に関する情報を確認できます。
dependencies = [
    "datasets>=3.5.0",
    "google-adk==1.18",
    "google-cloud-firestore>=2.20.1",
    "gradio>=5.23.1",
    "pydantic>=2.10.6",
    "pydantic-settings[yaml]>=2.8.1",
]
設定構成ファイル
次に、このプロジェクトの構成ファイルを設定する必要があります。pydantic-settings を使用して、YAML ファイルから構成を読み取ります。
ファイル テンプレートは settings.yaml.example の中に用意されているため、このファイルをコピーして settings.yaml に名前を変更する必要があります。次のコマンドを実行してファイルを作成します。
cp settings.yaml.example settings.yaml
次に、次の値をファイルにコピーします。
GCLOUD_LOCATION: "us-central1"
GCLOUD_PROJECT_ID: "your-project-id"
BACKEND_URL: "http://localhost:8081/chat"
STORAGE_BUCKET_NAME: "personal-expense-{your-project-id}"
DB_COLLECTION_NAME: "personal-expense-assistant-receipts"
この Codelab では、GCLOUD_LOCATION, BACKEND_URL, と DB_COLLECTION_NAME の事前構成済みの値を使用します。
これで、次のステップに進み、エージェントとサービスを構築できます。
3. 🚀 Google ADK と Gemini 2.5 を使用してエージェントを構築する
ADK のディレクトリ構造の概要
まず、ADK の機能とエージェントの構築方法について説明します。ADK の完全なドキュメントは、こちらの URL でご覧いただけます。ADK は、CLI コマンド実行内で多くのユーティリティを提供します。以下に例を示します。
- エージェント ディレクトリ構造を設定する
- CLI の入出力でインタラクションをすばやく試す
- ローカル開発 UI ウェブ インターフェースをすばやく設定する
次に、CLI コマンドを使用してエージェント ディレクトリ構造を作成します。次のコマンドを実行します。
uv run adk create expense_manager_agent
プロンプトが表示されたら、モデル gemini-2.5-flash と Vertex AI バックエンドを選択します。ウィザードでプロジェクト ID とロケーションの入力を求められます。Enter キーを押してデフォルト オプションをそのまま使用するか、必要に応じて変更します。このラボで先ほど作成した正しいプロジェクト ID を使用していることを確認してください。出力は次のようになります。
Choose a model for the root agent:
1. gemini-2.5-flash
2. Other models (fill later)
Choose model (1, 2): 1
1. Google AI
2. Vertex AI
Choose a backend (1, 2): 2

You need an existing Google Cloud account and project, check out this link for details:
https://google.github.io/adk-docs/get-started/quickstart/#gemini---google-cloud-vertex-ai

Enter Google Cloud project ID [going-multimodal-lab]:
Enter Google Cloud region [us-central1]:

Agent created in /home/username/personal-expense-assistant/expense_manager_agent:
- .env
- __init__.py
- agent.py
次のエージェント ディレクトリ構造が作成されます。
expense_manager_agent/
├── __init__.py
├── .env
├── agent.py
init.py と agent.py を調べると、次のコードが表示されます。
# __init__.py

from . import agent
# agent.py

from google.adk.agents import Agent

root_agent = Agent(
    model='gemini-2.5-flash',
    name='root_agent',
    description='A helpful assistant for user questions.',
    instruction='Answer user questions to the best of your knowledge',
)
これで、次のコマンドを実行してテストできます。
uv run adk run expense_manager_agent
テストが完了したら、exit と入力するか、Ctrl+D キーを押してエージェントを終了できます。
費用管理エージェントの構築
経費管理エージェントを構築してみましょう。expense_manager_agent/agent.py ファイルを開き、root_agent を含む次のコードをコピーします。
# expense_manager_agent/agent.py

from google.adk.agents import Agent
from expense_manager_agent.tools import (
    store_receipt_data,
    search_receipts_by_metadata_filter,
    search_relevant_receipts_by_natural_language_query,
    get_receipt_data_by_image_id,
)
from expense_manager_agent.callbacks import modify_image_data_in_history
import os
from settings import get_settings
from google.adk.planners import BuiltInPlanner
from google.genai import types

SETTINGS = get_settings()
os.environ["GOOGLE_CLOUD_PROJECT"] = SETTINGS.GCLOUD_PROJECT_ID
os.environ["GOOGLE_CLOUD_LOCATION"] = SETTINGS.GCLOUD_LOCATION
os.environ["GOOGLE_GENAI_USE_VERTEXAI"] = "TRUE"

# Get the code file directory path and read the task prompt file
current_dir = os.path.dirname(os.path.abspath(__file__))
prompt_path = os.path.join(current_dir, "task_prompt.md")
with open(prompt_path, "r") as file:
    task_prompt = file.read()

root_agent = Agent(
    name="expense_manager_agent",
    model="gemini-2.5-flash",
    description=(
        "Personal expense agent to help user track expenses, analyze receipts, and manage their financial records"
    ),
    instruction=task_prompt,
    tools=[
        store_receipt_data,
        get_receipt_data_by_image_id,
        search_receipts_by_metadata_filter,
        search_relevant_receipts_by_natural_language_query,
    ],
    planner=BuiltInPlanner(
        thinking_config=types.ThinkingConfig(
            thinking_budget=2048,
        )
    ),
    before_model_callback=modify_image_data_in_history,
)
コードの説明
このスクリプトには、次のものを初期化するエージェントの初期化が含まれています。
- 使用するモデルを
gemini-2.5-flashに設定する - エージェントの説明と指示を、
task_prompt.mdから読み取られるシステム プロンプトとして設定します。 - エージェントの機能をサポートするために必要なツールを提供する
- Gemini 2.5 Flash の思考機能を使用して、最終的なレスポンスや実行を生成する前にプランニングを有効にする
- Gemini にリクエストを送信する前にコールバック インターセプトを設定して、予測を行う前に送信される画像データの数を制限
4. 🚀 エージェント ツールを構成する
経費管理エージェントには、次の機能があります。
- 領収書の画像からデータを抽出し、データとファイルを保存する
- 費用データの完全一致検索
- 費用データに対するコンテキスト検索
そのため、この機能をサポートする適切なツールが必要です。expense_manager_agent ディレクトリに新しいファイルを作成し、tools.py という名前を付けます。
touch expense_manager_agent/tools.py
expense_manage_agent/tools.py を開き、次のコードをコピーします。
# expense_manager_agent/tools.py

import datetime
from typing import Dict, List, Any
from google.cloud import firestore
from google.cloud.firestore_v1.vector import Vector
from google.cloud.firestore_v1 import FieldFilter
from google.cloud.firestore_v1.base_query import And
from google.cloud.firestore_v1.base_vector_query import DistanceMeasure
from settings import get_settings
from google import genai

SETTINGS = get_settings()
DB_CLIENT = firestore.Client(
    project=SETTINGS.GCLOUD_PROJECT_ID
)  # Will use "(default)" database
COLLECTION = DB_CLIENT.collection(SETTINGS.DB_COLLECTION_NAME)
GENAI_CLIENT = genai.Client(
    vertexai=True, location=SETTINGS.GCLOUD_LOCATION, project=SETTINGS.GCLOUD_PROJECT_ID
)
EMBEDDING_DIMENSION = 768
EMBEDDING_FIELD_NAME = "embedding"
INVALID_ITEMS_FORMAT_ERR = """
Invalid items format. Must be a list of dictionaries with 'name', 'price', and 'quantity' keys."""
RECEIPT_DESC_FORMAT = """
Store Name: {store_name}
Transaction Time: {transaction_time}
Total Amount: {total_amount}
Currency: {currency}
Purchased Items:
{purchased_items}
Receipt Image ID: {receipt_id}
"""


def sanitize_image_id(image_id: str) -> str:
    """Sanitize image ID by removing any leading/trailing whitespace."""
    if image_id.startswith("[IMAGE-"):
        image_id = image_id.split("ID ")[1].split("]")[0]

    return image_id.strip()


def store_receipt_data(
    image_id: str,
    store_name: str,
    transaction_time: str,
    total_amount: float,
    purchased_items: List[Dict[str, Any]],
    currency: str = "IDR",
) -> str:
    """
    Store receipt data in the database.

    Args:
        image_id (str): The unique identifier of the image. For example IMAGE-POSITION 0-ID 12345,
            the ID of the image is 12345.
        store_name (str): The name of the store.
        transaction_time (str): The time of purchase, in ISO format ("YYYY-MM-DDTHH:MM:SS.ssssssZ").
        total_amount (float): The total amount spent.
        purchased_items (List[Dict[str, Any]]): A list of items purchased with their prices. Each item must have:
            - name (str): The name of the item.
            - price (float): The price of the item.
            - quantity (int, optional): The quantity of the item. Defaults to 1 if not provided.
        currency (str, optional): The currency of the transaction, can be derived from the store location.
            If unsure, default is "IDR".

    Returns:
        str: A success message with the receipt ID.

    Raises:
        Exception: If the operation failed or input is invalid.
    """
    try:
        # In case of it provide full image placeholder, extract the id string
        image_id = sanitize_image_id(image_id)

        # Check if the receipt already exists
        doc = get_receipt_data_by_image_id(image_id)

        if doc:
            return f"Receipt with ID {image_id} already exists"

        # Validate transaction time
        if not isinstance(transaction_time, str):
            raise ValueError(
                "Invalid transaction time: must be a string in ISO format 'YYYY-MM-DDTHH:MM:SS.ssssssZ'"
            )
        try:
            datetime.datetime.fromisoformat(transaction_time.replace("Z", "+00:00"))
        except ValueError:
            raise ValueError(
                "Invalid transaction time format. Must be in ISO format 'YYYY-MM-DDTHH:MM:SS.ssssssZ'"
            )

        # Validate items format
        if not isinstance(purchased_items, list):
            raise ValueError(INVALID_ITEMS_FORMAT_ERR)

        for _item in purchased_items:
            if (
                not isinstance(_item, dict)
                or "name" not in _item
                or "price" not in _item
            ):
                raise ValueError(INVALID_ITEMS_FORMAT_ERR)

            if "quantity" not in _item:
                _item["quantity"] = 1

        # Create a combined text from all receipt information for better embedding
        result = GENAI_CLIENT.models.embed_content(
            model="text-embedding-004",
            contents=RECEIPT_DESC_FORMAT.format(
                store_name=store_name,
                transaction_time=transaction_time,
                total_amount=total_amount,
                currency=currency,
                purchased_items=purchased_items,
                receipt_id=image_id,
            ),
        )

        embedding = result.embeddings[0].values

        doc = {
            "receipt_id": image_id,
            "store_name": store_name,
            "transaction_time": transaction_time,
            "total_amount": total_amount,
            "currency": currency,
            "purchased_items": purchased_items,
            EMBEDDING_FIELD_NAME: Vector(embedding),
        }

        COLLECTION.add(doc)

        return f"Receipt stored successfully with ID: {image_id}"
    except Exception as e:
        raise Exception(f"Failed to store receipt: {str(e)}")


def search_receipts_by_metadata_filter(
    start_time: str,
    end_time: str,
    min_total_amount: float = -1.0,
    max_total_amount: float = -1.0,
) -> str:
    """
    Filter receipts by metadata within a specific time range and optionally by amount.

    Args:
        start_time (str): The start datetime for the filter (in ISO format, e.g. 'YYYY-MM-DDTHH:MM:SS.ssssssZ').
        end_time (str): The end datetime for the filter (in ISO format, e.g. 'YYYY-MM-DDTHH:MM:SS.ssssssZ').
        min_total_amount (float): The minimum total amount for the filter (inclusive). Defaults to -1.
        max_total_amount (float): The maximum total amount for the filter (inclusive). Defaults to -1.

    Returns:
        str: A string containing the list of receipt data matching all applied filters.

    Raises:
        Exception: If the search failed or input is invalid.
    """
    try:
        # Validate start and end times
        if not isinstance(start_time, str) or not isinstance(end_time, str):
            raise ValueError("start_time and end_time must be strings in ISO format")
        try:
            datetime.datetime.fromisoformat(start_time.replace("Z", "+00:00"))
            datetime.datetime.fromisoformat(end_time.replace("Z", "+00:00"))
        except ValueError:
            raise ValueError("start_time and end_time must be strings in ISO format")

        # Start with the base collection reference
        query = COLLECTION

        # Build the composite query by properly chaining conditions
        # Notes that this demo assume 1 user only,
        # need to refactor the query for multiple user
        filters = [
            FieldFilter("transaction_time", ">=", start_time),
            FieldFilter("transaction_time", "<=", end_time),
        ]

        # Add optional filters
        if min_total_amount != -1:
            filters.append(FieldFilter("total_amount", ">=", min_total_amount))

        if max_total_amount != -1:
            filters.append(FieldFilter("total_amount", "<=", max_total_amount))

        # Apply the filters
        composite_filter = And(filters=filters)
        query = query.where(filter=composite_filter)

        # Execute the query and collect results
        search_result_description = "Search by Metadata Results:\n"
        for doc in query.stream():
            data = doc.to_dict()
            data.pop(
                EMBEDDING_FIELD_NAME, None
            )  # Remove embedding as it's not needed for display

            search_result_description += f"\n{RECEIPT_DESC_FORMAT.format(**data)}"

        return search_result_description
    except Exception as e:
        raise Exception(f"Error filtering receipts: {str(e)}")


def search_relevant_receipts_by_natural_language_query(
    query_text: str, limit: int = 5
) -> str:
    """
    Search for receipts with content most similar to the query using vector search.
    This tool can be use for user query that is difficult to translate into metadata filters.
    Such as store name or item name which sensitive to string matching.
    Use this tool if you cannot utilize the search by metadata filter tool.

    Args:
        query_text (str): The search text (e.g., "coffee", "dinner", "groceries").
        limit (int, optional): Maximum number of results to return (default: 5).

    Returns:
        str: A string containing the list of contextually relevant receipt data.

    Raises:
        Exception: If the search failed or input is invalid.
    """
    try:
        # Generate embedding for the query text
        result = GENAI_CLIENT.models.embed_content(
            model="text-embedding-004", contents=query_text
        )
        query_embedding = result.embeddings[0].values

        # Notes that this demo assume 1 user only,
        # need to refactor the query for multiple user
        vector_query = COLLECTION.find_nearest(
            vector_field=EMBEDDING_FIELD_NAME,
            query_vector=Vector(query_embedding),
            distance_measure=DistanceMeasure.EUCLIDEAN,
            limit=limit,
        )

        # Execute the query and collect results
        search_result_description = "Search by Contextual Relevance Results:\n"
        for doc in vector_query.stream():
            data = doc.to_dict()
            data.pop(
                EMBEDDING_FIELD_NAME, None
            )  # Remove embedding as it's not needed for display
            search_result_description += f"\n{RECEIPT_DESC_FORMAT.format(**data)}"

        return search_result_description
    except Exception as e:
        raise Exception(f"Error searching receipts: {str(e)}")


def get_receipt_data_by_image_id(image_id: str) -> Dict[str, Any]:
    """
    Retrieve receipt data from the database using the image_id.

    Args:
        image_id (str): The unique identifier of the receipt image. For example, if the placeholder is
            [IMAGE-ID 12345], the ID to use is 12345.

    Returns:
        Dict[str, Any]: A dictionary containing the receipt data with the following keys:
            - receipt_id (str): The unique identifier of the receipt image.
            - store_name (str): The name of the store.
            - transaction_time (str): The time of purchase in UTC.
            - total_amount (float): The total amount spent.
            - currency (str): The currency of the transaction.
            - purchased_items (List[Dict[str, Any]]): List of items purchased with their details.
        Returns an empty dictionary if no receipt is found.
    """
    # In case of it provide full image placeholder, extract the id string
    image_id = sanitize_image_id(image_id)

    # Query the receipts collection for documents with matching receipt_id (image_id)
    # Notes that this demo assume 1 user only,
    # need to refactor the query for multiple user
    query = COLLECTION.where(filter=FieldFilter("receipt_id", "==", image_id)).limit(1)
    docs = list(query.stream())

    if not docs:
        return {}

    # Get the first matching document
    doc_data = docs[0].to_dict()
    doc_data.pop(EMBEDDING_FIELD_NAME, None)

    return doc_data
コードの説明
このツール関数実装では、次の 2 つの主なアイデアに基づいてツールを設計します。
- 領収書データを解析し、画像 ID 文字列プレースホルダ
[IMAGE-ID <hash-of-image-1>]を使用して元のファイルにマッピングします - Firestore データベースを使用したデータの保存と取得
ツール「store_receipt_data」
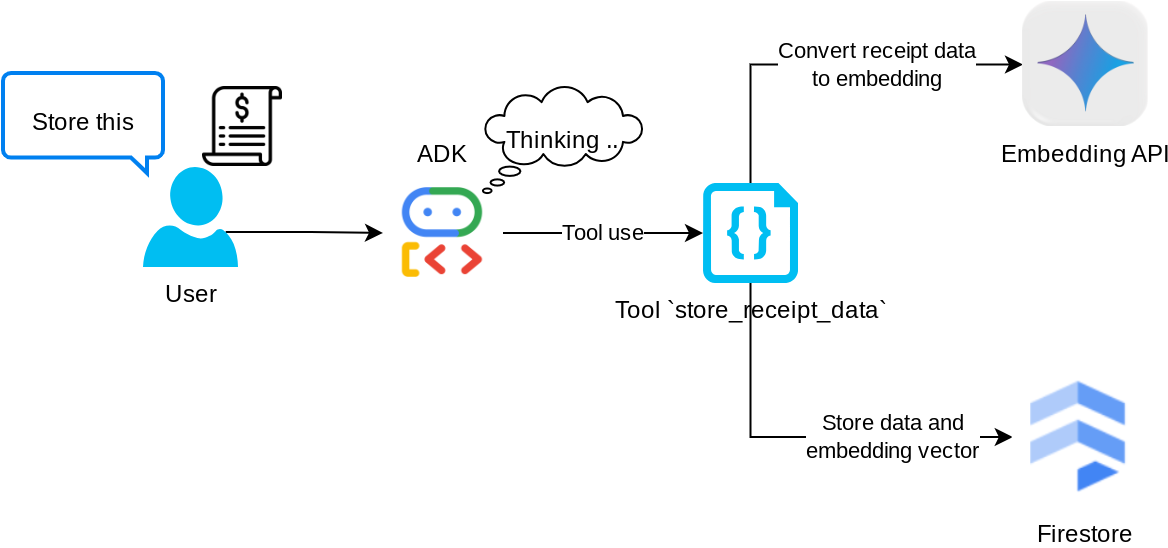
このツールは光学文字認識ツールです。画像データから必要な情報を解析し、画像 ID 文字列を認識して、それらを一緒にマッピングして Firestore データベースに保存します。
また、このツールは text-embedding-004 を使用して領収書のコンテンツをエンベディングに変換し、すべてのメタデータとエンベディングを一緒に保存してインデックス登録します。クエリ検索またはコンテキスト検索で柔軟に取得できるようにします。
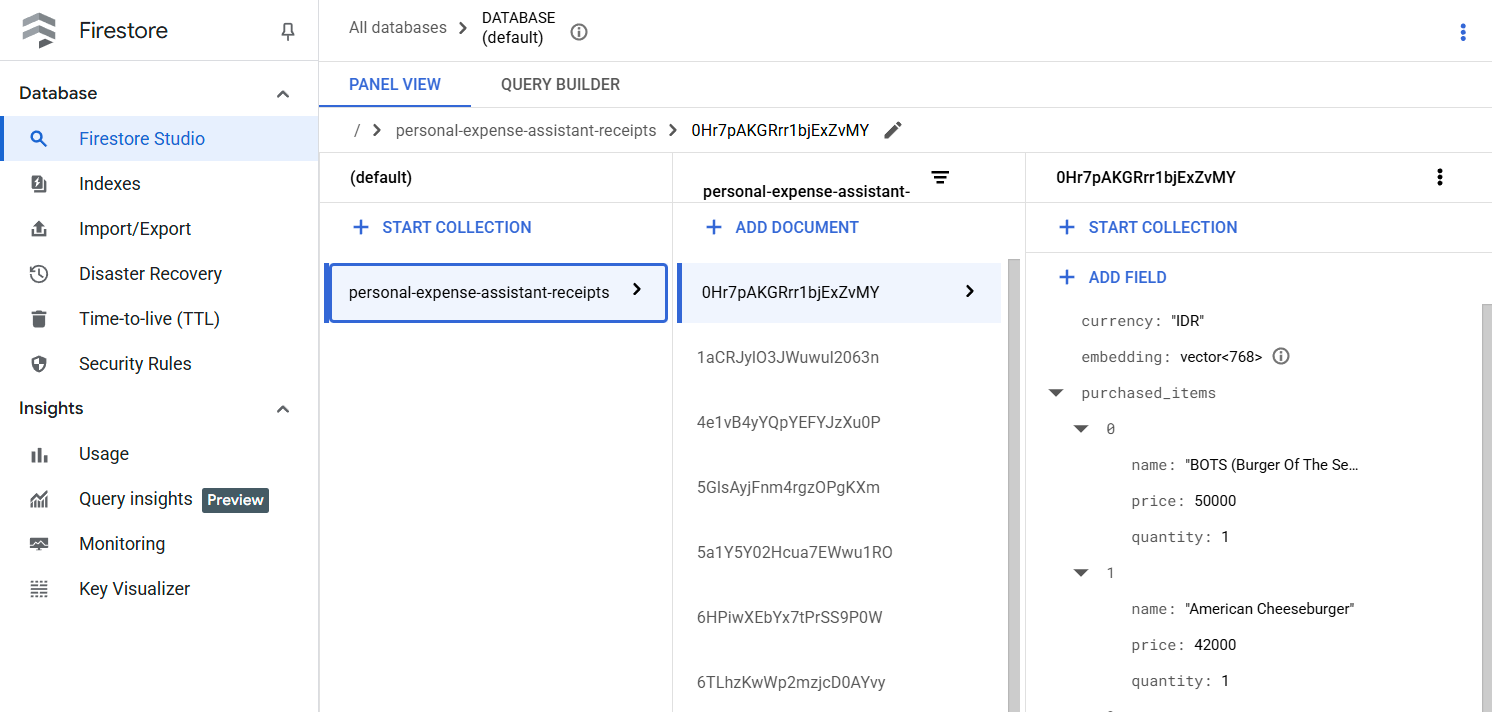
このツールを正常に実行すると、次のように Firestore データベースにすでにインデックス登録されている領収書データを確認できます。
ツール「search_receipts_by_metadata_filter」
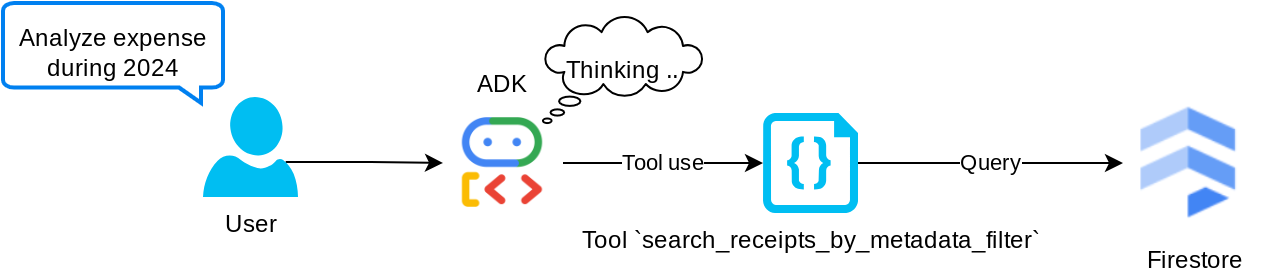
このツールは、ユーザーのクエリをメタデータ クエリ フィルタに変換します。このフィルタは、期間や合計トランザクションによる検索をサポートしています。一致するすべての領収書データが返されます。このプロセスでは、エージェントがコンテキストを理解するために必要ないため、エンベディング フィールドが削除されます。
ツール「search_relevant_receipts_by_natural_language_query」
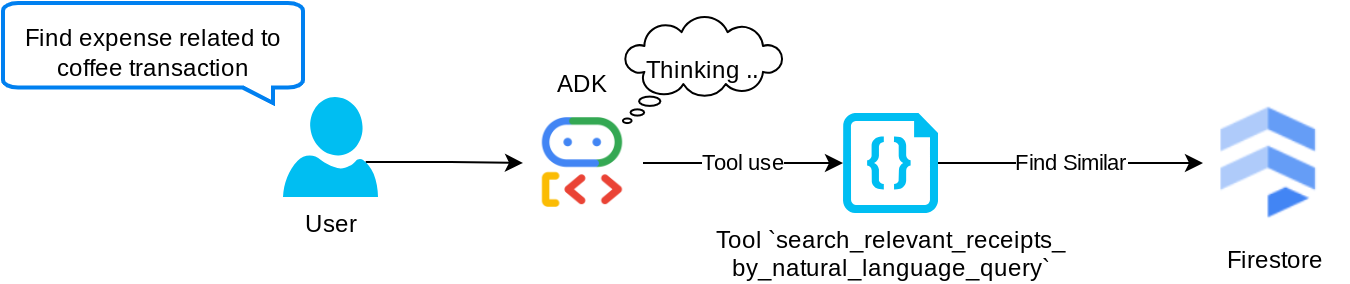
これは、検索拡張生成(RAG)ツールです。Google のエージェントには、ベクトル データベースから関連する領収書を取得するための独自のクエリを設計する機能があり、このツールを使用するタイミングを選択することもできます。エージェントがこの RAG ツールを使用するかどうかを独自に判断し、独自のクエリを設計できるようにするという概念は、エージェント RAG アプローチの定義の 1 つです。
独自のクエリを構築できるだけでなく、取得する関連ドキュメントの数を選択することもできます。適切なプロンプト エンジニアリングと組み合わせます。例:
# Example prompt

Always filter the result from tool
search_relevant_receipts_by_natural_language_query as the returned
result may contain irrelevant information
このツールは、ほぼすべてのものを検索できる強力なツールになりますが、最近傍検索の性質上、期待どおりの結果がすべて返されるとは限りません。
5. 🚀 コールバックによる会話コンテキストの変更
Google ADK を使用すると、さまざまなレベルでエージェントのランタイムを「インターセプト」できます。この機能の詳細については、こちらのドキュメントをご覧ください。このラボでは、before_model_callback を使用して、LLM に送信する前にリクエストを変更し、古い会話履歴のコンテキストから画像データを削除します(効率を高めるため、最後の 3 回のユーザー インタラクションの画像データのみを含めます)。
ただし、必要に応じてエージェントが画像データのコンテキストを取得できるようにする必要があります。そのため、会話内の各画像バイトデータの後に文字列画像 ID プレースホルダを追加するメカニズムを追加します。これにより、エージェントは画像 ID を実際のファイルデータにリンクさせることができます。このデータは、画像の保存時と取得時の両方で利用できます。構造は次のようになります。
<image-byte-data-1>
[IMAGE-ID <hash-of-image-1>]
<image-byte-data-2>
[IMAGE-ID <hash-of-image-2>]
And so on..
また、会話履歴内のバイトデータが古くなっても、文字列識別子は残っているため、ツールを使用することで引き続きデータアクセスできます。画像データ削除後の履歴構造の例
[IMAGE-ID <hash-of-image-1>]
[IMAGE-ID <hash-of-image-2>]
And so on..
それでは、始めましょう。expense_manager_agent ディレクトリに新しいファイルを作成し、callbacks.py という名前を付けます。
touch expense_manager_agent/callbacks.py
expense_manager_agent/callbacks.py ファイルを開き、次のコードをコピーします。
# expense_manager_agent/callbacks.py

import hashlib
from google.genai import types
from google.adk.agents.callback_context import CallbackContext
from google.adk.models.llm_request import LlmRequest


def modify_image_data_in_history(
    callback_context: CallbackContext, llm_request: LlmRequest
) -> None:
    # The following code will modify the request sent to LLM
    # We will only keep image data in the last 3 user messages using a reverse and counter approach

    # Count how many user messages we've processed
    user_message_count = 0

    # Process the reversed list
    for content in reversed(llm_request.contents):
        # Only count for user manual query, not function call
        if (content.role == "user") and (content.parts[0].function_response is None):
            user_message_count += 1
            modified_content_parts = []

            # Check any missing image ID placeholder for any image data
            # Then remove image data from conversation history if more than 3 user messages
            for idx, part in enumerate(content.parts):
                if part.inline_data is None:
                    modified_content_parts.append(part)
                    continue

                if (
                    (idx + 1 >= len(content.parts))
                    or (content.parts[idx + 1].text is None)
                    or (not content.parts[idx + 1].text.startswith("[IMAGE-ID "))
                ):
                    # Generate hash ID for the image and add a placeholder
                    image_data = part.inline_data.data
                    hasher = hashlib.sha256(image_data)
                    image_hash_id = hasher.hexdigest()[:12]
                    placeholder = f"[IMAGE-ID {image_hash_id}]"

                    # Only keep image data in the last 3 user messages
                    if user_message_count <= 3:
                        modified_content_parts.append(part)

                    modified_content_parts.append(types.Part(text=placeholder))

                else:
                    # Only keep image data in the last 3 user messages
                    if user_message_count <= 3:
                        modified_content_parts.append(part)

            # This will modify the contents inside the llm_request
            content.parts = modified_content_parts
6. 🚀 プロンプト
複雑なインタラクションと機能を備えたエージェントを設計するには、エージェントをガイドして、望ましい動作をさせることができる十分なプロンプトを見つける必要があります。
以前は、会話履歴で画像データを処理するメカニズムがあり、search_relevant_receipts_by_natural_language_query. などの使いにくいツールもありました。また、エージェントが正しい領収書の画像を検索して取得できるようにしたいと考えています。つまり、これらのすべての情報を適切なプロンプト構造で適切に伝える必要があります。
エージェントに、思考プロセス、最終的な回答、添付ファイル(ある場合)を解析するために、出力を次のマークダウン形式で構造化するよう依頼します。
# THINKING PROCESS

Thinking process here

# FINAL RESPONSE

Response to the user here

Attachments put inside json block

{
    "attachments": [
      "[IMAGE-ID <hash-id-1>]",
      "[IMAGE-ID <hash-id-2>]",
      ...
    ]
}
まず、次のプロンプトを使用して、経費管理エージェントの動作に関する最初の期待値を達成しましょう。task_prompt.md ファイルは既存の作業ディレクトリにすでに存在しているはずですが、expense_manager_agent ディレクトリに移動する必要があります。次のコマンドを実行して移動します。
mv task_prompt.md expense_manager_agent/task_prompt.md
7. 🚀 エージェントのテスト
CLI を介してエージェントと通信してみましょう。次のコマンドを実行します。
uv run adk run expense_manager_agent
次のような出力が表示されます。エージェントと順番にチャットできますが、このインターフェースから送信できるのはテキストのみです。
Log setup complete: /tmp/agents_log/agent.xxxx_xxx.log
To access latest log: tail -F /tmp/agents_log/agent.latest.log
Running agent root_agent, type exit to exit.
user: hello
[root_agent]: Hello there! How can I help you today?
user:
CLI の操作に加えて、ADK では、操作中に何が起こっているのかを操作して確認するための開発 UI も使用できます。次のコマンドを実行して、ローカル開発 UI サーバーを起動します。
uv run adk web --port 8080
次の例のような出力が生成されます。これは、ウェブ インターフェースにすでにアクセスできることを意味します。
INFO:     Started server process [xxxx]
INFO:     Waiting for application startup.

+-----------------------------------------------------------------------------+
| ADK Web Server started                                                      |
|                                                                             |
| For local testing, access at http://localhost:8080.                         |
+-----------------------------------------------------------------------------+

INFO:     Application startup complete.
INFO:     Uvicorn running on http://0.0.0.0:8080 (Press CTRL+C to quit)
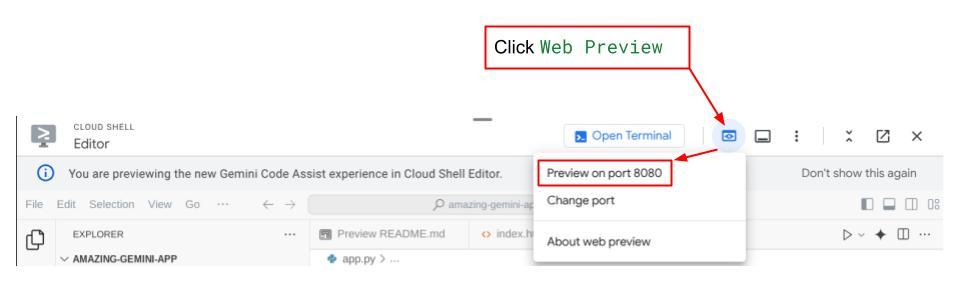
確認するには、Cloud Shell エディタの上部にある [ウェブでプレビュー] ボタンをクリックし、[ポート 8080 でプレビュー] を選択します。
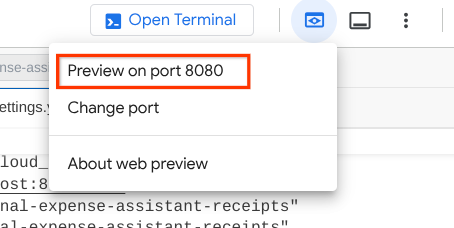
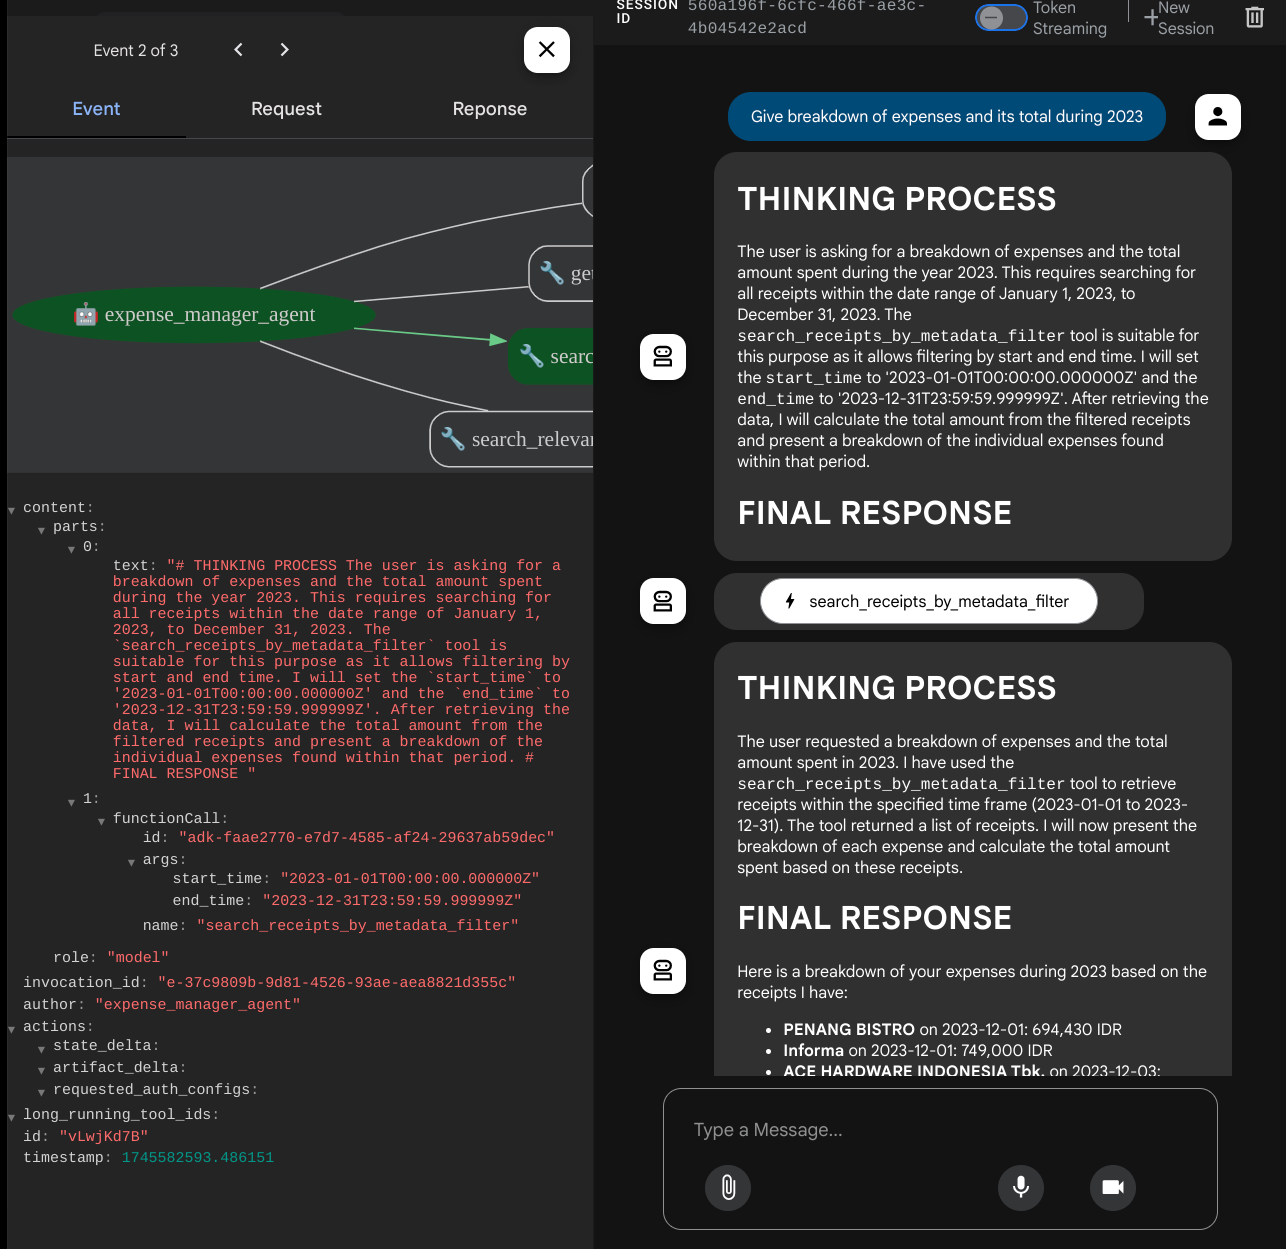
次のウェブページが表示されます。左上のプルダウン ボタンで利用可能なエージェント(この場合は expense_manager_agent)を選択し、ボットとやり取りできます。左側のウィンドウには、エージェントの実行時のログの詳細に関する多くの情報が表示されます。
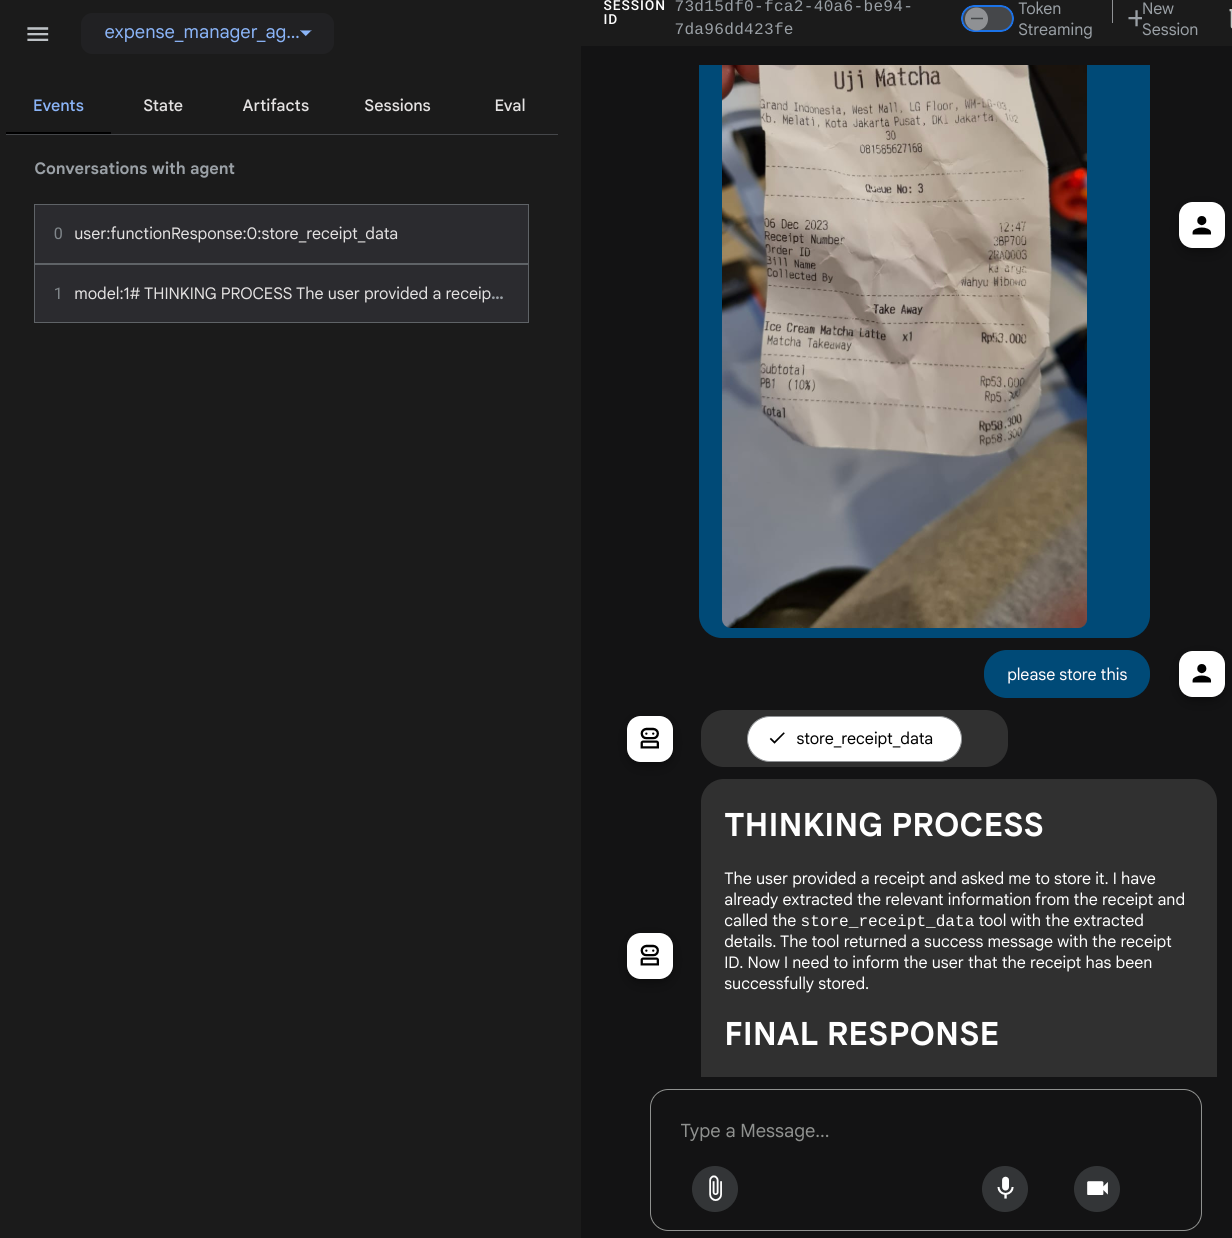
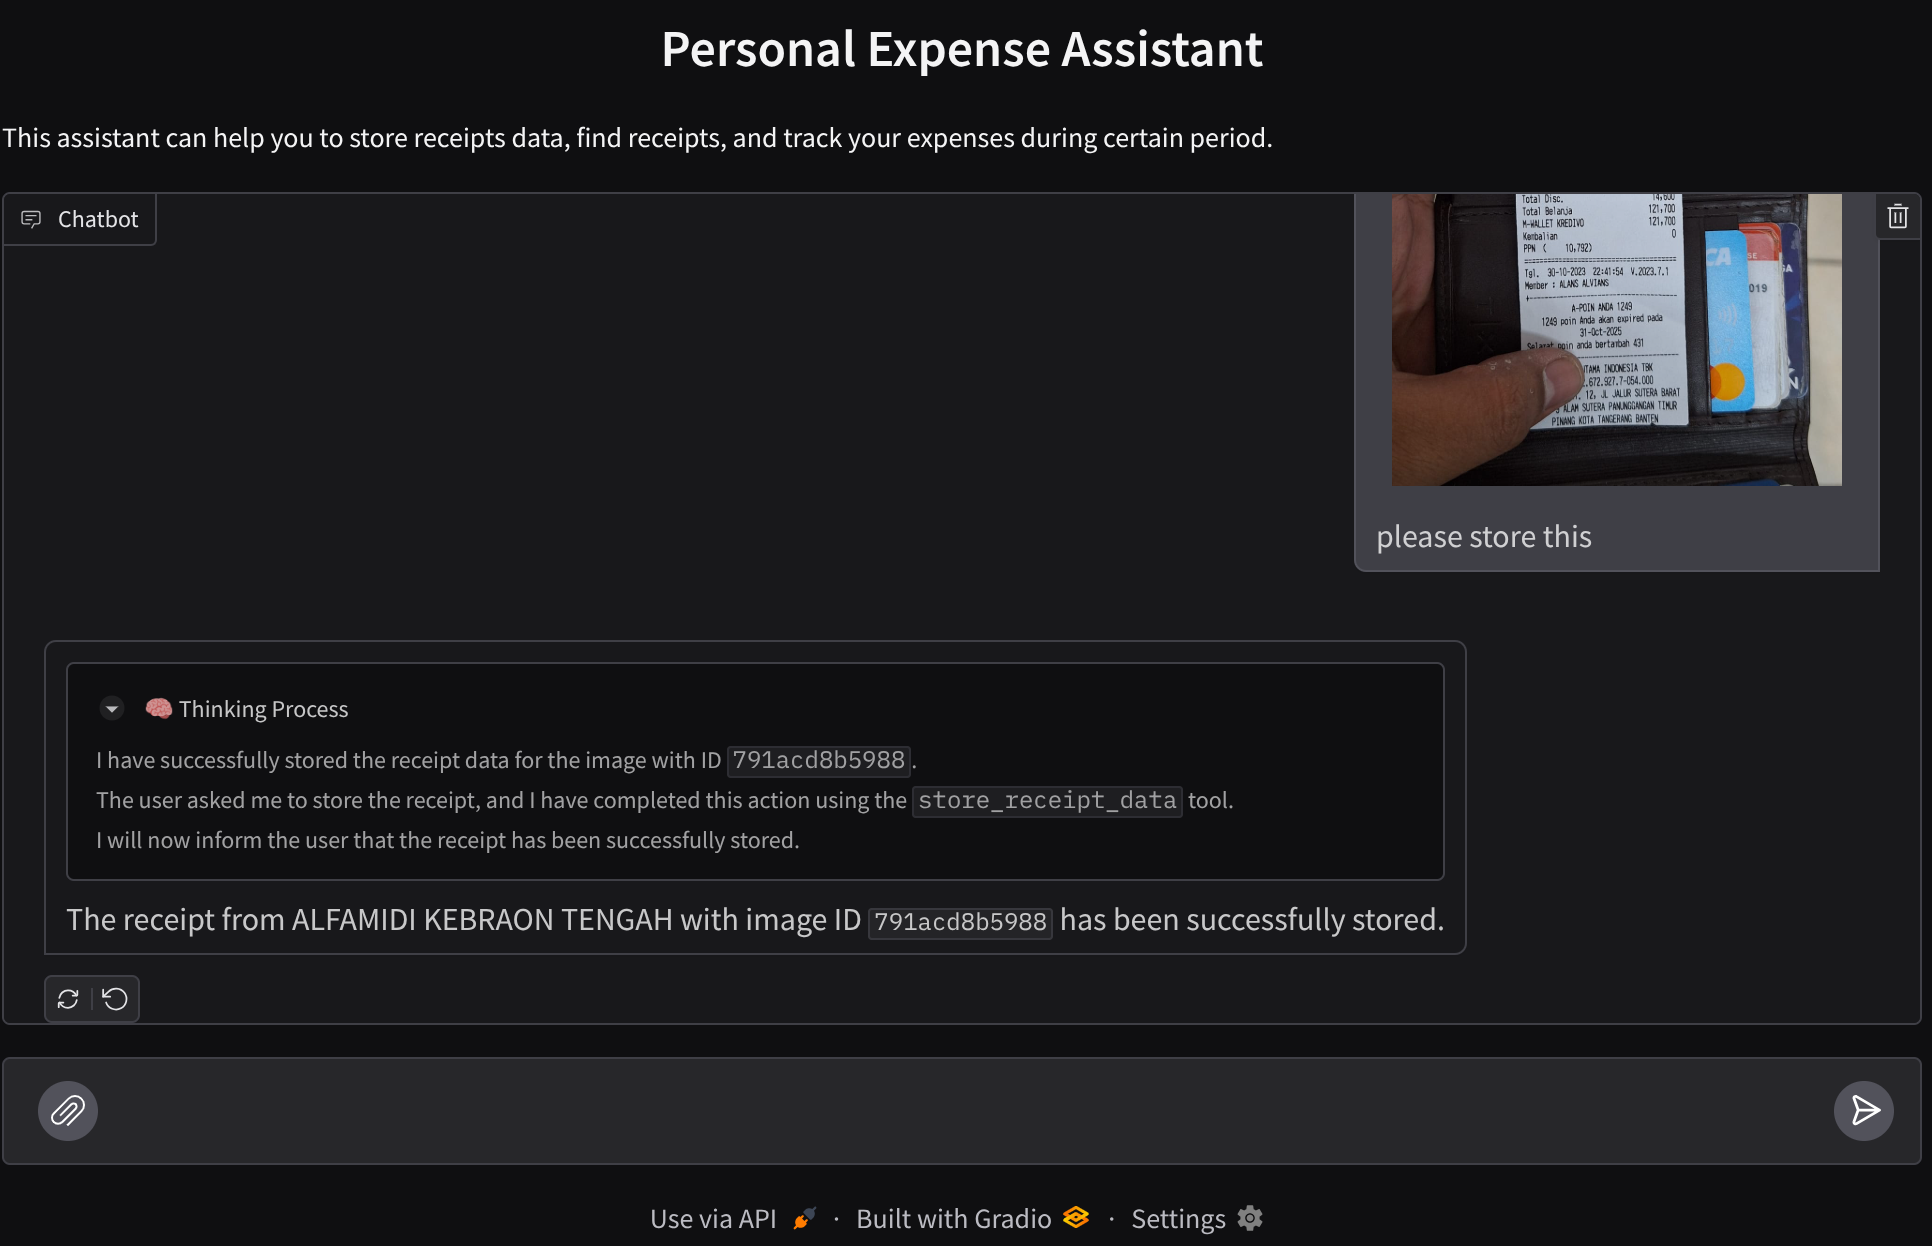
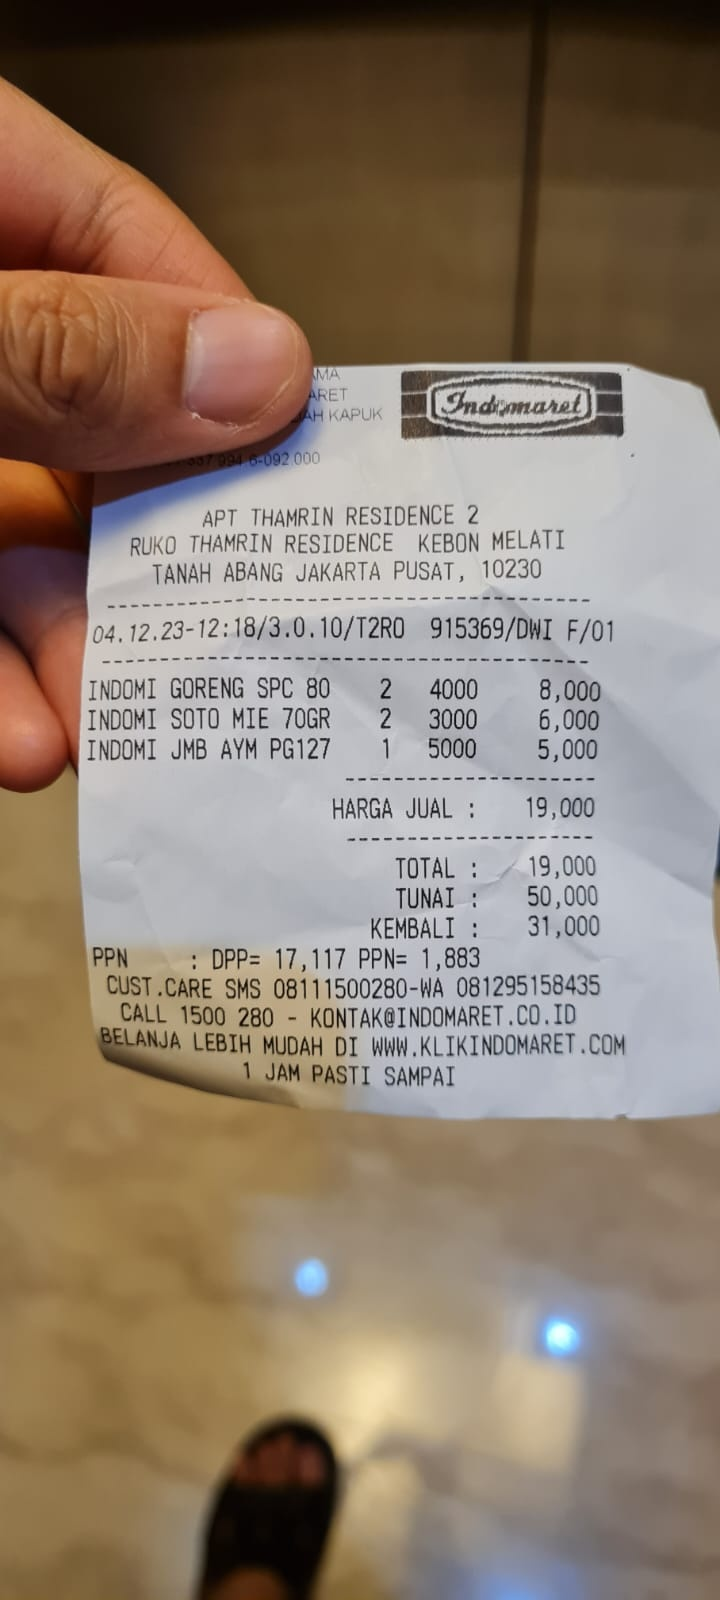
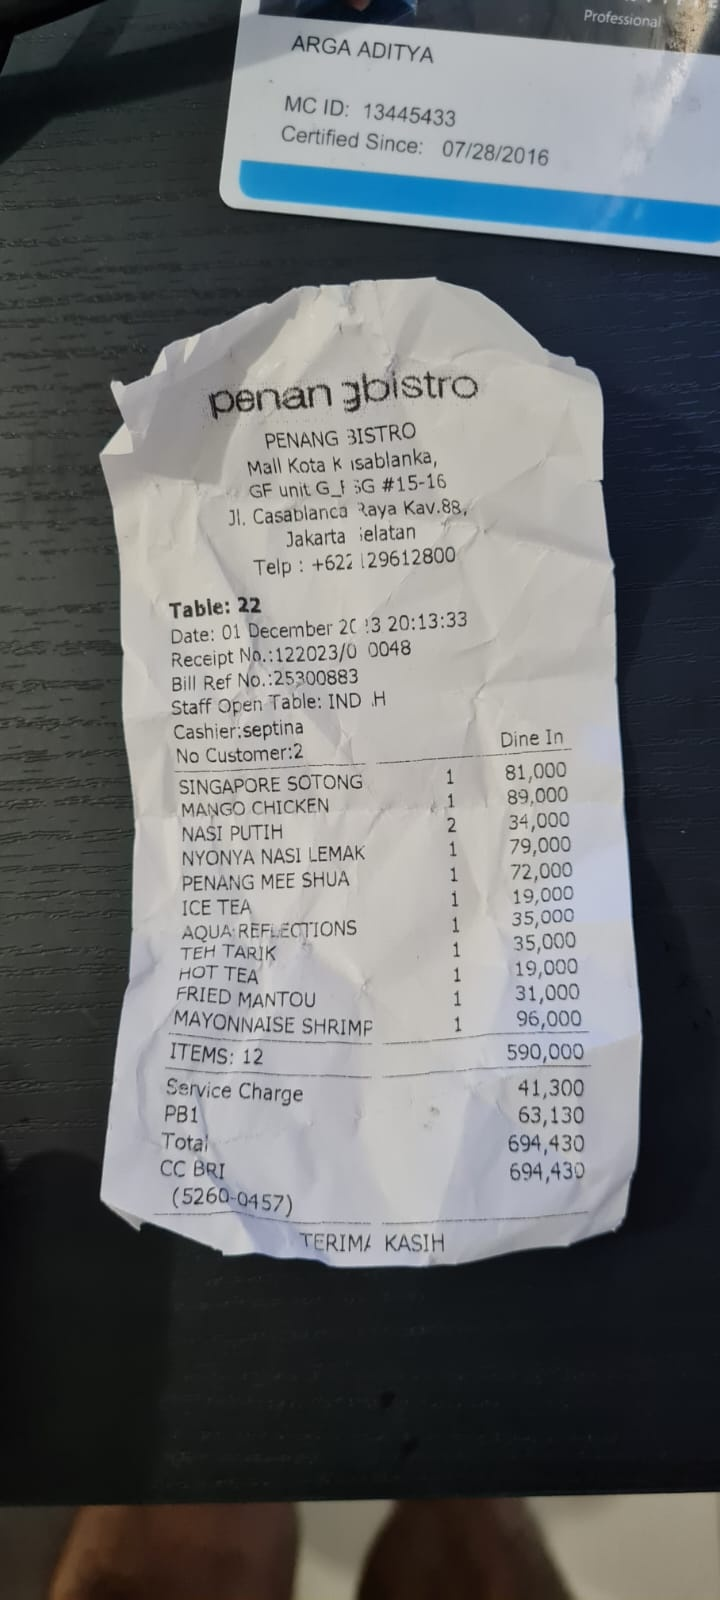
いくつかのアクションを試してみましょう。次の 2 つの領収書の例をアップロードします(出典 : Hugging Face データセット mousserlane/id_receipt_dataset)。各画像を右クリックして、[名前を付けて画像を保存] を選択します。(領収書の画像がダウンロードされます)。次に、「クリップ」 アイコンをクリックしてファイルを bot にアップロードし、これらの領収書を保存したいことを伝えます。
その後、次のクエリを試して、検索やファイル取得を行います。
- 「2023 年の費用の内訳と合計を教えて」
- 「Indomaret の領収書ファイルを送って」
一部のツールを使用すると、開発 UI で何が行われているかを確認できます。
エージェントがどのように応答するかを確認し、task_prompt.py 内のプロンプトで指定されたすべてのルールに準拠しているかどうかを確認します。おめでとうございます。これで、動作する開発エージェントが完成しました。
次は、適切な UI と、画像ファイルをアップロードおよびダウンロードする機能を実装して、完成させます。
8. 🚀 Gradio を使用してフロントエンド サービスをビルドする
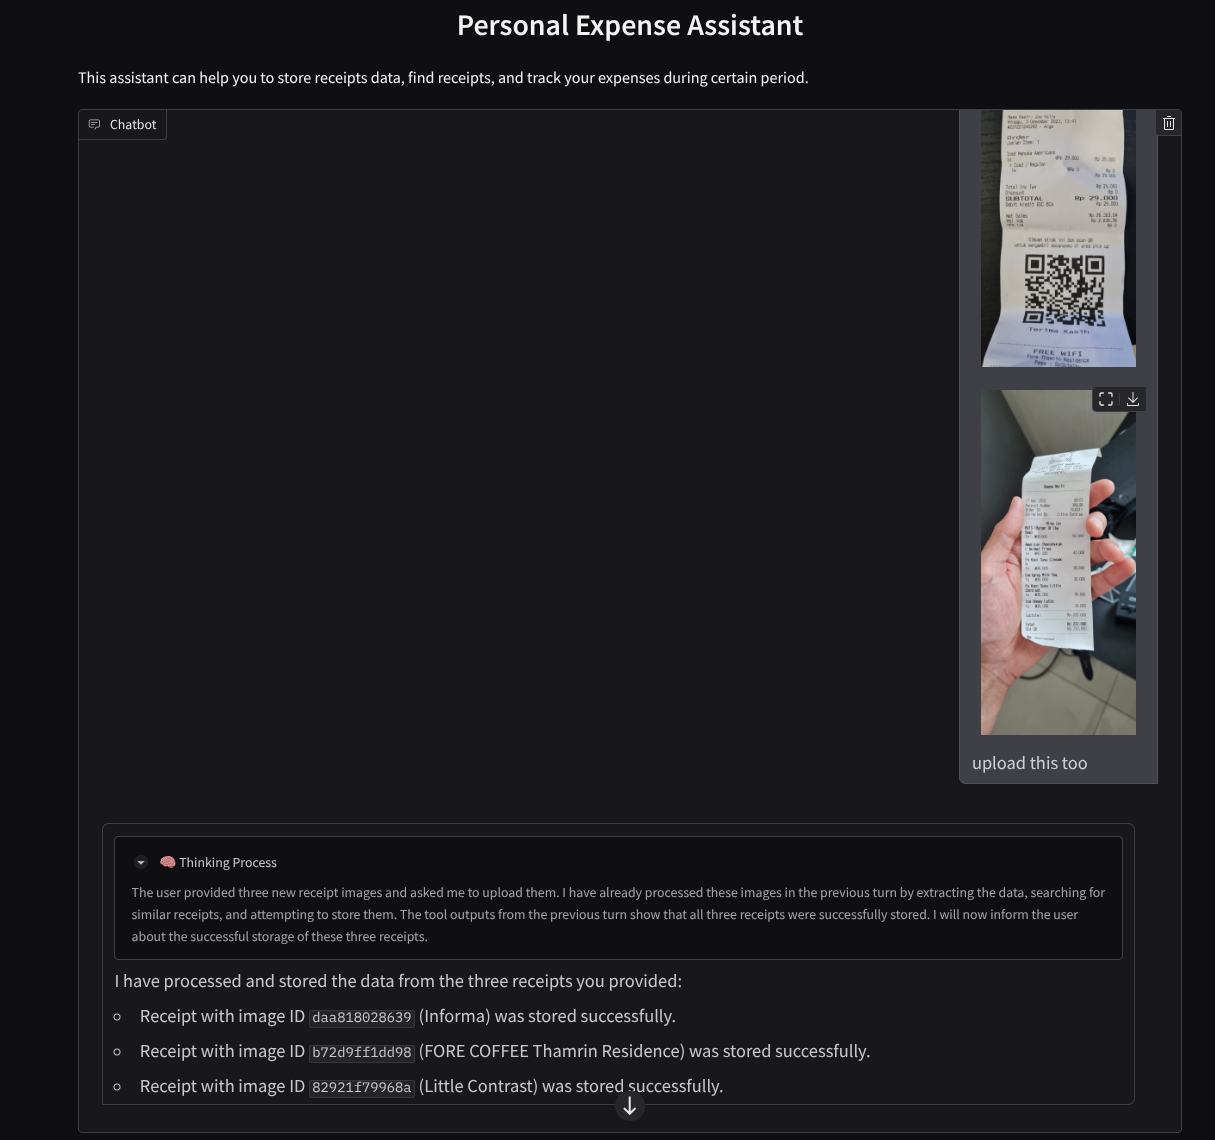
次のようなチャット ウェブ インターフェースを構築します。
ユーザーがテキストを送信したり、領収書の画像ファイルをアップロードしたりするための入力フィールドを備えたチャット インターフェースが含まれています。
フロントエンド サービスは Gradio を使用して構築します。
新しいファイルを作成し、frontend.py という名前を付けます。
touch frontend.py
次のコードをコピーして保存します。
import mimetypes
import gradio as gr
import requests
import base64
from typing import List, Dict, Any
from settings import get_settings
from PIL import Image
import io
from schema import ImageData, ChatRequest, ChatResponse


SETTINGS = get_settings()


def encode_image_to_base64_and_get_mime_type(image_path: str) -> ImageData:
    """Encode a file to base64 string and get MIME type.

    Reads an image file and returns the base64-encoded image data and its MIME type.

    Args:
        image_path: Path to the image file to encode.

    Returns:
        ImageData object containing the base64 encoded image data and its MIME type.
    """
    # Read the image file
    with open(image_path, "rb") as file:
        image_content = file.read()

    # Get the mime type
    mime_type = mimetypes.guess_type(image_path)[0]

    # Base64 encode the image
    base64_data = base64.b64encode(image_content).decode("utf-8")

    # Return as ImageData object
    return ImageData(serialized_image=base64_data, mime_type=mime_type)


def decode_base64_to_image(base64_data: str) -> Image.Image:
    """Decode a base64 string to PIL Image.

    Converts a base64-encoded image string back to a PIL Image object
    that can be displayed or processed further.

    Args:
        base64_data: Base64 encoded string of the image.

    Returns:
        PIL Image object of the decoded image.
    """
    # Decode the base64 string and convert to PIL Image
    image_data = base64.b64decode(base64_data)
    image_buffer = io.BytesIO(image_data)
    image = Image.open(image_buffer)

    return image


def get_response_from_llm_backend(
    message: Dict[str, Any],
    history: List[Dict[str, Any]],
) -> List[str | gr.Image]:
    """Send the message and history to the backend and get a response.

    Args:
        message: Dictionary containing the current message with 'text' and optional 'files' keys.
        history: List of previous message dictionaries in the conversation.

    Returns:
        List containing text response and any image attachments from the backend service.
    """
    # Extract files and convert to base64
    image_data = []
    if uploaded_files := message.get("files", []):
        for file_path in uploaded_files:
            image_data.append(encode_image_to_base64_and_get_mime_type(file_path))

    # Prepare the request payload
    payload = ChatRequest(
        text=message["text"],
        files=image_data,
        session_id="default_session",
        user_id="default_user",
    )

    # Send request to backend
    try:
        response = requests.post(SETTINGS.BACKEND_URL, json=payload.model_dump())
        response.raise_for_status()  # Raise exception for HTTP errors

        result = ChatResponse(**response.json())
        if result.error:
            return [f"Error: {result.error}"]

        chat_responses = []

        if result.thinking_process:
            chat_responses.append(
                gr.ChatMessage(
                    role="assistant",
                    content=result.thinking_process,
                    metadata={"title": "🧠 Thinking Process"},
                )
            )

        chat_responses.append(gr.ChatMessage(role="assistant", content=result.response))

        if result.attachments:
            for attachment in result.attachments:
                image_data = attachment.serialized_image
                chat_responses.append(gr.Image(decode_base64_to_image(image_data)))

        return chat_responses
    except requests.exceptions.RequestException as e:
        return [f"Error connecting to backend service: {str(e)}"]


if __name__ == "__main__":
    demo = gr.ChatInterface(
        get_response_from_llm_backend,
        title="Personal Expense Assistant",
        description="This assistant can help you to store receipts data, find receipts, and track your expenses during certain period.",
        type="messages",
        multimodal=True,
        textbox=gr.MultimodalTextbox(file_count="multiple", file_types=["image"]),
    )

    demo.launch(
        server_name="0.0.0.0",
        server_port=8080,
    )
その後、次のコマンドを使用してフロントエンド サービスの実行を試すことができます。main.py ファイルの名前を frontend.py に変更することを忘れないでください。
uv run frontend.py
クラウド コンソールに次のような出力が表示されます。
* Running on local URL:  http://0.0.0.0:8080

To create a public link, set `share=True` in `launch()`.
その後、ローカル URL リンクを Ctrl+クリックすると、ウェブ インターフェースを確認できます。別の方法として、Cloud Editor の右上にある [ウェブでプレビュー] ボタンをクリックし、[ポート 8080 でプレビュー] を選択して、フロントエンド アプリケーションにアクセスすることもできます。
ウェブ インターフェースは表示されますが、まだ設定されていないバックエンド サービスが原因で、チャットを送信しようとすると想定されるエラーが発生します。

サービスを実行したまま、まだ終了しないでください。バックエンド サービスは別のターミナル タブで実行します。
コードの説明
このフロントエンド コードでは、まずユーザーがテキストを送信して複数のファイルをアップロードできるようにします。Gradio では、gr.ChatInterface メソッドと gr.MultimodalTextbox を組み合わせて、このような機能を作成できます。
ファイルとテキストをバックエンドに送信する前に、バックエンドで必要となるファイルの MIME タイプを特定する必要があります。また、画像ファイルのバイトを base64 でエンコードし、MIME タイプとともに送信する必要があります。
class ImageData(BaseModel):
    """Model for image data with hash identifier.

    Attributes:
        serialized_image: Optional Base64 encoded string of the image content.
        mime_type: MIME type of the image.
    """

    serialized_image: str
    mime_type: str
フロントエンドとバックエンドのやり取りに使用されるスキーマは schema.py で定義されています。Pydantic BaseModel を使用して、スキーマでデータ検証を適用します。
回答を受け取ると、思考プロセス、最終的な回答、添付ファイルがすでに分離されています。したがって、Gradio コンポーネントを使用して、各コンポーネントを UI コンポーネントとともに表示できます。
class ChatResponse(BaseModel):
    """Model for a chat response.

    Attributes:
        response: The text response from the model.
        thinking_process: Optional thinking process of the model.
        attachments: List of image data to be displayed to the user.
        error: Optional error message if something went wrong.
    """

    response: str
    thinking_process: str = ""
    attachments: List[ImageData] = []
    error: Optional[str] = None
9. 🚀 FastAPI を使用してバックエンド サービスを構築する
次に、エージェント ランタイムを実行できるように、他のコンポーネントとともにエージェントを初期化できるバックエンドを構築する必要があります。
新しいファイルを作成し、backend.py という名前を付けます。
touch backend.py
次のコードをコピーします。
from expense_manager_agent.agent import root_agent as expense_manager_agent
from google.adk.sessions import InMemorySessionService
from google.adk.runners import Runner
from google.adk.events import Event
from fastapi import FastAPI, Body, Depends
from typing import AsyncIterator
from types import SimpleNamespace
import uvicorn
from contextlib import asynccontextmanager
from utils import (
    extract_attachment_ids_and_sanitize_response,
    download_image_from_gcs,
    extract_thinking_process,
    format_user_request_to_adk_content_and_store_artifacts,
)
from schema import ImageData, ChatRequest, ChatResponse
import logger
from google.adk.artifacts import GcsArtifactService
from settings import get_settings

SETTINGS = get_settings()
APP_NAME = "expense_manager_app"


# Application state to hold service contexts
class AppContexts(SimpleNamespace):
    """A class to hold application contexts with attribute access"""

    session_service: InMemorySessionService = None
    artifact_service: GcsArtifactService = None
    expense_manager_agent_runner: Runner = None


# Initialize application state
app_contexts = AppContexts()


@asynccontextmanager
async def lifespan(app: FastAPI):
    # Initialize service contexts during application startup
    app_contexts.session_service = InMemorySessionService()
    app_contexts.artifact_service = GcsArtifactService(
        bucket_name=SETTINGS.STORAGE_BUCKET_NAME
    )
    app_contexts.expense_manager_agent_runner = Runner(
        agent=expense_manager_agent,  # The agent we want to run
        app_name=APP_NAME,  # Associates runs with our app
        session_service=app_contexts.session_service,  # Uses our session manager
        artifact_service=app_contexts.artifact_service,  # Uses our artifact manager
    )

    logger.info("Application started successfully")
    yield
    logger.info("Application shutting down")
    # Perform cleanup during application shutdown if necessary


# Helper function to get application state as a dependency
async def get_app_contexts() -> AppContexts:
    return app_contexts


# Create FastAPI app
app = FastAPI(title="Personal Expense Assistant API", lifespan=lifespan)


@app.post("/chat", response_model=ChatResponse)
async def chat(
    request: ChatRequest = Body(...),
    app_context: AppContexts = Depends(get_app_contexts),
) -> ChatResponse:
    """Process chat request and get response from the agent"""

    # Prepare the user's message in ADK format and store image artifacts
    content = await format_user_request_to_adk_content_and_store_artifacts(
        request=request,
        app_name=APP_NAME,
        artifact_service=app_context.artifact_service,
    )

    final_response_text = "Agent did not produce a final response."  # Default

    # Use the session ID from the request or default if not provided
    session_id = request.session_id
    user_id = request.user_id

    # Create session if it doesn't exist
    if not await app_context.session_service.get_session(
        app_name=APP_NAME, user_id=user_id, session_id=session_id
    ):
        await app_context.session_service.create_session(
            app_name=APP_NAME, user_id=user_id, session_id=session_id
        )

    try:
        # Process the message with the agent
        # Type annotation: runner.run_async returns an AsyncIterator[Event]
        events_iterator: AsyncIterator[Event] = (
            app_context.expense_manager_agent_runner.run_async(
                user_id=user_id, session_id=session_id, new_message=content
            )
        )
        async for event in events_iterator:  # event has type Event
            # Key Concept: is_final_response() marks the concluding message for the turn
            if event.is_final_response():
                if event.content and event.content.parts:
                    # Extract text from the first part
                    final_response_text = event.content.parts[0].text
                elif event.actions and event.actions.escalate:
                    # Handle potential errors/escalations
                    final_response_text = f"Agent escalated: {event.error_message or 'No specific message.'}"
                break  # Stop processing events once the final response is found

        logger.info(
            "Received final response from agent", raw_final_response=final_response_text
        )

        # Extract and process any attachments and thinking process in the response
        base64_attachments = []
        sanitized_text, attachment_ids = extract_attachment_ids_and_sanitize_response(
            final_response_text
        )
        sanitized_text, thinking_process = extract_thinking_process(sanitized_text)

        # Download images from GCS and replace hash IDs with base64 data
        for image_hash_id in attachment_ids:
            # Download image data and get MIME type
            result = await download_image_from_gcs(
                artifact_service=app_context.artifact_service,
                image_hash=image_hash_id,
                app_name=APP_NAME,
                user_id=user_id,
                session_id=session_id,
            )
            if result:
                base64_data, mime_type = result
                base64_attachments.append(
                    ImageData(serialized_image=base64_data, mime_type=mime_type)
                )

        logger.info(
            "Processed response with attachments",
            sanitized_response=sanitized_text,
            thinking_process=thinking_process,
            attachment_ids=attachment_ids,
        )

        return ChatResponse(
            response=sanitized_text,
            thinking_process=thinking_process,
            attachments=base64_attachments,
        )

    except Exception as e:
        logger.error("Error processing chat request", error_message=str(e))
        return ChatResponse(
            response="", error=f"Error in generating response: {str(e)}"
        )


# Only run the server if this file is executed directly
if __name__ == "__main__":
    uvicorn.run(app, host="0.0.0.0", port=8081)
その後、バックエンド サービスの実行を試すことができます。前の手順でフロントエンド サービスを実行したことを思い出してください。新しいターミナルを開いて、このバックエンド サービスを実行する必要があります。
- 新しいターミナルを作成します。下部のターミナルに移動し、[+] ボタンを見つけて新しいターミナルを作成します。または、Ctrl+Shift+C を押して新しいターミナルを開くこともできます。

- その後、作業ディレクトリ personal-expense-assistant に移動し、次のコマンドを実行します。
uv run backend.py
- 成功すると、次のような出力が表示されます。
INFO:     Started server process [xxxxx]
INFO:     Waiting for application startup.
INFO:     Application startup complete.
INFO:     Uvicorn running on http://0.0.0.0:8081 (Press CTRL+C to quit)
コードの説明
ADK エージェント、SessionService、ArtifactService の初期化
バックエンド サービスでエージェントを実行するには、SessionService とエージェントの両方を受け取る Runner を作成する必要があります。SessionService は会話の履歴と状態を管理します。したがって、Runner と統合すると、エージェントは進行中の会話のコンテキストを受け取ることができます。
また、アップロードされたファイルを処理するために ArtifactService も使用します。ADK のセッションとアーティファクトの詳細については、こちらをご覧ください。
...

@asynccontextmanager
async def lifespan(app: FastAPI):
    # Initialize service contexts during application startup
    app_contexts.session_service = InMemorySessionService()
    app_contexts.artifact_service = GcsArtifactService(
        bucket_name=SETTINGS.STORAGE_BUCKET_NAME
    )
    app_contexts.expense_manager_agent_runner = Runner(
        agent=expense_manager_agent,  # The agent we want to run
        app_name=APP_NAME,  # Associates runs with our app
        session_service=app_contexts.session_service,  # Uses our session manager
        artifact_service=app_contexts.artifact_service,  # Uses our artifact manager
    )

    logger.info("Application started successfully")
    yield
    logger.info("Application shutting down")
    # Perform cleanup during application shutdown if necessary

...
このデモでは、InMemorySessionService と GcsArtifactService を使用して、エージェント Runner と統合します。会話履歴はメモリに保存されるため、バックエンド サービスが強制終了または再起動されると失われます。これらは FastAPI アプリケーションのライフサイクル内で初期化され、/chat ルートの依存関係として挿入されます。
GcsArtifactService を使用した画像のアップロードとダウンロード
アップロードされたすべての画像は GcsArtifactService によってアーティファクトとして保存されます。これは utils.py 内の format_user_request_to_adk_content_and_store_artifacts 関数で確認できます。
...

# Prepare the user's message in ADK format and store image artifacts
content = await asyncio.to_thread(
    format_user_request_to_adk_content_and_store_artifacts,
    request=request,
    app_name=APP_NAME,
    artifact_service=app_context.artifact_service,
)

...
エージェント ランナーで処理されるすべてのリクエストは、types.Content 型にフォーマットする必要があります。関数内では、各画像データも処理され、その ID が抽出されて画像 ID プレースホルダに置き換えられます。
同様のメカニズムを使用して、正規表現で画像 ID を抽出した後に添付ファイルをダウンロードします。
...
sanitized_text, attachment_ids = extract_attachment_ids_and_sanitize_response(
    final_response_text
)
sanitized_text, thinking_process = extract_thinking_process(sanitized_text)

# Download images from GCS and replace hash IDs with base64 data
for image_hash_id in attachment_ids:
    # Download image data and get MIME type
    result = await asyncio.to_thread(
        download_image_from_gcs,
        artifact_service=app_context.artifact_service,
        image_hash=image_hash_id,
        app_name=APP_NAME,
        user_id=user_id,
        session_id=session_id,
    )
...
10. 🚀 統合テスト
これで、複数のサービスが異なる Cloud コンソール タブで実行されるようになります。
- ポート 8080 で実行されるフロントエンド サービス
* Running on local URL:  http://0.0.0.0:8080

To create a public link, set `share=True` in `launch()`.
- バックエンド サービスがポート 8081 で実行されている
INFO:     Started server process [xxxxx]
INFO:     Waiting for application startup.
INFO:     Application startup complete.
INFO:     Uvicorn running on http://0.0.0.0:8081 (Press CTRL+C to quit)
現在の状態では、領収書の画像をアップロードし、ポート 8080 のウェブ アプリケーションからアシスタントとシームレスにチャットできます。
Cloud Shell エディタの上部にある [ウェブでプレビュー] ボタンをクリックし、[ポート 8080 でプレビュー] を選択します。
それでは、アシスタントとやり取りしてみましょう。
次の領収書をダウンロードします。領収書データの期間は 2023 ~ 2024 年です。アシスタントに保存/アップロードを依頼します。
- Receipt Drive(ソース Hugging Face データセット
mousserlane/id_receipt_dataset)
さまざまなことを質問する
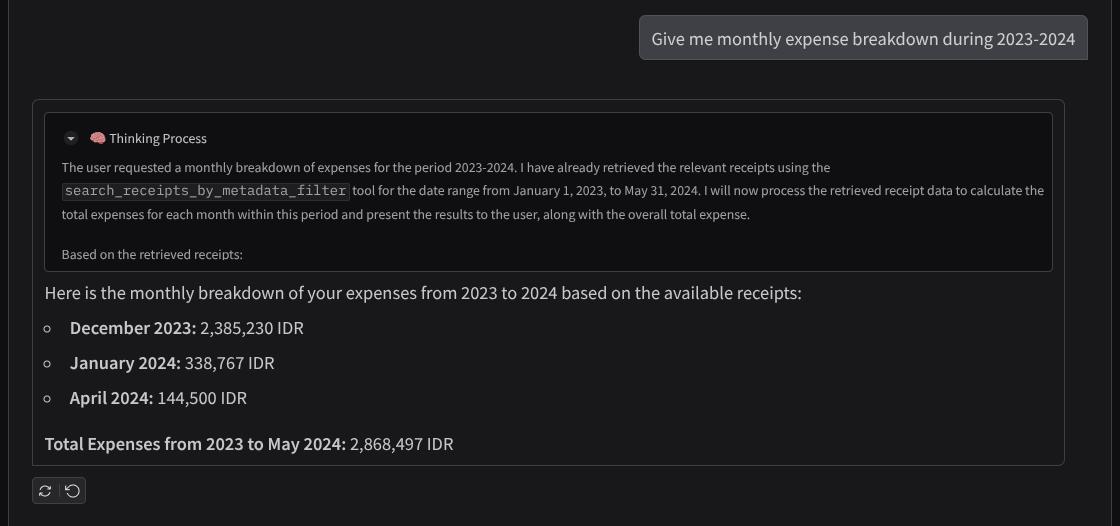
- 「2023 年から 2024 年の月ごとの費用の内訳を教えて」
- 「コーヒーの取引の領収書を表示して」
- 「焼肉ライクの領収書ファイルを送って」
- など。
成功したインタラクションのスニペットを次に示します。
11. 🚀 Cloud Run へのデプロイ
このすばらしいアプリには、どこからでもアクセスできるようにしたいところです。そのため、このアプリケーションをパッケージ化して Cloud Run にデプロイします。このデモでは、このサービスは他のユーザーがアクセスできる公開サービスとして公開されます。ただし、これは個人用アプリケーションに適した方法であり、この種のアプリケーションのベスト プラクティスではありません。
この Codelab では、フロントエンド サービスとバックエンド サービスの両方を 1 つのコンテナに配置します。両方のサービスを管理するには、supervisord のサポートが必要です。supervisord.conf ファイルを調べて、supervisord をエントリ ポイントとして設定した Dockerfile を確認できます。
この時点で、Cloud Run にアプリケーションをデプロイするために必要なファイルはすべて揃っています。デプロイしましょう。Cloud Shell ターミナルに移動し、現在のプロジェクトがアクティブなプロジェクトに構成されていることを確認します。構成されていない場合は、gcloud configure コマンドを使用してプロジェクト ID を設定します。
gcloud config set project [PROJECT_ID]
次に、次のコマンドを実行して Cloud Run にデプロイします。
gcloud run deploy personal-expense-assistant \
                  --source . \
                  --port=8080 \
                  --allow-unauthenticated \
                  --env-vars-file=settings.yaml \
                  --memory 1024Mi \
                  --region us-central1
Docker リポジトリのアーティファクト レジストリの作成を確認するよう求められたら、「Y」と答えます。これはデモ アプリケーションであるため、ここでは未認証のアクセスを許可しています。エンタープライズ アプリケーションと本番環境アプリケーションには適切な認証を使用することをおすすめします。
デプロイが完了すると、次のようなリンクが表示されます。
https://personal-expense-assistant-*******.us-central1.run.app
シークレット ウィンドウまたはモバイル デバイスからアプリケーションを使用します。すでに公開されているはずです。
12. 🎯 課題
今こそ、探索スキルを磨き、輝くときです。バックエンドが複数のユーザーに対応できるようにコードを変更するスキルはありますか?どのコンポーネントを更新する必要がありますか?
13. 🧹 クリーンアップ
この Codelab で使用したリソースについて、Google Cloud アカウントに課金されないようにするには、次の手順を行います。